

Results 1 to 11 of 11
Thread: Rookie restoring a 1968 Camaro
-
11-03-2020 #1
 Registered User
- Join Date
- Jan 2020
- Location
- Columbus, Ohio
- Posts
- 20

Rookie restoring a 1968 Camaro
As the title suggests, Im a rookie when it comes to body work/ automotive restorations. Ive been gathering some info, and am pretty sure which direction I want to go with the car, and how I want to use it. Ive had this car for 10 years and have not done much with it. Its time to begin the restoration. Its a 1968 Camaro SS coupe.
The car will need to be totally restored, as I know there will need to be some quarter panel work, a new floor and trunk, and some window channel repair, minimum.
I think my next steps should be
1.) remove the rest of the glass and interior from the car
2.)remove the remainder of the front clip (core support, inner/outer fenders)
3.) leave the doors in, remove the subframe and rear axle
4.) take a million measurements and make a body jig
5.) strip the car to bare metal (mostly using mechanical methods- a DA polisher and 60 or 80 grit sandpaper)
5.) brace the interior of the car
6.) media blast with crushed glass or walnuts where the chance of metal warping is low
7.) since the car will be in this state for quite a while, it should be shot with primer, but at least all of the rust will now be visible (SPIs epoxy primer?)
9.) remove floor and trunk pans
8.) install one piece trunk/floor from Real Deal Steel
9.) install DSE mini tubs
10.) Repair/replace panels
Anything youd change or do differently?
I know Ill make mistakes, I just dont want to take any chances in ruining the car. All input is greatly appreciated.
-
11-03-2020 #2
 Registered User
- Join Date
- Nov 2008
- Location
- Lawrenceburg, TN
- Posts
- 4,083
your a rookie and gonna cut out the floor? all of it? and inner wheel wells? post pictures, I think its awesome to jump in the pool and paddle
-
11-03-2020 #3
Registered User
- Join Date
- Jan 2020
- Location
- Columbus, Ohio
- Posts
- 20
Thanks! Yep. I’d love to outsource the floor pan and trunk replacement job, but I can’t afford the labor, so I’ll just have to do it myself out of necessity. I’ve checked with a couple of places to just do the floors and trunk, but it seems like they don’t want to tackle it.
Maybe I’ll turn this into the build thread. I’ll post up some pictures this evening
-
11-03-2020 #4

 Registered User
- Join Date
- Nov 2006
- Location
- Mountain Springs, Texas
- Posts
- 4,495
Without seeing pictures of the car it seems like a good plan.
SPI epoxy is a good choice. Great quality and decent price.
Don1969 Camaro - LSA 6L90E AME sub/IRS
1957 Buick Estate Wagon
1959 El Camino - Ironworks frame
1956 Cameo - full C5 suspension/drivetrain
1959 Apache Fleetside
-
11-04-2020 #5
Registered User
- Join Date
- Jan 2020
- Location
- Columbus, Ohio
- Posts
- 20
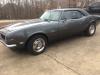
Here are some pictures, Ill get some better ones soon. Since these were taken, I have removed almost all of the glass and rinsed the barn dust off!
Don, Ive read good things about SPI from you and others on here, and on camaros.net
-
11-06-2020 #6
 Registered User
- Join Date
- Aug 2007
- Location
- Jonesboro, Arkansas
- Posts
- 2,506
Just a idea, but I'm betting your going to find some more rust under that vinyl top. Boy I sure did...
Carl Wilson
1968 Camaro - T-56 6 speed - 383 Stroker, 2014 Mustang GT seats. FiTech EFI, Tanks Inc. Tank with Deutschwerks fuel pump.
-
11-07-2020 #7
 Registered User
- Join Date
- Aug 2015
- Location
- charlotte
- Posts
- 924
I'm glad you're saving it, and I hope you see it through, that's no easy task but a lot of us have done it before.
your plan is good. Let's also add - fill spoiler mounting holes in trunk and redrill them to mount spoiler facing forward.
I also recommend SPI products, my car has sat in the epoxy throughout several stages of my build and its always remained flawless, certainly no signs of rust anymore
-
11-07-2020 #8
 Registered User
- Join Date
- Feb 2019
- Location
- Kankakee IL
- Posts
- 362
Well to your benefit compared to when I did my first car , the internet is much more informative to give you info. One tip, take a million photos. Even if you don't think there's something important you'll still have something to reference. Two, buy a case of ziplock bags and bag and label everything and keep it organized. Three, on the sheet metal you'll be repairing, make cuts conservatively. You can always take off a little more but putting some back isn't so easy.
Tracey
-
11-08-2020 #9
Registered User
- Join Date
- Jan 2020
- Location
- Columbus, Ohio
- Posts
- 20
The vinyl has already been removed, it's just either been repainted, or was just left as is after the vinyl was removed, but yep...there was some rust around the rear window and in the window channel. Originally Posted by minendrews68

- - - Updated - - -
Thanks for the words of encouragement! It won't be easy, but it'll be a great learning experience. Haha, the spoiler was bothering me, too, and was already cracked in half, so I removed it already. Originally Posted by slimjim
Good to hear about the SPI epoxy.1987 Buick Regal T- 231ci, E85, ported heads...boost loading
1968 Camaro SS...pro-touring build on the way. Body work first
-
11-08-2020 #10
Registered User
- Join Date
- Jan 2020
- Location
- Columbus, Ohio
- Posts
- 20
I wish I would have taken some pictures years ago when I removed the interior, but I am going to take tons of them going forwards. Thanks for the guidance! Originally Posted by Tsaints1115
1987 Buick Regal T- 231ci, E85, ported heads...boost loading
1968 Camaro SS...pro-touring build on the way. Body work first
-
11-08-2020 #11
Registered User
- Join Date
- Jan 2020
- Location
- Columbus, Ohio
- Posts
- 20
Here's a few more random pictures. The picture on the trailer is earlier this summer before having the glass removed. The dusty picture of the interior just shows the original British Green, which I may end up going with when it comes time to repaint. You can see some of the rot in the rear window channel.1987 Buick Regal T- 231ci, E85, ported heads...boost loading
1968 Camaro SS...pro-touring build on the way. Body work first
-

 Reply With Quote


