

Results 21 to 35 of 35
Thread: '67 Firebird 400 Resto Mod
-
03-22-2020 #21

 Registered User
- Join Date
- Jan 2020
- Location
- UT
- Posts
- 43
 Thanks! And I totally dig your Firebird collection. How are you liking that cam with your 461?
 Originally Posted by anguilla1980

I know our setups are crazy different, but I am curious to see what the difference between 55ci and EFI is.
-
03-22-2020 #22
 Registered User
- Join Date
- Sep 2016
- Location
- Bakersfield, CA
- Posts
- 603
It's honestly totally the wrong cam for my combo. When I upgrade my heads I'll be swapping cams.
I'll be finishing my EFI next month, then engine refresh with new heads/cam/pistons, then dyno tuning hopefully by fall.http://www.TheFOAT.com/92GTA
1969 Pontiac Firebird w/535ci IAII aluminum block, Dailey dry sump, Holley EFI (full road race build). Primer black w/black interior.
1992 Pontiac Trans Am GTA w/SLP Performance Package. Dark Jade Grey Metallic, grey leather, T-Tops.
-
03-31-2020 #23
Registered User
- Join Date
- Jan 2020
- Location
- UT
- Posts
- 43
This week was knocking out a few little tasks to get the car buttoned up enough to take her to the Transmission shop.
Temporarily zip-tied in the gauge cluster since we will need to get back into the dash later. We still need to install the dash pad and clean/refurbish the gauge assembly. I was bored due to the goings-on so I took a video with cabin engine noises.
We finally got the pieces together to route the air intake a bit better. The bracket did end up touching the upper radiator hose so we fashioned a little cushion from leftover hose.
The last little bit we got wrapped up was to mount the heat shielding on the heater block-off plate. Much credit to my wife's small hands in getting that to attach with all the wiring in the way.
Hoping for no setbacks going forward. the car is still having a slightly hard time with cold start so I will keep making adjustments to try and get to the point of firing on the first crank.
-
04-11-2020 #24
Registered User
- Join Date
- Jan 2020
- Location
- UT
- Posts
- 43
So there hasn't been progress for this last week. Though adding more overall fuel to the idle trim helped tremendously with the cold start issues.
We dropped the car off to the transmission shop but the main guy we were working with came down with some sickness on that same day. So our thoughts are out to him hoping that he is able to make a full recovery.
Before that, I taped out some boundaries to try to figure out the hood situation
So with the cowl panel in place, it is looking like our clearance may put us close to being able to use a stock style hood. We have a 400 hood that came with the car, but I am preparing myself for the possibility of needing to get a plain flat hood if we need to do some cutting. I've been back and for on which scoop/cowl to go with, but as of now am leaning towards using a Full Bubble cowl scoop to cover the air cleaner.
Looks like the high point of the airbox is about 4" above the fender line.
-
06-06-2020 #25
Registered User
- Join Date
- Jan 2020
- Location
- UT
- Posts
- 43
It's been a while since last update as the car has been at the transmission shop to get the TV cable dialed in. Turns out the throttle rod linkage and Pro-flo throttle body made for problems getting a TV cable installed so the car is getting converted to a throttle cable. So in the meantime, I am collecting parts. Glass, bumper hardware, headlights, and a glasstek hood have showed up and I am just waiting for the car to get back.
Pictures!
We also got ourselves a blasting cabinet so it's a great time to clean up and re-shoot some of the grungier parts.
Also, since my wife has been such a trooper through this whole ordeal we jumped at the chance to pick up one her dream cars.
A dang close to complete '68 Cougar with a 302 and C4 transmission. The worst part is that it is going to need floor pan and torque box replacement. But with a few minor fixes and a tune-up it runs and the sequentials work!
I'll eventually throw up a build thread for her. Eventually, the plan will be to stroke the 302 out to 347 with a pro-flo as well and perhaps go with a T5 conversion.
-
06-07-2020 #26 Registered User
- Join Date
- Oct 2013
- Location
- H-Town, TX
- Posts
- 356
Love this build- kept the Pontiac motor and used a Fiero spoiler! Ive literally seen thousands of first gen bird and never noticed anyone using a Fiero spoiler- it looks great. Fiero seats are a nice touch too!
06-15-2020 #27
Registered User
- Join Date
- Oct 2009
- Location
- Reno, NV.
- Posts
- 481
Nice build! Be careful with that Ford Fan - I had one of those with a pwm and kept having issues. Loved the cooling potential, not so much the problems. I may re-attempt using it later on, but for now I went with a dual setup by Derale
06-25-2020 #28
Registered User
- Join Date
- Jan 2020
- Location
- UT
- Posts
- 43
Thanks! I am happy so far with how the fiero bits are gelling with the rest of the build. For better or worse, I've been trying to do things that haven't been done too often. Originally Posted by 1965gp
Thanks for the input! Did you run into issues of the fan burning out the fan controller? Hopefully I don't have too many issues since the High speed power wire is using the factory split in it and is being run off of two 40 amp relays. I'm using the MAD Electric wiring setup so when the main fan kicks on the voltage reading doesn't dip at all (from what I can see in the EFI control). Originally Posted by 67rstbkt
Anyways, still waiting on the transmission shop. Was going to try to get the car into the local Goodguys show in July but no idea if they'll even be done with it by then. So in the meantime working on the Cutlass, Cougar, and collecting parts.
07-11-2020 #29
Registered User
- Join Date
- Jan 2020
- Location
- UT
- Posts
- 43
At long last, the 'bird is back home and can be driven without fear of frying clutches.
So next steps are to get the lighting structures installed and wired, get the body panels aligned, and swap the power steering pump. The pump that came with the car so it was an unknown until we were able to drive around the parking lot. Once we could drive around under power, it was screeching up a storm.
Now that the car is back, we could test fit the cowl hood to see how it clears the intake.
View from the Driver seat. The hood isn't bolted in so it is slightly cocked forward but it looks like the airbox should clear nicely!
08-04-2020 #30
Registered User
- Join Date
- Jan 2020
- Location
- UT
- Posts
- 43
Been a crazy stretch the past few weeks with looking to sell/buy a new place with a bigger garage. In the meantime, we got a bit more progress on the dash, the remaining glass is installed, lights are in and wired, and installed the Speedway Hollywood side mirrors.
Catching up on backlog pics, this is the bracket the trans shop had to custom make for the Pro-Flo TV/Throttle cable provision. Still needs to go back in since they dialed the throttle in at 83% instead of WOT.
Mock up of the hood with the lights. These pictures are making me question my color choice of True Red since the flat black is looking pretty mean. Definitely something to think about.
And here is with wiring tidied up some more and the mirrors and grille in. Also a look at how the halos worked out.
I haven't fully pinned in the bumper at this time, but am curious on how much further I should expect it to tuck in to the fender from where it is. The gap I am seeing now seems a bit excessive.
Thanks!
08-10-2020 #31
Registered User
- Join Date
- Jan 2020
- Location
- UT
- Posts
- 43
Spent a nice Sunday with my wife and father in law dialing in the body panels and getting the front end pieced together. It's looking a lot better now aside from confirming that the original bumper had a bit of a twist to it on the passenger side.
Got an hour of drive-time in it to let the EFI learn something aside from idling. Knock on wood, the drive was nice and uneventful for the 'bird. Though my wife who was running chase got her truck sideswiped by a guy ogling the car.
04-07-2021 #32
Registered User
- Join Date
- Jan 2020
- Location
- UT
- Posts
- 43
Wow, so it has been 8 months since the last update and there is a decent amount of progress to talk about.
With the help of my wife and father-in-law we got the aerocatches and body work done up enough to get into a first primer. We also took the time to get the carpet kit and sound deadening on the floor boards to take some of the edge off the cabin exhaust notes.
And once we got that far we sold our house and had to store the 'bird for the winter. Getting her out of storage we found that her hard starting had gotten worse and she was burning up power steering pumps and spitting up PS fluid. To temporarily get her home until we could get that figured out, we disconnected the power steering belt.
After 3 months of dealing with the home buying process and house-sitting a friend's house, we finally managed to find the house we were dreaming of and got all of the cars back home and tucked into the garage until we got settled.
Another month passed and we finally got the car to a shop for a tune and to get the power steering issue figured out. Turns out that all the sitting managed to clog up the factory steering box, so out that went and in goes a Detroit Speed 600 series box. Another issue found was that the inline LS filter/regulator we used was providing way too much fuel for what the 400 wanted so we also installed a 43 psi regulator in the engine bay.
After those drivability issues were squared away we finally bit the bullet to pull the car back apart to do final prep for paint.
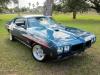
Which brings us about up to date now to the exciting part, she has some color! The original plan was to shoot her Mazda True Red to get a color with pop. After some looking around a bit, and waffling several times, the family and I decided to take a page from the Ford boys and go Grabber Blue. The 'bird still has a couple more passes through the paint booth to go to get graphics and clear-coated, but this is where we now stand.
Once she gets back and cures a bit, we then have the daunting task of getting all the interior bits and bobs installed. Some highlights are the TMI molded headliner and a 3 point seat belt kit for the safety.
Thanks for looking!
-Phil
07-12-2021 #33
Registered User
- Join Date
- Jan 2020
- Location
- UT
- Posts
- 43
And we're back! We just got the car back from paint and have spent the last weekend installing a large percent of the boxes that had been piling up for the past 5 months.
First in was the TMI headliner. It looks super nice once in, but was a bit of a bear to wrestle to get it all in place. The A-pillar covers do leave a bit to be desired with their fitment so we may need to keep an eye out for some OE A-pillar moldings.
The interior is coming together but still needs some love. We still need to wrap up installing the console, do something with the dash center stack, and find the rear armrest assemblies for the deluxe interior.
On a plus side, the new bumper seems to be fitting in nicely and really add some nice pop. Next on the list will be getting emblems and trim pieces installed.
07-12-2021 #34
Registered User
- Join Date
- Sep 2016
- Location
- Bakersfield, CA
- Posts
- 603
Looks great!
I chose a while back to go with Porsche Riviera Blue when I finally go into paint. It's just a tiny shade lighter.http://www.TheFOAT.com/92GTA
1969 Pontiac Firebird w/535ci IAII aluminum block, Dailey dry sump, Holley EFI (full road race build). Primer black w/black interior.
1992 Pontiac Trans Am GTA w/SLP Performance Package. Dark Jade Grey Metallic, grey leather, T-Tops.
07-12-2021 #35
Registered User
- Join Date
- Jan 2020
- Location
- UT
- Posts
- 43
Ooh that should be a pretty striking color. Can't wait to see how that turns out. Originally Posted by anguilla1980

 Reply With Quote


