Results 1 to 20 of 30
Thread: T-56 Early Camaro Trans Swap
-
09-24-2015 #1

 Registered User
- Join Date
- Aug 2007
- Location
- Jonesboro, Arkansas
- Posts
- 2,506

T-56 Early Camaro Trans Swap
A recent cruise down the bypass revealed that my Camaro, traveling at 70 MPH, was turning 3200 RPM. Way too tight for my liking. I had a couple of options. One was to change out the 3.73 gears for something higher, or change out the transmission to one that had overdrive. The later was my choice, since changing out the gears would mean I would have to find another posi unit for the higher gears, and this would kill my lower end.
I used a T-56 out of a '95 Trans Am because it was readily available. I'll start out by saying that I have an early model small block Chevrolet engine coupled to a Muncie four speed transmission via a Lakewood bell housing. I am wanting to use the existing parts I have, the bell housing, mechanical clutch setup, etc. For some reason, I just like the mechanical clutch better than the hydraulic. Too me, less of a headache to put the hydraulics in.
In using this T-56, I had to change the input shaft to a "LS" version because a adapter plate will be used in this swap. The LS input shaft is longer than the LT shaft and it will help take up some of the slack for the input to reach the pilot bushing. Changing the input shafts is a breeze, It was not hard at all. I went through two of the pilot bushings before I found the right one.
I used the Hooker rear cross member for the rear mount. This cross member is made for putting the T-56 into a first gen Camaro using a LS engine. This cross member is NOT made for putting this trans behind a early sbc. I knew this going in, but I wanted to use it anyway, because I liked the way it was built, I liked the way it looked, and I knew I could alter it to work the way I wanted it. Anyone doing this swap can certainly use whichever rear cross member they choose. If by chance anyone doing this swap want's to use this cross member, I can send them instructions on what to do to alter it to work.
Another thing I did, I cut the "H" pipe out of my exhaust. It bolted up to my headers and I cut it off about 8" beyond the length of the transmission. I did this for a couple of reasons. One, I wanted them out of the way while doing this swap and two, I wanted a way I could unbolt it if I ever needed to change a clutch, throw out bearing or do any other work. Just seemed like a good idea to me, and I'm happy with the results.
I also cut a big gaping hole in my floorboard. Some have done this without cutting the floor by "massaging" the floor in the area of the trans with a big hammer. I decided to cut it out. Although it made the installation a ton easier with the hole, I knew eventually I was going to have to fill it back in. Luckily, I was able to put the old piece back in by adding some material on the sides and screwing to the floor. I can show anyone how to do that too.
The first thing I did after getting the T-56 home was to give it a good bath, it needed it. Knowing that I was going to have to pull the front bearing plate off to change out the input shaft, I didn't want any dirt or grit inside the trans. On a note here, If your going to do this swap, you will be ahead if you can find a transmission from a LS car, it will already have the correct input shaft. The LT version is what I did and certainly doable.
First and foremost, while this is what I did for my car and it worked great, these instructions may not be what works for yours. There are always different scenarios. I'm not responsible if yours doesn't work like mine did. There's always something different. Remember, while doing this swap to check, check, check again and measure everything you do repeatedly. I can't say that enough. The old adage "measure twice, cut once" is certainly in play here.
If your coming from a four speed, you will have to replace your clutch disc. The four speed uses a 10 spline hub, the T-56 uses a 26 spline.
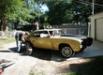
Lets get started; In the following text I have given instructions, and pictures to show what I did. Hopefully, if someone decides to do this swap it will save them some time and money. Along with that, I have also given the place where I purchased the parts along with part numbers. You will need plenty of room under the car to do this. I do not have a lift so I had to jack my car up and crawl under it (hard on this old man by the way). several years ago I made the jack stands out of 2x4's everyone was using. I forget who came up with these but they are really an asset. They go under the tires and that allows full access under the car.
After the car was jacked up the fun began. First, remove the shifter from the trans, then the drive shaft, (the drive shaft will have to be shortened, more on this later). At this point you'll need to jack up the back of the engine to take the weight off of the rear cross member. You will have to brace the back of the engine! You cannot put your bracing under the bell housing, because it along with the clutch assembly will have to be removed. I did this by getting square pieces of wood big enough to put under the rear of the oil pan to rest on. Do this only if you feel comfortable doing so! I also took the distributor cap off to prevent possibly cracking it if the engine had to come down any, they sit pretty close to the firewall. Continue removing the existing rear cross member, transmission, and clutch assembly. You may also have to remove some exhaust and possibly the parking brake cable. I'm telling ya' pulling the trans, or putting the new one back in only to find out you've hung up on the cable or anything else while your holding a 75 lb. trans isn't going to be fun. (the T-56 weighs in excess of 147 lbs.). Remember to put a old spline yoke or something to catch the trans fluid when taking the four speed out, or you will have a mess everywhere.
With everything removed down to the flywheel, you'll need to remove the old pilot bushing. Sometimes these can be boogers. I had a pilot bushing puller, and still had to wind up cutting mine out. Be careful if your cutting out the old bushing and don't mess up the inside diameter of the bushing hole.
Disassembly done, on to the T-56...
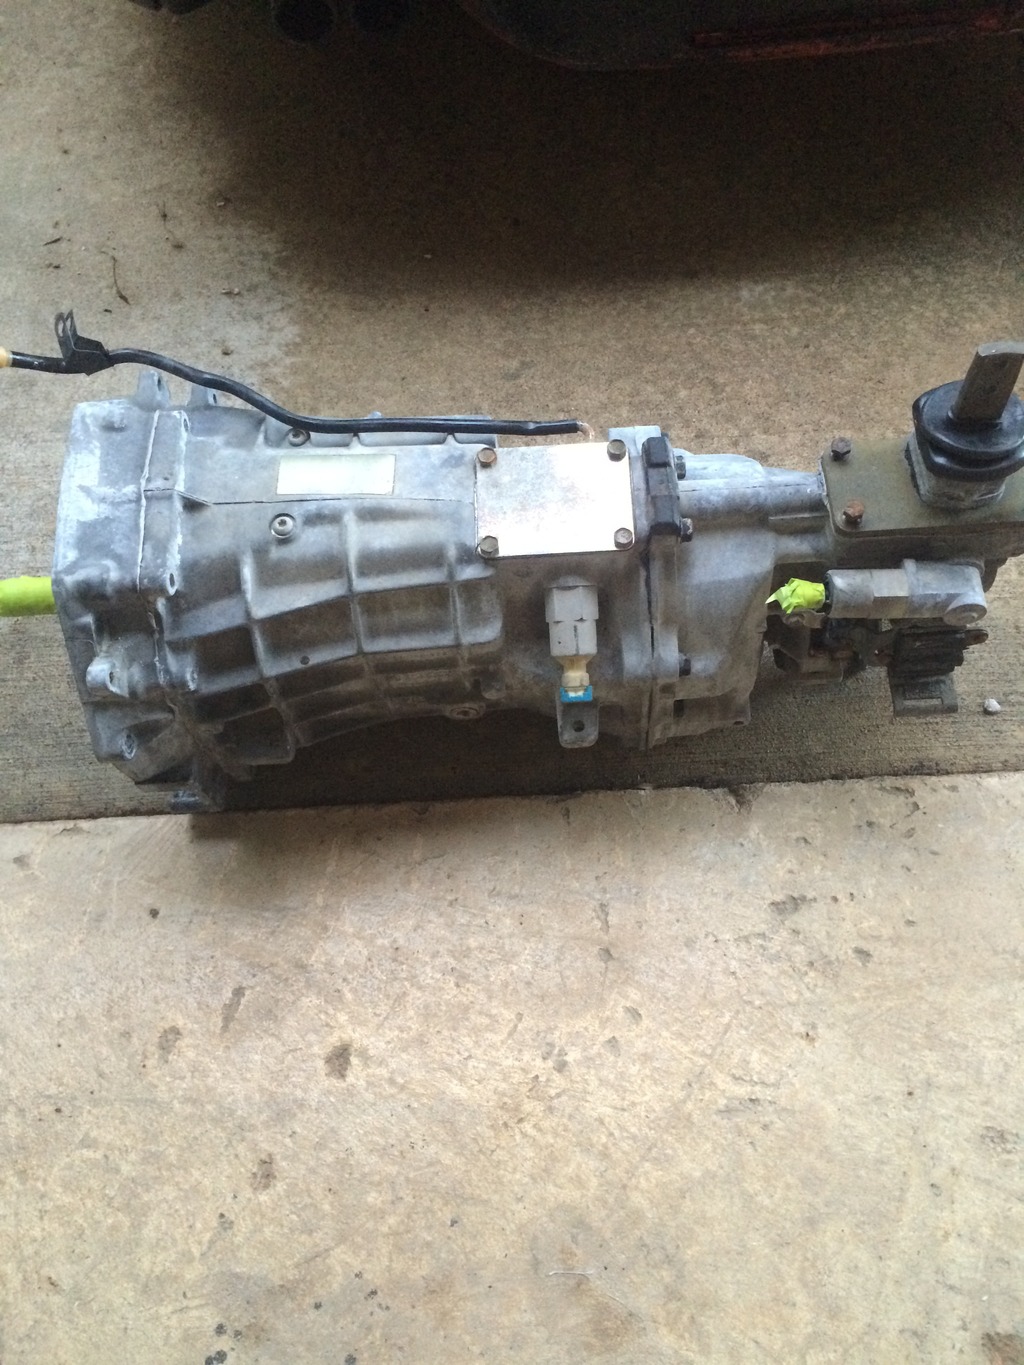
This is a picture of the transmission after I cleaned it up. I'm a stickler for things looking good so I'll have to tell you, I'm going to prime and paint it before it goes back in. I also replaced the three wiring pigtails I am going to use. 1. VSS (vehicle speed sensor), 2. Reverse Lockout Solenoid, 3. Reverse light Switch. I got these from Amazon from a company called Muzzy's Automotive for $25.95 (free shipping) for the set.
If your using a "LT" version, you'll need to take the front plate (bearing plate) off to gain access to the input shaft. Your going to replace it with the "LS" version. Like I said, this is not hard to do. I got my input shaft from D&D Performance, 47901 Anna Ct, Wixom, MI 48393. 1-248-735-6220. I'm sure there's other places to buy, so use your preference. I also let them press a new bearing onto the shaft. I didn't know it at the time but the bearing race doesn't come with it unless you ask. I purchased that locally. The input shaft part number is BG27; it is a 26 spline input for a 2.66 first gear. You will need to check to see what you have. The bearing part number is BB4. Drain all the fluid out of the T-56 you can, and I put mine tail first into a 5 gallon bucket. This allowed me to have a way to hold it while working on it as well as having a place to catch the remaining fluid.
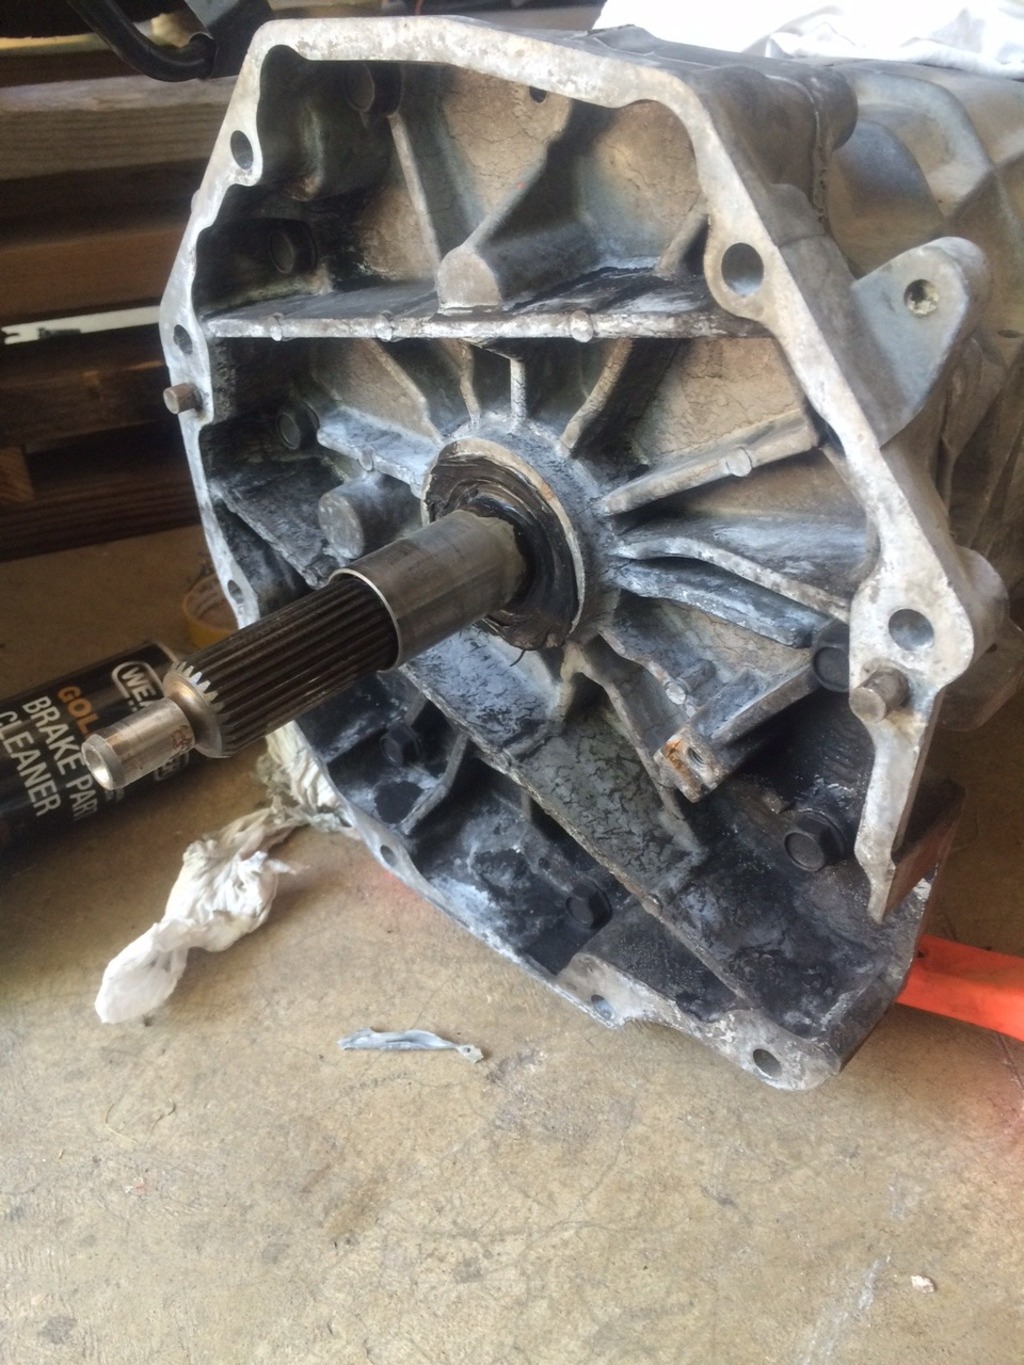
You will see the bolts holding the bearing plate on, take them out and pry the plate away from the transmission. Be careful not to score the sealing surface, this will allow a place for leaks in the future if not. I used a wooden mallet to tap on the bearing plate and to tap on the input shaft while pulling the plate off. On the underside of the bearing plate there are two big bearing races with shims behind them. Be careful not to let these races fall out allowing the shims to come out. You'll use these shims later. Here's a pic of the back of the bearing plate attached to the trans, make note of the throw out bearing retainer (some call it the snout) More on that later.
Here's a picture of the back of this plate where the races and shims go:

The throw out bearing retainer (snout), cannot be used because it will interfere with the installation of the adapter plate. (it sticks out too far, and the adapter plate has this new retainer bolted to it). What I did was to cut the existing (snout) below the face of the bearing plate. You can opt to buy a new bearing retainer plate for the LS. (it doesn't have this "snout") I just decided to cut this one off. It hasn't given me a problem so far. Do this at your own risk. You can see in this picture where I cut it off. (just above the grey area).
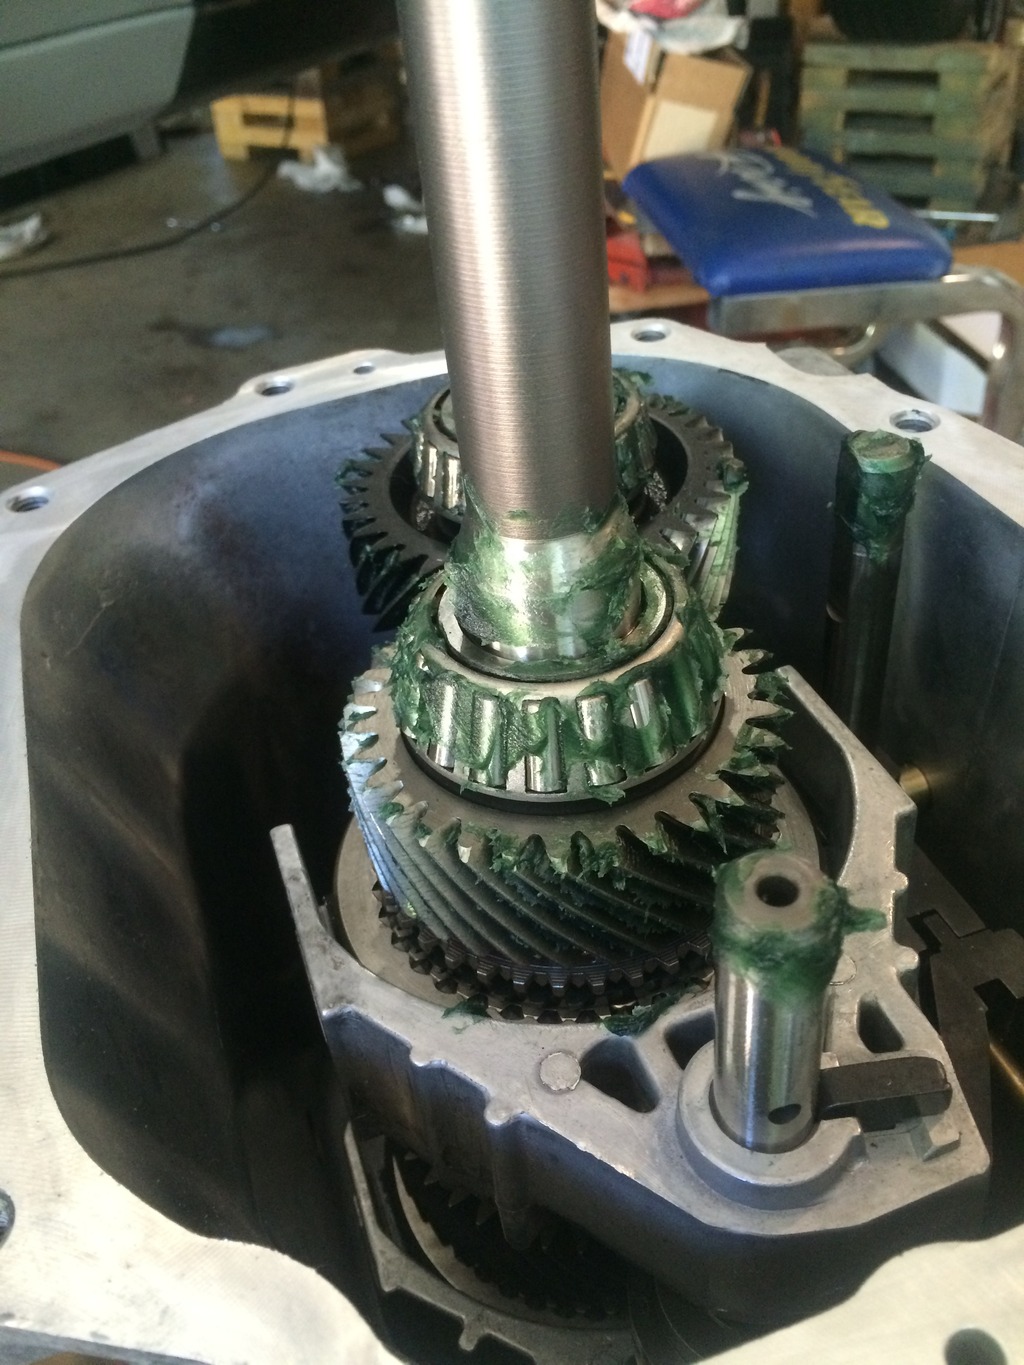
Once the bearing plate is removed you will be able to see the input shaft as well as some other gears (the input shaft is the tallest one) It has to come out. Very easy to do. Grab the shaft, and wiggle it while pulling upward, you may have to push the other gear to the side a little bit but it will come out. Goes back in just as easy! Here's a pic of the input. This is a picture of the new shaft already installed with a coat of transmission assembly lube.
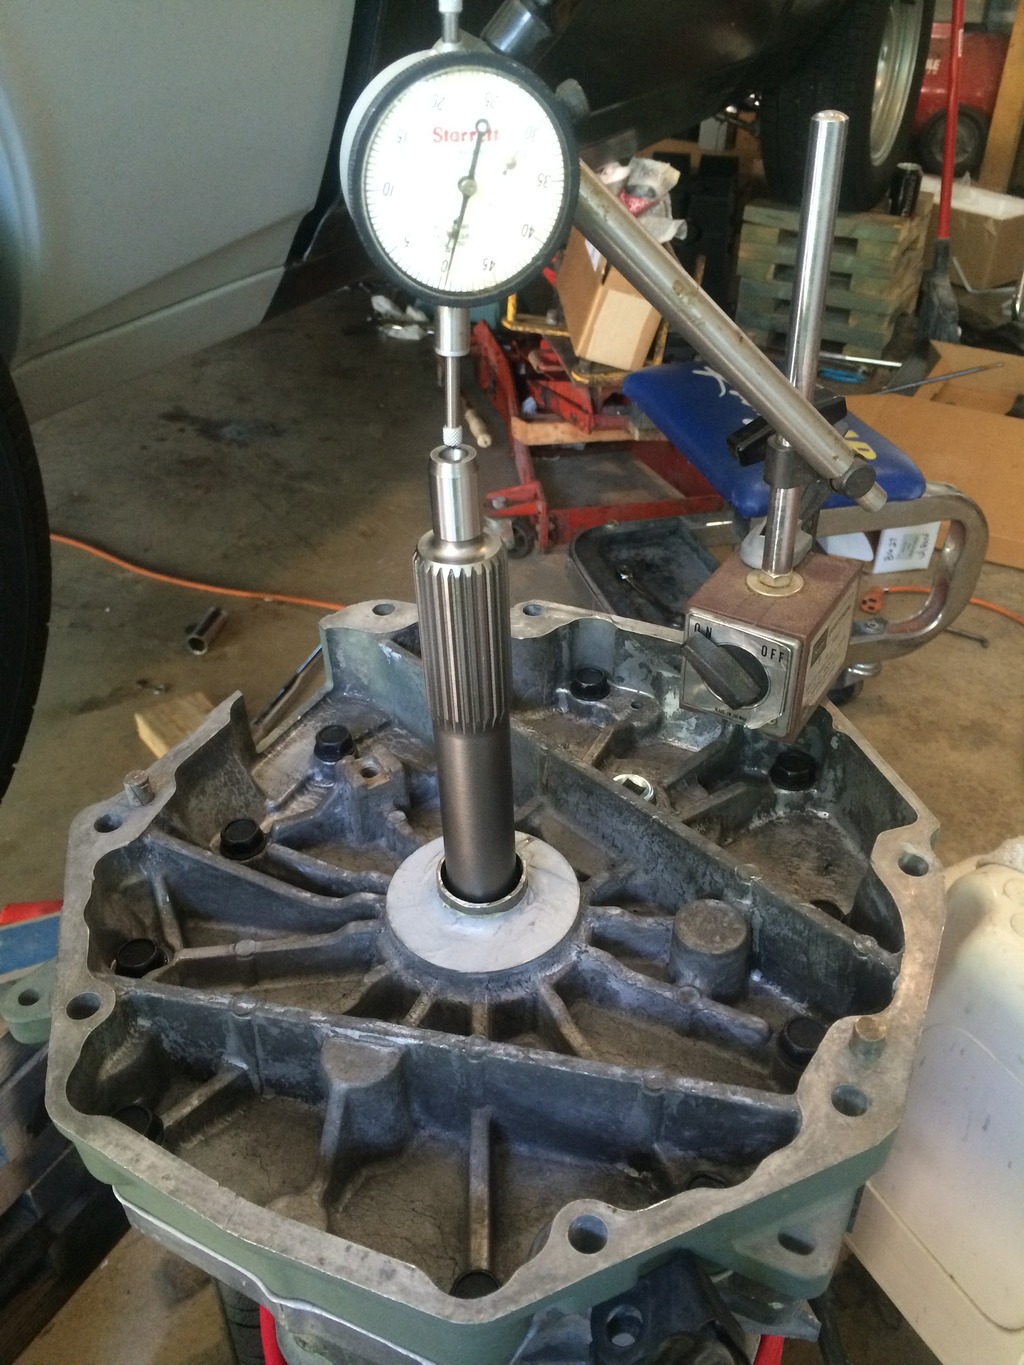
Next, you'll need to set thrust endplay. Assemble the bearing plate back onto the transmission and torque the bolts down to spec. (26 lb. ft.). You'll need a dial indicator as in the above picture. What your looking for is the endplay (movement) of the input shaft. To do this, you'll set up the indicator push down on the input shaft, set the indicator to "0" and pull up on the shaft. You don't want the needle to move over .002. I think the preferred is 0.000/0.002. Others may reflect on this. (See above picture.) You can adjust this by adding or subtracting shims from behind the input shaft bearing race. Once you've got your endplay set correctly, you can put the bearing retainer plate on permanently. Make sure all mating surfaces are clean and free of any oil or grease. I used Permatex Ultra Grey sealant. Apply a small layer of sealant to the sealing surface of the transmission. Before installing the bearing plate on, I would put some of the transmission assembly grease on the inside of the seal that is going around the input shaft on the bearing plate. Replace the bearing plate (aligning the dowels) to the transmission. I hand tightened the bolts holding it on, waited several hours and then came back and torqued to specs.
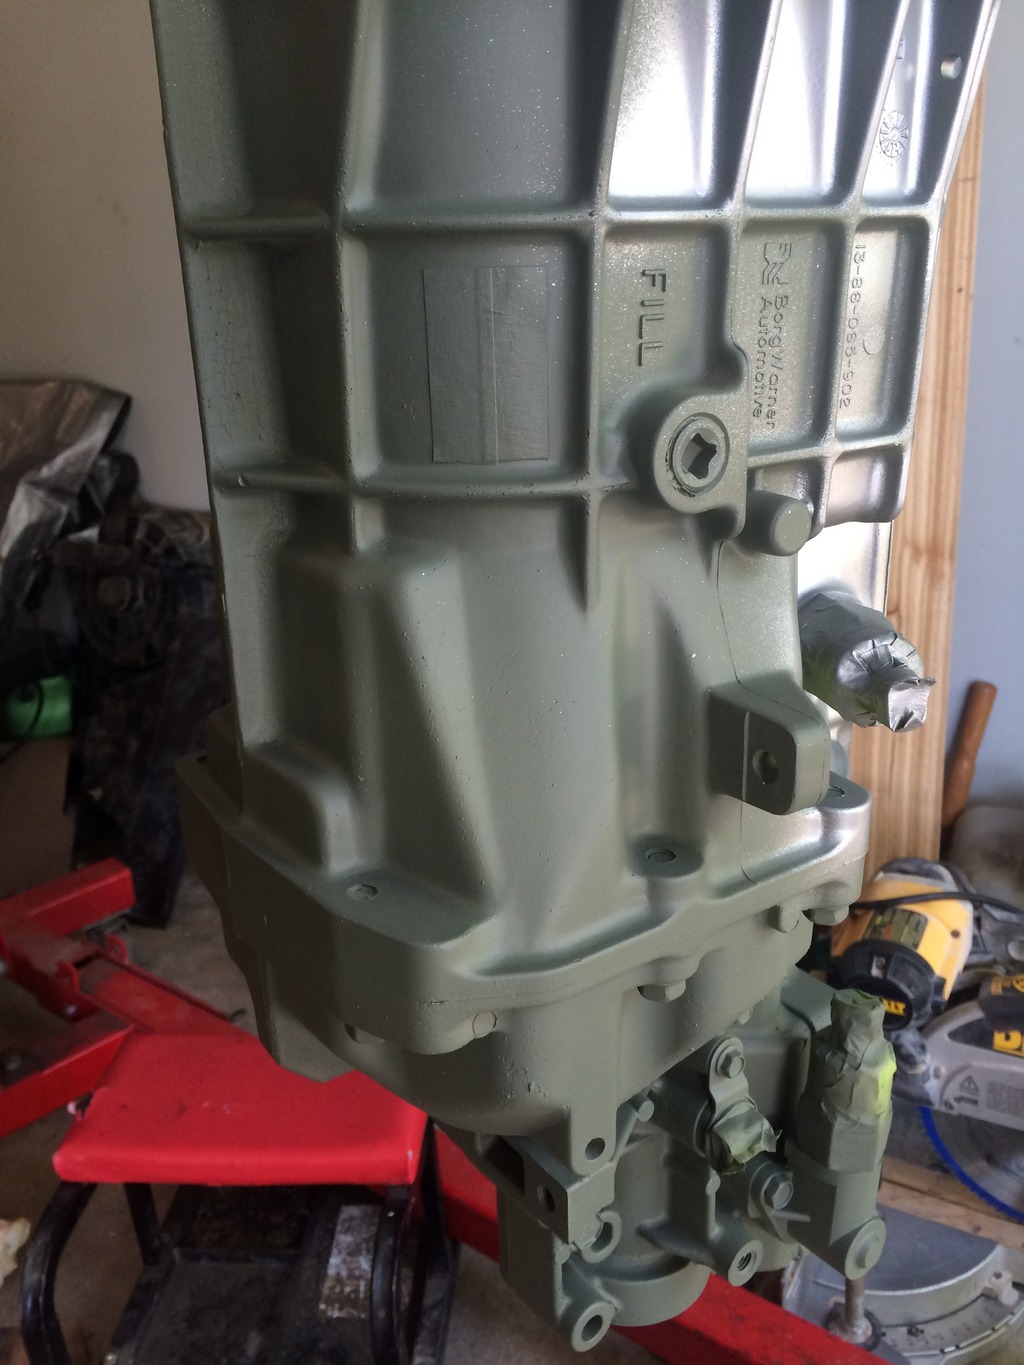
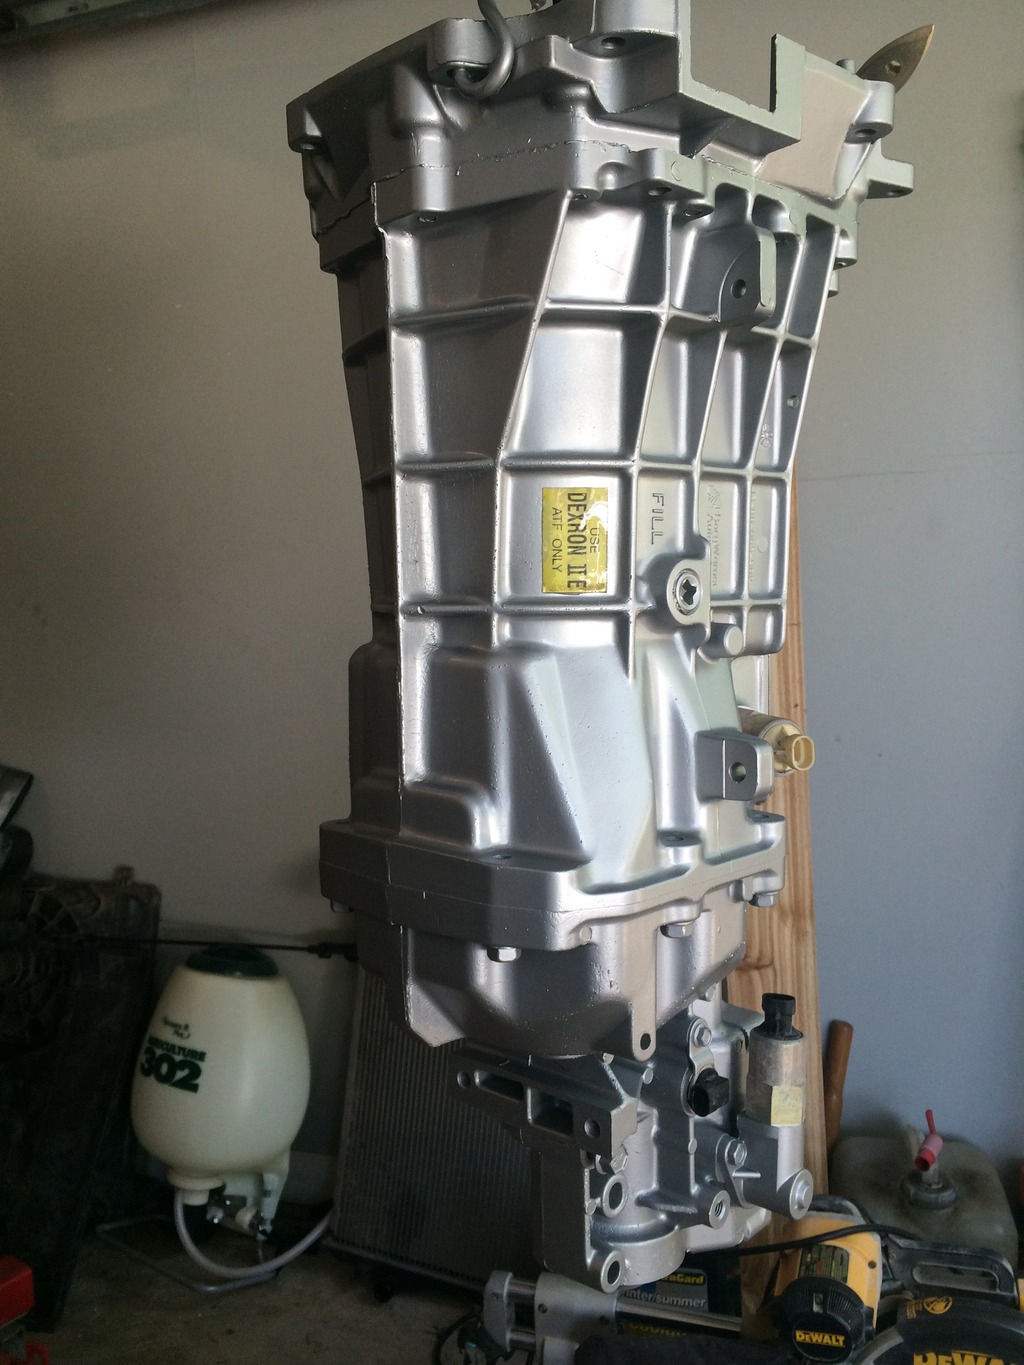
If you haven't yet, or don't want to I painted my transmission. The first picture is with the trans primered, and the second painted with silver paint. I'll admit I used rattle cans in both instances..
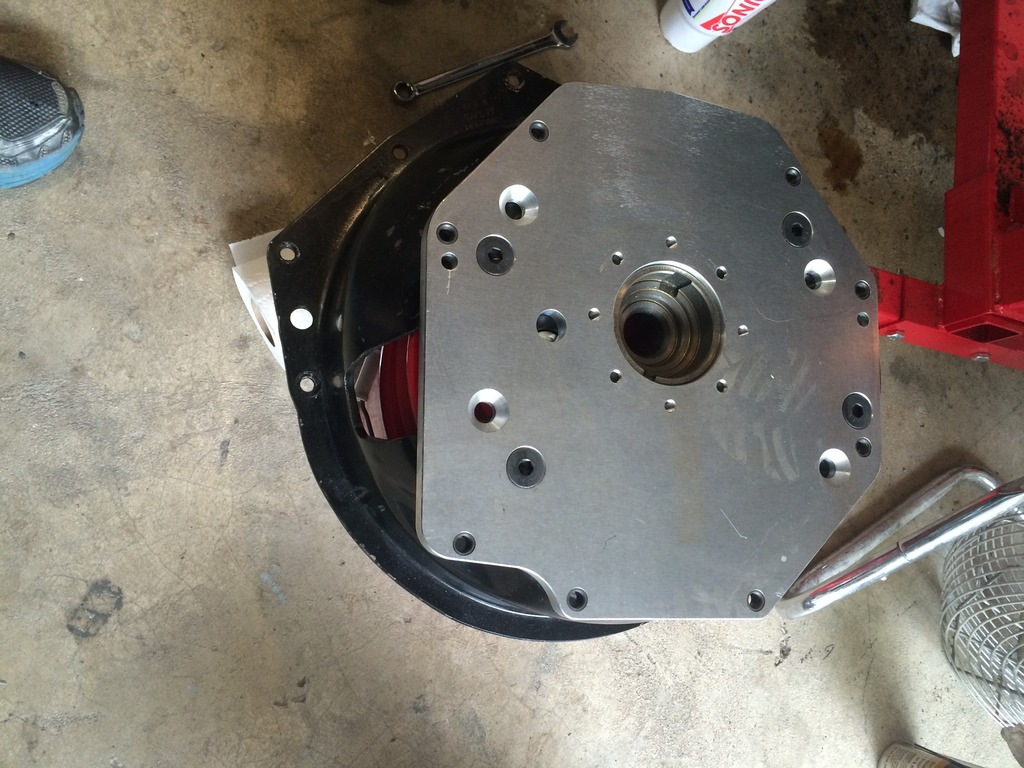
With the bell housing out, now is the time to fit the adapter plate to the bell housing. I used McLeod's adapter #MCL-8-207. I purchased it from Summit Racing. It is made of billet aluminum and is pretty well made. Picture of adapter plate :

You'll notice that the adapter has a throw out bearing retainer "snout" bolted onto it. (This is why the one on the original bearing plate had to either be cut off or replaced). Check to make sure the bearing retainer is on correctly. Mine was not. It was bolted onto the wrong side. If you look at the adapter, the four flat head bolts that bolt the adapter to the bell housing, the tapered holes are opposite of the side the retainer is. In other words, if the adapter is bolted to the bell housing correctly, the throw out bearing retainer will be sticking into the bell housing. See pic below:
Going back together: With your old pilot bushing out it's time to install the new extended pilot bushing. I (of course) bought the wrong one the first time and I had to cut it out. I called McLeod and they set me straight on which one was needed. This bushing does not go into the same hole the original one was in. This one fits the large diameter in the end of the crankshaft. It has a large outer shell that holds the smaller inner bronze bushing. The smaller bronze bushing can be moved in our out to achieve your desired input shaft engagement. Brilliant!! That part number is #MCL-8-1094-4 (McLeod) purchased from Summit as well. here's a picture of it ( had to take a picture of a picture since I forgot to take one of the bushing itself)

Finished with the upgrades, now we're ready to start putting all this stuff back together.. I used the Hooker rear transmission cross member. As stated at the beginning I just liked it. Again, this cross member wasn't made for this swap, I had to alter it to fit my needs. I knew this in the beginning. The alteration was not a hard fix, but your welding skills are going to have to be up in shape, or know someone's that is. Here is a picture of before and after:
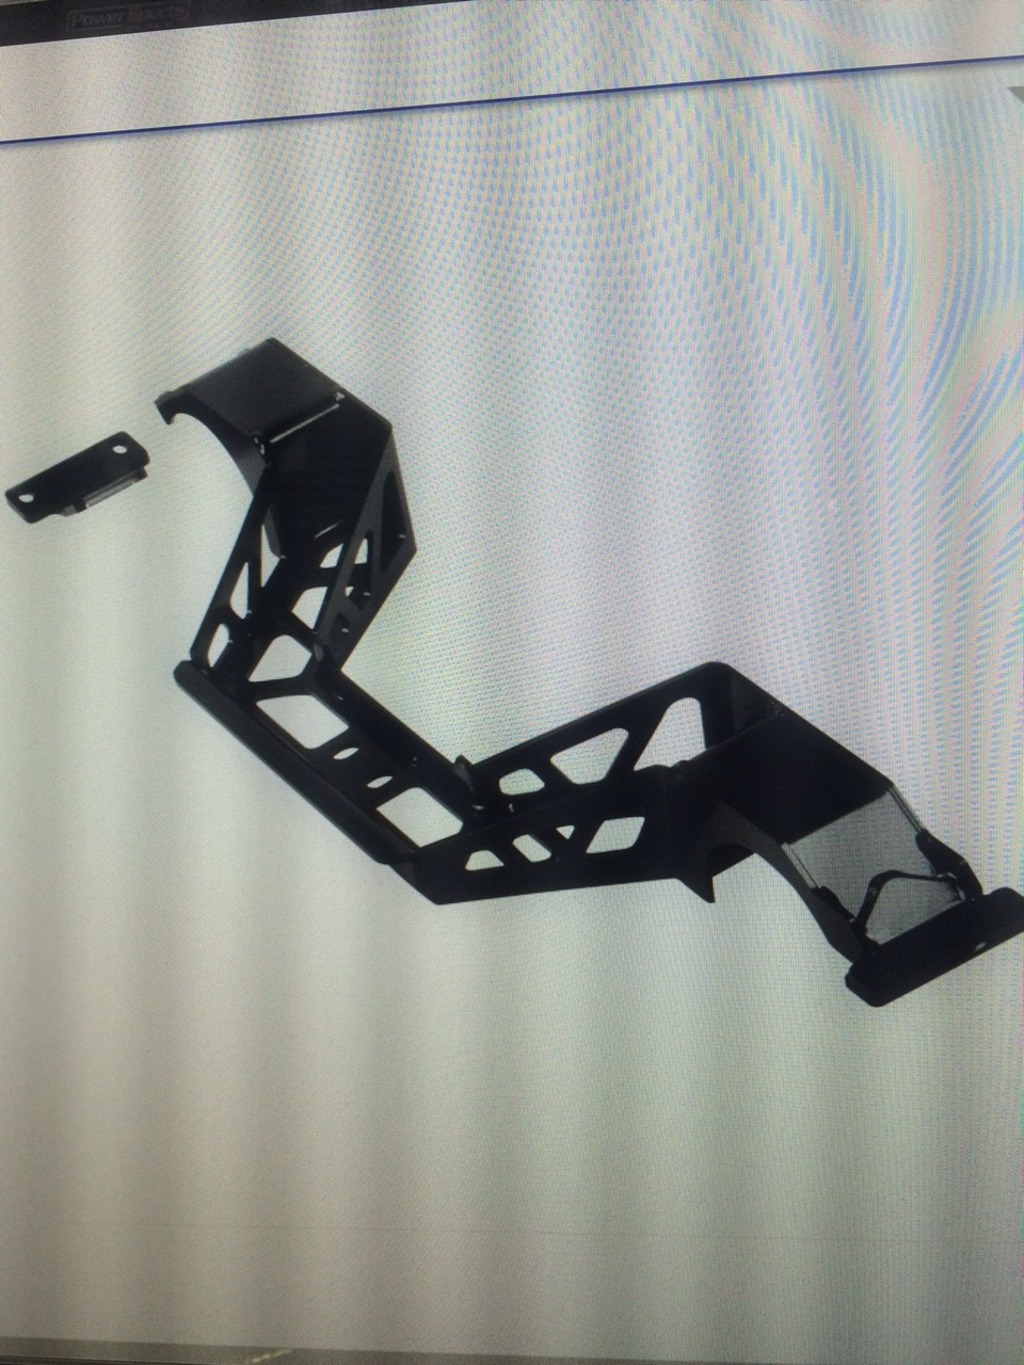
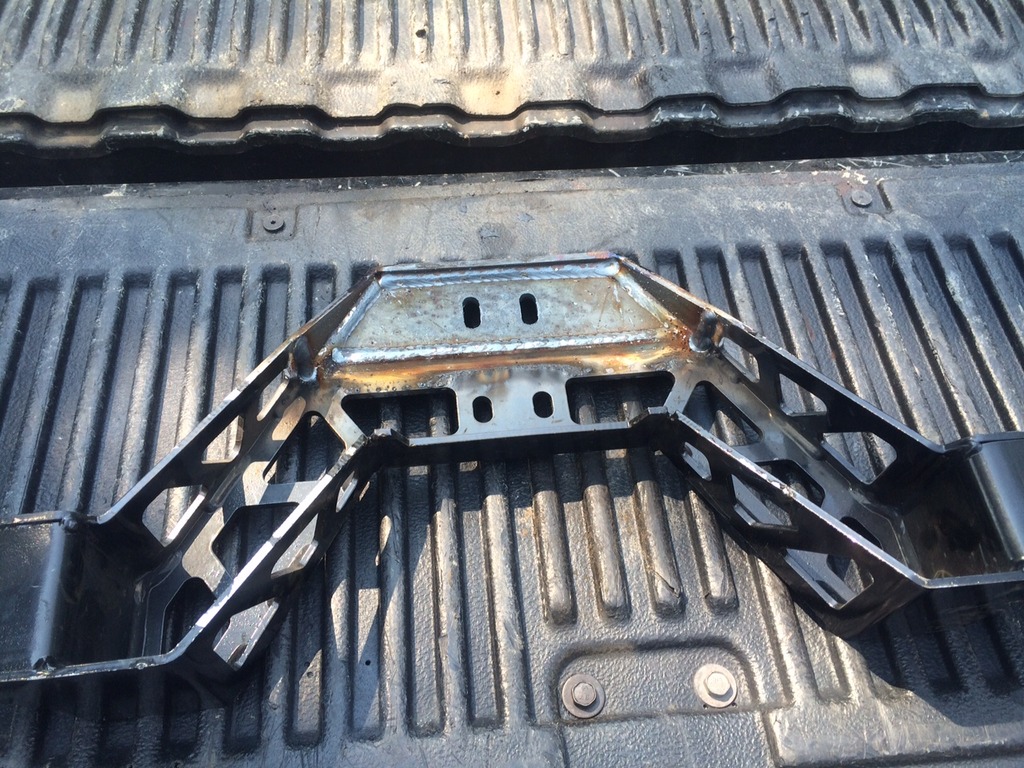
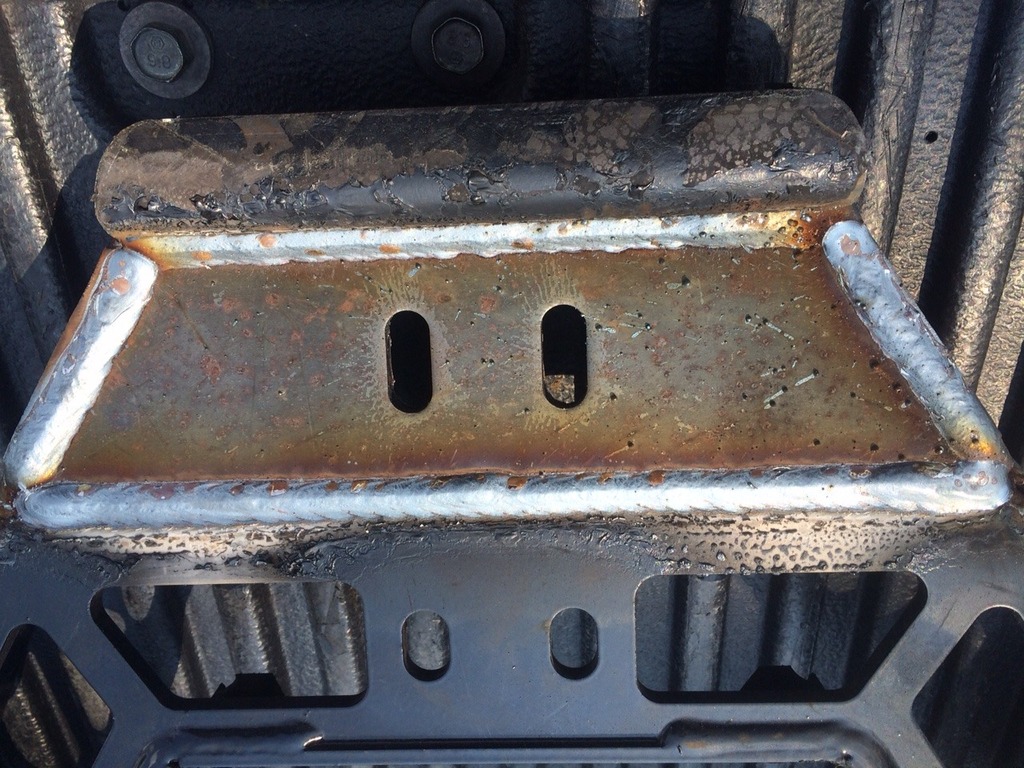
Since this cross member was made for the LS engine swap, the bolt hole location had to be moved back approx. 5". The LS engine sits farther forward than the small block. As you can see in the picture where the original holes were, this will have to be cut out so the rear of the transmission will clear. After doing this I had braces welded back in for support. I don't have a picture of it after it was cut out, but I can take one and post at a later time. Here is a close up of the welding. Top view:
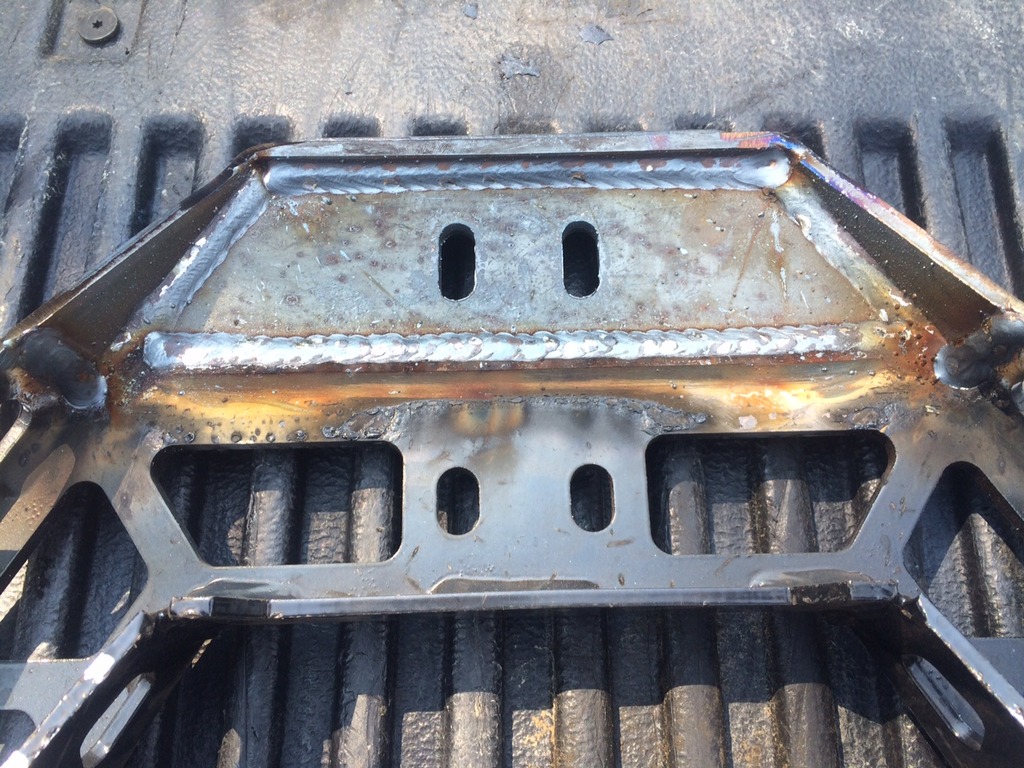
Bottom view:
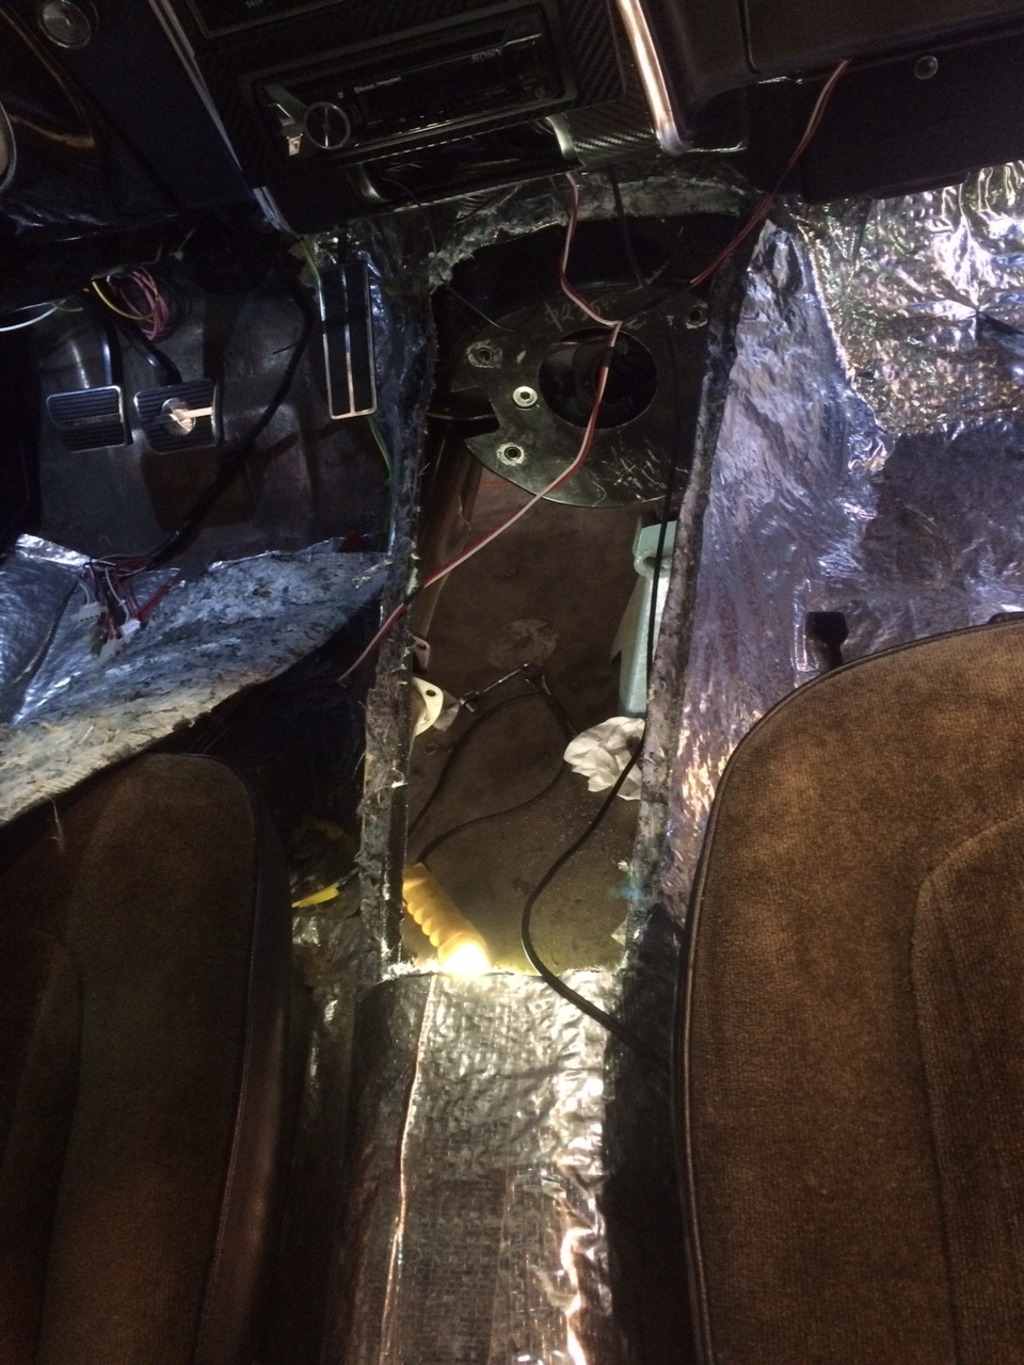
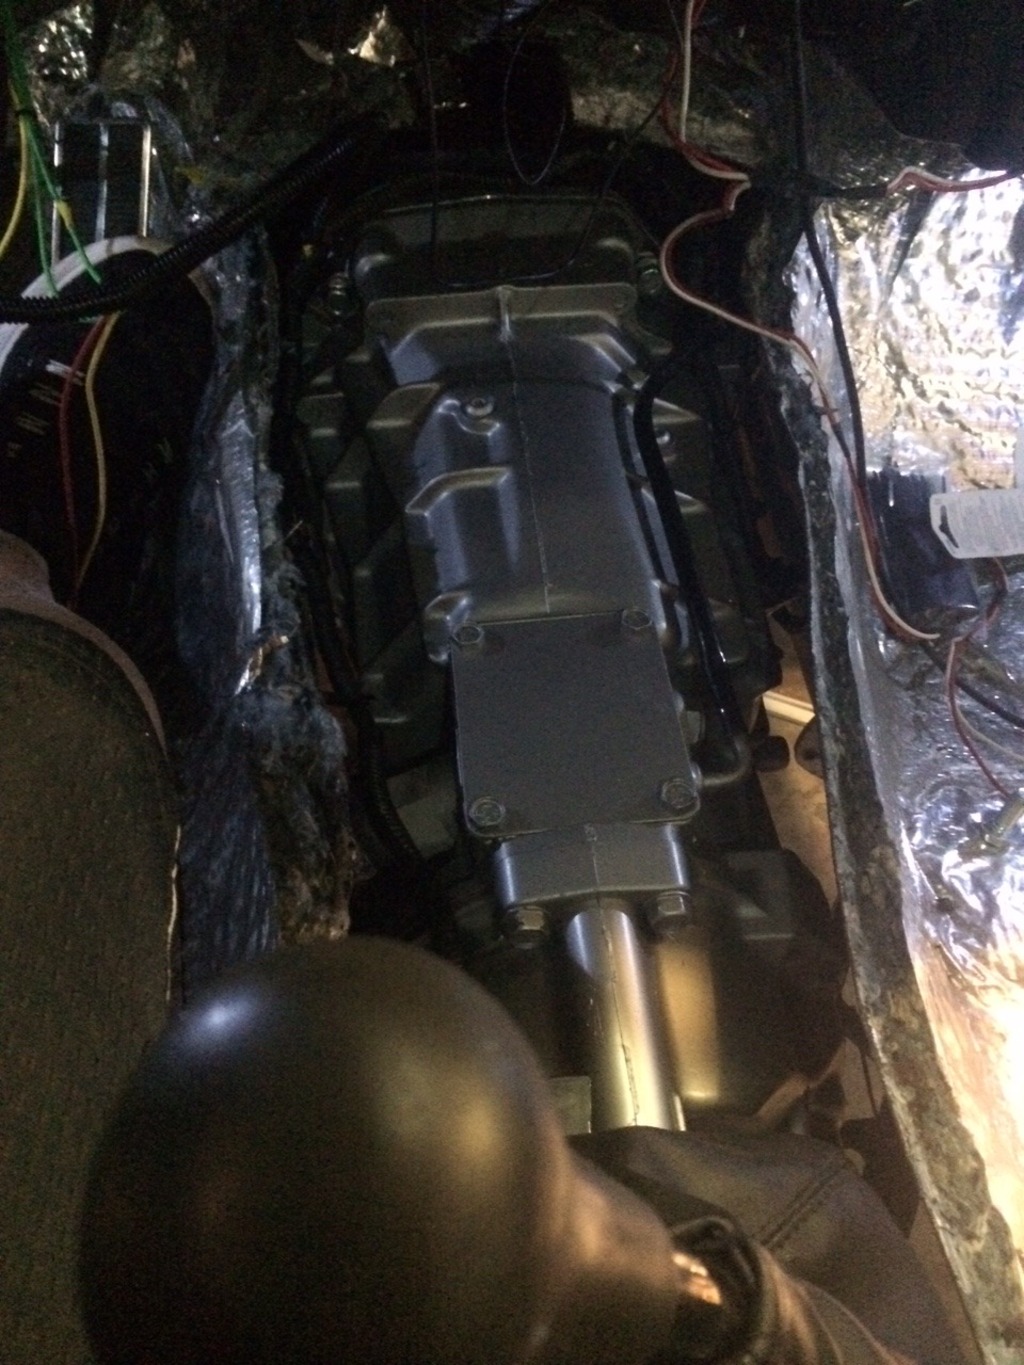
I did cut a rather large hole in my floor board. Like I said above, some do not do this, I thought it was just make things easier. For me it did. It was really handy when putting the transmission back in. See what I mean...:
Picture of transmission back in:
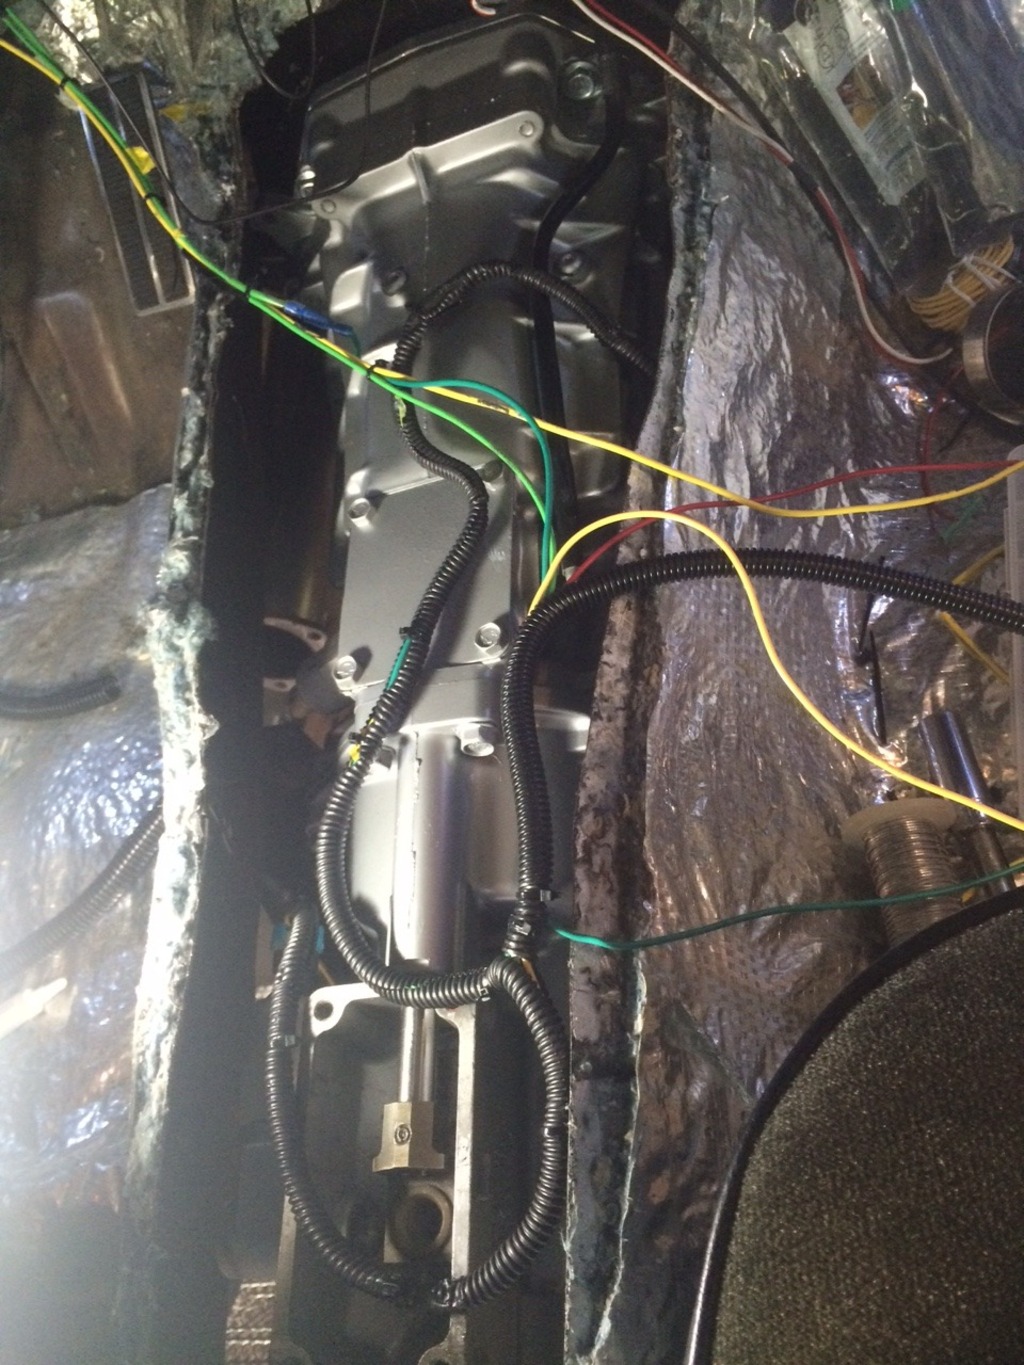
Time to do some wiring. I wired my Reverse Lockout Solenoid to my brake lights. I know some don't use the solenoid, but I thought it would be a good idea since it can be easy to go into reverse instead of 5th gear. Besides, it wasn't a problem to do. Wiring picture:
If your coming from a Muncie four speed (or any other manual early model), you're going to have to change clutches. The LS version has a 26 spline hub as opposed to the Muncie 10 spline. I think, but not sure, some Muncie transmissions came with 26 spline as well.. Don't quote me on that though. After your clutch assembly, bell housing with adapter, and transmission has been installed it's time to work on the drive shaft. Listen!, Measure several times, cut once!!! If you don't get the correct measurement here and have it cut off too short, your going to be buying a new drive shaft!! Pay attention to this. I put the transmission yoke end of the drive shaft back into the trans. I pushed it in until it bottomed out, backed the drive shaft back out about 1.5" to 2" ( don't remember which). Work with this to your liking, don't take my measurements, it will have to have some room for movement. Once you've figured this out, have someone help you hold the driveshaft up (on the rear end, end of the driveshaft) to the yoke coming out of the rear end. Get it as close as possible. Now, measure the distance from the center of the (transmission end) yoke, where the U-Joint is, to the center of the yoke (rear end) where the U-Joint is. This dimension is going to be shorter than the driveshaft you removed. Write this dimension down and take it with you to whomever cuts down the drive shaft. That's what length it needs to be. Again, measure enough times that your comfortable with your finings. Once cut off and welded back, install it back into the car.
Now, back to that big hole in the floor board... I used the piece I took out and used 3M panel adhesive to glue a strip (1.5" wide) down each side of the panel I took out. This gave me a way to screw the panel back to the floor board. I didn't take a picture of it, but here is a pic of everything buttoned back up:
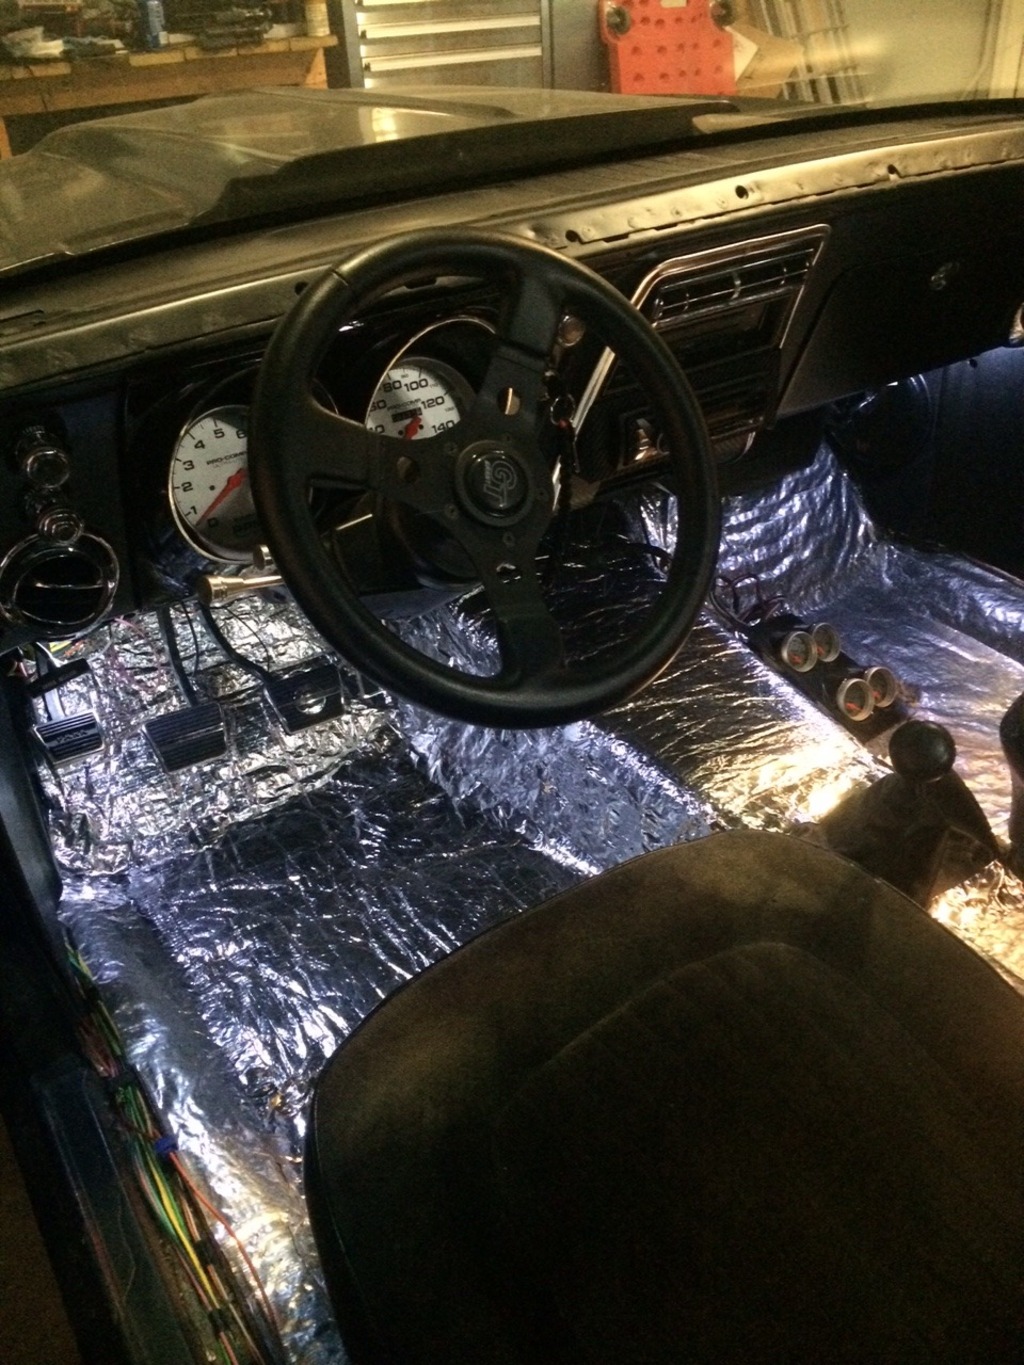
I have Autometer gauges in my car. The speedo is mechanical and I'm going to have to purchase the electrical one to work with this trans. They make a adapter to go from electrical to mechanical, but it's pretty pricey. You can also add a mechanical drive to the transmission but I didn't want to go through taking all that apart either. So new speedometer it is.
Sorry for the long thread, but I tried to make it as informative as I could, I hope I didn't leave anything out. I've driven the car every day since I made this swap and so far (knock on wood) everything is working great. I didn't do this alone. I had quite a lot of help along the way from a few guys here on the forum. I would like to acknowledge them and thank them for their patience and help"
Steve Hayes (TheJDMan), Andrew (sorry Andrew I don't know your last name..) (Andrewb70), Jody Haag, (Jody's transmissions)
Others: The guys at Summit, D@D Performance, and at McLeod. I thank you for your help as well. There has been others that voiced their opinions in the threads.. Thank you
I hope this thread helps someone trying to do this swap someday, and if anyone has any questions, send me a PM.
Thanks for reading
Carl
Carl Wilson
1968 Camaro - T-56 6 speed - 383 Stroker, 2014 Mustang GT seats. FiTech EFI, Tanks Inc. Tank with Deutschwerks fuel pump.
-
09-24-2015 #2
Registered User
- Join Date
- Nov 2014
- Posts
- 37
By moving the trans tunnel sheetmetal up, do you have a gap between the console and the carpet? If so, how much? How noticeable is it?
09-24-2015 #3
Registered User
- Join Date
- Nov 2014
- Posts
- 37
Excellent writeup by the way, thanks
09-24-2015 #4
Registered User
- Join Date
- Aug 2007
- Location
- Jonesboro, Arkansas
- Posts
- 2,506
Everything fit back into it's original position in the tunnel cover except the front. It came up about 3/4". I put insulation and aluminum tape around it. So far it's worked great.
And thanks for the feedback..
Carl
Carl Wilson
1968 Camaro - T-56 6 speed - 383 Stroker, 2014 Mustang GT seats. FiTech EFI, Tanks Inc. Tank with Deutschwerks fuel pump.
09-24-2015 #5 -Moderator/Sponsor-
- Join Date
- Apr 2001
- Location
- The City of Fountains
- Posts
- 15,975
Carl,
Nice write-up. Just be careful with the reverse solenoid being on the brake switch if you are downshifting from 6th to 5th, reverse can easily be hit, if you are on the brake at the same time.
Andrew1970 GTO Version 3.0
1967 Cougar build
GM High-Tech Performance feature
My YouTube Channel Please Subscribe!
Instagram @projectgattago
Dr. EFI
I deliver what EFI promises.
Remote Holley EFI tuning.
Please get in touch if I can be of service.
"You were the gun, your voice was the trigger, your bravery was the barrel, your eyes were the bullets." ~ Her
09-24-2015 #6
Registered User
- Join Date
- Aug 2007
- Location
- Jonesboro, Arkansas
- Posts
- 2,506
I'll certainly keep that in mind. Thanks again for all your help.
 Originally Posted by andrewb70

Carl Wilson
1968 Camaro - T-56 6 speed - 383 Stroker, 2014 Mustang GT seats. FiTech EFI, Tanks Inc. Tank with Deutschwerks fuel pump.
09-24-2015 #7
Registered User
- Join Date
- Nov 2014
- Posts
- 37
Excellent writeup by the way, thanks
09-24-2015 #8
Registered User
- Join Date
- Nov 2014
- Posts
- 37
I don't know why that posted twice
09-24-2015 #9 Registered User
- Join Date
- Nov 2006
- Location
- Hildebran, NC
- Posts
- 992
Or, after a 1 thru 4 blast, I slow down to go into 5th. Originally Posted by minendrews68
That is where I would be afraid of going into reverse.
I actually took the reverse lockout solenoid apart and cut about 1/3 of the spring off.
It is not nearly as hard to get into reverse, but still has enough force to keep it out of the reverse gate when going to 5th.
Super nice install thread!!!!!
09-25-2015 #10
Registered User
- Join Date
- Aug 2007
- Location
- Jonesboro, Arkansas
- Posts
- 2,506
Thank you.. Originally Posted by rchaskin
Carl Wilson
1968 Camaro - T-56 6 speed - 383 Stroker, 2014 Mustang GT seats. FiTech EFI, Tanks Inc. Tank with Deutschwerks fuel pump.
09-25-2015 #11 Registered User
- Join Date
- Mar 2009
- Location
- Under Lake Michigan
- Posts
- 76
Cool thread. I was all ready to package up my lt1 T56 and sell it off. I was going to buy the lt1 clutch kit and conversion flywheel but it ended up being over $1100! I have a Lakewood muncie style scattershield so I think your way may be about the same price wise but a future clutch change would be less expensive than the $700 LT1 clutch kit.
What is the price breakdown for all items you used to make the swap?
Thanks.
Mike15 Camaro 2SS 1LE summer ride
00 Yukon work ride - parts hauler
69 Camaro LS Turbo - project car
09-26-2015 #12
Registered User
- Join Date
- Aug 2007
- Location
- Jonesboro, Arkansas
- Posts
- 2,506
I think, roughly, around $750. That is without the exhaust work I had done. ( That wasn't necessary just something I wanted to do), and the electronic speedometer.... and buying some things twice, the trial and error thing. I am well pleased with how everything turned out and to me the price wasn't too bad.
Carl Wilson
1968 Camaro - T-56 6 speed - 383 Stroker, 2014 Mustang GT seats. FiTech EFI, Tanks Inc. Tank with Deutschwerks fuel pump.
09-26-2015 #13 Registered User
- Join Date
- Dec 2010
- Location
- Fredericksburg, VA.
- Posts
- 3,155
Carl,
Just an idea, for the reverse lock out solenoid switch I use a shift knob equipped with a line lock button.Steve Hayes
"Dust Off"
68 Camaro

Given sufficient initial acceleration, even pigs can fly!
09-26-2015 #14
Registered User
- Join Date
- Mar 2009
- Location
- Under Lake Michigan
- Posts
- 76
So would you consider the 3.73 gears to be adequate with the trans you're running? I'm using 2.73s now with a 350 turbo automatic but I plan on switching to a set of 3.73s with the T56 when I swap it in. I want this thing to run out well and also give me good low rpms at say 70mph...
Thanks
Mike15 Camaro 2SS 1LE summer ride
00 Yukon work ride - parts hauler
69 Camaro LS Turbo - project car
09-27-2015 #15
Registered User
- Join Date
- Aug 2007
- Location
- Jonesboro, Arkansas
- Posts
- 2,506
This trans runs out like my close ratio four speed did, which I liked I just didn't like being at 3200 rpm at 70 mph. The six speed gives you the two extra gears that are overdrive to allow you to get on the highway and relax. The 3.73 gears are perfect for what I'm wanting. I've driven this car every day a little bit. (it's not painted yet, and the front cap needs some aligning.) but it's just too fun to drive than to leave it in the garage to look at! Really, I don't see 6th gear getting much use unless your on a long highway somewhere. I think you'll like the 3.73's.
Carl
Carl Wilson
1968 Camaro - T-56 6 speed - 383 Stroker, 2014 Mustang GT seats. FiTech EFI, Tanks Inc. Tank with Deutschwerks fuel pump.
09-28-2015 #16
Registered User
- Join Date
- Nov 2014
- Posts
- 37
What shifter are you running? Does it come up through the stock hole in the tunnel?
09-28-2015 #17
Registered User
- Join Date
- Aug 2007
- Location
- Jonesboro, Arkansas
- Posts
- 2,506
Steve,
Are you talking about like the "T" handle Hurst makes for the Line-Loc? I've got one of those....!
2A,
I'm guessing it's the stock one. I know there are others, just don't know how much difference there is using aftermarket ones. My shifter sits about 5" behind where my four speed shifter came through.
Carl Wilson
1968 Camaro - T-56 6 speed - 383 Stroker, 2014 Mustang GT seats. FiTech EFI, Tanks Inc. Tank with Deutschwerks fuel pump.
09-28-2015 #18
Registered User
- Join Date
- Aug 2007
- Location
- Jonesboro, Arkansas
- Posts
- 2,506
I've never figured out how to reply using quotes from different posts. .. dangit!
Carl Wilson
1968 Camaro - T-56 6 speed - 383 Stroker, 2014 Mustang GT seats. FiTech EFI, Tanks Inc. Tank with Deutschwerks fuel pump.
09-28-2015 #19
-Moderator/Sponsor-
- Join Date
- Apr 2001
- Location
- The City of Fountains
- Posts
- 15,975
It's the button to the right of "Reply with Quote." Click it for every response you want to quote, then click "Reply to Thread." Originally Posted by minendrews68
Andrew1970 GTO Version 3.0
1967 Cougar build
GM High-Tech Performance feature
My YouTube Channel Please Subscribe!
Instagram @projectgattago
Dr. EFI
I deliver what EFI promises.
Remote Holley EFI tuning.
Please get in touch if I can be of service.
"You were the gun, your voice was the trigger, your bravery was the barrel, your eyes were the bullets." ~ Her
09-28-2015 #20
Registered User
- Join Date
- Aug 2007
- Location
- Jonesboro, Arkansas
- Posts
- 2,506
I had to try it
thanks Andrew Originally Posted by minendrews68
Originally Posted by andrewb70
Carl Wilson
1968 Camaro - T-56 6 speed - 383 Stroker, 2014 Mustang GT seats. FiTech EFI, Tanks Inc. Tank with Deutschwerks fuel pump.


 Reply With Quote