

Results 1 to 20 of 22
Thread: 64 falcon 1jz project
-
12-05-2019 #1
 Registered User
- Join Date
- Dec 2019
- Location
- Ga
- Posts
- 22
64 falcon 1jz project
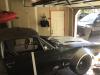
Hello. Here are some pics of my project. Been working on this car in my spare time
for a while now. I just started the engine the other day. Still have tons to do and I will update the progress as I go. I also have a video of the engine on instagram. #1jzfalcon. I started with a 64 falcon four door. the engine was knocking and needed a rebuild. I didn't want to use the stock engine. I wanted to build a car that was reliable,powerful, and fun to drive. I also wanted something that my wife could get in and drive without any issue. I have been a Toyota tech for 23 years and have always loved the jz series engines. So i found a 1jzgtevvti engine and transmission from a 2001 crown athlete and thats how this project began.
After test fitting. I knew this was going to be a lot of work. The engine would not fit between the towers in the falcons tiny engine bay. I didn't want to spend a ton on a mustang 2 suspension and so i decided if i notched the shock towers i might have just enough room. I went with the relocation kit from Crites.
The shock tower kit gave me just enough room. Next it was time for engine mounts. I used factory 1997 turbo supra mounts and brackets and modified the Crites pads to fit.
After getting the engine mounts done it was time to address the trans tunnel.
Pulled the interior out and found more work. The beware of dog sign was covering one of 2 holes in the floor.
I will fix that later. on with the tunnel.
I cut out most of the tunnel and made a new one with some 16 gauge. I recently realized that i had a 3" mock up driveshaft and that i needed a 3.5" shaft. I just ordered it and may have to cut it and raise it a little more.
Now it was time to build my trans cross member. I also installed a set of Crites subframe connectors.
[ATTACH=CONFIG]169932
I welded some plate to the floor for strength and then welded some c channel for the cross member to sit in. Then drilled through to bolt everything together. I also tied the cross member mounts to the subframe connectors. Now on to the radiator.
[ATTACH=CONFIG]
I used a 1991 supra radiator and a spearco intercooler. I modified the lower radiator support and used the factory rubber bushings for the supra radiator.
Then i used a universal intercooler pipe kit and routed the piping. After that i modified and installed the bumper and grill.
I still have some fab work left on the bumper but everything fits! I also finished the upper radiator brackets. I used some l brackets and lexus sc400 radiator hold downs.
Next i decided to do some floor patching and cleanup. Also got my Aeromotive stealth tank.
I also mounted the gas pedal from a 2001 tundra.
Now it was on to some wiring. I used an is300 fuse block and wired the efi to the factory ecm. I also wired the factory immobilizer circuit and the dlc3 connector. I can communicate with the computer using the factory global Techstream software. i still have to tidy everything up but wanted to make sure everything was functioning properly first.
So now the engine and trans is mounted, radiator and intercooler done and the wiring roughed in. I decided to build a temporary downpipe for my first start. I used some 2.5" piping and a flange from Driftmotion.com. I don't know if i will use 2.5" or 3" for my exhaust but the flange fit nice and i used a factory downpipe gasket.
After making my test pipe. I was ready to hear this thing fire up for the first time. I installed the radiator hoses, filled the fluids, grabbed my jump box and after 5 years of sitting, the motor fired right up.
I have a short video at the bottom of this thread.
My goal now is to get the suspension on and figure out how to hook the column shifter to the Toyota trans. I just ordered my driveshaft and some global west upper control arms. I want to get everything together and work the bugs out. Then clean and paint everything and make it look nice. So that's where i am at this point. i will keep updating this as it i make more progress. Thanks for checking out my build!
-
12-05-2019 #2
Registered User
- Join Date
- Dec 2019
- Location
- Ga
- Posts
- 22
Sorry. Trying to get my pictures to post.
-
12-05-2019 #3
 Registered User
- Join Date
- Oct 2012
- Location
- Kennewick, WA
- Posts
- 259

That will be a cool build, good to see a four door getting some love!
-
12-05-2019 #4
Registered User
- Join Date
- Dec 2019
- Location
- Ga
- Posts
- 22
Thanks! I think this will be a fun cruiser.
-
12-06-2019 #5

 Registered User
- Join Date
- Aug 2015
- Location
- charlotte
- Posts
- 924
This is awesome, can't wait to see it burning those tires
-
12-06-2019 #6
Registered User
- Join Date
- May 2017
- Posts
- 118
What a great project, yours is the second Falcon I have seen with a Toyota inline 6, the other was a NA engine.
-
12-06-2019 #7
Registered User
- Join Date
- Jul 2013
- Location
- Two Harbors, MN
- Posts
- 24
This is great! Should come out as a very fun and reliable car.
3 Years ago I swapped a JDM 2JZ-GTE into an 86 Cutlass after getting rid of the V6. Had it running on a Haltech Elite 2500 and the stock ECU controlling the transmission which was shifted via a B&M ratchet shifter on the floor. I also had to do lots of cutting and modifications to make it fit. Mostly just to the A/C box and crossmember though. I may have gone a little overboard with my install though because I had it looking factory stock in there when it was done.
Depending on how stock you plan to keep it I recommend going to an aftermarket ECU. You're able to eliminate a lot of the "messiness" of the factory wiring, vac lines, etc.
-
12-06-2019 #8
Registered User
- Join Date
- Dec 2019
- Location
- Ga
- Posts
- 22
Thanks! I love the sound of this engine.
-
12-06-2019 #9
Registered User
- Join Date
- Dec 2019
- Location
- Ga
- Posts
- 22
Im gonna keep the power around 400 horsepower. If I upgrade to a top mount turbo later, I may use an aftermarket computer.
-
12-07-2019 #10
 -Moderator/Sponsor-
- Join Date
- Apr 2001
- Location
- The City of Fountains
- Posts
- 15,975
Great way to update an old 4 door that most people give very little value to. I really want my next project to be a 4 door.
Andrew1970 GTO Version 3.0
1967 Cougar build
GM High-Tech Performance feature
My YouTube Channel Please Subscribe!
Instagram @projectgattago
Dr. EFI
I deliver what EFI promises.
Remote Holley EFI tuning.
Please get in touch if I can be of service.
"You were the gun, your voice was the trigger, your bravery was the barrel, your eyes were the bullets." ~ Her
-
12-07-2019 #11
Registered User
- Join Date
- Sep 2019
- Location
- Utah
- Posts
- 142
That inter cooler mounting is sexy. I so love it. Not a huge 2jz fan, as I prefer the rumble of 8cyl, but they make great power, I am sure you will love it. Now it needs a killer wide body!
My cougar project.
-
12-07-2019 #12
Registered User
- Join Date
- Jul 2006
- Location
- Chesapeake, VA
- Posts
- 612
Cool and different...I like it.
Cars are meant to be driven.
John B
-
12-07-2019 #13
Registered User
- Join Date
- Dec 2019
- Location
- Ga
- Posts
- 22
Thanks! I cant wait to load everyone up and ride.
-
12-07-2019 #14
Registered User
- Join Date
- Dec 2019
- Location
- Ga
- Posts
- 22
Grambo. I love the sound of a v8. My other car is a 5.0 Lexus. This engine sounds amazing at 7500rpm with the turbo screaming.
-
12-07-2019 #15
Registered User
- Join Date
- Sep 2019
- Location
- Utah
- Posts
- 142
I dont think there is a human who doesnt like that sound, just some cant admit it. As for your 2jz falcon, just cause its not my cup of tea doesnt mean I dont respect it. Shes gonna be a beast. Build on. Originally Posted by 1jzfalcon
 My cougar project.
-
12-18-2019 #16
Registered User
- Join Date
- Dec 2019
- Location
- Ga
- Posts
- 22
Got my driveshaft in. I am going to have to modify my tunnel slightly. I am thinking about going with the TCI four link.
-
12-18-2019 #17
Registered User
- Join Date
- May 2017
- Posts
- 118
I have the TCI 4 link along with there front suspension. I am impressed with the fit and install but can't provide impressions on how it drives, in the middle of a 3.5 Ecoboost swap with a ways to go.
12-18-2019 #18
Registered User
- Join Date
- Dec 2019
- Location
- Ga
- Posts
- 22
I know the feeling. So much to do it is overwhelming sometimes. Did it give you more tire clearance?
12-19-2019 #19
Registered User
- Join Date
- May 2017
- Posts
- 118
Yes it does on the front and a little more at the rear. I am going back and forth on minitubbing the rear, I would like to get a 275 on the back. With the measurements I have taken 245 is an easy fit on the front and back with out tubbing the rear.
12-20-2019 #20
Registered User
- Join Date
- May 2013
- Location
- SE Michigan
- Posts
- 149
I'm so torn on this. On the one hand I love it. On the other hand I also love it.
I was this close >< to doing a 1JZ or 2JZ in my 62 Falcon. Having previously done an RB20DET ranger swap, I have a great fondness for Japanese turbo inline sixes. Ultimately I went with a 5.0 but half of me still wants a JZ in my car. Anyway, rock on. This is awesome.

 Reply With Quote


