

Results 121 to 140 of 201
-
03-17-2020 #121
 Registered User
- Join Date
- Sep 2019
- Location
- Utah
- Posts
- 142
 good eye. I did put a slight bend down the center of the grill, still trying to decide if I want to make it more pronounced.
 Originally Posted by Tsaints1115

My cougar project.
-
03-17-2020 #122 Registered User
- Join Date
- Feb 2019
- Location
- Kankakee IL
- Posts
- 362
Maybe a pinch? That subtle shape makes a huge difference.
Tracey
03-18-2020 #123 Registered User
- Join Date
- May 2019
- Location
- Melbourne Australia, dual citizen tho with USA.
- Posts
- 20
Yep......an extra pinch is my vote.
While ur at it.....make a simple plywood press tool for the hood mesh to joggle them up 3/16" .
Hold the ply underneath the hood slots and Sharpie a cut line an eighth inch inside the slot, cut out the INSIDE piece and bin it......cut another filler piece that goes INSIDE the slot in the first plywood but is a quarter inch smaller again all round.
Place the bigger outer piece on the ground under a lift arm or similar, put the mesh located central on top, then put the smallest insert piece centered on everything and drop the lift a calculated amount. ....about 3/16.
BingoBango.....proper vent inserts.
You're welcome
Jim
03-19-2020 #124
Registered User
- Join Date
- Sep 2019
- Location
- Utah
- Posts
- 142
Originally Posted by Falcon64
I was panning to just mount them underneath, but that sounds like a good idea, and might look better slightly raised(or flushed to the sheet metal body work) I will look at that when I have the front valence figured out. Thanks.
i also must say I will defiantly crown the grill a bit more, it is calling to me.My cougar project.
03-19-2020 #125
Registered User
- Join Date
- Sep 2019
- Location
- Utah
- Posts
- 142
I have made three front valence templates now and have not loved any of them. The first one (see last times pics) looked the best so far, but even it was not quite right. So I Decided another approach was needed, I jumped past it and made a splitter for the car, thinking with it In place it would be easier to make the valence fit to it. I started with a 1/2 inch plywood (Birch) and used a plumb bob to make a template on paper taped to the floor then transferred it to wood and through trial and error (mostly error) got it to fit around everything in the front end. It took 6 hours and I once more have a grumpy wife, so I think I am gonna spend the day with her today. Gotta keep momma happy... anyway here are some pics.
I wanted to tie in the fender flairs and also kinda visually match up the air ducts in the rear fenders, so I made it a bit wide. I plan to wrap it in carbon fiber at some point, but the shape is working out well. Now I just gotta level it out and the I can work on a new valence design. I have a oil cooler on the drivers side that will need a vent hole and I plan to run the brake duct intake on the passenger side, hopefully I can make the holes match. And I do like the first valences center opening, but it needs a flange for depth/streignth. So, yeah still flying by the seat of my pants, but maybe something cool will happen.My cougar project.
03-21-2020 #126
Registered User
- Join Date
- Sep 2019
- Location
- Utah
- Posts
- 142
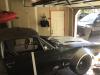
Ok front valence prototype #6 might be the one. Its crazy how long this is taking me, but I gotta be happy with it. Anywhere here is the template in place. Thoughts?
My cougar project.
03-21-2020 #127
 -Moderator/Sponsor-
- Join Date
- Apr 2001
- Location
- The City of Fountains
- Posts
- 15,975
This thing is going to be nuts!
1970 GTO Version 3.0
1967 Cougar build
GM High-Tech Performance feature
My YouTube Channel Please Subscribe!
Instagram @projectgattago
Dr. EFI
I deliver what EFI promises.
Remote Holley EFI tuning.
Please get in touch if I can be of service.
"You were the gun, your voice was the trigger, your bravery was the barrel, your eyes were the bullets." ~ Her
03-21-2020 #128 Registered User
- Join Date
- May 2012
- Location
- Kansas City, Missouri
- Posts
- 666
I like it. Really looks nice the way u rounded it into the flares
03-21-2020 #129 Registered User
- Join Date
- Jan 2020
- Location
- UT
- Posts
- 43
Digging the mesh screen! It has to be nice to start seeing your car's face.
And it's amazing how much the fiddly aesthetic stuff can drive you crazy. I don't know if this is helpful, but I threw together a quick photochop of the front valence with some lines borrowed from the main grill.
Keep up the great work!
03-22-2020 #130
Registered User
- Join Date
- Sep 2019
- Location
- Utah
- Posts
- 142
That does look good, but I really want to use the cf brake duct (it is sitting I front of the car I that pic) on the passenger side, and it would not look right if it didn’t match side to side ( also there is an oil cooler on the drivers side that needs air.) so the outside two need to stay rectangular, but I do like the middle with the slanted edges. Ok I think I feel Aa version #7 coming on. I will toy with it for sure. thanks for the ideas!
My cougar project.
03-22-2020 #131
Registered User
- Join Date
- Jan 2020
- Location
- UT
- Posts
- 43
Right on. For sure it for sure would be awkward to block off part of a duct for aesthetics.
Looking forward to see what you come up with in v7!
03-24-2020 #132
Registered User
- Join Date
- Sep 2019
- Location
- Utah
- Posts
- 142
Ok attempt #7 was the best yet (thanks again for the ideas fierbird67), so after finishing up the template I transferred it to 20ga, and got to cutting. I then made grill stand offs (so I would have somewhere to attach the ducting on the side two grill openings, and I made the middle one match for coolness.) it took 8 hours but it is coming along very well, I still have a bit more fitting up to do and some clean up (grinder work) but the main valence work is there and it is coming together very well. Here are some pics.
if you look close in that last pic you will see some things sitting on the splitter, I did not like how the area between the grill openings looked, it was too boring. So I thought back to when I took apart a cougar for all the sheet metal I needed a year ago, I I kinda remember there being some supports holding the factory valence to the bumper bracket, so to pay homage to the factory car, I made those arm things. Here is the plan:
ok, ok, that was all a load of bs, I just thought it would look cool, so I did it... here are some duct shots.
and finally the fender tie in bits.
still love every Minuit I get to spend building on the old cat, but I need to go mop the floor in the interest of marital harmony.
My cougar project.
03-25-2020 #133
Registered User
- Join Date
- Jan 2020
- Location
- UT
- Posts
- 43
Looking good! Nice touch with the bumper guards, that should be interesting to see finished.
03-27-2020 #134
Registered User
- Join Date
- Sep 2019
- Location
- Utah
- Posts
- 142
And now for your viewing pleasure I give you... the loosely assembled front end...
My cougar project.
03-27-2020 #135 Registered User
- Join Date
- Oct 2018
- Location
- Phoenix, AZ
- Posts
- 584
Nice! I like how that turned out so far. Once it's all done in a uniform color it will look like you bought a kit.
Wanna come do mine next? haha'95 F-150 track ready street beastWant more projects/photos? Check my Instagram
03-28-2020 #136
Registered User
- Join Date
- Jan 2020
- Location
- UT
- Posts
- 43
That turned out great! Keep it up!
03-29-2020 #137
Registered User
- Join Date
- Sep 2019
- Location
- Utah
- Posts
- 142
Thanks guys.
My cougar project.
04-03-2020 #138
Registered User
- Join Date
- Sep 2019
- Location
- Utah
- Posts
- 142
Snuck in a few hrs yesterday, I tend to bounce around if you havent noticed, the way I see it building a car needs to be enjoyable, and as I have plenty left to do I just pick whatever sounds fun to work on. I should have finished the front end, but this sounded more fun. So this time I worked on sealing up the passenger compartment, especially the behind the seats where the body meets the chassis and floor. I need to prime them so clecos are holding everything until I buy more primer, but I like how they turned out. Also I got a new window regulator for the drivers door, as the one it has is toast. I am not sure haw I am going to install it, all the how to videos start with the window in the exact place it must be for disassembly, mine is seized up in the wrong spot, so that will be interesting when I decide it sounds like fun that is...
My cougar project.
04-13-2020 #139
Registered User
- Join Date
- Sep 2019
- Location
- Utah
- Posts
- 142
Still plugging away, and doing research when not working. It turns out (despite what I had been told several times) that I can convert the factory mustang pump to a return system so before I disposed of the old tank I cut the mounting ring and flange out. I had to bend the two rods as the mustang holds the pump at an angle. Today I played with the fuel cell, I started by relocating the fuel filler and fuel vent to make room for the pump to go into the center then cut holes (with a soldering iron so it would not fill the tank with debris) and made everything fit. An added bonus of using the factory pump is that it has a built in sender and float all of which are the perfect depth so I ordered a fuel gauge. I also spent a day re-working the passenger side ball joint angle as it was binding at ride height, so I cut and welded it some. And in other car news I took my center console and dashboard metal to a local shop and had them bend everything up on their fancy press break, some assembly still required, but it is so nice to see it in steel.
My cougar project.
04-14-2020 #140
Registered User
- Join Date
- Jan 2014
- Posts
- 5
Excellent vision. Can't say how many RacingJunk-derived projects I've started in my head... thanks for actually doing one and sharing the process.

 Reply With Quote


