

Results 1 to 5 of 5
-
07-29-2019 #1

 Registered User
- Join Date
- Oct 2015
- Location
- Western Mass
- Posts
- 227

Smoothing & Painting Steel Bumper Questions
I've acquired an unchromed front bumper for my '69 Camaro. Its never been mounted, it was just hanging around someone's garage collecting dust and some minor surface rust which is easily cleaned up. Looking at painting it to match (leMans Blue) when I paint the RS grill I'm installing. Had a couple of ideas about how to deal with the four (4) visible mounting holes, wanted to see if anyone's done this or might suggest different approach.

One approach is to simply weld in the mushroom bolt from the inside and then grind off the head, weld up the outside and then grind smooth. Some people have said this could distort the number if you tightened the bolt too much because its pulling dead center.
Another approach is to use a nice thick washer, curve it a little and weld it to the bolt and the bumper then grind the mushroom off and weld up the outside. Theoretically, the washer will distribute the force better.

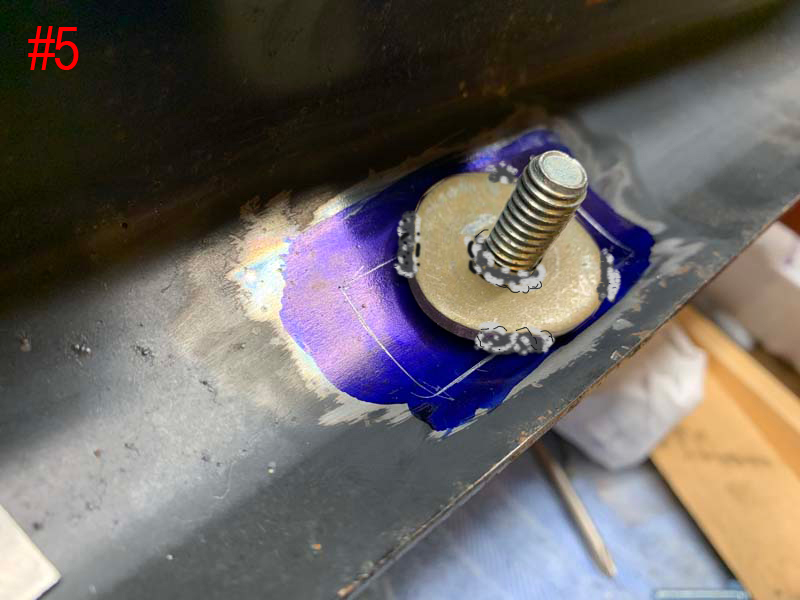
I'm thinking this is a good approach... weld up the holes using a copper backer tool, grind it nice, then weld on a weld nut which has a tiny amount of slop to fit a bolt from the back side. There's never any stress on the welded hole, the weld nut can be tacked anywhere on its perimeter and its got that slop. Locate the weld nut possibly with scribe lines.
So I'm curious as to whether anyones done something similar, specifically in a bumper that's going to be painted, not chromed. Oh yeah... one last question... I'll probably test it, but I used some blue machinists dye and scribed the weld nut. Wonder what will happen to the dye when it gets heated up?'69 LeMans Blue Coupe, White Interior, Massaged .030" over 454, Super T10 4-Speed,
Holley 4150, Pertronix Ignition, CompCams Xtreme Energy XS274S, 781 Oval Port Heads
-
07-29-2019 #2 Registered User
- Join Date
- Mar 2014
- Location
- Yuma, AZ
- Posts
- 635
When we did this on our Chevelle, I tried the first technique that you listed. It worked, but like you said if you went crazy tightening the bolt it pulled in a little and left a depression. Since it was just for test fitting at the time, I did not care. Later, I went back and added the big washers to the back side and welded everything. No issues after that, but I also did not go crazy with the impact to tighten the bolts either.
Make sure whatever you do that you can get the bumper brackets off and on once you're done. I just cut slots in mine so we could twist them out, not a big deal. May not be an issue on a Camaro with a much smaller bumper.Nelson
1969 Chevelle "Cone Smasher" Family Project
https://www.pro-touring.com/threads/...uot?highlight=
1984 "Rustang" GT, 5.0, 5 Speed Project
https://www.pro-touring.com/threads/...T-(Slow-Build)
07-29-2019 #3
Registered User
- Join Date
- Apr 2012
- Location
- Woodstock, IL
- Posts
- 2,410
We usually do the #2 approach and haven't had any problems with distortion.
But you have a couple of other great alternatives there too
-DaleSchwartzPerformance
The leader in bolt-in muscle car chassis
SchwartzPerformance.com | GMachineChassis.com | Facebook | Twitter | Instagram
Dealer for: Forgeline, RideTech, Tremec, American Powertrain, Silver Sport Transmissions, GM Performance Parts, RECARO, Cerullo Seats, TMI Products, Vintage Air, Baer Brakes, Wilwood, BeCool, AFCO, Tanks Inc, Holley / Hooker, Ultimate Headers, Rick's Tanks, Moser Engineering, Currie, TechAFX, Stainless Works, II Much Fabrication, and many more
07-29-2019 #4 Registered User
- Join Date
- Aug 2015
- Location
- charlotte
- Posts
- 924
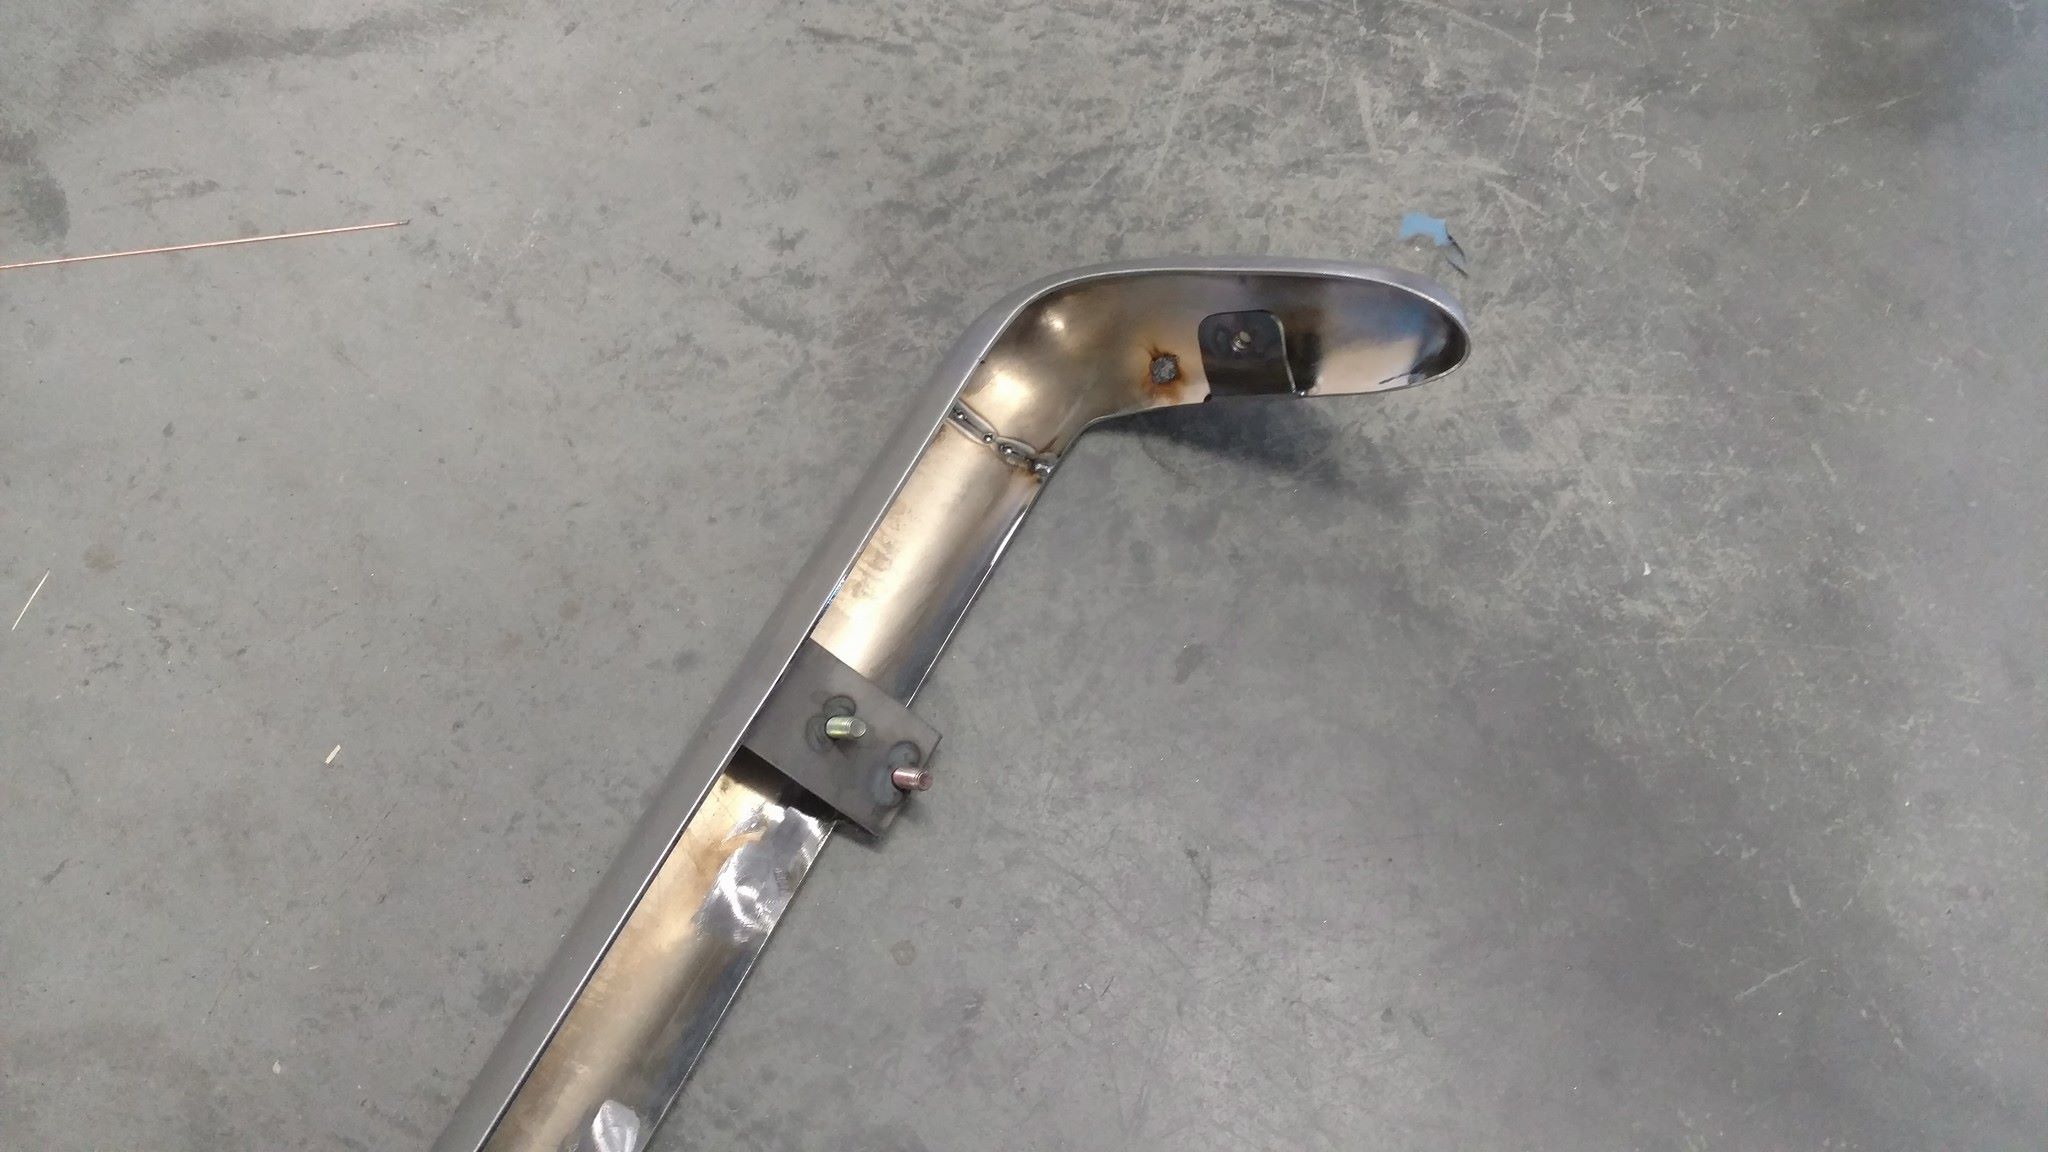
This is how we did my rear bumper, removes the possibility of the distortion altogether.
07-31-2019 #5
Registered User
- Join Date
- Oct 2015
- Location
- Western Mass
- Posts
- 227
I've read where a few other folks did similar stuff in the front, weld in a 1/4" 1 X 1 pad with the bolt welded in. Also see you narrowed the rear to tuck it, and used a threaded pad on the corners. I'll keep your ideas in mind if/when I do the rear. Fronts... I will probably mock it up and try either the washer or weld nut approach. Main concern is on/off ease and alignment. Originally Posted by slimjim

Most important is what WallaceMFG said, test fit to make sure you can get it on and off without too much of a hassle. Just curious about what bolts you guys used. Did you go to grade 8 or stainless steel just to keep things from rusting?'69 LeMans Blue Coupe, White Interior, Massaged .030" over 454, Super T10 4-Speed,
Holley 4150, Pertronix Ignition, CompCams Xtreme Energy XS274S, 781 Oval Port Heads

 Reply With Quote


