

Results 241 to 260 of 273
Thread: 1967 Dodge D-100 (Isaacs truck)
-
02-04-2022 #241
 Registered User
- Join Date
- Feb 2019
- Posts
- 218
Got busy making brake lines and fuel lines today. Got all the lines on the frame done. I still need to remake the ones that go from the master cylinder to the proportioning valve, but the cab will have to be back on for those. I also got the rearend back in, but I didnt get pictures. Goal for tomorrow is to get the front suspension in, and set the engine.
I had a really bad day yesterday. I was out looking at the frame and seeing what needs to be done, and I realized I am so disappointed in how this is turning out. I know I cant make a show truck, I just dont have the skills or the money, and I have seen some really sketchy stuff on YouTube and this truck isnt near that bad. But using those as the scale, where the better builds are a 10, and the sketchy stuff is a 1, I would rate this truck a 4. I feel like I can do better, like maybe a 7 or 8, but it seems everything is just fighting me. The chassis paint looks like crap. I mixed it and did it outside, and it looks like garbage. The control arms look horrible. Its frustrating. So I decided to just put it together and drive it. I have a lot of skills I need to work on, and tools to buy, and things to get sorted. I told my wife after we get this truck on the road, we will fix the Ford (it wont be anywhere near this involved, just an engine /trans swap, lowered suspension and wider tires in the back), then we will work on the body work for this truck. After that is sorted, I am building a frame, with a different suspension, using everything I have learned by screwing up on this truck. It might be 10 years from now, but I can feel better knowing I am trying to make it as good as I can. Its like I am letting Isaac down with this truck right now.
Anyway, pictures...More tomorrow I hope.Picture folder for Isaacs truck
https://drive.google.com/drive/folde...aN?usp=sharing
Isaacs truck build thread:
https://www.pro-touring.com/threads/...(Isaacs-truck)
-
02-05-2022 #242 Registered User
- Join Date
- Jan 2011
- Location
- Jefferson City, MO
- Posts
- 240
Don't be so hard on yourself. How many people do you know who can rebuild and modify their own cars? Just make it safe and relatively comfortable, for now. As you said, you can learn more as you get through this and the Ford.
02-05-2022 #243
Registered User
- Join Date
- Sep 2013
- Location
- sw Kansas
- Posts
- 1,645

Growth in your skills as well as your expectations. When you're young and have not seen really good work, you do something and you're happy with it. Age and exp. changes that. The exposure of the internet has humbled all of us at some time. We all start somewhere to get better. I used to build dragsters and tube cars. I called Davey Urehara one time and asked some questions. He was a chassis builder with a reputation for excellence. We were talking about a nose cone he made. I asked how many attempts it took to get it right. He laughed and said they make "prototypes" and there are lots behind the building in the scrap pile. I try hard not to have redo's but as I age and try to improve my craft, it happens often. So you have reached the stage of "that's not good enough". Maybe I should say "congratulations on your growth".

02-05-2022 #244
Registered User
- Join Date
- Nov 2019
- Location
- SoCal
- Posts
- 31
Ill add my thoughts. Im also building a 67 Dodge pickup. Im the person who sold you my driveshaft. Anyway, I thought about putting a thread on here but every time I see the builds on here I say nah, Id be embarrassed. But you know, mines not half bad either. Maybe some day.
Youre doing pretty good. That fact that you redid your front end instead of just giving up and selling, gives you a lot of cred in my book. Time is a big factor also. How long do some of these guys spend just on their frames? Money is another big one. I appreciate the high dollar builds, but what really appeals to me is the garage built projects like youre doing. Oh and trust me, they all fight you. Every step of the way. Ill stop rambling now. Hang in there. Youll get there. One day someone will ask you about the truck and youll say I did it. Theyll look at you and say No sh_t Thatll be worth it.
Your lines look good.
-Ed
02-05-2022 #245
Registered User
- Join Date
- Feb 2019
- Posts
- 218
Thank you all for the encouragement. I guess YouTube is the problem. I watch a lot of videos about these things, and they are just so much better. I know I cant do it like Tre5 or the Chassis shop, or any number of channels on there, but I think I can do better. Ill keep learning and practicing, and like I said, the plan is to get it on the road, drive it, fix the Ford, then work on the body of the Dodge. Once its right, Ill look into making a frame. It might take me 10 years, but thats the goal.
I got a ton done today. After such a bad day thursday, its good to get stuff done. I got the suspension in, the driveshaft, rearend, exhaust, trans and brakes. Everything is tightened down, and ready. I will have to align the front end. The wheels are still cambered and toed in, but Ill get that later. I still have the main brake lines to do, and the park brake to install. I went with the Lokar brake handle and cable after all, so it should work well. No surprises and nothing seems out of place, so its seems to be going okay. There are one or two things Ill have to change, like the upper a-arm bolt is not long enough to engage the thread lock on the nut because the rod ends are wider than the originals. Not a huge deal, Ill either get a slightly skinnier nut with the lock, or a slightly longer bolt. I also have to change the exhaust tip mounts. I had them in place, but didnt like them, so I cut them off. Ill make a new set, and bolt the tips to them.
The wheels are from my car. To make a long story short, they are polished as I never planned on driving my car in adverse weather. Well, life happens, and its my daily now, so the wheels are very corroded. Ill have to have them polished and repaired. The good news is, they fit the mustang 2 brake spindle without a spacer. We will see how they work on the truck when its together. I might have to add spacers anyway. And itll need longer wheel studs all the way around.Picture folder for Isaacs truck
https://drive.google.com/drive/folde...aN?usp=sharing
Isaacs truck build thread:
https://www.pro-touring.com/threads/...(Isaacs-truck)
02-19-2022 #246
Registered User
- Join Date
- Feb 2019
- Posts
- 218
I worked a little yesterday and today, and made decent progress. I finished the exhaust finally, and the brakes. I also got the parking brake cable secured to the frame. I mounted the cab also, but its only loosely bolted on for now. Im going to get some washers and some different bolts to mount it, so I can level it better.
Now for the hard parts. I have to finish installing the wiring (Im adding some features that I didnt add before, and they have to be installed and wired) and then the fun of bolting the fenders, core support, front bumper, hood and doors to the cab begins. Ill have to remove the dash again also, but I think we are going to paint it when I do. I still have to deal with a ton of details also.
Im going to try and work a deal with a friend of a friend on some body work. I do wiring, and he doesnt. He does body work and I cant. Im hoping we can swing a deal at least for some reduced cost on the body work and prep.
Oh and I did some horse trading for a new tool box. Im going to get another one later, and split the tools up. The old box I was using was about 30 years old and a bit sketchy. Plus I cleaned the garage again.
Picture folder for Isaacs truck
https://drive.google.com/drive/folde...aN?usp=sharing
Isaacs truck build thread:
https://www.pro-touring.com/threads/...(Isaacs-truck)
02-21-2022 #247
Registered User
- Join Date
- Sep 2013
- Location
- sw Kansas
- Posts
- 1,645
Good progress. A big pile is better than little piles all over the place.
02-26-2022 #248
Registered User
- Join Date
- Feb 2019
- Posts
- 218
No pictures this week. I got some stuff done, but had a lot of other things to do, so I didnt get much on the truck finished. Im thinking about taking Friday off this week to make a good long weekend. The weather should be good here.
I got the parking brake mostly installed. It still needs some bolts here and there, but Ill have to swing by the hardware store. I went with the black billet handle from Lokar after all, even though I said I wouldnt. My thinking was this; I didnt have the right cable to go from the handle to the rear cables. I searched the interwebs and didnt find one. I could have had one made I guess, but that would be a hassle. This way if the cable breaks, I can get another one. Plus I want to add rear discs one day, and this should work with them. Plus the old handle mounts were all rusted out. I didnt want to fix them and have other issues to work around. It was expensive at almost $500, but it should work well.
I also got the dash out. Im working a few side deals to get some stuff done. I hope to get the dash painted real soon. I can finish the wiring while its out.Picture folder for Isaacs truck
https://drive.google.com/drive/folde...aN?usp=sharing
Isaacs truck build thread:
https://www.pro-touring.com/threads/...(Isaacs-truck)
02-27-2022 #249
Registered User
- Join Date
- Jan 2017
- Location
- Los Angeles
- Posts
- 38
Truck is looking sweet! Great job on all the hardline
03-05-2022 #250
Registered User
- Join Date
- Feb 2019
- Posts
- 218
I took Friday off hoping to get somewhere this weekend. I got a little done, but had a lot of other crap going on.
I started on the wiring. I have been putting this off for a few reasons. When I installed the panel and harness I didnt know there would be so many changes. I have swapped the frame, moved the battery and gas tank, and added a bunch of other stuff. The wiring looks like amateur hour to me. I was going to gut it and start over. I contacted Ron Francis and they will sell me the wiring for under $300. But I decided to wait. Im not sure what engine Ill be getting. Im also not sure we dont have other changes to make. I might add a radio, or an A/C system, of even fuel injection. So....Im leaving it for now. It is working just fine, and I can make the necessary changes between now and the time the body work gets done or the engine decision has been made. Everything should be settled by then, and I can get the new wiring and run it like I know I can.
Things that I finished wiring this weekend; interior lights, neutral safety switch, line lock, heater blower, aux outlets. I also cleaned it up a bit, but it still looks like crap. I also wired the radiator fan in, but it isnt working. Ill have to look into it. I didnt get the electric fan wiring from Ron Francis because I didnt know I was going to need it, and the the fan came with a relay and harness, so I figured why waste the money. I had to do a little detective work on the panel which has a fan relay built in, but I got it figured out, sort of. Ill get it working.
One thing Ill have to look into is the windshield wipers. Ive read a few posts about them but I havent really looked into it yet. I have 4 wires coming out of the motor, but the wiring diagram I have only shows 2.
Top left; Wiring vomit. Ill clean it up a little more.
Top right; Radiator support and radiator. I still need to mount the horns and overflow somewhere.
Bottom; A little better, but not by much. Im hoping to redo it all later.
I also never got the blinkers working before so Ill need to investigate that as well. I did get the radiator support on, to check wire length on the fan. Im getting closer to putting it back together, and starting it.
Picture folder for Isaacs truck
https://drive.google.com/drive/folde...aN?usp=sharing
Isaacs truck build thread:
https://www.pro-touring.com/threads/...(Isaacs-truck)
03-12-2022 #251
Registered User
- Join Date
- Feb 2019
- Posts
- 218
I didnt do much electrical this week. I had started looking into the cooling fan, and hit a couple of roadblocks. I think Im not getting a good enough ground when the coolant switch closes, which causes the relay to chatter. The battery voltage is good, and the wiring is also good. Ill look more into it this week. I might buy a 2-wire switch from GM and wire it in. That would give me a better looking connection anyway.
I managed to get the fenders on. For those who dont know; its way easier to install the fenders without tires, and with the radiator support loosened. I have tried it every way imaginable, maybe even a few ways you couldnt imagine. Removing the wheels makes it a ton easier.
I love the way the wheels are tucked in on the front. This is without the 1-1/2" spacers I have. These wheels are from my charger, and you can see the corrosion in the pictures, which is why I took them off. They were leaking pretty bad. Anyway, the wheel offset is 24 mm, or close to an inch. The wheels are 20 x 8 front, and 20 x 10 rear. Front tires are 255/20s and the rears are 275/20s. This is the problem with modern wheels; the offset. I could get a wheel with a negative 24mm offset, and move the wheel out almost 2 inches, but those are expensive. I could run a spacer, but I dont want to do that either. I think Im going to drive it like this and see how it works. Its also very low, I know. It has about 2 inches from the top of the tire to the inner fender, and with coilovers, it will settle after driving. This is also the lowest setting, so I can raise the truck about 1-1/2" I think in the front if needed. The good news is, these wheels fit over the spindle of the Mustang 2 hub, whereas the factory wheels did not. Also the tires are toed in and cambered quite a bit because I havent adjusted the suspension yet. It will get slightly better after I adjust everything and drive it.
So some visual progress this week. I have a bunch of things to mount, and wire still. I was hoping for good weather from here on out, but we woke up to about 3 inches of snow, so I guess I still have a few weeks of cold weather left.
Top left; I like it when the fender line cuts through the wheel like this. It may have to be raised though.
Top right; 3rd brake light. This little sucker is bright. I worry about the factory lights not being bright enough, even though I switched to LEDs.
Middle left; Inside 3rd brake light mount. Ill add rivnuts and replace those super long bolts with something shorter.
Middle right; Sitting nice and low. I love it, but it might be too much. We will see. I have some adjustments I can make.
Bottom left; The wheels are tucked in about 3 or 4 inches. Ill drive it and see how I like it. It might have to come out.
Bottom right; Inside the engine compartment. The wheels are tucked well up into the fender. I still have some things to bolt in.
Picture folder for Isaacs truck
https://drive.google.com/drive/folde...aN?usp=sharing
Isaacs truck build thread:
https://www.pro-touring.com/threads/...(Isaacs-truck)
03-12-2022 #252
Registered User
- Join Date
- Sep 2013
- Location
- sw Kansas
- Posts
- 1,645
If you can't get a jack under it when you have a flat tire, you are too low. I'm concerned about my 51 in that manner.
03-13-2022 #253
Registered User
- Join Date
- Feb 2019
- Posts
- 218
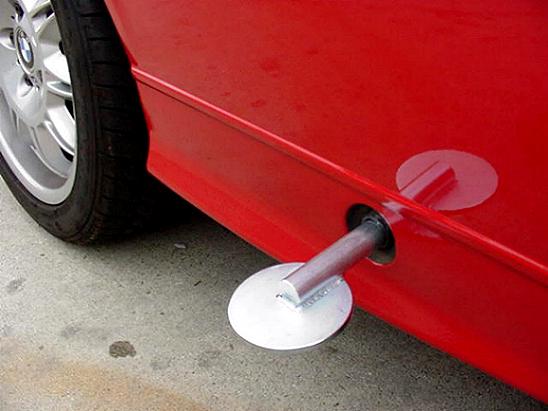
I can get a jack under it, but I bet it wont go up a set of ramps. And I cant get under it while its on the ground, I have to jack it up to do anything. I added a 3/16 steel plate to the front cross member as a jack point, because the next cross member was really hard to get to. The rearend is also kinda far away from the rear of the truck, so I added the rear cross member with the hitch/jackpoint. Originally Posted by wfo guy

It would be cool to install a set of pneumatic jacks like the race cars have, but I wont always have access to air, and it seemed a bit much for this truck.Picture folder for Isaacs truck
https://drive.google.com/drive/folde...aN?usp=sharing
Isaacs truck build thread:
https://www.pro-touring.com/threads/...(Isaacs-truck)
03-13-2022 #254
 Registered User
- Join Date
- Nov 2018
- Posts
- 646
You could always have access to air. A small electric or engine driven air pump and a small tank would be enough. Run hard line to each jack, put an air valve on, and run a small line to the side for an air hose connection and you'd be able to check and fill each tire with a 2ft hose kept behind the seat. Probably be about 20lbs added weight, no more than 30lbs.
An alternative to the pneumatic jack, Mercedes used to use a jack hole through the rocker panel as a jack point. Don't know if they still do. A 1-inch nut welded to the frame on all 4 corners, with a bolt long enough to stick out and high enough to slide a jack under would do the job. When not in use, they're covered with a plug since you'd likely have to drill a hole through the body if the truck sits too low to get a jack under. I don't think Mercedes uses a bolt, they just use a metal bar, but I'd rather use a bolt to control sliding when the jack point is in use.
03-13-2022 #255
Registered User
- Join Date
- Feb 2019
- Posts
- 218
I plan to make an on board air system in the F100 when I build it, but itll be for shop air, not pneumatic jacks. That truck wont be as low either. I have an old york air compressor thatll work great as an air compressor. The "theme" of that truck will be a shop truck, so its going to have air, and some inverters for charging tools and stuff. I also plan on having a folding pneumatic hoist in the back that mounts to the hitch and allows me to lift heavy stuff into the bed.
On Isaacs truck, I added the jack points front and back so I should be good. I hope to set it on the ground in a week or two to see how low it actually is.Picture folder for Isaacs truck
https://drive.google.com/drive/folde...aN?usp=sharing
Isaacs truck build thread:
https://www.pro-touring.com/threads/...(Isaacs-truck)
03-19-2022 #256
Registered User
- Join Date
- Feb 2019
- Posts
- 218
No pictures, because nothing really interesting has happened. I got the 3rd brake light mounted, but not wired. I got the driveshaft loop finished, but it needs paint. I filled the factory gas filler hole with a metal plug, but it needs some filler, and primer.
Most of my weekend was spent at work, where the paint shop supervisor is helping me get the dash ready for paint. I look forward to seeing this thing in the color we have picked for the truck, which is Viper GTS blue. The body work will take me a few years to get done Im afraid, but the dash will give us some motivation. And I figured it would be best to just go ahead and paint it before the installation. That will give me the next week or two to get the wiring done before the dash is ready to go in.
I feel like I am close to starting it again. It needs; brakes bled, oil lines made and installed, wiring on lights and the coolant fan (Ill go ahead and do the windshield wipers too) and I have to figure out something with the gas filler neck. Otherwise, its just a few days of installing things to make it drive-able. I hope to make that happen by summer.Picture folder for Isaacs truck
https://drive.google.com/drive/folde...aN?usp=sharing
Isaacs truck build thread:
https://www.pro-touring.com/threads/...(Isaacs-truck)
04-02-2022 #257
Registered User
- Join Date
- Feb 2019
- Posts
- 218
I didnt get to do a lot last week, so I didnt post anything. I spent all day doing maintenance on my mower, and weedeater. Then we did the yard, so not a lot of progress on the truck.
This week I have tried to get some stuff done. I wired the 3rd brake light, and the fuel sender. And I made the park brake bracket, and finished bolting it in. Then I dropped the bed and hood in place, and set it on the ground to get an idea of how it will sit. The pictures are actual ride height on its springs,almost full weight so this is where itll be. It is at the lowest setting, so I can raise it if needed. Ill probably have to to be honest. I like it this low, and it is still higher than my car, but the shocks and springs will settle a little, so it might get lower. Plus the front tires are very close to rubbing on the inner fender well, on the top and inside.
To get the tires on, I swapped the spacers around. I was using 1-1/2" up front, and 2" in the rear to make the factory 20 inch Charger wheels work with the cobbled job that existed on the junk frame, They are 8" wide I think, and have a +24mm offset. These rear wheels are wider, so they are 10" (I cant remember the offset, its been too long), and the fronts are the factory size. To make everything work, I figured I could use the 1-1/2" spacers in the rear, and the 2" up front, which will make the wheel base the same front and back, at 70 inches. I dont like the spacers at all, and I have been looking for a way to eliminate them, but everything is expensive. They make custom offset wheels, that I can get in any width, any backspace (offset) and any lug spacing. They are beautiful also, but they are $1500...each. I dont know if Im prepared or even capable of paying $6k for wheels. So the spacers might have to stay.
Top left and right- Thats about where she will sit. Ill add the spacers up front and do an alignment, but thats it. Its right where I wanted it, with the fender well line running through the wheels. I think it looks good.
Bottom left- Park brake handle. I went with the Lokar in black. It works well, and looks good. Ill have to adjust everything a little more.
Bottom right-Park brake bracket. Please ignore the weld on the inside of the bracket. I put another on the outside and it looks better. Also, notice one of the cables are longer than the other. Ill have to get back into the brakes and check them out.
Picture folder for Isaacs truck
https://drive.google.com/drive/folde...aN?usp=sharing
Isaacs truck build thread:
https://www.pro-touring.com/threads/...(Isaacs-truck)
04-02-2022 #258
Registered User
- Join Date
- Jan 2011
- Location
- Jefferson City, MO
- Posts
- 240
If you can get in your driveway without any drama, I'd say the ride height is perfect!
04-09-2022 #259
Registered User
- Join Date
- Feb 2019
- Posts
- 218
I have been avoiding this part for awhile. I decided to do the suspension adjustments. Im glad they are done, but man what a pain. I fixed the caster and tow in issues, and added the spacers in the front. I also raised the front suspension about an inch I think. Its still plenty low, but maybe ill be able to turn it now.
I think the spacers are just too much in the front. The wheelbase matches at 74-1/2" front and back with the wheels on, but the front wheels look like they might rub the outer fender now. Im not going to change anything right now though. Im going to finish it, and drive it and see. A conversation with a friend the other day has me a little worried. Basically, the distance from the center of the lower ball joint to the center of the tire is about 6-1/2". This will cause the tire to "swipe" in a large arc, whereas its better if it pivots as close to the center line of the tire as possible. I know the modern cars set as much suspension inside the tire as possible, and it wasnt an issue in the early days. Plus this is still a Mustang 2 suspension with a spindle instead of a hub, so its essentially from the 70s. But a hitting a pothole or a bump with just one tire might make it act funny, Im just not sure. Ill drive it and see. I expect a heavy steering wheel when going slow, because I have a manual rack. The plan was to upgrade to power steering later anyway.
Either way, here are the pictures.
I wont be able to work on it much over the next two weeks. I have a very complicated delivery to make at work, and its going to take a bunch of time to get it all right and worked out.Picture folder for Isaacs truck
https://drive.google.com/drive/folde...aN?usp=sharing
Isaacs truck build thread:
https://www.pro-touring.com/threads/...(Isaacs-truck)
04-09-2022 #260
Registered User
- Join Date
- Nov 2018
- Posts
- 646
Here's some reading for you in your spare time over the next 2 weeks - might help you figure out what to do when you get back on the truck. Ranger Mike, the guy doing the writing, goes WAY in depth on suspension geometry and if this-then that kind of examples. I have the link saved for when I'm fine-tuning my own project.
https://www.physicsforums.com/thread...-class.326355/

 Reply With Quote


