

Results 421 to 440 of 527
-
05-11-2020 #421

 Registered User
- Join Date
- Oct 2018
- Location
- Phoenix, AZ
- Posts
- 584
 The VSR is 1 of 2 versions II Much offers their vent in. This is for remote mounting the actual breather which is why you see the second line running straight down from mine. The canister itself functions exactly the same and is nearly physically identical to the other version. You can see it on their website.
 Originally Posted by JayinMI

I definitely plan to share some sound clips. I seem to have my mic dialed in decent for my camera so it should be easy to hear. My biggest fight with mufflers is trying to find one that offers an aggressive idle while not blowing out your ear drums when you mat the fun pedal. I get that is largely unrealistic, but a guy can dream. My little mufflers that I've been running have an angry idle, but they are simply too loud when you go over 2500 rpm. Not ear-splitting (to me), but just way too much for around town or any track. Lance believes I'll still have some tracks that these Borlas are too loud for (I agree), but I have an idea for that as well. I think I'll be buying a Decimeter soon to do some sound tests with real data which should help you guys and myself pick something appropriate.'95 F-150 track ready street beastWant more projects/photos? Check my Instagram
-
05-11-2020 #422
Registered User
- Join Date
- Aug 2014
- Posts
- 435
I think my biggest pet peeve would be drone on the highway. My commute to work is about 62 miles one way (40+ on the freeway) and even tho I don't plan on my truck being my daily, it will certainly make a few trips. I don't know if you're familiar with the Woodward Dream Cruise in Michigan, but I work right on it's path, so I would eventually like to run it down there for that.
Jay
05-13-2020 #423
Registered User
- Join Date
- Oct 2018
- Location
- Phoenix, AZ
- Posts
- 584
I will get back to you about the level of drone once I take a real cruise. I will always have some drone with my exhaust routing because it dumps under the bed. It always helps to get that sound out and directed away from the vehicle. Borla claims these have less drone, but I take that with a grain of salt.
And yes, thanks to Hoonigan I am familiar with the Woodward Dream Cruise. I'd love to go someday.'95 F-150 track ready street beastWant more projects/photos? Check my Instagram
05-13-2020 #424
Registered User
- Join Date
- May 2013
- Location
- SE Michigan
- Posts
- 149
Here's how you can run any muffler you want, without drone.
http://ironhydroxide.blogspot.com/20...e-warfare.html
05-13-2020 #425
Registered User
- Join Date
- Oct 2018
- Location
- Phoenix, AZ
- Posts
- 584
Fascinating write up! Thank you for sharing that. I love at-home engineering with simple data acquisition, just like he did.
For this truck I don't worry too much about it because I only take it out to play and it really has zero interior so fighting sound is a losing battle. I know for many others that will be helpful and I've seen more and more aftermarket systems include that exact method of killing drone. I'm just out to be noisy anyway because apparently I'll never grow up. '95 F-150 track ready street beastWant more projects/photos? Check my Instagram
05-20-2020 #426
Registered User
- Join Date
- Oct 2018
- Location
- Phoenix, AZ
- Posts
- 584
I think we can agree more than anything else, the slow down of deliveries right now SUCKS! My Gates Powergrip hose clamps finally arrived after UPS delaying delivery 3x and I got them installed last night. I really must thank Jesse at Level 7 Motorsports for this one. He was telling me way back when I first did the cooling system that it had too many connections and to use these clamps. Thanks to my hardheadedness we are now to that point.
From this mess:
To this streamlined layout:
Less connections and a cleaner engine bay always make me happier.
Now the other pressing matter is wrapping up the real fuel cell filler solution. This never got done purely out of laziness and then getting busy with the whole move. I've very happy to finally be about done with this task. After finding fuel fillers to be excessively expensive I settled on modifying one of the 2 original fillers from the truck. The fuel cell came with a 2.5" inlet neck and the Ford fillers were right at 2" in diameter. My simple solution was to cut and weld the bend of the stock filler 180 degrees from where it came and then add a steel 2 to 2.5" exhaust reducer to the end so they would match. Then a short piece of the special fuel filler hose and boom...done.
As always I used Ram Board for the template material. I'll cut it out of plate tonight and weld it to the cage bar so I can lock everything down. Some black paint and it will look mint.
Not the prettiest but very functional. So it definitely matches the rest of the truck. The idea being that this will end up hidden under the eventual bed cover with just the cap sticking up for easy access.
Next up is the new mufflers, the rest of the AC install since it has already been well beyond 100 degrees here a few times, and then some interior parts like a shifter cover and door panels. Time to really bring my vision together.'95 F-150 track ready street beastWant more projects/photos? Check my Instagram
05-20-2020 #427
Registered User
- Join Date
- Aug 2014
- Posts
- 435
What is the valve in the lower heater hose from? Is it electrical or vacuum?
The "after" looks way better!
My Amazon packages keep getting delayed in Detroit for like a week. Sigh.
But I ordered some aluminum stock from Onlinemetals.com and it came in like 2 days.
Rocker panels for my S10, too. Guess using UPS/FedEx is the way to go for me, anyway.
Also, where did you get the power bulkhead fittings. I have some in my Amazon wishlist, but nice to have options.
Jay
05-21-2020 #428
Registered User
- Join Date
- Oct 2018
- Location
- Phoenix, AZ
- Posts
- 584
That valve is the heater control valve supplied by Vintage Air. Admittedly I'm not thrilled with the way this integrates, but it does keep it universal.
It always seems like car/truck related stuff ships slower right now. I routinely have stuff show up in 2 days for the house. Maybe the world is telling me what to actually focus on? Haha
Those feed through bushings are straight off of Amazon. They worked great and came with boots too.'95 F-150 track ready street beastWant more projects/photos? Check my Instagram
05-22-2020 #429
Registered User
- Join Date
- Oct 2018
- Location
- Phoenix, AZ
- Posts
- 584
Somehow I was on a roll last night and knocked out a few outstanding items I mentioned in the last post.
First up was finishing the fuel filler I made. I made up a quick bracket on my new drill press and welded that to the driver's side rear down bar. The neck is removable with the 3 original bolts just like when it was inside the fender. It all still needs to be painted, but it fits well and I suspect it will work perfectly. Best part about it is this whole thing cost about $50 to make which is way less than any other filler I found.
Then onto the mufflers. Now I personally like it fairly loud, but most people don't. In the interest of not attracting too much negative attention and hopefully avoiding most track decibel thresholds I bought these Borla mufflers. They are pretty light for a stainless muffler and kill a lot of sound while leaving that nice bark you expect at WOT.
For now they will just be slipped on like you see. I want to come up with a simple way of swapping mufflers without much hassle depending on my mood or the requirements of where I'm running. The crap on the tube is from another muffler, not these leaking.
The turn downs I made myself out of some 45 degree bends. I bought a new gas lens setup to try and get better results out of TIG welding. It definitely helped more than I expected, but I'm also running way too hot. It's a bad habit of mine when TIG welding. To be fair, for about the last 10 years I rarely pick up a TIG torch so I'm seriously rusty. Some practice will go a long way, as with anything.
So there you go internet, my welds for you to all complain about. Haha
Heater hoses are on for good now and tonight I'll go for the first drive in about 2 weeks so I'm looking forward to that. Now I can dive back into the other finishing items that have been neglected lately.'95 F-150 track ready street beastWant more projects/photos? Check my Instagram
05-22-2020 #430
Registered User
- Join Date
- Aug 2014
- Posts
- 435
Our window tinter just got a new Tundra. He went with Borla mufflers on it, and said they were quieter than stock under normal loads, but still sounded good when you gave it some pedal. Sounds like you found about the same.
When I'm driving down the freeway, I'd like it to be as quiet as possible, but when I get on it, I'd like people to look to see where the sound is coming from. lol
Jay
05-22-2020 #431
Registered User
- Join Date
- Oct 2018
- Location
- Phoenix, AZ
- Posts
- 584
Part of it is this motor, I believe. Some engines just seem to be louder than others for any number of reasons. A decent muffler seems to knock this thing right down. For your purposes I have to recommend the Flowmaster Hushpower. Every engine I have used them with has had the exact sound behavior you just mentioned. But these Borlas appear to be about the same at a slighly lower price. I'm going for a short drive this evening so that will help me have a better idea.
'95 F-150 track ready street beastWant more projects/photos? Check my Instagram
05-22-2020 #432
Registered User
- Join Date
- Aug 2014
- Posts
- 435
I'll look into them. Thanks for the recommendation.
Jay
05-22-2020 #433
Registered User
- Join Date
- Oct 2018
- Location
- Phoenix, AZ
- Posts
- 584
Well a short 12 minute cruise is all I had time for. I can say that these are very mellow when holding steady cruising speeds and have a nice smooth roar at WOT. Definitely not super obnoxious under any condition.
'95 F-150 track ready street beastWant more projects/photos? Check my Instagram
05-28-2020 #434
Registered User
- Join Date
- Oct 2018
- Location
- Phoenix, AZ
- Posts
- 584
Took the truck to run a bunch of unimportant errands last Saturday and it performed fantastic! Cooling system easily handled mixed driving in 95 degree heat and the new mufflers don't really have much drone and really do calm the sound down all around.
95 was a bit warm for me sitting in those race seats with the engine that tight on the firewall so the quest to complete the AC system is on. I've had all the main components installed for a while, but actually plumbing and wiring it all hasn't been a major priority. Turns out that I only needed 3 wires and making the hoses was incredibly easy.
When I ordered the AC components from Vintage Air I saw they sold the hose crimping tool for a reasonable amount of money. So being the DIYer that I am, I had to have it. It's been sitting on a shelf waiting for it's time to shine, but I expected it to be harder than it was.
You can see there that a socket/ratchet with the crimper in a vise produces a nice looking result. And it isn't super difficult either. I figured I'd be all worn out from the strain, but everything is clearly marked and the tools do most of the work.
I used their dryer with a trinary switch for my electric fans. This was also something I was thinking would be tricky, but after studying the wiring this is actually very simple to do. That being said, I am slightly increasing the complexity by routing the wiring through my Smartwire box so that the CAN network will allow the fans to be controlled via solid state along with compressor shutdown above certain RPM or throttle position. Unfortunately I lost my pins so I'm waiting for more to arrive.
The big question is will it leak? I'll pull vacuum on the system once the wiring is done in a couple days and find out with a leakdown test. I feel confident that everything is sealed. I'm very excited to see how well it performs. Especially since as I type this it is 107 outside.'95 F-150 track ready street beastWant more projects/photos? Check my Instagram
05-29-2020 #435 Registered User
- Join Date
- Aug 2012
- Location
- Peoria, AZ
- Posts
- 1,758
I'm happy to hear you have AC line building tools and know how Sean. I've been wanting to replace the 35 year old OEM AC lines on my car for a long time.
Lance
1985 Monte Carlo SS Street Car
05-29-2020 #436
Registered User
- Join Date
- Oct 2018
- Location
- Phoenix, AZ
- Posts
- 584
Well Lance you do know where I live now and it would be nice to see these tools used more than once a decade. Come on down!
'95 F-150 track ready street beastWant more projects/photos? Check my Instagram
05-29-2020 #437
Registered User
- Join Date
- Aug 2012
- Location
- Peoria, AZ
- Posts
- 1,758
I have got to get rid of this OEM line running across the top of the engine. Would like to run the hoses from the compressor and condenser up in front of core support and over to the dryer and evaporator on the passenger side.
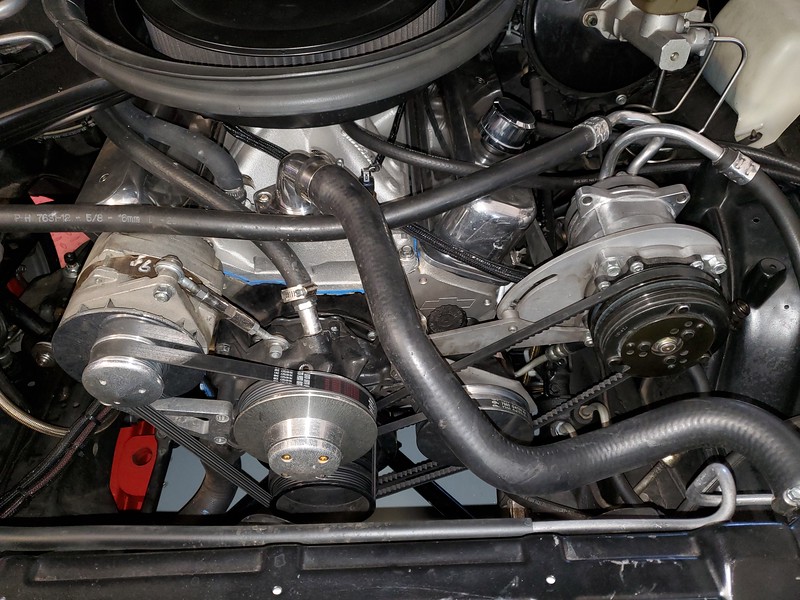
How do I figure out what size hoses and connectors I'll need?Lance
1985 Monte Carlo SS Street Car
05-29-2020 #438
Registered User
- Join Date
- Oct 2018
- Location
- Phoenix, AZ
- Posts
- 584
My system from Vintage Air utilized 3 sizes of fittings/hoses. #6, #8, and #10. I'm not sure what fittings yours uses looking at the pic, but I would imagine we can get adapters if needed to utilize the leftover fittings I already have or a fresh hose kit altogether, which wasn't very expensive. I'll have to swing by and look it over so we can formulate a better plan.
'95 F-150 track ready street beastWant more projects/photos? Check my Instagram
05-31-2020 #439 Registered User
- Join Date
- Oct 2012
- Location
- Kennewick, WA
- Posts
- 259
If you look at the hose across the engine it has a part number 7631-12 and then 5/8, -12 indicated 3/4 and 5/8 is the ID which matches the ID of the tubes on the fittings. I imagine your other hoses have that same info on them. Originally Posted by SSLance
05-31-2020 #440
Registered User
- Join Date
- Aug 2012
- Location
- Peoria, AZ
- Posts
- 1,758
Good idea, I'll check for part numbers on all hoses then try to decipher fitting sizes from there. Thanks...
Lance
1985 Monte Carlo SS Street Car
Tags for this Thread

 Reply With Quote


