
Results 1 to 18 of 18
-
09-21-2018 #1

 Registered User
- Join Date
- Aug 2004
- Location
- Jacksonville, FL
- Posts
- 1,651

67-69 camaro Nu-relics door wire boot picture?
I was wondering if someone with Nu-Relic power windows can either post up or send me a picture of the boot placement (where you drill the hole) on the body side. I have the paperwork from Nu-relic and it only shows the door side. Any help or info would be appreciated.
Chris
1968 Chevy Camaro SS
LS3/T56 DSE suspension

-
09-21-2018 #2
 Registered User
- Join Date
- Nov 2006
- Location
- Mountain Springs, Texas
- Posts
- 4,495
There are dimples in the door and door pillar.
Don1969 Camaro - LSA 6L90E AME sub/IRS
1957 Buick Estate Wagon
1959 El Camino - Ironworks frame
1956 Cameo - full C5 suspension/drivetrain
1959 Apache Fleetside
09-21-2018 #3
Registered User
- Join Date
- Aug 2004
- Location
- Jacksonville, FL
- Posts
- 1,651
I know that Don but the Nu-Relics instructions say not to use them. The boot has 2 90s in it and the instructions say to drill offset of the factory dimples. Looking for what the correct orientation for them is as a reference. The holes are 7/8" so I don't want to mess it up the first time LOL Thanks!
Chris
1968 Chevy Camaro SS
LS3/T56 DSE suspension
09-22-2018 #4
Registered User
- Join Date
- Nov 2006
- Location
- Mountain Springs, Texas
- Posts
- 4,495
Interesting. Maybe they have changed their instructions. Pretty sure I used the factory dimples when I did mine. I would take a pic but I sold the car. Originally Posted by 130fe

Don1969 Camaro - LSA 6L90E AME sub/IRS
1957 Buick Estate Wagon
1959 El Camino - Ironworks frame
1956 Cameo - full C5 suspension/drivetrain
1959 Apache Fleetside
09-22-2018 #5
Registered User
- Join Date
- Aug 2004
- Location
- Jacksonville, FL
- Posts
- 1,651
Here is from the Nu-Relics instructions.
Chris
1968 Chevy Camaro SS
LS3/T56 DSE suspension
09-22-2018 #6
Registered User
- Join Date
- Jan 2018
- Location
- Saint Louis, Missouri
- Posts
- 87
Chris,
I think what they want you to do is offset the hole on the door next to the dimple and then on the cowl side have the hole centered on the dimple.
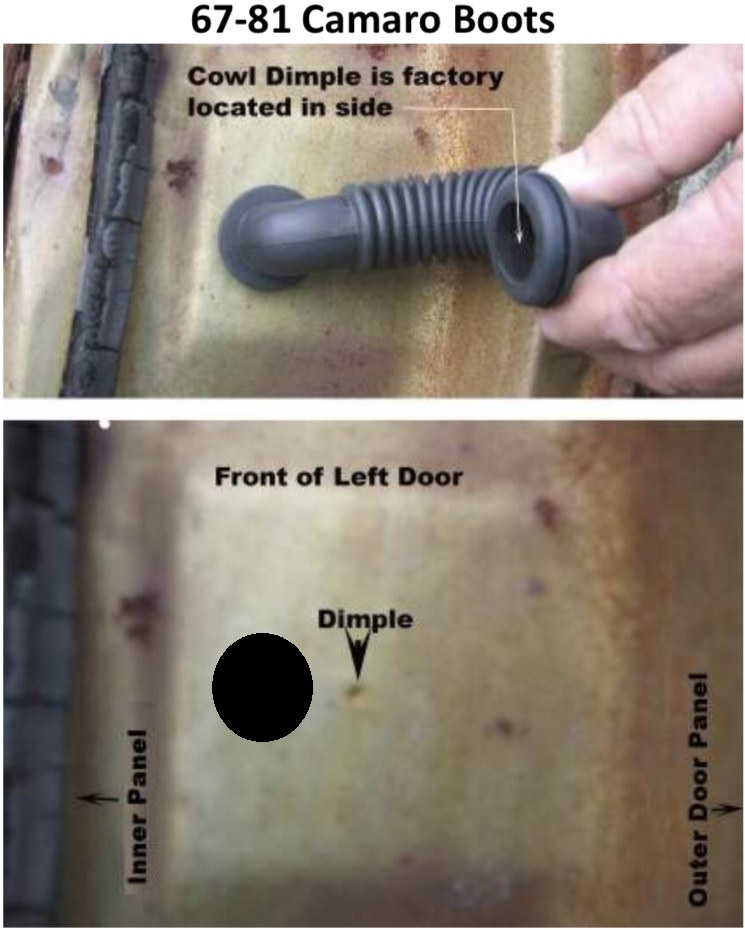
In the above photo of yours I added a black circle which would be the location of the hole on the door and it looks to be offset inward from the dimple.
How they have it worded as "Cowl Dimple is factory located in side" just leads me to believe the hole is centered just on the cowl side.
Just a heads up but after drilling the hole, debur the edges and then paint them.
Jim
09-22-2018 #7
Registered User
- Join Date
- Aug 2004
- Location
- Jacksonville, FL
- Posts
- 1,651
Yeah Jim, the cowl side is what I am wondering about. I talked to them on Friday and will have to call them back next week. The person that helped me on the phone told me to check the instructions..... No kidding...... Might try and talk to someone else next time. Will let everyone know what I find out. My car is at a buddy's shop and I am having my hinges rebuilt. Figured it was a great time to drill the holes (while doors were off) so I can install the window motors my self. I am trying to find the right answer the first time ;-)
Chris
1968 Chevy Camaro SS
LS3/T56 DSE suspension
09-23-2018 #8
Registered User
- Join Date
- Jan 2018
- Location
- Saint Louis, Missouri
- Posts
- 87
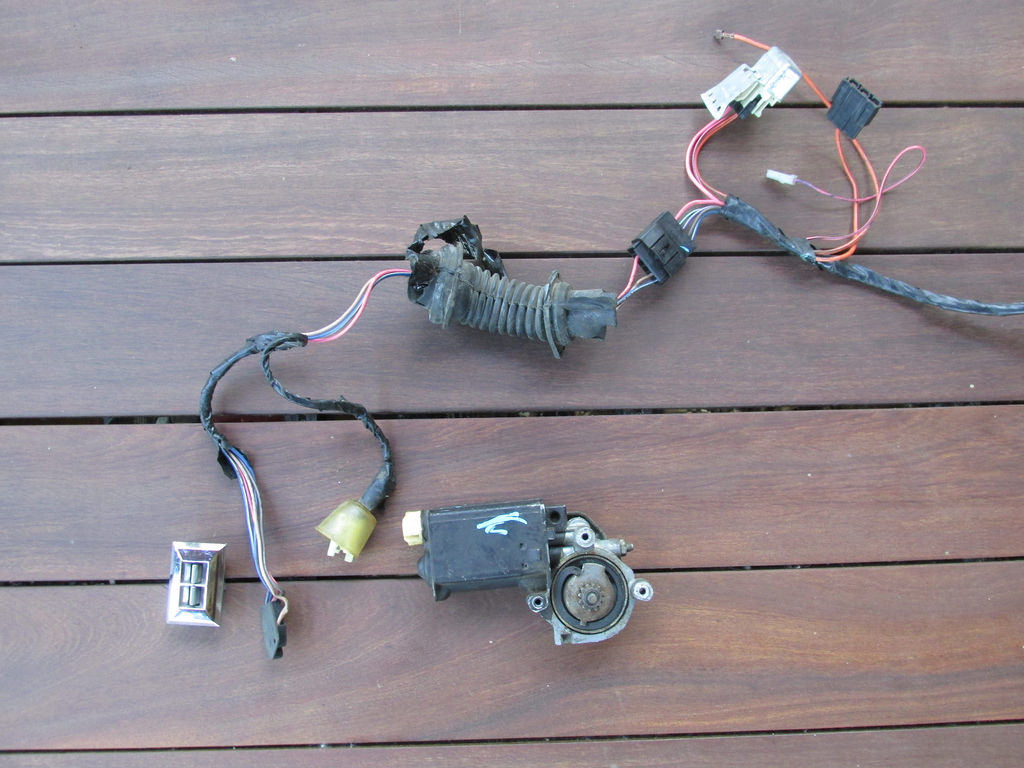
How attached are you to those boots ?. The reason I'm asking is I used to deal with a supplier that offered those right angled end style boots and I'm also getting ready to help another friend of mine add power windows into his 68 Chevelle and I suggested to him to get either some original boots removed from that era GM car or get the reproductions that are larger with the inside diameter and require larger holes. Originally Posted by 130fe
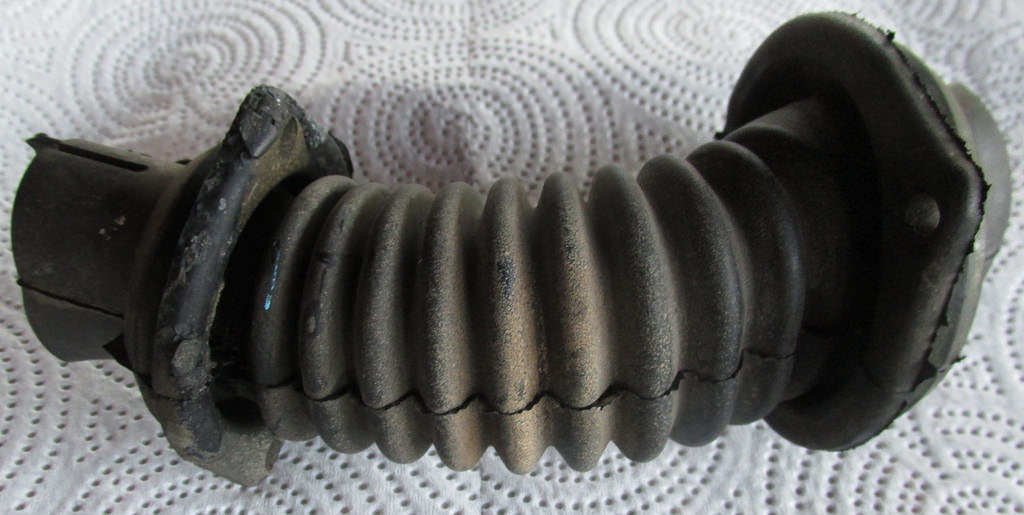
While the below is a picture of the straight aftermarket boots I installed in a 77 Nova of mine, I also bought a set of factory 1977 Nova power window assemblies and it had the larger diameter straight boots.
On both cars they had the holes centered on those dimples stamped into the metal surfaces.
I do wonder with the right angle ones if this might put more or less pressure on the wire concerning flexing. I have had through the years replaced a wire or two in door jambs from the wire being bent from opening an closing the door to where it eventually failed.
The aftermarket straight boots in my 77 Nova:
The factory straight boots from a 78 Nova (which has the same door jamb area as the 67-69 Camaro and the 68-79 Nova):
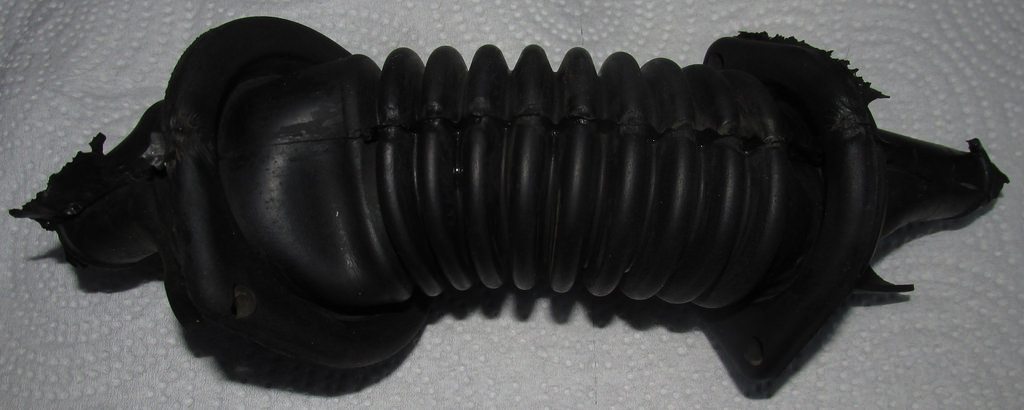
I think too the reason the factory boots I have for a 77 Nova are the size they are in the overall diameter is to allow the connectors for the switch and motor to pass easily through them to where if you have to take the door on or off things can be threaded through the boots and holes in the metal so maybe look at your connector ends to see if they will pass through the boot they supplied.
If all else fails and to be on the safe side, maybe hang the doors to mock things up with the fenders off to where you could hold each end of the tube in place and then see how the tube bends when the door is closed and then fully open and then make the decision where the holes actually need to be at.
Jim
09-23-2018 #9
Registered User
- Join Date
- Aug 2004
- Location
- Jacksonville, FL
- Posts
- 1,651
Yeah, I am not attached to them at all. I know the drivers side has more wires (than pass side) and I would like to add more wires (factory locks). Any suggestions would be appreciated.
Chris
1968 Chevy Camaro SS
LS3/T56 DSE suspension
10-30-2018 #10
Registered User
- Join Date
- Jan 2018
- Location
- Saint Louis, Missouri
- Posts
- 87
Chris,
Did you get the boots installed and take any pictures to share ?. Just wondering.
Jim
10-31-2018 #11 Registered User
- Join Date
- Apr 2010
- Location
- Jersey Shore
- Posts
- 695
The holes are supposed to be offest in the up and down position. When the holes are placed at the same height door vs jamb, the wires bend everytime you open and close the door. With the offest holes, they only have to twist a few degrees. Makes the wires far less likely to break over time and also prevents the boot from bunching up with the door closed.
-Chris
'69 Corvette
'55 Chevy Hardtop
AutoWorks Middletown, NJ
@autoworksnj for corvette and shop car pics
https://www.pro-touring.com/showthre...e-Build-Thread
10-31-2018 #12
Registered User
- Join Date
- Aug 2004
- Location
- Jacksonville, FL
- Posts
- 1,651
Jim, no I haven’t had anytime to give an update on my car. Been traveling out of the country lately. Will post something as soon as I can. Hope to have everything done in the next month. Chris, thanks for the photo reference!
Chris
1968 Chevy Camaro SS
LS3/T56 DSE suspension
10-31-2018 #13 Registered User
- Join Date
- Apr 2010
- Location
- Prescott, Arizona
- Posts
- 100
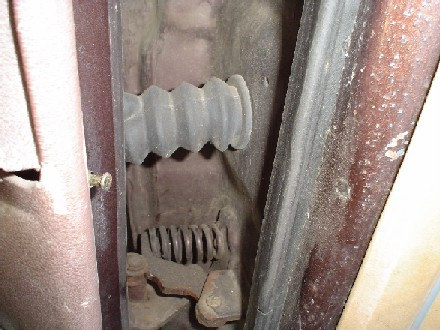
Installed my Nu Relics boots on Sunday in my 69 Camaro.
11-01-2018 #14
Registered User
- Join Date
- Apr 2010
- Location
- Jersey Shore
- Posts
- 695
Looking at the door jamb design on a camaro you may not be able to offset the boot up/ down... the up/down offset is just how many new cars are setup. Where applicable, I try to mimic this design on customer cars.
-Chris
'69 Corvette
'55 Chevy Hardtop
AutoWorks Middletown, NJ
@autoworksnj for corvette and shop car pics
https://www.pro-touring.com/showthre...e-Build-Thread
12-30-2019 #15
Registered User
- Join Date
- Nov 2009
- Location
- Austin Texas
- Posts
- 640
Whats the part number for the nu relic boots? Did you have to pull the doors or fenders to drill the holes?
12-30-2019 #16
Registered User
- Join Date
- Aug 2004
- Location
- Jacksonville, FL
- Posts
- 1,651
Don’t have the part numbers but the doors were coming off for a hinge rebuild. Seemed like a better time to drill the holes then. Not sure if you can drill the holes from the inside out if the doors are still on.
Chris
1968 Chevy Camaro SS
LS3/T56 DSE suspension
08-01-2020 #17 Registered User
- Join Date
- Oct 2007
- Posts
- 1,853
For those who did this.. were you able to create the holes without pulling the door off? If so how?
From a place you will not see comes a sound you will not hear....
67 Camaro In progress
https://www.pro-touring.com/showthre...-Tap-67-camaro
08-01-2020 #18
Registered User
- Join Date
- Feb 2011
- Location
- dallas, tx
- Posts
- 1,729
Step bite and drilled. Simple

 Reply With Quote


