Results 1 to 18 of 18
Thread: PT '85 GMC shortwide project
-
01-05-2024 #1

 Registered User
- Join Date
- Jan 2024
- Location
- Gainesville, Ga
- Posts
- 27

PT '85 GMC shortwide project
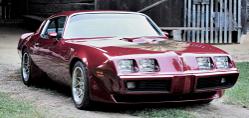
What's up guys, long time lurker and finally joined up to document my C10 build. I come from a road racing/autoX background, my dad's buddy races/restores air-cooled Porsches so I grew up helping them at the track. I've had a bunch of Mustangs, an IROC Camaro and whatnot over the years and done AutoX several times and a few open track sessions. The Mustang scene really took a downturn once the S550 came out and I started getting involved with the truck scene through work so I sold my pristine, low mile ridetech development mule '03 Mach 1 to find a Squarebody. The truck crowd is so much better than the Mustang crowd and has some really killer events. I work in the restoration sheetmetal business and have gotten some partners on board through work. Here's the rendering of what we're shooting for.
So here's where I started. This was long before it become a company build. I searched for a long time and fell in love with this two tone blue truck I found in NC. I'd never seen this color combo before (I've loved squares since I was a kid but being from Ga, most of them are red) and had to have it. Picked it up in January of '20, it was a running and driving truck with 104k miles loaded up with PW/PL/tilt/non-working cruise. It was originally a longbed and the guy I bought it from had it cut down, paint spotted in, clear coated and dropped. 305/T350C/2.73 peg-leg. This thing even had a 5th wheel in it at one time The plan for this truck from day one has been a true Pro-Touring build, not full race truck. LS power, eventually a stick, good suspension but full interior/AC/sound system/etc for roadtripping.
-
01-05-2024 #2
Registered User
- Join Date
- Jan 2024
- Location
- Gainesville, Ga
- Posts
- 27
So, I drove the truck for a few months mostly like that, rebuilt the front end and swapped on some rallies, maybe put ~10k miles on it before I tore it down for stage 1...
Started looking around for a motor. I briefly considered a Coyote for poops and giggles but decided to go tried and true LS since that's what I have the most experience with from all my NBS trucks. A friend of ours owns a salvage yard so I paid him a visit. In his personal stash he had this LH6 out of a rear ended Envoy Denali. Perfect!! All aluminum for lower weight, flat top pistons, 10:1 compression, 799 heads, TBSS style intake and larger TB. Paired with the 4L65E, computer and only had 104k, I grabbed it
Separated the trans after almost tipping my buddy's tractor over trying to pull the whole thing outta the truck and stuck it in the corner of the shop while I gathered more parts. Plan was pull it down to a long block to inspect and hopefully just freshen up the heads, lap the valves, stick a cam in it, valve springs and new gaskets all around. The bottom end was perfect, no scuffs at all, nice cross hatch, spun like butter so I didn't go any further. Of course once all that was done, I had to fully dress it while on the stand and stand back to admire the jewelry
01-05-2024 #3 Registered User
- Join Date
- Nov 2018
- Posts
- 645
The blue truck is nice, but I'm really liking that brown one. I've always liked the 73-80 vs the 81-87, the front clip looks better and the more rigid frame on the older ones just drives better.
That'll be something to address on the 85 model if you're doing it for handing - GM lightened the frame for fuel economy, and there's more flex as a result. I've had both ranges, and always found that the older ones handle better.
I've not used them so can't speak to their quality, but https://www.modernc10.com does frames for those trucks. I spoke to them about building a frame on my own project but they're strictly C10s.
01-05-2024 #4
Registered User
- Join Date
- Jan 2024
- Location
- Gainesville, Ga
- Posts
- 27
That other truck is our shop truck, its a base model ~65k original mile 76 6cyl 3OTT shortbed. Its a great little truck, we run errands in it all the time. Its all stock, never been screwed with. One of these days Id like to throw a basic 4.5/6 drop and some fat steelies in the rear with a big/little setup and letter it up like a proper shop truck. But otherwise leave it alone
I do plan on some boxing of the frame when it comes apart for the suspension. I have a TCI front and rear setup to go in, well do some boxing/stiffening and depending on some other details, Id like to run a TinWorks center brace setup as well.
01-06-2024 #5
Registered User
- Join Date
- Jan 2024
- Location
- Gainesville, Ga
- Posts
- 27
So then it was time to start yanking out the wheezy, hurt ole 305 and T350C. I started the swap a little sooner than planned after a trip up to TN and it couldnt keep 30mph going up the mtn, manually shifted down into 2nd with my foot to the floor lol. It had 2 dead holes when I checked compression. So we yanked it out as one unit, pushed the truck to the door of the shop and cleaned it with some degreaser. Then sprayed the frame with some VHT Chassis Black. Wanted something I could touch up easily as time goes
01-07-2024 #6 Registered User
- Join Date
- Aug 2013
- Location
- Shelton WA
- Posts
- 133
I love these old square bodies. I wish I never sold my 86 swb.
01-08-2024 #7
Registered User
- Join Date
- Jan 2024
- Location
- Gainesville, Ga
- Posts
- 27
So at this point I rolled it back in the shop, put it up on cribbing and started wire wheeling the frame and cab. The main reason I bought this truck is that it was 100% rust free. Just some surface scale, nothing of any real note. Check out those inner cab corners!
I'd been researching what I wanted to do underneath and decided on Raptor Liner. The deciding factor was that I could get it in aerosol cans since my buddy's shop that I was building the truck in didn't have a big enough air compressor to do a traditional spray gun. Instead of the normal black, I decided I'd take a chance on the blue hopefully matching. It did not. At all. But it's all good. It looks great against the VHT Chassis Black on the rails and makes it easy to see leaks/issues
Looking back now (this part of the build was over 3 years ago), I should've lifted the cab up a few inches to get full coverage but I didn't. Anyway, I did all the way back to the back of the cab with the Raptor and VHT. Figured I'd pull the bed off to do the back half of the truck at a later date. 3 years later, it's never been done lol. That'll change soon.
So then we moved onto getting the engine and trans set in. Y'all already saw the motor makeover, the 4L65 just got a fresh filter and Circle D 3000 converter. Nothing more
01-08-2024 #8
Registered User
- Join Date
- Jan 2024
- Location
- Gainesville, Ga
- Posts
- 27
I forgot to mention, I used the engine mounts and transmission cross member from Tejas Steelworks out of Texas. They move the engine up and forward 1" each way. Not ideal for my PT dreams, but it was the best bang for the buck to get the truck on the road. Our first hurdle was the PS pump, it was hitting the frame. Nothing a BFH couldn't fix...
At this point, I had hoped to run the Envoy AC compressor. You can see here how much room I had to the rail, fittings would be no issue. That plan would eventually change and we'd go back to a regular truck AC comp and have to notch the frame
I also shot the core support with Chassis Black before dropping the drivetrain in
So at this point, I started ordering parts for the rear axle. I'd found a local guy that said he'd build it for me for $500 if I bring him the axle and parts. Ordered everything from Quick Performance. They have the best deal for a "kit" for the center section, you get to choose your Richmond gear set, 28 or 30-spline Yukon Dura-Grip diff, all bearings and seals for $500 at the time. I went 30-spline so I picked up their matching axles, 1350 forged yoke and T/A girdle while I was at it. Went with 3.90 gears.
01-08-2024 #9
Registered User
- Join Date
- Jan 2024
- Location
- Gainesville, Ga
- Posts
- 27
So now that the drivetrain is in, it was time to start installing the new PSI Conversions harness and figuring out what original stuff to keep or get rid of
Threw the intake on to double check the routing of everything. I hate wiring lol
It was around this time that I also attempted to replace the Envoy PS pump with a truck pump and found out the bolt pattern is different. (Don't mind the backwards pulley, that was a distracted moment) The truck pumps have 4 larger bolts in a square pattern vs the TB/Envoys that have 3 smaller bolts in a half moon. So out came the BFH and back in went the Envoy pump
01-11-2024 #10
Registered User
- Join Date
- Jan 2024
- Location
- Gainesville, Ga
- Posts
- 27
I picked up the fan shroud from Tejas Steelworks as well. It's meant to work with an OE 454 radiator and use dual 13" fans, either Spal or V6 4th gen Camaro fans is what they recommend. I picked up the middle of the road CFM Spal's
My rear end guy sent me some pictures that day, said my axle had been into before and there were a few burrs and junk in the axle tubes but thankfully everything cleaned up just fine.
01-11-2024 #11
Registered User
- Join Date
- Jan 2024
- Location
- Gainesville, Ga
- Posts
- 27
Around this time we started working with Joe over at Squarebody Syndicate on one of his builds, so we worked out a deal on a set of his gauges. I love these since they look very close to stock, but they're made by Dakota so they have all the fancy features too. They were super easy to wire up once I found the master pin-out chart for these trucks
While I was in the dash, I started working on making all the connections in the cab between the factory wiring and the swap harness and mounting the ECM/TCM.
Tried using the factory ESC computer box but that ended up not working. I ended up using industrial strength velcro to the top side of the cowl in between the original computer mounts and a couple zip ties to the mounts for good measure
01-11-2024 #12 Registered User
- Join Date
- Feb 2013
- Posts
- 1,417
Truck's looking good as always man! I hope you're doing good

01-11-2024 #13
Registered User
- Join Date
- Jan 2024
- Location
- Gainesville, Ga
- Posts
- 27
Oh hey buddy! :wave: I'm doing good, hope all is well up your way!
01-15-2024 #14
Registered User
- Join Date
- May 2009
- Location
- Minnesota
- Posts
- 615
Keep the updates coming. Enjoying the build and love the square body trucks.
01-15-2024 #15
Registered User
- Join Date
- Mar 2022
- Posts
- 128
Great work! Did you say you were going to do some events with it? Just curious how the auto will fare.
01-15-2024 #16
Registered User
- Join Date
- Jan 2024
- Location
- Gainesville, Ga
- Posts
- 27
Thanks! So the truck has been "done" and on the road for about 3 years now and with the auto until the last 4 months. I never did an autoX with the old setup purely because it was on stock lowered suspension and handles terribly (plus the bench seat doesn't help lol). However I did do plenty of roadtrips and burnouts/donuts with the auto. I put 28k on it going to various events/shows and drove it cross country to Dino's Git Down once. It never skipped a beat, even starting with 104k on it and having a 400hp motor and 3000 stall in front of it. I'm keeping this one for another build lol. If my tuner could make it where it would hold 2nd gear no matter what when manually shifted, I think it would've been just fine for a good while doing autoX. But it's got 3 pedals now... Originally Posted by Pedigry

- - - Updated - - -
Thanks man! These have always been my favorite with the 99-07 NBS trucks being a close second Originally Posted by 68400BIRD
01-15-2024 #17
Registered User
- Join Date
- Jan 2024
- Location
- Gainesville, Ga
- Posts
- 27
So let's see here...once the wiring was buttoned up and I got the rearend put back in, I had to get new brake lines for the rear. The old ones wouldn't come loose no matter what I tried. No biggie. Then measured for the drive shaft and got our local driveshaft shop to whip me up a 4" steel one with 1350s at both ends
Also had to cut all the e-brake cables when I pulled the rear end out. When they chopped the truck down, instead of buying new cables, they just used a nut and a ton of weld to shorten the longbed cables. So they got ziptied to the x-members for now
Then threw on some extensions on the headers so we could do the first fire and have the o2s be happy. We fired it up briefly before the fuel pump died. This would be the beginning of a long saga...
01-16-2024 #18
Registered User
- Join Date
- Jan 2024
- Location
- Gainesville, Ga
- Posts
- 27
So that pump was a Delco EP381. Nobody had one in stock so I bought the equivalent Delphi pump and through it in. My tuner came by long enough to load a basic tune in it so it would idle. Then we loaded it up and took it to C10 Fall Revival '20.
https://www.youtube.com/shorts/hWqK0yfPyGw
Brought it back home, finished up a few things and tried to load it in the trailer to go to the exhaust shop and it wouldn't start again So winched it in the trailer and pushed it into the exhaust shop. They do good work but it's just a run of the mill shop, no mandrels or anything. For a driver, that's fine. Got 'em to neck down the 3" collectors to 2.5" pipe (I like the way it sounds raspier over the boomier 3" and I was hoping to mitigate drone), into an X-pipe and Borla ProXS mufflers.
Took it straight over to my tuner and got it to start and cough once but that was it. Ran all the usual tests and decided we didn't have fuel. So down comes the tank again...
Ended up bringing it back to work to get it out of his way. Got another Delco EP381 this time. He swears by these but I've had ZERO luck with them. I ended up redoing the wiring with a weather pack relay back there right at the tank and larger gauge wire and threw it all back together
That worked and he came up to start actually tuning it. Got it pretty decent but it had a dead skip at idle. Got the temp gun out and sure enough, #1 was cold. So he left and I pulled the spark plug, looked fine. Pulled the injector, it was wet and had been firing. That's weird. Pulled the valve cover and found the culprit...I forgot to tighten down one of the rockers
https://www.youtube.com/shorts/ONvzYJA9vdA
Tags for this Thread

 Reply With Quote