Results 41 to 60 of 236
-
05-10-2018 #41

 Registered User
- Join Date
- Mar 2017
- Location
- Mississippi
- Posts
- 167
Patching the time capsule - with actual metal.
-
05-10-2018 #42
Registered User
- Join Date
- Mar 2017
- Location
- Mississippi
- Posts
- 167
The driver side door had been replaced from a donor. It wasn't in much better shape.
It looks a little better now.
05-10-2018 #43
Registered User
- Join Date
- Mar 2017
- Location
- Mississippi
- Posts
- 167
I wanted to run power brakes and hydraulic clutch but the car originally had manual brakes and an automatic so my existing pedals were all wrong. I looked at some expensive pedal assemblies that would require a good bit of fabrication to install. I also considered switching my pedals to a stock clutch and power brake setup but that option was nearly as much as a Wilwood assembly. Just as I was about to pull the trigger on a three pedal setup, I remembered I had an old manual brake pedal from the 69 mustang. I played around with it a little bit and realized I could make it work.
Here, the 69 brake pedal is hanging from the stock bracket, mounted the same way an original clutch would be. Only the footpad needs to be trimmed. There is plenty of clearance between the pedals for the steering column. Once I was committed to that configuration, I bought a fox body gas pedal from eBay.
05-10-2018 #44
Registered User
- Join Date
- Mar 2017
- Location
- Mississippi
- Posts
- 167
I needed a fairly compact power brake booster so I would have room to mount the clutch master cylinder. I found an old website that described fitting a 93 Mustang brake booster and CNC clutch master cylinder. The only modification required to mount the '93 booster is to drill a few new holes and fill a couple old ones.
It is tight but there is enough room to mount a 3/4" Wilwood clutch master cylinder.
05-10-2018 #45
Registered User
- Join Date
- Mar 2017
- Location
- Mississippi
- Posts
- 167
Here's a better view of the pedal assembly.
I reinforced the firewall at the clutch master cylinder mount to eliminate flex.
The pushrod on the clutch MC is too short so I'm using a socket as a spacer for the photo. It's not a permanent addition.
I made a new pushrod from a grade 8 bolt. I just chucked it in my wood lathe and shaped the head with a metal file.
05-10-2018 #46
Registered User
- Join Date
- Mar 2017
- Location
- Mississippi
- Posts
- 167
I went through my spare parts pile to find an old brake master cylinder push rod. I cut the loop end off it and welded that to a threaded coupler. Combined with the bolt that I just turned, I now have an adjustable pushrod for the clutch MC.
I'll find (or make) some smaller pedal pads eventually.
05-10-2018 #47
Registered User
- Join Date
- Mar 2017
- Location
- Mississippi
- Posts
- 167
I used a brake master cylinder from a V8 94 Mustang.
Here, I've just started bending the brake lines.
05-10-2018 #48
Registered User
- Join Date
- Mar 2017
- Location
- Mississippi
- Posts
- 167
Cleaned up the bracket and mounted some smaller footpads.
05-10-2018 #49 Registered User
- Join Date
- Dec 2006
- Location
- Out of the Burbs of Detroit to SoCal, then onto my ancestral homeland, the woods of Cascadia
- Posts
- 1,753

[QUOTE=jstanard;1265927]Suspension can be assembled now. Everything bolts to the crossmember.
Attachment 152311
Might want to drop a bracket from the frame too pick up the back end of that lower control arm mount. They have been known to crack the weldment to the crossmember, causing interesting handlingGreg Fast
(yes, the last name is spelled correctly)
1970 Camaro RS Clone
1984 el Camino
1973 MGB vintage E/Prod race car
(Soon to be an SCCA H/Prod limited prep)
05-10-2018 #50
Registered User
- Join Date
- Mar 2017
- Location
- Mississippi
- Posts
- 167
Here?
05-10-2018 #51 -Moderator/Sponsor-
- Join Date
- Apr 2001
- Location
- The City of Fountains
- Posts
- 15,975
Yes, and also maybe a short piece diagonally to the cross member. Originally Posted by jstanard

Andrew1970 GTO Version 3.0
1967 Cougar build
GM High-Tech Performance feature
My YouTube Channel Please Subscribe!
Instagram @projectgattago
Dr. EFI
I deliver what EFI promises.
Remote Holley EFI tuning.
Please get in touch if I can be of service.
"You were the gun, your voice was the trigger, your bravery was the barrel, your eyes were the bullets." ~ Her
05-11-2018 #52
Registered User
- Join Date
- Mar 2017
- Location
- Mississippi
- Posts
- 167
I'll put that on the list to complete when I pull the engine before paint. It would be awful hard to get to right now.
05-11-2018 #53
Registered User
- Join Date
- Mar 2017
- Location
- Mississippi
- Posts
- 167
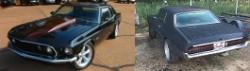
What do these things have in common?
1967 Mercury Cougar
1997 Mercury Mountaineer
2017 Major back surgery
05-11-2018 #54
Registered User
- Join Date
- Mar 2017
- Location
- Mississippi
- Posts
- 167
If you answered "3.73 Trac-Loc Ford 8.8", you would be correct! If you're pulling one of these things at a junk yard where you can't use jacks, I recommend that you bring a friend or two. Just sayin'.
05-11-2018 #55
Registered User
- Join Date
- Jan 2006
- Location
- Southern California / Maryland
- Posts
- 488
Sorry about your back brother! My disc is completely gone there - i have 7 other herniations to boot - glad I carry around about 80lbs of gear daily at work
1966 Chevrolet Chevelle 300 Deluxe 350 / 350 auto
1968 Dodge Charger SRT8 6.1L Hemi / 6-speed
1964 Dodge Polara 8-71 Blown 440 / 4-speed
1998 Toyota 4Runner SR5 3.4L / 5-speed
2013 Dodge Challenger R/T 5.7L Hemi / 6-speed
05-12-2018 #56
Registered User
- Join Date
- Mar 2017
- Location
- Mississippi
- Posts
- 167
Ugh. I can't imagine. Well, actually i CAN, i just don't want to. This was my second. Both left permanent nerve damage in my legs, BUT, the surgery eliminated 100% of the pain both times and after 6 months, i'm getting around just fine so I'm not complaining.
05-12-2018 #57
Registered User
- Join Date
- Mar 2017
- Location
- Mississippi
- Posts
- 167
While at the salvage yard looking for the explorer rear end, I found these power leather seats in a 2001 Volvo S60. I'm still not sure on my interior color but if I go with something in tan, the seats are good to go. With the headrests removed, the seat height looks just right. They will need custom mounting brackets, of course.
Here's the best part...I paid a TOTAL of $55 for BOTH seats.
05-16-2018 #58
Registered User
- Join Date
- Mar 2017
- Location
- Mississippi
- Posts
- 167
8.8 with rebuilt explorer brakes ready to go under the car.
05-16-2018 #59
Registered User
- Join Date
- Mar 2017
- Location
- Mississippi
- Posts
- 167
On another junkyard run, I picked up an inertia switch from an Explorer, a parking brake lever from a BMW, and power mirrors from a Miata. I'm not certain I'll use the mirrors yet. It's hard to get an idea of what they will look like when I don't even have doors installed.
05-16-2018 #60
Registered User
- Join Date
- Mar 2017
- Location
- Mississippi
- Posts
- 167
I'm relocating the battery to the trunk so I cut out the rusty battery tray and welded in a patch.
I also filled in some holes in the engine bay.

 Reply With Quote