

Results 1 to 20 of 204
Hybrid View


-
08-06-2017 #1

 Registered User
- Join Date
- Aug 2017
- Location
- South Dakota
- Posts
- 153

1970 Mustang Mach 1 Restomod/Pro-Touring Build
Hello everyone.
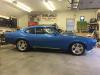
I am in the middle of a re-build on my 1970 Mustang Mach 1. I purchased the car as a junior in high school in 2002 and the car was pretty rough as you can see in the photo. I took the car with me to my collision repair program after high school and did a complete restoration on it starting in the fall of 2003 and finishing the project in the summer of 2005. I have enjoyed the car through the years until I got rear ended in the spring of 2015. I decided after the collision and the insurance work was all worked out to not only repair the car but to completely re do it with some changes and take care of things that weren't up to my standards from the original restoration.
Purchased as a parts car from a friend in 2002. My friend Doug inside the car demonstrating the flinstone brakes. He has a sweet 69 Camaro!
A photo of my Mach 1 next to a 69 GT pro-touring car I built back in 2010-2011 and has been featured in a few different mustang magazines.
My car was lucky enough to be shown in Mustang magazine a while back and grace it with the Ring Brothers Reactor 67 Mustang.
Spring 2015 My first outing of the season with the car and a guy in a GMC Jimmy bumped into the back of me at a red light. Didn't look too bad but looks can be deceiving. The insurance estimate at $8,500 may have been a bit light but even being in the business it's tough to estimate vintage cars.
-
08-06-2017 #2
Registered User
- Join Date
- Aug 2017
- Location
- South Dakota
- Posts
- 153
Initially I was going to repair the car and go just a few steps further but that snowballed quickly! When I originally restored the car some parts weren't available like full quarters and I was never happy with my panel fit and gaps. Now that full quarters have been made available I decided this was a good opportunity to replace the partial skins with new full quarters and things kept going from there. I also never liked The way my long tube Hooker headers came down so low and you could see so much of the exhaust from the side. That and some oil leaks equaled the engine coming out and going in for a "freshen up".
08-06-2017 #3
Registered User
- Join Date
- Aug 2017
- Location
- South Dakota
- Posts
- 153
After removing the the 408 Cleveland 4V from the car and going down memory lane I decided that getting to plug wires and header bolts is a bit tight and not the most fun. With that in mind I decided to do an old school notch on the shock towers to allow for easier access and more engine bay room. I notched the towers as much as I could but wanted to leave enough room to use factory style suspension if I ever wanted to return it that way but I will be installing my ridetech level II coilovers with strong arms and muscle bar up front. I also shaved up any unwanted/needed holes in the engine bay at this time to give a cleaner appearance.
03-16-2021 #4
Registered User
- Join Date
- Mar 2021
- Posts
- 1
Towers
Are able to still use factory motor mounts? Do you have a temp let of the plates?
03-17-2021 #5
Registered User
- Join Date
- Aug 2017
- Location
- South Dakota
- Posts
- 153
Yes you can use stock motor mounts. I am using some aftermarket poly urethane mounts currently but they are the same configuration as the stock mounts. I had stock parts store rubber ones on the car but the rubber started to tare and so I replaced them. I may have a few sets of the plates left. I can check. Originally Posted by Recipient69

- - - Updated - - -
Thank you! Originally Posted by Jonathonar89
My 1970 Mustang Mach 1 Build
www.pro-touring.com/threads/125911-1970-Mustang-Mach-1-Restomod-Pro-Touring-Build
08-06-2017 #6
Registered User
- Join Date
- Aug 2017
- Location
- South Dakota
- Posts
- 153
In another attempt to hide the 3" exhaust system and also make the car appear lower without hurting actual ground clearance, suspension travel, or drastically altering the appearance of the car I extended the rockers, fenders, and quarters slightly hiding the pinch weld and adding a little cover for the exhaust and frame connectors. I had done this on the red 69 GT pro-touring build and also a few other projects and really liked the result.
08-06-2017 #7 Registered User
- Join Date
- Mar 2015
- Location
- FL
- Posts
- 318
Wow, in the magazine, very cool! Lookin' good. Version 2.0, good luck.
-Mitch
G8 GXP, White Hot, Auto, bone stock
68 Firebird, 428 Pontiac, CNC'd KRE Al d-ports, hyd roller, EFI, TKO600, TCI Eng complete chassis, Ridetech, Kore3 C6Z brakes, C5Z 18" with 315 rivals x4, C6zr1 mufflers
RRR, NASA HPDE https://youtu.be/DPp1l9-FuNE
08-06-2017 #8
Registered User
- Join Date
- Aug 2017
- Location
- South Dakota
- Posts
- 153
On to the quarters. I also shaved the drip rails this time around as this is a common mod performed at my shop and really cleans the cars looks up. I made some patches to bridge the gap of the factory roof to quarter panel seam to add some strength and reduce the body works chances of shrinking in that location over time. I went ahead and welded up the other seams as well.
08-06-2017 #9
Registered User
- Join Date
- Aug 2017
- Location
- South Dakota
- Posts
- 153
I got my rear tail panel on and welded on the lower valance like I had before for a cleaner seamless look. At this point I had decided that because I was in need of a new rear bumper from the accident anyway I may as well use a fiberglass flush mount style. I have done two 69 sportroofs with this style bumper one a Anvil and the other a Mustangs To Fear. They both fit like a typical fiberglass part and needed plenty of work to make fit right. I am glad both companies are offering these parts and I know it is tough to make a part fit every car as there are slight inconsistencies in these cars. With that being said it would appear both of these companies designed them to fit a 69 model and simply assumed they would also work on a 70 like the factory steel bumper does. The factory steel bumper had such a large gap that it was much more forgiving in its fitting both years than these flush mount bumpers are. From personal experience the Mustangs to fear bumper fit a touch better out of the box for a 69 car and needed less work. I chose an Anvil fiberglass one for mine as it lent itself better to a 1970 model. After some surgery I have it fitting pretty good with a little finish work left. I also had to change the bumper mounting studs as they were too low for my 70 but I didn't have this issue with either of the 69's I did.
Last edited by builttodrive; 08-06-2017 at 07:57 PM. Reason: add photo
08-07-2017 #10
Registered User
- Join Date
- Aug 2017
- Location
- South Dakota
- Posts
- 153
Still working in the rear I decided I wanted to come up with a better gas cap solution. I didn't want to use the stock style pop open cap but the billet aftermarket twist off cap with cable wasn't cutting it. I searched the internet for ideas and better alternatives when I came across another members 69 Mustang with a Challenger Cap that I really liked. So I borrowed his idea and needed to figure out how to make it work for my 70. After getting the cap in place I decided the trunk lock needed to go and shaved that for a cleaner look. I will use one of the electric remote latches.
08-07-2017 #11
Registered User
- Join Date
- Mar 2009
- Location
- Houston, TX
- Posts
- 1,192
Nice progress. I really like the subtle mods you've done so far. I've been mulling over extending the rockers on my 67 Firebird, but as bolt on extensions instead of welding them in permanently.
Tu Ho
Firebird V2-LS swap
08-07-2017 #12
Registered User
- Join Date
- Jun 2017
- Posts
- 65
You are an artist!! Wow, amazing work.
08-07-2017 #13 Registered User
- Join Date
- Jan 2009
- Location
- Chattanooga, TN
- Posts
- 282
Nice!
What do you think of that cap and Tanks INC set up? I watched the '69 build on here go with that cap and loved it too! I'll be putting one on my '67 here shortly.
Glad to follow along, thanks for posting!Stephen S.
1967 Ford Mustang 4.7L, T5
08-07-2017 #14
Registered User
- Join Date
- Aug 2017
- Location
- South Dakota
- Posts
- 153
After pulling the Cleveland out to get a freshen up and re-seal I come to find out it was a good thing I did. It turns out that my first engine guy may have done me more harm than good with the machine work. After further inspection the cylinders had some issues and needed to be bored. My 408 Cleveland turned into a 409 and needed a new set of JE forged pistons. While we were at it we did a port match and clean up on the heads and went with some larger intake valves. I also changed from a Holley 750 Street avenger carb and went with Holley's Terminator Stealth EFI unit. The engine was good for roughly 500HP and 475ftlbs and made peak power just before 6K. Not earth shattering power but good street-able power on pump gas with iron 4v heads naturally aspirated.
I gave the block and heads a coat of base coat and clear in the matching Shadow Grey accent color I'm using on the car and powder coated the intake a silver vein.
08-07-2017 #15
Registered User
- Join Date
- Aug 2017
- Location
- South Dakota
- Posts
- 153
Thanks for all the kind words everyone! I do call this my profession and I have a small restoration shop but I am somewhat young yet and have a lot to learn. With this project being that it is my own I have more time than funds and so if some of these mods take a little more time but save me money and achieve the same end result thats ok.
MSTSFabbed. I liked the way the cap looked on his 69 and really liked not having to worry about where to set a cap when filling up or letting it hang down against my painted bumper from a cable. Tanks sells a nice product and I will be using their 22 gallon EFI tank as well. The Scott Drake Challenger cap looks nice and is a good piece but the base isn't flat. It's concave and its the opposite direction of the 67-69 Mustang tail panel. If you have more room the same version of the cap is offered for a Jeep but it is much larger. I used the challenger cap and machined the mounting base flat to work for my 70.
08-09-2017 #16
Registered User
- Join Date
- Jan 2009
- Location
- Chattanooga, TN
- Posts
- 282
Killin it man. Motors looking great!
Ha! We're exactly on the same page. I was looking at the Jeep version thinking the flat would help me out, but hadn't considered it being bigger or interference with the trunk key hole, which I'd prefer to keep if possible. I'll look closer at the ODs, thanks for the tip! Originally Posted by builttodrive
I'm right with you, I've got a perfect arced scrape in my painted bumper from my dumb stock cabled cap rubbing!Stephen S.
1967 Ford Mustang 4.7L, T5
08-09-2017 #17
Registered User
- Join Date
- Aug 2017
- Location
- South Dakota
- Posts
- 153
MTSFabbed: Thanks again! Glad I could help. That was the reason for the build thread.
08-09-2017 #18
Registered User
- Join Date
- Aug 2017
- Location
- South Dakota
- Posts
- 153
I have spent a lot of time shaving and cleaning up items from the body but being that the car is a Mach 1 I wanted to keep a few elements the car would have originally had. The first time around I didn't have hood pins but I decided to add them this time. The original Mach 1 twist lock pins are a bit large and chrome so I wanted to look for something a touch smaller and that had a better design to work with my painted theme. I decided I didn't want pins with cables or removable pins because they are a pain when not in use with the hood up. I decided to adapt the 68 Shelby GT500 KR hood pins to work on my 70. I will most likely paint them The gray stripe color.
08-07-2017 #19
Registered User
- Join Date
- Aug 2017
- Location
- South Dakota
- Posts
- 153
I went back and forth on doing a mini tub on the car and finally decided to pull the trigger. I had been running a 295/30-20 on the rear with decent room after I used a precision tool to make clearance where necessary. (BFH) I was able to get a 305/30-20 under the car as well but thought I may as well make a little extra room for the future because now is the time to do it. The 305 was really about as big as I could go with the perfect back space on the wheels and using leaf springs. At least if you like a low stance with the tires tucked up in the wheel well.
My plan for the mini tub was to be able to use the stock seat and interior panels as normal without having to modify them. The stock rear seat is small as it is but I wanted my son to be able to ride back there when we go out as a family in the car. I used a 1" strip of steel and added it to the inner wheel well to gain an approximate inch at the top. I gained just a little bit more at the bottom and took the tub to the outer seat belt bolt bracket and went to the frame rail on the back side. I then modified the rear seat brackets to work with the wider wheel tub. I have the non fold down back seat but this should also work for the fold down.
I am currently limited to my 20x10 wheels so a 305 is as wide as I can really get away with without the tire looking funny on the wheel. Some day when funds allow I would like to get a nice set of forged wheels in either a 18" or 19" diameter and going a touch wider to get a little more tire under the car. I think with this set up i could easy get a 315 under there and maybe a 325-335 if everything was perfect. The ridetech four link system will give me a touch more room over the leaf springs as well.
08-08-2017 #20 Registered User
- Join Date
- Oct 2009
- Location
- CT.
- Posts
- 738
Nice build so far!!!
Glenn
1955 Chevy BelAir
1951 Chevy 3100
1987 Chevy Silverado
My last project....
https://www.pro-touring.com/threads/...my-72-Maverick!!

 Reply With Quote


