Results 1 to 20 of 39
Thread: No Limit "Goldie"
-
10-27-2016 #1

 Registered User
- Join Date
- Aug 2010
- Location
- now In Dandridge, Tn.
- Posts
- 1,301

No Limit "Goldie"
Back Story first.
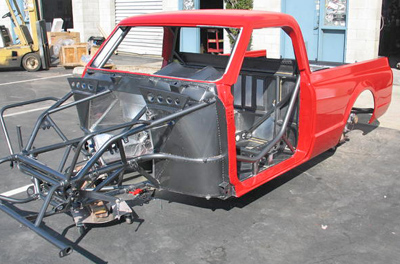
If you were one of the lucky ones to go on the Cars and Cones Road Trip, you had a great time. I did the trip in Tina's mustang to give it a good shake down. No issues at all, and it performed very well. But, most of the trip, I was thinking that I should really be in a truck. During that event, we gave away a grand prize, and the winner chose a $7500 credit towards a new chassis for a 1961 Ford Uni-body. His plan is to finish the truck for next years Cars & Cones tour. That really got me thinking. Early this summer I was considering a freshen up of my trusty C10, the JT (Joe Touring) But, in reality, an update would leave me with a bunch of unused parts. So, it seams better to build another truck and sell the JT at a later date. If you want to see the build on the JT, it is on another site dedicated to 67-72chevytrucks. Back when we built the JT, we were not building chassis for C10's, but, now we do. So, it seams natural that a new shop truck would be built on a new chassis. Now, I had a cab/doors nose and title from a C10 we brought out from Ca when we moved, and I still have the 6.0 LQ9 that was the first motor for the HellBoy. And, I have the TKO-600 that I took out of the HellBoy in favor of the Legends trans. So, I don't really have to start from scratch.
OK, I already started, and we're making good progress. When we build these chassis, it's all in "sub-assembly" The end rails are built first, fronts and rears. The inside and outside panels are .188", and placed in a fixture with cut tube spacers. The spacers are welded in (heavy tacks) to hold the rail width. Then the rail tops and bottoms are fitted and tacked. The rail is then loaded in a press fixture to weld. Once fully welded, the are ground and sanded, and are then ready to go into the chassis table. So, here's a few picts. I'l put more info in as I go.
Last edited by RobNoLimit; 10-27-2016 at 09:35 AM.
-
10-27-2016 #2
Registered User
- Join Date
- Sep 2011
- Location
- Southern Ontario
- Posts
- 640

Wait a minute, wait a minute,,,, what about Jenny? Poor Jenny sitting in the corner. Show her some love!
10-27-2016 #3
Registered User
- Join Date
- Aug 2010
- Location
- now In Dandridge, Tn.
- Posts
- 1,301
haha. Jenny is in the "lots of time invested to go a little way, doesn't look much different". But she is moving forward.
10-27-2016 #4 Starting The Transformation
- Join Date
- Feb 2010
- Location
- El Segundo, CA
- Posts
- 268
This should be a good thread Rob. I'll be watching for updates.
Btw, do you have a build thread on Hell Boy posted anywhere? If not, have you ever considered doing one? Or just posting some pics of the build? I for one would love to see them!
Side note, I was reading an old thread on another forum where someone had posted links to these videos you made testing the torsional stiffness of your Big-10 frame:
https://youtu.be/e8cJwco4hrw
I had no idea you'd done this. Kudos. This should be a standard in the industry. I have a dream of building my own frame one of these days and was planning on doing my own stiffness test similar to yours. My thinking was "no one does this". And now I find you you actually have.
10-27-2016 #5 Registered User
- Join Date
- May 2013
- Location
- Texas
- Posts
- 297
awwwwwe yeah!
10-29-2016 #6 Registered User
- Join Date
- Oct 2007
- Location
- Newark DE
- Posts
- 238
Subscribed!
The Hell boy thread was fun to follow. Originally Posted by Dr G

http://67-72chevytrucks.com/vboard/s...d.php?t=488826
10-29-2016 #7 Registered User
- Join Date
- Mar 2010
- Posts
- 469
Oh. So. Subscribed.
Also a big fan of your torsional twist videos, would be very curious to see a 67-72 chassis comparison.
10-30-2016 #8
Registered User
- Join Date
- Aug 2010
- Location
- now In Dandridge, Tn.
- Posts
- 1,301
coming soon Originally Posted by bovey
11-03-2016 #9
Starting The Transformation
- Join Date
- Feb 2010
- Location
- El Segundo, CA
- Posts
- 268
Well, I just finished reading all 34 pages of the Hell Boy build and development thread. Quite worth it. Thanks for the tip. Highly recommended to anyone here who has not seen it. Originally Posted by Eric Howell
11-14-2016 #10
Registered User
- Join Date
- Sep 2011
- Location
- Southern Ontario
- Posts
- 640
Rob, I just read the build of hellboy and have two questions. Is there a build thread on the silver bullet and on the Summers truck, what kind of steering rack is that? Is it part of your wide ride front end?
11-16-2016 #11
Registered User
- Join Date
- Aug 2010
- Location
- now In Dandridge, Tn.
- Posts
- 1,301
No real threads on the Silver Bullit, It was very simple. Big-10 chassis with some std upgrades, For Racing 392 Windsor (no longer offered) T-5, F-100 body. Not sure of the Summers C10. The rack on the HellBoy is a Flaming River "RoadRace" rack. Same geometry and torsion valve as the Fox rack, but with a larger diameter rack shaft and pillow block mounting. I get a lot of comments on the front end geometry +/-, about what it is or isn't. The geometry itself is a spot on copy of our Wide-Ride geometry. So, the UCA and LCA mounting points are exactly the same. We did however build this as a test bed, so the way the arms are mounted and constructed allows us to make changes for testing (same for the rear). Even the spindle geometry is the same as our WideRide spindle, we just had Coleman build these for a Wide-5. So, after four years of testing and trying different geometry on the IFS, I can tell you that the only real improvement is a slight change in Ackreman vs. caster/SAI match. The wheel base also comes into play here, and due to this knowledge, we have made a slight change to the WideRide spindle during the last production run. And by slight, I mean, less than .100" total re position of the outer TRE pick-up point. What we really learned is, WideRide geometry is pretty bad ass. Originally Posted by Peter Mc Mahon
11-17-2016 #12
Registered User
- Join Date
- Dec 2015
- Location
- Ruhr-Area, NRW, Germany
- Posts
- 313

What did you say again when are you going to make these chassis for Dodge trucks?


1985 Dodge Power Ram W250 3/4t 360/518/241
2005 Dodge Ram 1500 SRT-10 505/T56/D60 small upgrades
11-26-2016 #13
Registered User
- Join Date
- Aug 2010
- Location
- now In Dandridge, Tn.
- Posts
- 1,301
Making progress. I'm having trouble getting picts to download out of my phone, sorry for the delay in posting. I got one pict to send, then none. Should be fixed soon. Anyway, making great progress. The chassis is back from powder and I am working on the cab and bed. The doner truck was a Ca. cab and nose with "no rust". So much for that. The cab took a new roof, rebuilding of some inner structure, a rocker, a corner and some floor repair. And, the snowball starts rolling. At least this was a factory A/C cab. At this point it is back in stock configuration. I am having some thoughts on a few mild custom touches. We'll see. Hope everyone is having a nice Thanksgiving holiday.
12-10-2016 #14
Registered User
- Join Date
- Aug 2010
- Location
- now In Dandridge, Tn.
- Posts
- 1,301
OK, so in the "you know your getting old when" section of this build, I decided to fab in a cargo box. I carry a lot crap around on a day to day basis. Chain, rope, jumper cables, hitch, wood blocks, ....... and I am tired of having it all bang around in the back of the JT. So, I went ahead and built in this cargo box. It has flush lids with gas struts, aero-locks, and I cut in the center drop for a large LED light. I am also going to mount the battery and a compressor in the box. - Tired of having the battery under the truck. You may also notice that the bed floor is raised 4" to clear the raised rails.
12-10-2016 #15
Registered User
- Join Date
- Jul 2016
- Location
- Las Vegas
- Posts
- 24
Very nice! are you going to be able to secure each item separately or have some sort of retention system inside the cargo box? Originally Posted by RobNoLimit
12-12-2016 #16
Registered User
- Join Date
- Aug 2010
- Location
- now In Dandridge, Tn.
- Posts
- 1,301
I put in a tube sleeve to hold the hitch and pin. The battery and compressor will be mounted. I put in a few dividers to hold the blocks and chains. The rope, straps, tie-downs and jumper cables will have their own tote bags (thanks to DeWalt tool bags they supply with cordless tools) It's kind of an odd thing to do, but I have a goal of an actual driver, with the comfort and quality of a new truck.
12-12-2016 #17 Registered User
- Join Date
- Feb 2016
- Location
- Lawrenceville, IL
- Posts
- 348
I love the idea Rob. I've always thought the same thing. Rather than spend $xx on a new truck just build an older one to be what you want in a new truck. I'm really looking forward to seeing the completed project. Originally Posted by RobNoLimit
 visit us on the web at www.bowlertransmissions.com
12-13-2016 #18
Registered User
- Join Date
- Aug 2016
- Posts
- 33
Subscribed. Looks fantastic!
12-13-2016 #19
Registered User
- Join Date
- Aug 2010
- Location
- now In Dandridge, Tn.
- Posts
- 1,301
Not sure this will really be any less $$ than a new one, but it will be cool.
12-13-2016 #20
Registered User
- Join Date
- Aug 2010
- Location
- now In Dandridge, Tn.
- Posts
- 1,301
Thanks guys. Here are a few picts of the bed/floor raising mod. This is how I usually do it for C10's. I am raising the bed floor 4" to clear the higher rail. So, I had a local sheet metal shot form up some risers. They are 4" tall with 1" ledges. There are six total parts. four small for the sides, in front of and behind the wheel tubb, and two longer ones, for the front and back. I start fitting by marking and drilling matching holes in the top and bottom ledges. This way they will bolt to the exising O.E. ledge, and then the floor will fit on the top ledge. Then, once clamped in place, I drill a series of holes to hold them into the sides. These are small, 1/4". Once all are drilled and fitted, they get two coats of good old Rustoleum SGB (semi-gloss-black). If this was a customers truck, I would send them out to powder coat. But, I plan on having the underside of the bed sprayed with Line-X (and the cab) so that isn't needed. During final assembly, I use a sealant around the edges to lock the moisture and rattles out. Don't laugh, I use liquid nail subfloor adhesive. It works great. Last here is a pict of the fuel filler. I did this on my current truck, the JT, and I just felt that I needed to carry this one over. But, I am using larger fill tube and vent. - The JT burps fuel sometimes.

 Reply With Quote