
Results 21 to 40 of 141
Thread: Mom's '66 Chevelle Malibu
-
01-11-2017 #21
 Registered User
- Join Date
- Sep 2005
- Location
- FL and Calif.
- Posts
- 299

Wery cool project, thanks for the pics.
-
01-11-2017 #22
Registered User
- Join Date
- Dec 2015
- Posts
- 51

How is fitment on the brakes? Which master cylinder?
01-11-2017 #23 Registered User
- Join Date
- Jan 2016
- Posts
- 121
Went with the Wilwood aluminum tandem master and prop valve combo. Haven't mounted anything for brake system yet. Hopefully everything works well. Looks like it should. Originally Posted by Manitoban
 Chris Johnson
'66 Chevelle Malibu
01-11-2017 #24 Registered User
- Join Date
- Aug 2007
- Location
- Jonesboro, Arkansas
- Posts
- 2,506
I really like that car, reminds me of the car my ex-brother in law had back in '67.
Carl Wilson
1968 Camaro - T-56 6 speed - 383 Stroker, 2014 Mustang GT seats. FiTech EFI, Tanks Inc. Tank with Deutschwerks fuel pump.
01-12-2017 #25
Registered User
- Join Date
- Jan 2016
- Posts
- 121
Suspension is subbed up and ready to go on!
Finished sub-assembling all of the suspension components with bushings and hardware last night. Ready to start putting this beast back together!
Chris Johnson
'66 Chevelle Malibu
01-23-2017 #26
Registered User
- Join Date
- Jan 2016
- Posts
- 121
Front suspension assembly!
Well we have been busy in the shop on the front suspension installation! Everything went on pretty nicely. Ran into a couple snags here and there due to this being my first time assembling these parts, but if I had to do it again it would go way faster. It has been awesome to see all of these new parts bring some new life and excitement to the car.
Rear end and driveshaft have been disassembled and dropped off for blast and powder coat and then they will be rebuilt.
Hanging newly blasted and powdered OEM control arms on frame
ridetech Street Grip spring installed and held with new disc brake spindle from MCB/Right Stuff Detailing
ridetech Street Grip HQ Single-Adjustable shock installed
Ridetech Street Grip Front MUSCLEbar sway bar installed
Chris Johnson
'66 Chevelle Malibu
01-23-2017 #27
Registered User
- Join Date
- Jan 2016
- Posts
- 121
Right Stuff Detailing 4-wheel disc brake conversion kit install
Started fitting up my 4-wheel disc brake conversion kit I bought from MCB at the same time as my SG kit. Required drilling out the 2 holes on the OEM steering arms to 1/2" diameter for them to be able to mounted to the new disc brake spindles that were included in the kit. This wasn't difficult, it just takes some time and patience, plenty of cutting fluid, low rpm, and someone to hold it flat to get a nice hole through there. Everything's fitting great so far!
Drilling OEM steering arms to accept larger, 1/2" fasteners to factory-style disc brake spindles
Steering arm onto spindle
Caliper bracket, shield, and single-piston caliper (based on '69 Chevelle caliper)
Zinc-plated, drilled/slotted/vented rotor, Timken inner/outer wheel bearings, and new hardwareChris Johnson
'66 Chevelle Malibu
01-27-2017 #28
Registered User
- Join Date
- Jan 2016
- Posts
- 121
Disc brake install continued
Finished up the right front corner.
Chris Johnson
'66 Chevelle Malibu
02-06-2017 #29
Registered User
- Join Date
- Jan 2016
- Posts
- 121
More front end chassis assembly
More front end chassis assembly done this weekend (left brakes, steering) Also got the TH-400 tailhousing back on with new slip-yoke bushing and seal installed.
Chris Johnson
'66 Chevelle Malibu
02-20-2017 #30
Registered User
- Join Date
- Jan 2016
- Posts
- 121
Mom's Chevelle is back on the ground!
We got the GM 12 bolt rear end back from being rebuilt with new bearings, seals and gear lash adjustment in the blasted and powdercoated housing. Also added a little shine under there with a Yukon chrome diff housing cover and ARP stainless cover bolts. Turned out great!
Dad and I spent the weekend assembling the Right Stuff rear brakes, OEM replacement rubber bushings for OEM rear lower control arms, ridetech adjustable upper control arms, and ridetech Street Grip springs, shocks, and sway bar. With all of those shiny new parts under there, the need to get the exhaust replaced is really noticeable now! That will have to happen this year too since the mufflers are nearly rusted through and there is a big exhaust leak we found that looks to have been there for 25 years.
The stance is right where I was hoping it would be; a little lower but with a slight rake, which is aided by the taller 275/60-15 tires out back. The front is going to need some camber adjustment as it is WAY positive right now. Hoping I can get that within street spec with the offset upper arm cross shaft and enough shims, while still maintaining some positive caster for stability.
Next up is plumbing the brakes. I picked up the cheap double-flaring tool from OReilly's, but the flare bar wouldn't hold the brake line in well enough to flare the end. When we cranked it down harder to try and hold it, the grooves inside the bar opening would dig into the tubing and actually crush it out of round. We tried mild steel and NiCopp line without success. Thinking I may have to get a professional flaring tool to be able to do this. Any recommendations on preferred flaring tools? I'd appreciate some feedback on good tools!
Chris Johnson
'66 Chevelle Malibu
03-09-2017 #31
Registered User
- Join Date
- Jan 2016
- Posts
- 121
Update - Rough alignment and brake line flare tool
I was able to get the upper control arm offset cross shafts flipped around 180 degrees which helped alot with the camber. From what I can tell they are both within a degree on vertical right now, which is good enough to get it up to an alignment shop to fine tune the shims. After fighting with a cheap flare bar to try and make a decent flare, we decided to get a nicer tool for this critical connection and ordered a Mastercool Hydraulic flare tool set. Nice tool! We will be working on re-plumbing the brakes this weekend with Ni-Copp tubing. I will post some pictures of the process. Also got a nice Eastwood double-sided deburr tool to prep the inside and outside of the tubing before flaring. The picture below of the flare is the first one I tried with the Mastercool flare tool which turned out really nice, and that was with marginal prep with a flat file, so it will only get better with the Eastwood tool.
After that is getting the new manual choke mechanism installed on the Holley 850cfm double pumper carb that had (no choke whatsoever) and then I am all out of parts (for now... :-) ) Weather up here is getting nicer so it will be good timing to get it out for its first shakedown run soon on all of these new parts. Can't wait to feel the difference in ride, handling, steering, braking, and launching.
Chris Johnson
'66 Chevelle Malibu
03-09-2017 #32 Registered User
- Join Date
- Nov 2006
- Location
- Ma.
- Posts
- 5,567
You guys are doing a killer job! That's a nice flaring tool, you'll be very happy with it. Nice work.
Wayne
Car FINALLY home !!!!!! lol
Project FNQUIK https://www.pro-touring.com/showthre...ghlight=FNQUIK
03-09-2017 #33
Registered User
- Join Date
- Jan 2016
- Posts
- 121
Thanks! Good tools (especially the lift) have made it go so smoothly, as well as everything I've learned on here for advice! Originally Posted by Motown 454
Chris Johnson
'66 Chevelle Malibu
03-09-2017 #34 Registered User
- Join Date
- Aug 2009
- Location
- Chandler, Az (from west NE)
- Posts
- 240
Nice looking Malibu, Chris, but I'm somewhat jaded as I've owned one that was originally that color since 1971! keep up the good work and thanks for sharing!
Ric
2002 s10, DD and AutoX.
1966 Malibu owned since 1971. Drag car converting to track toy!
03-10-2017 #35
Registered User
- Join Date
- Jan 2016
- Posts
- 121
Thanks! You should put some pictures up of yours! Originally Posted by rixtrix1
Chris Johnson
'66 Chevelle Malibu
03-13-2017 #36
Registered User
- Join Date
- Jan 2016
- Posts
- 121
Brake plumbing weekend
My dad and I spent the weekend routing and making new brake lines for the car. The Mastercool flare tool, Eastwood deburr tool, along with the NiCopp brake tubing made it a painless job! This job also made us feel so good to have FIRST spent the time and money putting the 2 post lift in. Way quicker and easier to do this kind of work with that. We also decided to use some black heat shrink on the 2 lines that are mounted to the rear axle to prevent rattling when they are strapped down since we didn't weld any bulkhead tabs onto the axle tubes before powder coat, as well as for a cleaner look against the black tubes. Worked great! We added some more line clips via nut and bolt where we could as well as drilled and tapped holes where we couldn't so everything is nice and solid now.
Just waiting for one adapter fitting to show up this week from Summit to attach the larger 1/4" front-to-rear line fitting (which is a 7/16-24 male inverted flare fitting) to the rear outlet of the Wilwood proportioning valve (which is 3/8-24 female inverted flare type). Then time to bench bleed the new Wilwood 7/8" manual master from Matt's Classic Bowties and then flush, fill, and bleed the rest of the system. The car will be ready for it's first shakedown drive after that.
Chris Johnson
'66 Chevelle Malibu
03-13-2017 #37
Registered User
- Join Date
- Nov 2006
- Location
- Ma.
- Posts
- 5,567
The lines look great, and that's a sweet lift. I built my garage with 12' ceilings so when I can swing it I'll get one. Keep the pictures coming.
Wayne
Car FINALLY home !!!!!! lol
Project FNQUIK https://www.pro-touring.com/showthre...ghlight=FNQUIK
03-13-2017 #38
Registered User
- Join Date
- Jan 2016
- Posts
- 121
Thanks Wayne. Yeah as you can see my shop has 10' ceilings so dad and I had to pocket the ceiling. One of the most useful things I've purchased yet. The BendPak XPR-12A that I got is well built. Good pricing and customer service through Alfredo over at Garage Auto Equipment (garageautoequipment.com) in Lake Elsinore, CA
Chris Johnson
'66 Chevelle Malibu
03-30-2017 #39
Registered User
- Join Date
- Jan 2016
- Posts
- 121
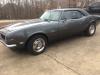
1st shakedown run, new tires, and new exhaust system!
We got the brakes finished up and got the car out last weekend for the 1st shakedown run! A few minor issues here and there (leaks, rubbing) that we were able to get fixed with some plumbing, new fuel pump, and alignment. Really happy with all of the new parts so far. Rides great, stops consistently, corners flat, no noise.
Car is in the shop now for a new Magnaflow 3" X-pipe stainless exhaust system fitment and installation to replace the old rusty exhaust. Looking forward to hearing what that will sound like when we get it back tomorrow. Great feeling to have the car out on the road again!
First startup
Shakedown run
New BF Goodrich Radial T/As - 235/60-15 fronts, 275/60-15 rears.
Alignment specs - This is as much positive caster as we were able to get with OEM upper control arms. Feels good on the street. Runs nice and straight without hands on wheel. Steering gearbox and steering wheel with lower profile sidewall tires and larger diameter wheels as a future project will be another big leap in handling feel.
At exhaust shop for new Magnaflow system - Sound video and pics to come soon!
Chris Johnson
'66 Chevelle Malibu
03-30-2017 #40
Registered User
- Join Date
- Nov 2006
- Location
- Ma.
- Posts
- 5,567
The car looks great. That must have felt great getting the first drive under your belt. I'm looking forward to hearing the exhaust on there, that's what I'm using but I don't have a big block.
Wayne
Car FINALLY home !!!!!! lol
Project FNQUIK https://www.pro-touring.com/showthre...ghlight=FNQUIK
Tags for this Thread

 Reply With Quote


