

Results 1 to 20 of 53
Thread: '69 Chevelle - Project TIMACHN
-
07-31-2012 #1

 Registered User
- Join Date
- Jul 2012
- Location
- Traverse City, MI
- Posts
- 574

'69 Chevelle - Project TIMACHN
PLEASE DELETE THREAD - Photo*****et killed it
-
02-07-2013 #2
Registered User
- Join Date
- Jul 2012
- Location
- Traverse City, MI
- Posts
- 574
Even tho no one commented when I made this thread, Im going to update it anyways.
I have since installed 3 point seat belts. and reinstalled the a-pillars and dash board uncovered. I cant get the dash pad into the upholsterers until the 12th. So once thats done I'll slap the dash back on and take some shots. I did however, color match the tired old pitted tail light bezels and polished the plastic. Not sure if I like it yet or not.....or if I do like it should I repaint the black inside of the bezel or not.
Color Matched

Not
Progress is slow on this car - Im too busy driving it to work on it. And heres a pic for photography buffs (shot with Canon T3i)
Had the dash pad covered and stitched.
Only good pic I have of it now. Also shown is , gauge bezel painted, metal dash part painted silver along with column, A-pillars covered with soft touch vinyl (really nice stuff), kick panels redyed black, vents painted black, tach reloacted from top center of dash. Im going to call the dash area done for now until I can fund VHX gauges, new carrier, and ididit column. My next thing to do is find a nice steering wheel. Then in a couple weeks I'll start on the door panels - I figure this to be a good month long project.
I know the stitching isnt perfect. But thats fine, I wasnt expecting it to be.
I just ordered a slew of parts for the ride. Only a couple frilley pieces that you will actually see. Most of them are functional parts. The list is as follows -
New CS130 140amp Alternator. The current 63amp isnt powerful enough to run the car when I mash the pedal.
New core support. Current one is rusted out.
New polyurethane front suspension bushings.
New polyurethane body mount bushings.
3" Rear lowering springs.
4 new sealed beam conversion headlights with relay harness. I will be converting the low beams to HiDs with projectors for more BRIGHT.
New steering wheel.
Holley SA 770cfm to replace the overly large Edlebrock Q-Jet that is currently on there.
Not sure what to do on the front yet on my limited budget.
02-07-2013 #3
Banned
- Join Date
- Oct 2012
- Location
- USA BABY!
- Posts
- 9
talk about mickey mouse
02-07-2013 #4
Registered User
- Join Date
- Jul 2012
- Location
- Traverse City, MI
- Posts
- 574
I dont get it
02-07-2013 #5
Registered User
- Join Date
- Jan 2012
- Location
- Plymouth, MA
- Posts
- 54
Bart,
Looks like it has alot of potential. Nice job with the dash cover. Keep at it.
Your driving your car and having fun and that's what it's all about.
Keep the updates coming.
John
02-07-2013 #6 Registered User
- Join Date
- Mar 2008
- Location
- The Piedmont Triad, NC
- Posts
- 373
That interior looks way better then when you first started out. Hows the rest of the car look? Rusty areas?
67 LeMans Convertible
67 GTO
69 Camaro Build Thread https://www.pro-touring.com/showthre...ost-Money-quot
70 Chevelle 400 4spd
70 Chevelle
02-08-2013 #7
Registered User
- Join Date
- Jul 2012
- Location
- Traverse City, MI
- Posts
- 574
The trunk is rotted out where it curves up toward the lid in the back. The core support is rotten on the battery side - but I already have that part sitting in my garage waiting to be put on. The floor boards show very little surface rust, on both sides. The doors are original and solid. The front and rear quarters were replaced and a decent but not perfect job was done on those. Around both front and rear windows there are pin holes from rust - not suprising considering the design allows water to just sit in there. The only thing I could think of doing at this point is slather some goop in there to keep water from leaking into the trunk. Unfortunately, I dont have garage space to work on the car a lot so I have to wait for warmer weather when I can kick the wife out of the garage so I can use her spot.
The frame is solid. Or as solid as A-body frames can be anyways. I went around the lower curved area of the frame where the rear LCS connect and tapped on the frame with a ball peen. It made that nice metal "tink" noise and not that "thud" that you get when you tap on layers of rusted metal.
Its going to be a slow process. But its mine. And I dont want to be without driving it for weeks at a time. My goal is to do everything myself except for any welding or when the time comes, body work. I dont have the patience to do body work. What good body guys do blows my mind.
02-08-2013 #8
Registered User
- Join Date
- May 2012
- Posts
- 19
I'll race you for the Slowest Build Title. lol. :D Originally Posted by Barrrf

I do like the Pro-Tinker thing. That's pretty much what I'm doing with my Camaro as well.
Your Chevelle looks great! If I didn't know better I'd say you had a lot more work into it than you do. The interior is coming along nicely. Are you planning any major modifications to the interior, or just going back to semi-stock?- Neil
- 1968 Camaro. Currently: SBC .040 over, 700R4, 10 bolt w/ 3.73's.
02-08-2013 #9
Registered User
- Join Date
- Jul 2012
- Location
- Traverse City, MI
- Posts
- 574
My plan, currently (which changes when I keep finding things that need to be changed vs things I want to change), is to completely update the interior. Im working front to back - sort of. Once get the suspension sorted out so I feel safe, Im going back to the interior.
First thing Im doing is changing out the seats - and unless someone has had a terrible bad experience with Cipher, Im going with those. Then I'll probably buy a new gauge carrier and put VHX gauges in it. Im also going to be working on a center console subsequently. I have a few ideas Im kicking around in my head about the center console - but I know I want to have a couple of removable panels so when I change from a stick to a ratchet auto I wont have to rebuild the whole console. I also want to have a gauge pod off the left side of the console so the passenger can see RPMs/MPH without having to crane their neck over to the drivers seat. And lets be honest - that planet sized tach has to go.
And dont hate me too much, but Id really like at least 1 cup holder. Its hard to drive, shift, and hold my morning coffee all at the same time.
02-08-2013 #10
Registered User
- Join Date
- Mar 2008
- Location
- The Piedmont Triad, NC
- Posts
- 373
Let me know how those Cipher seats work for you. I was wanting a pair of those when I get closer to getting finished with my Camaro
67 LeMans Convertible
67 GTO
69 Camaro Build Thread https://www.pro-touring.com/showthre...ost-Money-quot
70 Chevelle 400 4spd
70 Chevelle
02-09-2013 #11 Registered User
- Join Date
- Jun 2012
- Location
- N. Shore, Ma
- Posts
- 337
"longest (time wise, not post wise) pro-touring build maybe on the planet"
Ha I have you beat already! I started my GTO 27 years ago, and just started to work on it again last summer.
Don't listen to all the negative comments, just keep working on it and doing a little bit as you can afford it. Looks like you are off to a good start though, the body is nice and you can patch the floors later.
Nice to see more A bodies out there. Good luck.Eric
Building 1969 GTO - Roadster Shop chassis, LQ9 w LS3 heads and rebuild parts from TSP, Bowler prepped Magnum T56 6 spd, 3 Link Strange 9" w Speedway Floater Hubs, Wilwood 14" F - 13" R brakes, 275.18 - 345.19
https://www.pro-touring.com/threads/94970-69-GTO-Build
02-10-2013 #12 Registered User
- Join Date
- Nov 2006
- Location
- Ma.
- Posts
- 5,567
Your car looks nice. The dash looks great in there. Its nice your able to drive it while you work on it.
Wayne
Car FINALLY home !!!!!! lol
Project FNQUIK https://www.pro-touring.com/showthre...ghlight=FNQUIK
02-10-2013 #13
Registered User
- Join Date
- Jul 2012
- Location
- Traverse City, MI
- Posts
- 574
Thanks fellas. That's kind of my goal - be able to drive it and do work on it. Part of the reason why it's not stripped down. I need to be able to drive it. Too much fun.
05-20-2013 #14
Registered User
- Join Date
- Jul 2012
- Location
- Traverse City, MI
- Posts
- 574
Update: So I strayed from my original path of just replacing the core support and cleaning up the front suspension with some powder coat and new bushings. Whilst I did replace the core support, I also replaced the A-Arms and springs in the front, new alternator, lower alternator bracket (was missing), new CPP 3" springs in back, body bushings, and seats.
4/15/13 - Everything removed from drivers side. Gonna clean up the frame and paint before putting new stuff on.
Gross old stuff on the ground. It was at this point I decided to buy all new stuffs. I waffled a bit. But I got really frustrated with trying to remove the old bushings, so I chucked the a-arm and hit up ebay.
Rats nest behind the firewall. This is how it came to me. Its the horn relay (life of the car apparently) and the voltage regulator. 2 things that are curious about the factory build/wiring. 1.) The horn relay needs constant 12v power. Without it the car has absolutely 0 power. None. Cant even turn it over. 2.) All of the passenger side wires run in front of the core support on the outside of the car. I believe all of the wires were run and the connectors put on after that. Because I could not pull them back through - the connectors were too big. I had to cut 5 wires and put them back to together as a semi temporary fix.
4/19/13 - Grille, headlights,header panel, ect removed
Still 4/19/13 - Everything is off. Reassembly can begin.
4/30/13 - New A-Arms with Energy Suspension Bushings and Proforged ball joints with Hotchikis 2" drop springs. Im impressed the sway bar link are roto-joints. Not bad for cheap a-arms. .
*Disclaimer - I really really wanted UMIs with tall BJs but the coin wasnt there and I wanted to stretch my buck a bit further. So I bought these CPP A-arms for $279 shipped. I bought the Proforged BJs at the same time with the intention of swapping them out immediately. When the arms arrived, I disassembled them and installed the new bushings and ball joints. I also painted them silver - just because. What I did leave however, is the sway bar end links. The lower connection is a roto-joint as opposed to the OG bushing method.
Still 4/30/13 - Caliper bracket - steering linkage shot
5/4/13 - Painted new core support to install.
Another shot of some more stuff installed. Also, some wires just hanging around.
Some poly body bushings to show. Yes theyre on the whole car and not just right here.
Brackets and header panel reinstalled
Filler panel and headlights reinstalled. Used all new headlight bucket hardware and springs. Decided against installing retrofit projectors at this time because I just wanted to get the car on the road. Will install later - requires cutting headlight buckets and core support. So I just put in H4 highs (replaces T3s) and installed new relay harness. OEM wiring sends all headlight power through the headlight switch - makes for dim lights. Relays are the way.
5/5/13 - Forgot to take some pics along the way. So in this pic I have the fender wells reinstalled (painted silver), core support bracket reinstalled, and dirty **** reinstalled. You can also see new CS130 Alternator. It bothers me to no end to put old **** back on, but, this isnt an unlimited budget build. So I make due. I couldve cleaned some things up I suppose but I was in a damn hurry.
5/5/13 - Had old Edelbrock Q-Jet 850cfm carb on there. I bought this 770cfm Holley Street Avenger to use instead. Holy off idle hesitation batman. Took some research and some parts but it is tuned up and makes way more power than the Q-Jet did.
But I learned a lot about the Holley carb. Most people said the lean condition I was experiencing (popping out of the exhaust, off idle hesitation) was caused by vac leak or improperly set accelerator pump. So this gave a place to start. I removed the accel pump diaphragm and checked the primary squirter size. Everything seemed to be good there. I reinstalled those parts and set up a slightly more aggressive pump cam with a longer squirt duration. Still hesitated pretty bad but I could push through it and the car would move. So I bought a vac gauge and set the idle mixture screws, then the curb idle screw, and made sure the float levels were correct and also dialed the fuel pressure up from 4 1/2 psi to 6psi. Still a mean hesitation. Finally I decided to look at the primary and secondary metering jets. 68 and 76 respectively - yup, car is lean. Bought new jets and started with 72/76 combo. That almost did the trick - still a slight hesitation under light throttle. Went up to 76/82 - BOOM! MONEY! Now just waiting on my AFR gauge to arrive to see where I sit.
And on Friday 5/17 - New Seats and Wheel installed. The wheel is a flimsy piece of crap and I need to find a better one (thats my personal opinion about this particular wheel made by Forever Sharp. They may have better wheels I dont know. But the adapter parts that came with the wheels are awesome). I'll make due for now. The Cipher seats however, firm, good bolstering, solid construction - not bad for $340 shipped. Im am slightly concerned about the sitching - we'll see how well it holds over time. The biggest hit was buying the Planted seat brackets. $140 each. Theyre very nice brackets though.
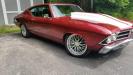
And the lowered shots -
Forgot to remove SS plate. Oh well.
For the most part, everything went ok. Only one bolt on the passenger side lower A-Arm had to be cut off. Mostly everything lined back up which is lucky considering the nature of aftermarket replacement sheet metal. I had one issue with the headlight wiring, it was a ground so easy fix. Then I mentioned the no power thing - that had me stumped. I initially thought the POs terrible wiring job was the culprit - there was a random blue wire tied to battery +. Turns out random blue is pretty important to the life of the car so I ran a new red power wire to the horn relay.
So in the end, I have some nice new parts. Jury is still out on if it handles any better. I'll do my best to describe the before and after seat of the pants handling.
Before - car seemed to roll slightly then bite hard in sharp corners
After - car doesnt seem to roll. Seems to effortlessly glide through the corners. Giving the illusion the car isnt biting. Handling seems worse but I have more confidence in the corners.
05-20-2013 #15 Registered User
- Join Date
- Apr 2001
- Location
- The Netherlands
- Posts
- 1,509

sometimes i wished I had done mine in steps.....it took me years so I understand your approach...., like what you did to the dash, keep up the good work!
05-21-2013 #16 Registered User
- Join Date
- Apr 2013
- Location
- Evansville, IN
- Posts
- 21
looking good. I like that you are doing it while driving it. its cool to do that way so you can find out the weak points as you enjoy it. very nice.
05-21-2013 #17 Registered User
- Join Date
- May 2006
- Location
- Rhode Island
- Posts
- 676
Dash looks awesome!! Love the chevelle, looks good! Great job so far. One day I'll splurge and get some tubular control arms. Its gotta handle better after doing all that! I noticed a huge difference and I didn't upgrade to the tubular arms. maybe you need to throw her around harder
 LOL
LOL
05-21-2013 #18
Registered User
- Join Date
- Jul 2012
- Location
- Traverse City, MI
- Posts
- 574
I think youre right. Coming into work this morning I'll held the suggested 35mph corner to 70mph. Minimal body roll - easy through the corner. I never felt out of control or uncomfortable. Whereas before, it'd roll then snap into the corner. This must be what the suspension experts talk about when they describe the terrible factory camber of these cars and how the tire rolls over too much before the camber can compensate?
05-21-2013 #19 Registered User
- Join Date
- Oct 2011
- Location
- Katy, Tx
- Posts
- 309
My friend has a 69 Chevelle that he is going to be putting an LS????? into. He is looking to find a salvage CTSV with an LSA for it. Your Chevelle wears it's colors well.
08-02-2013 #20
Registered User
- Join Date
- Jul 2012
- Location
- Traverse City, MI
- Posts
- 574
Slowly coming along. Tore out the back seat, pkg tray, side panels so I can fix quarter winders. Decided at that time I might as well make a custom pkg tray because that will be relatively easy. Also found this -
Why would someone cut all that out? So doesnt matter, I'll make it work.
About half way through - the tear drops are for 6 1/2" Components to mount underneath the tray on a sub plate. Theyre covered in speaker cloth. The others cut outs are for faux suede inserts.
and in the car -
Turned out looking better in the car than it did to me while it was laying on the ground. Next project - rear interior side panels.

 Reply With Quote


