

Results 81 to 100 of 808
-
09-07-2016 #81

 Registered User
- Join Date
- Sep 2009
- Posts
- 2,711

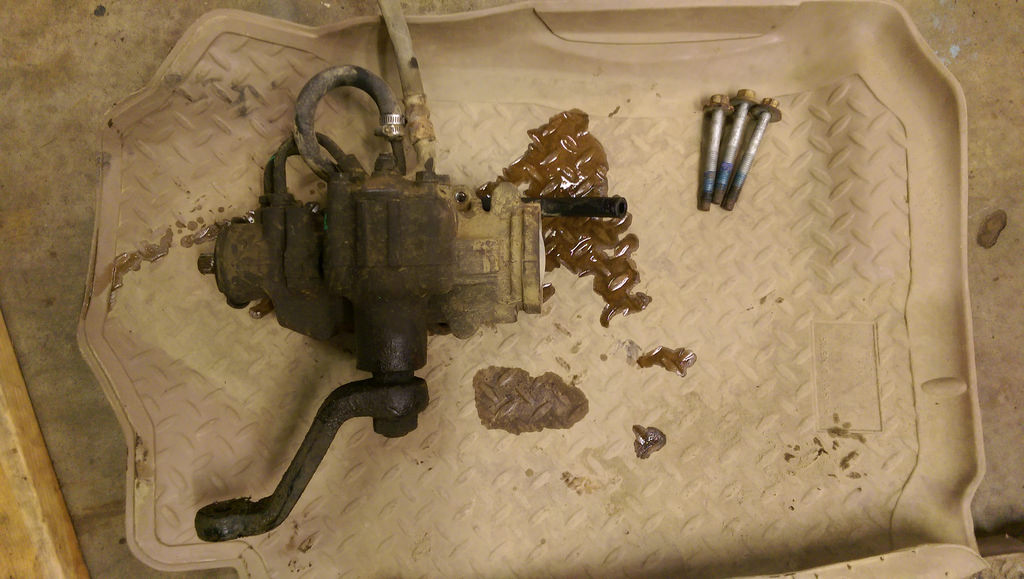
I have been working here and there making some small progress and got enough worth of making a post. I had to go to my local pick-a-part to get some parts for my truck, and while I was there I got some parts to finish up my wiring harness. I also found a Jeep Grand Cherokee steering box from a lower mileage vehicle 1997.
Here is the box as pulled. The guys did me a favor, and got the whole box as is for $38 bucks! It should make a pretty cheap upgrade to quick steering with the 12.75:1 ratio, and also give me the metric lines to hook to my LS1 pump. Win-Win.
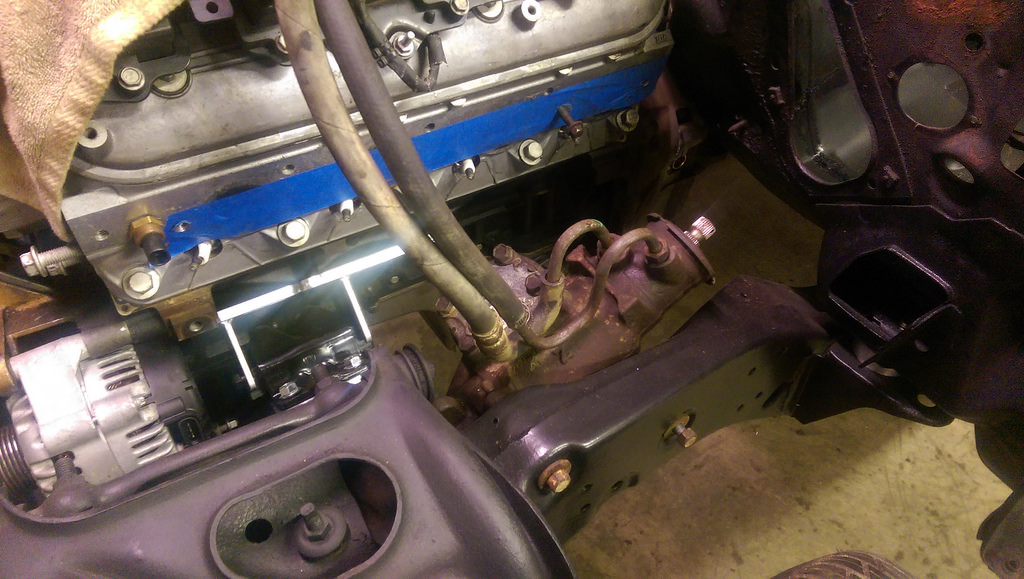
Test fit after some power washing. Fits great, just needs a little paint and good to go.
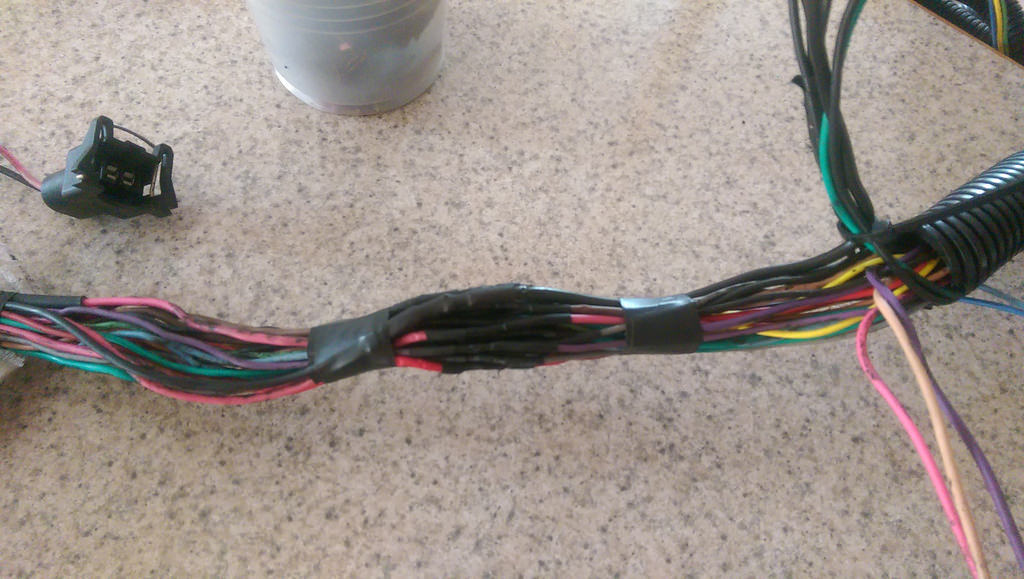
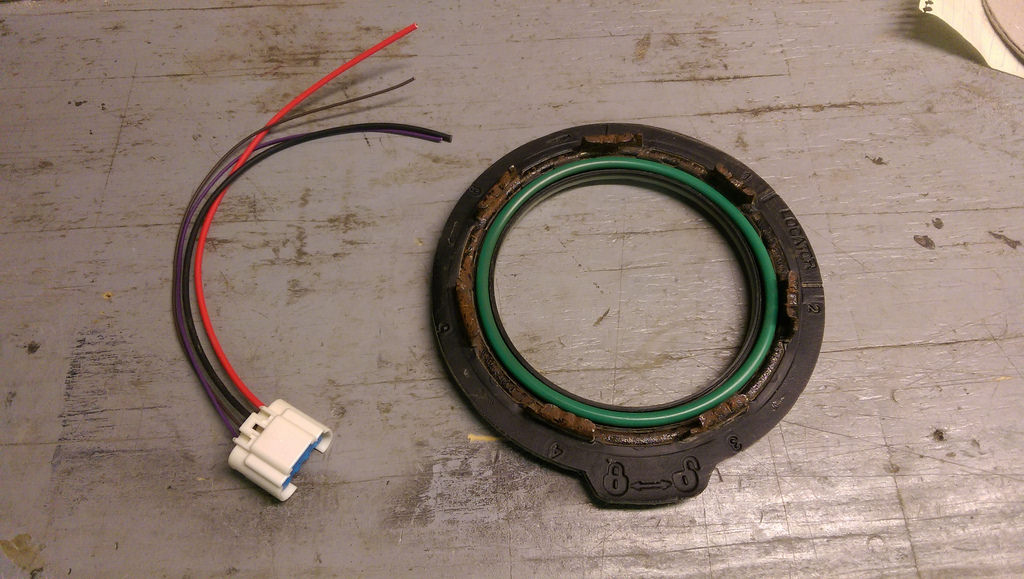
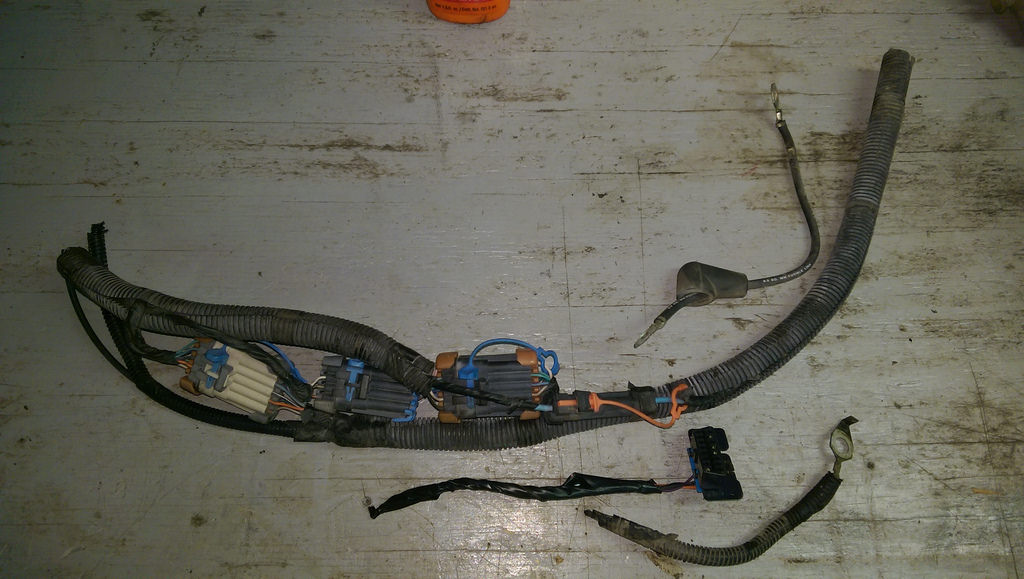
I also needed the MAP, Crank, and Cam sensor pigtails which were the last ones needed to finish the harness.
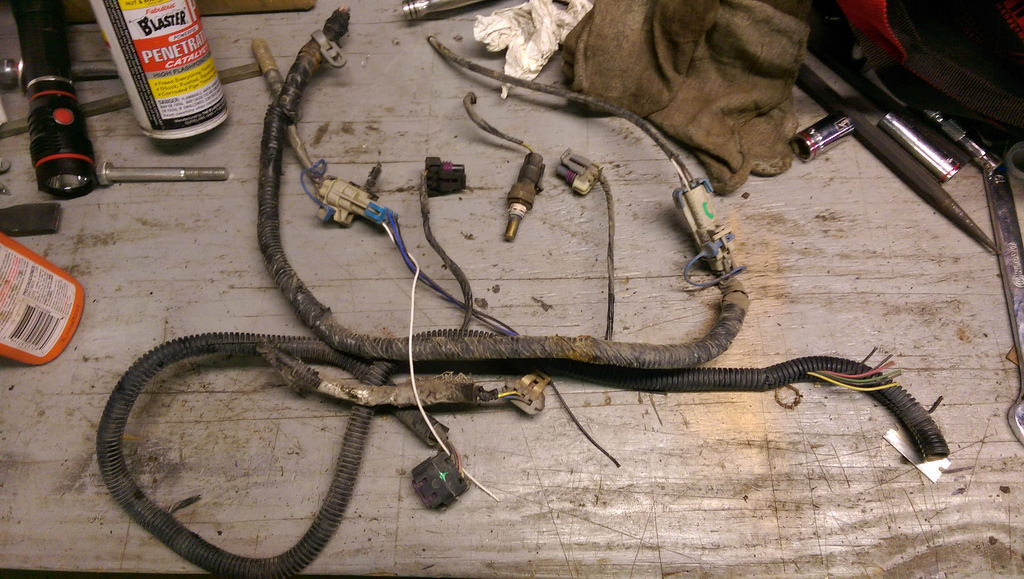
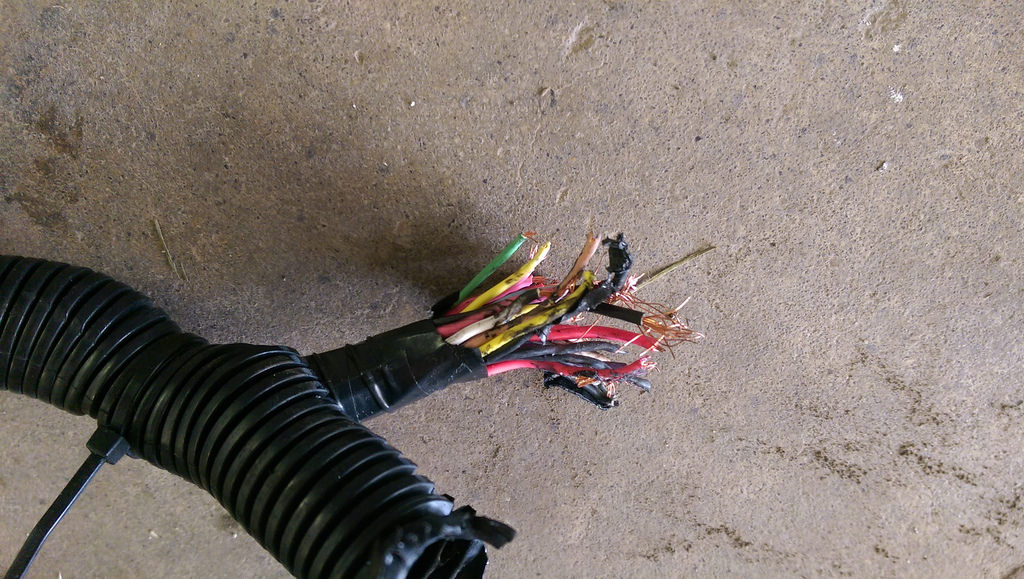
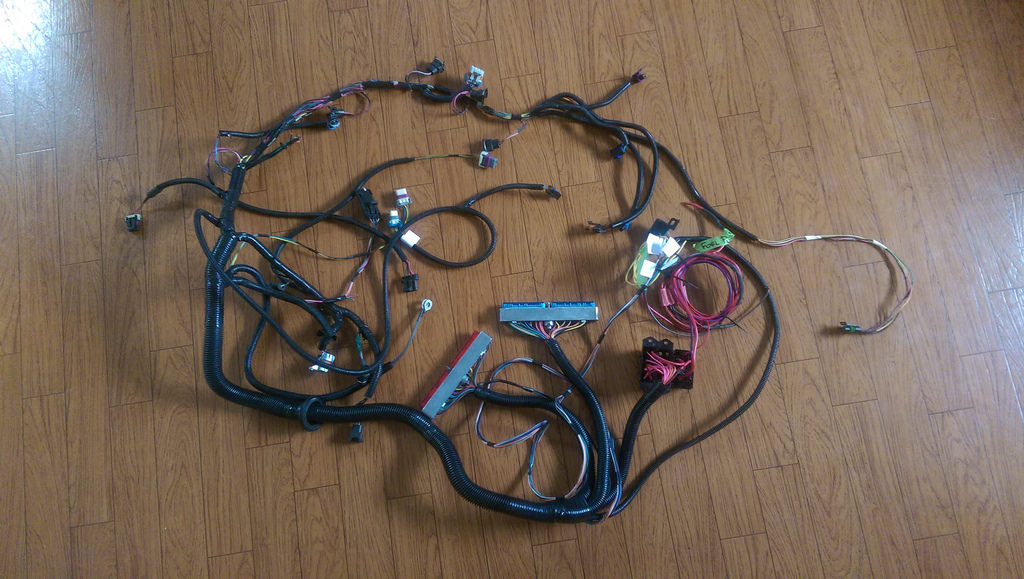
If you remember this is what I started with. I traced and tested all of the wires to verify they are correctly pinned.
Almost done.

All shrink wrapped and soldered back together.
Ready to swap!
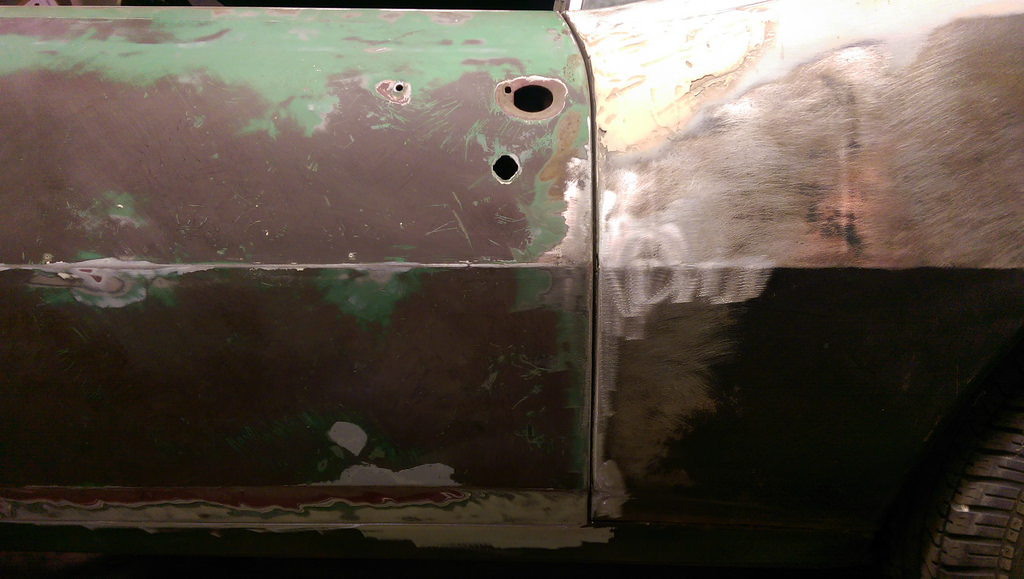
Another part that I was very concerned with was the rocker panel installation in relation to the door and fender. I finally got around to grinding out the door jamb and roughly fit the door and to my relief it all will fit! I didn't get pictures of anything as I need to rebuild the hinges still. Here is where I left off.
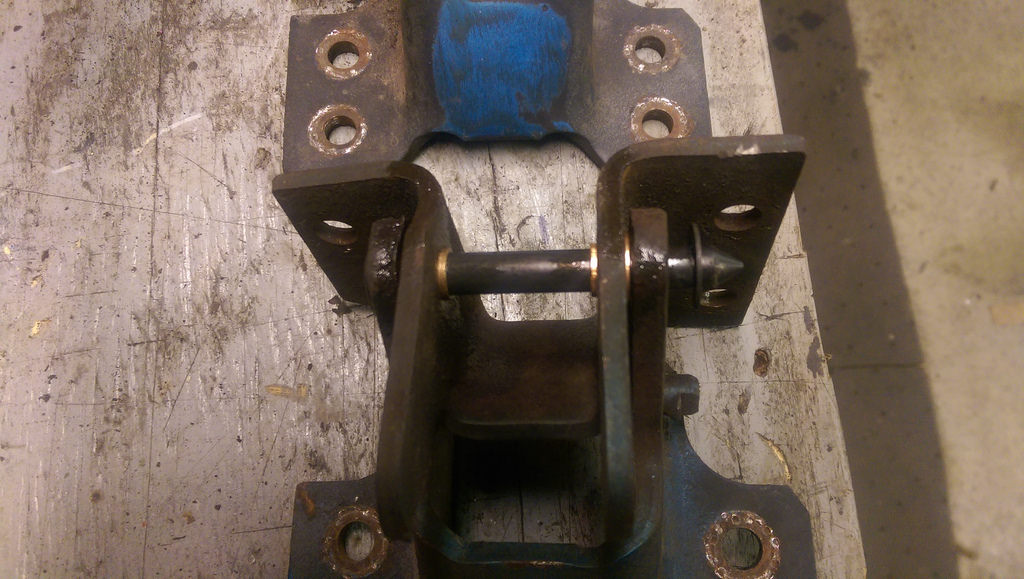
That's all for now. I still need to order new rollers for the hinges, then I can do a real test fit of the door/fender/quarter and see how it all matches up. After the test fit last night, I am so relieved as I thought I would need to possibly cut the rocker off and refit.
Cheers,
Ryan
1955 Nomad project LC9, 4L80e, C5 brakes, Vision wheels
1968 Camaro 6.2 w/ LSA, TR6060-Magnum hybrid and etc SOLD
1976 T/A LS1 6 Speed, and etc. SOLD
Follow me on Instagram: ryeguy2006a
-
09-10-2016 #82
Registered User
- Join Date
- Sep 2009
- Posts
- 2,711
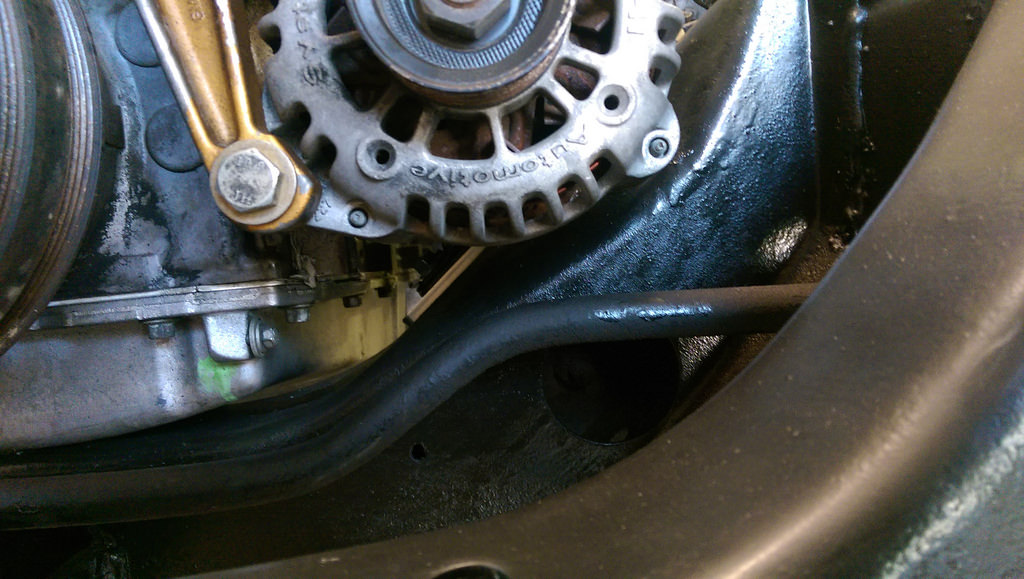
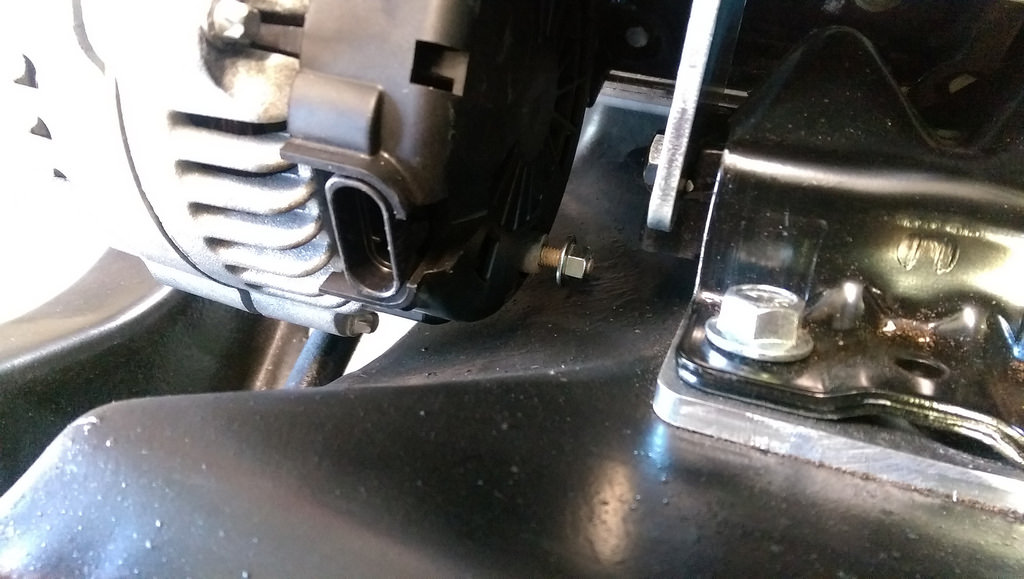
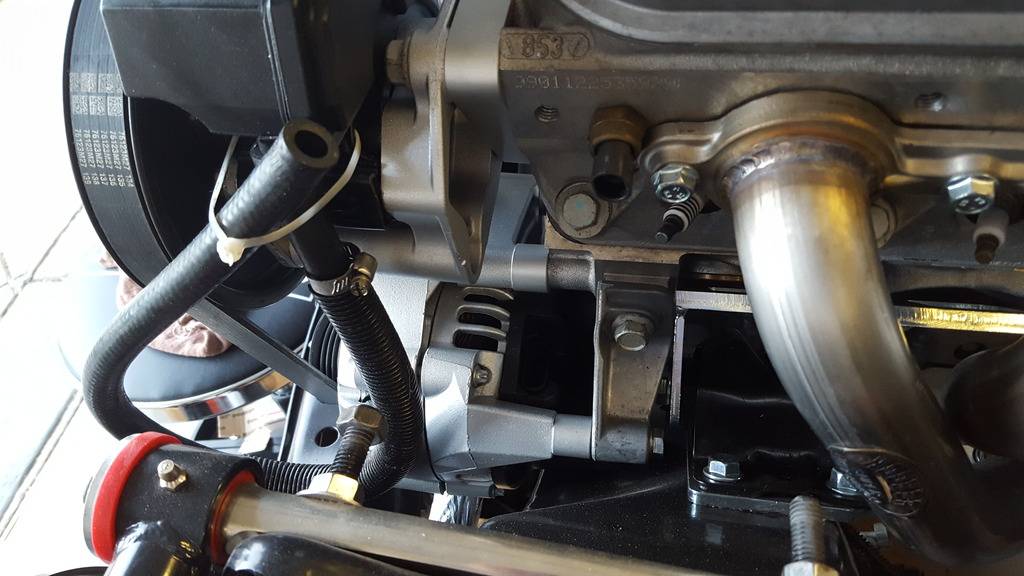
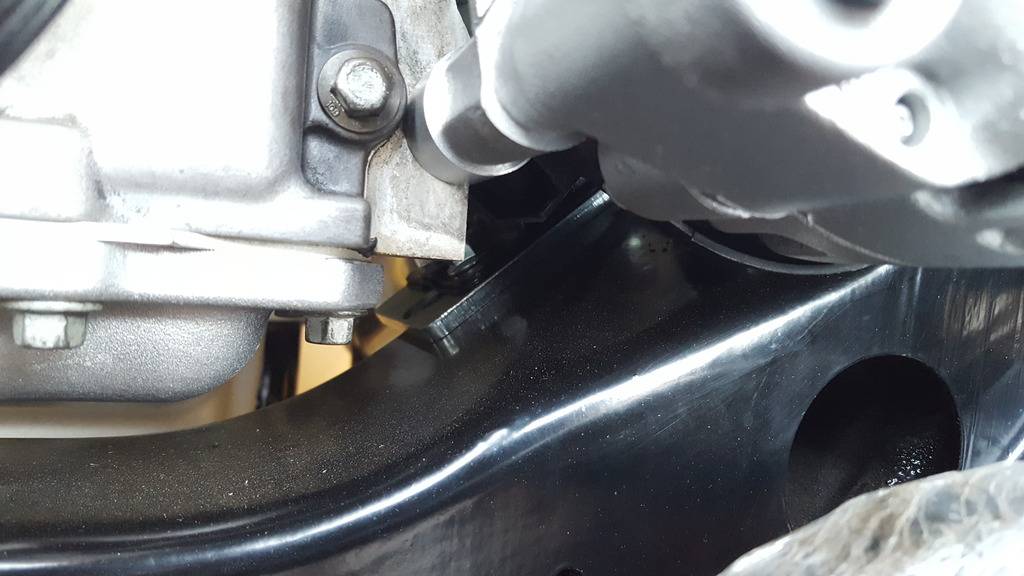
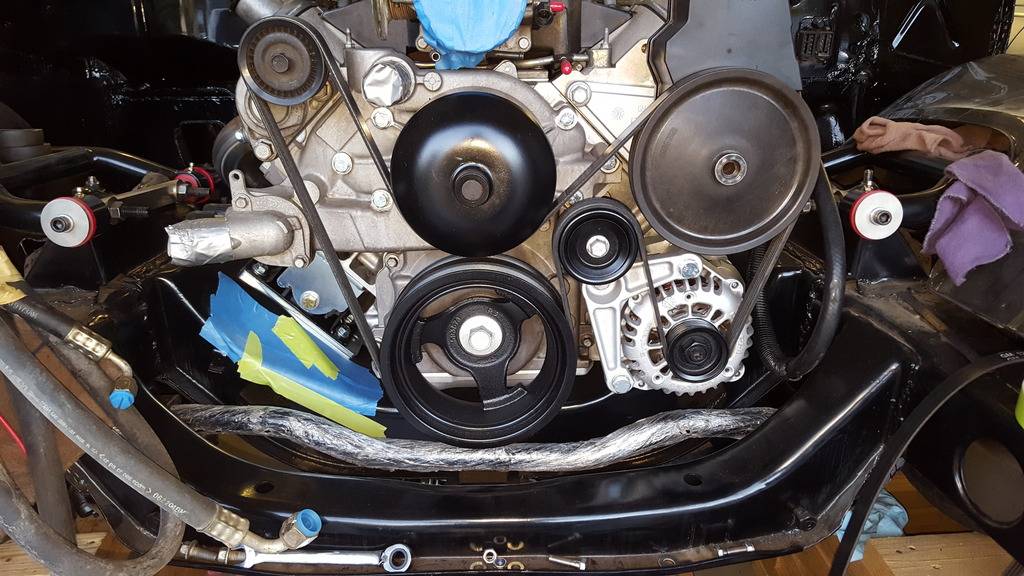
I got a little time in the garage last night, and thought I would update my build. I borrowed a tap and die set, so I put it to good use and drilled the lower boss on the 5.3 so that I can use my 4th gen accessories. It turned out great and was dead center and straight for the hole that I drilled and tapped. For those that may be curious about how the accessories fit with the Holley mounts, I took a few pictures of the clearance around the frame. It is pretty tight, so I may have to make a small notch, but very close to fitting as is.

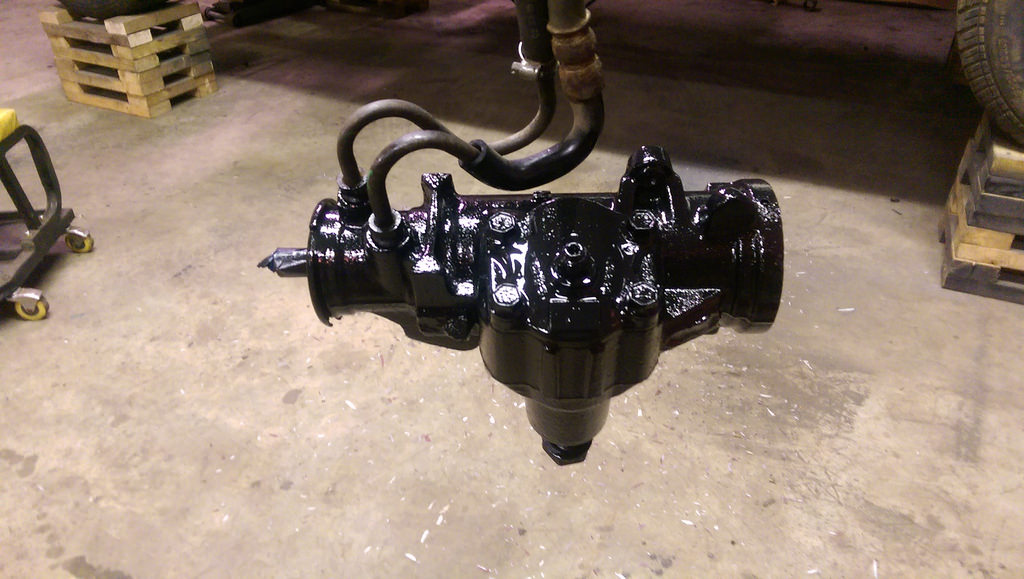
I cleaned up and painted the steering box. I also verified that it had the right "alpha" code and is the quick steer box. It had the WK code and it was from a 1997 JGC.

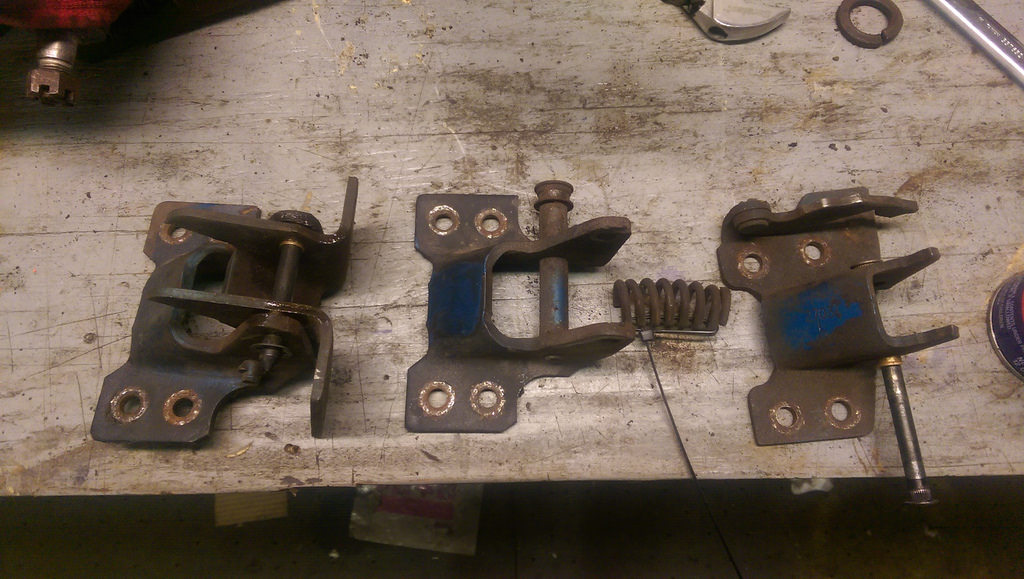
After I painted that box I decided to finish rebuilding the hinges, and noticed that the passenger side was actually the original hinge and was never touched. It was actually pretty solid still. But I had the rebuild kits and figured I would do it now so it's good for another 45 years!

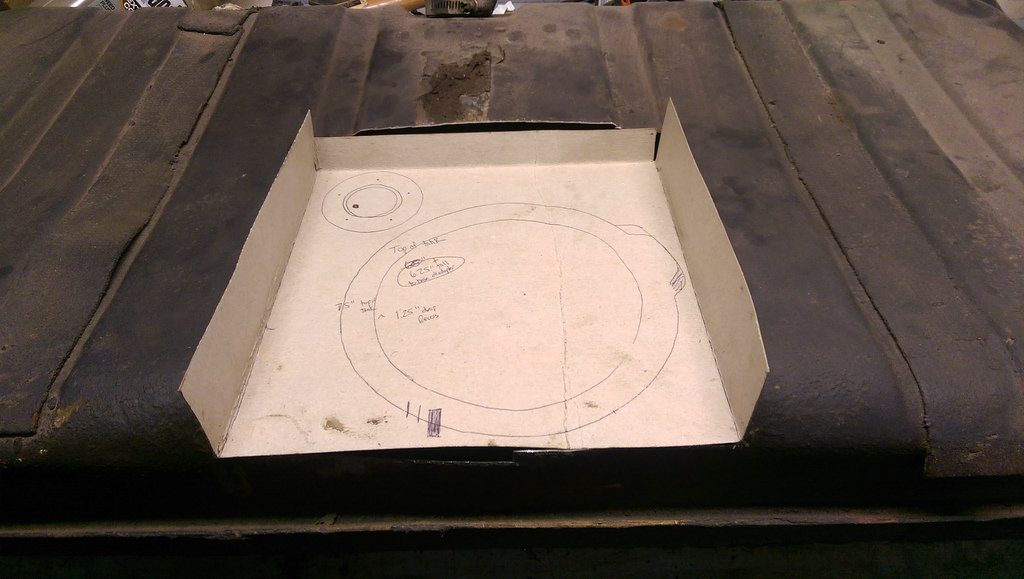
Then to change gears away from body work and welding, I decided to start the modifications to my fuel tank. I first started, by taking all of my measurements for the adapter ring that I made from a '09 Colorado fuel tank, and where it would sit in relation to the fuel tank recess I want to make. With the fuel pump assembly attached to the adapter ring, the height I wanted was 6.25" tall. That gave me the measurements I needed to start my template. I cut mine out of some thin cardboard I have been saving for this project.
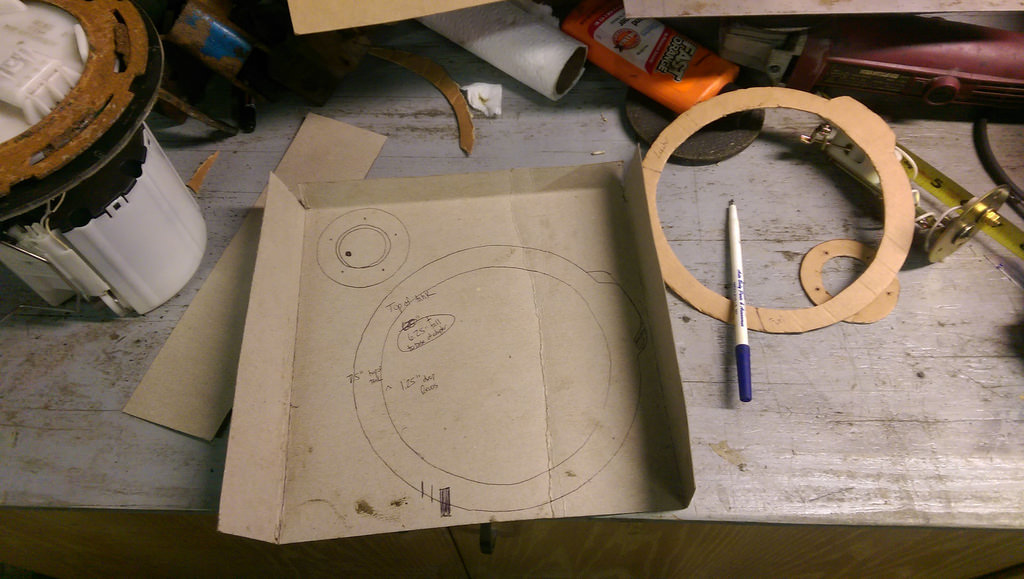
Once I had the template, I measured where it would fall in relation to the fuel tank. I wanted it centered, and where the outlet of the fuel pump assembly would be pointing in the right direction. My template measured 10" x 10", and will recess the pump roughly 1.25". No turning back now!
Luckily it fit right in between the two ribs on the tank.
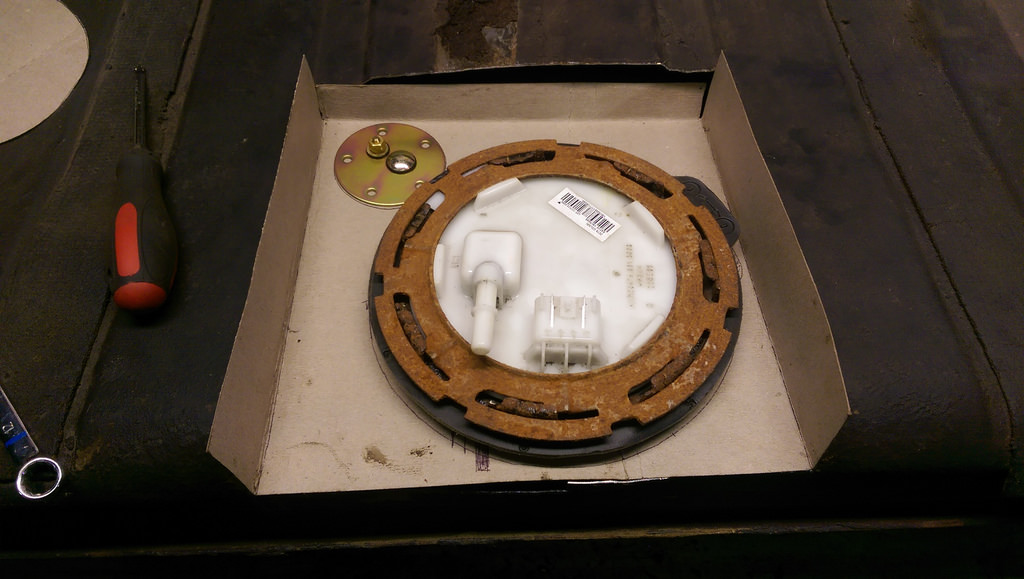
And test fit, it is going to work perfectly. I wanted the compressed height of the assembly to be between 6.25" and 6.5" and it measured in right at 6.5" with my template. Perfect. Now for those wondering, the fully compressed height for the assembly is 5.75" and the fully extended height is 7.125". So somewhere in the middle is right where I want to be.
Now, my original plan was to cut my recess out of stainless steel, but due to the added complications, I just used mild steel. I had a piece of 16 gauge steel, which is a little more rigid and won't give any issues with welding to the tank.
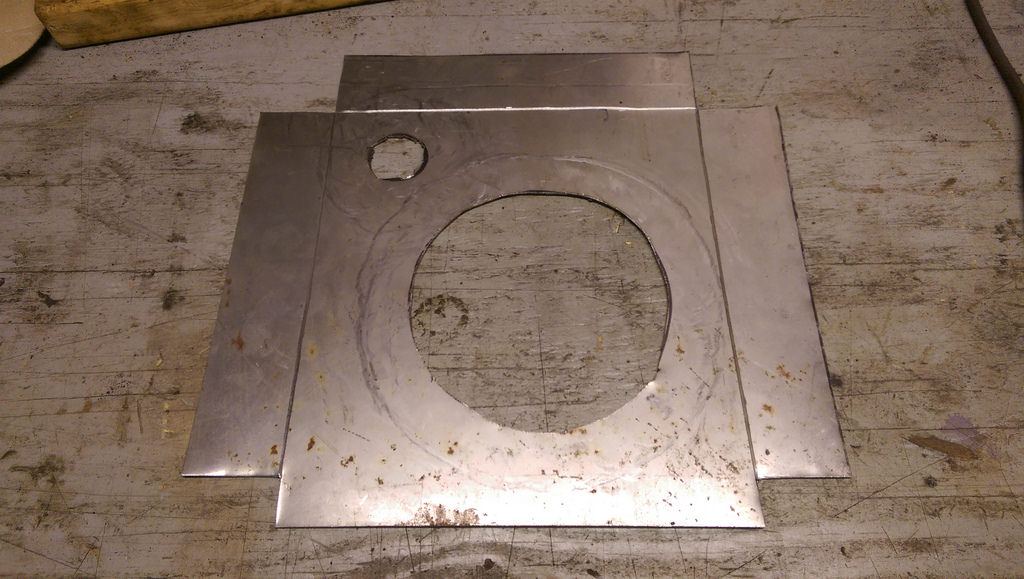
To make the bends much cleaner, I used a tape line and my cut off disk on my 4 1/2 grinder and cut a small line where I wanted the bends. I saw this trick somewhere else online, and it worked incredibly well. The lines are so clean and the bends are spot on. This is the first time I have had a piece of metal this large, come out exactly like my template. Not too bad for working at 2am.
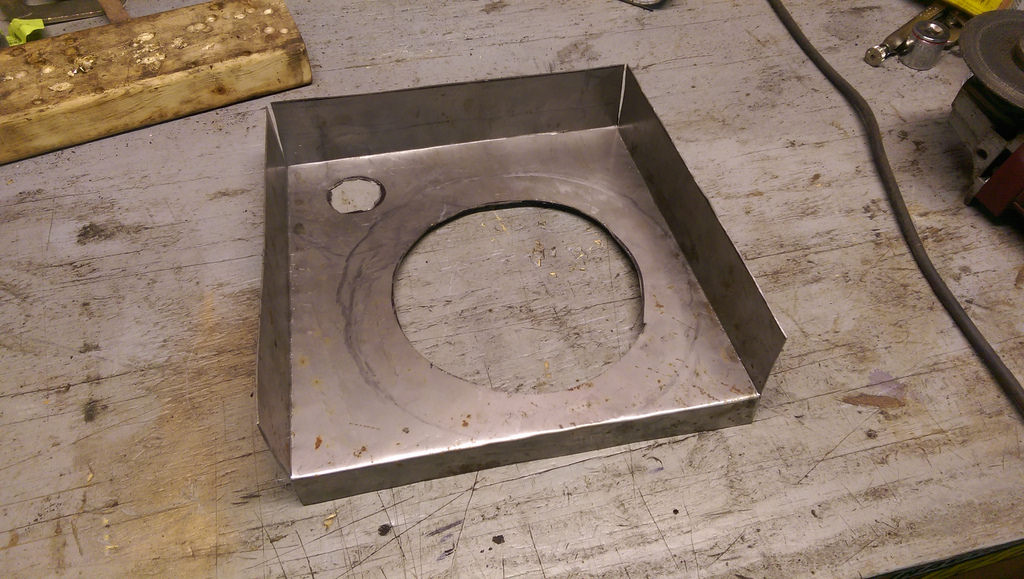
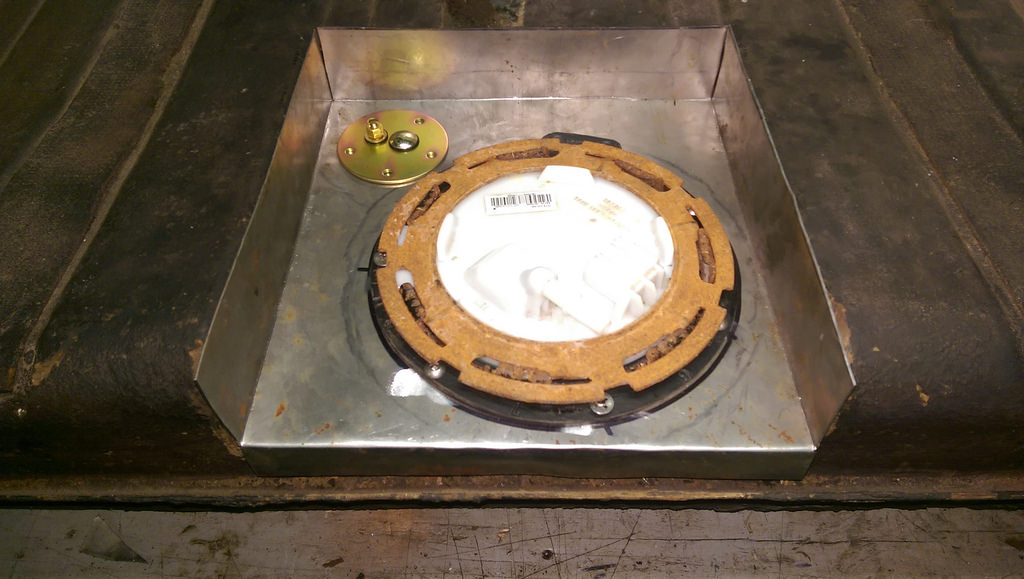
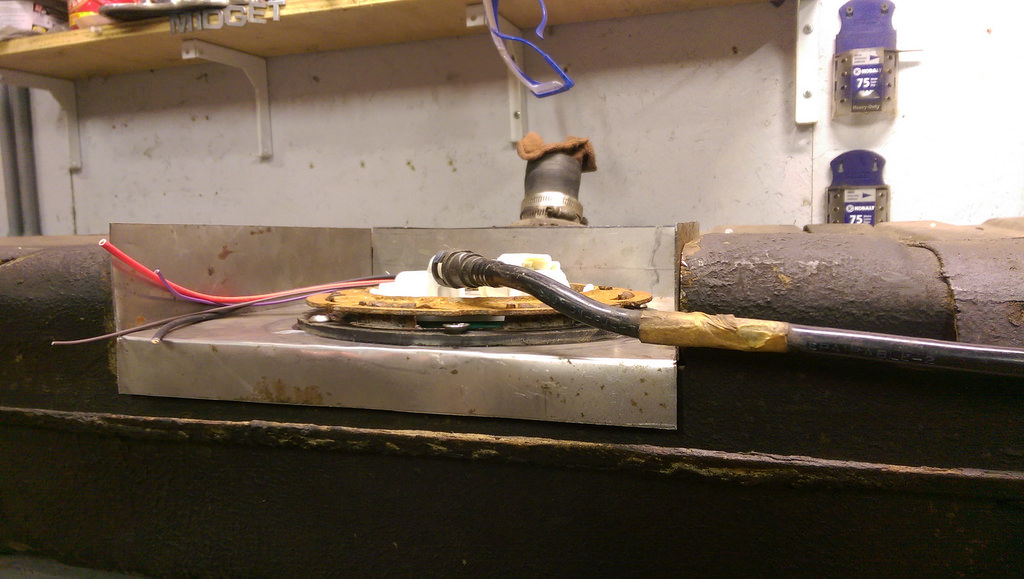
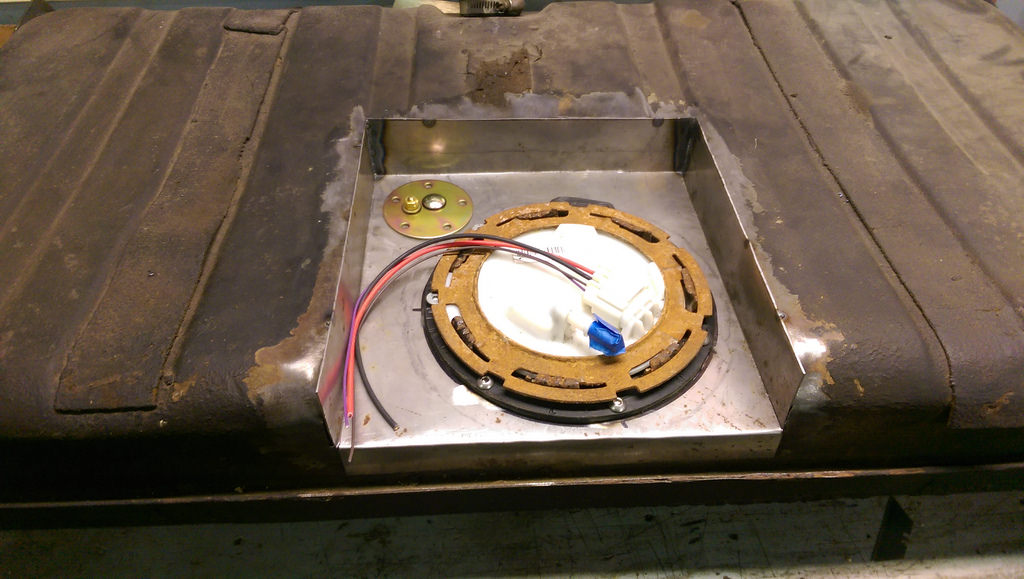
And here is the first trial fitment. I still need to verify the exact height for the pump assembly, make sure it is level, and that the pickup is where I want it. I am tempted at this point to bit the bullet, and buy the corner pick-ups and be done with it. I haven't welded anything so that is still up in the air. Overall, it came out better than I had imagined. The recess fits exactly where I wanted it and fits perfectly in the center of the tank. The zinc coated part in the upper left is a universal fuel level sender I picked up at a swap meet for $5 bucks. And yes, I will be buying a new locking ring as that one is severely pitted/rusty.
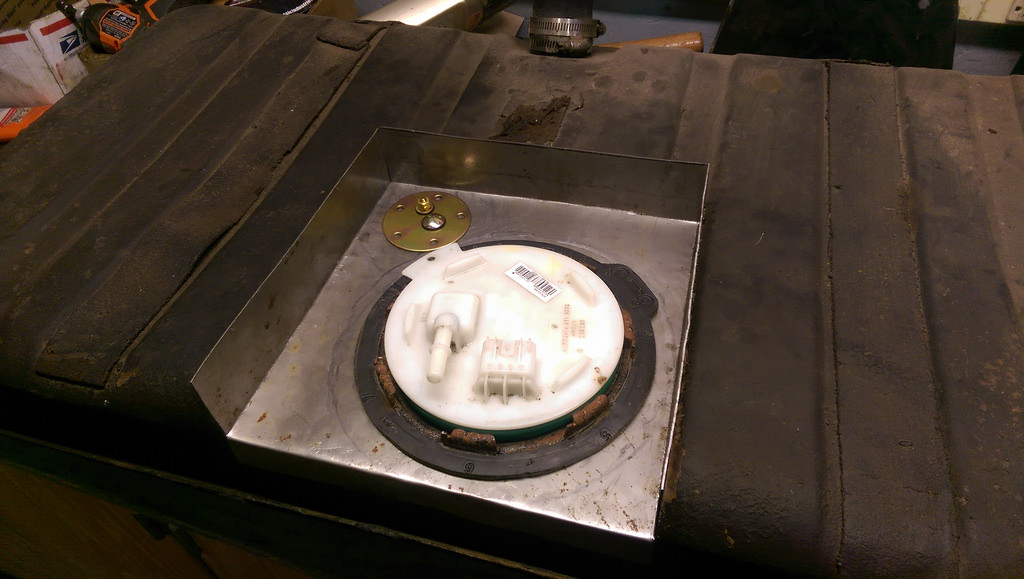
I can't wait to see the final product! Very happy with the progress on that so far.
Cheers,
Ryan
1955 Nomad project LC9, 4L80e, C5 brakes, Vision wheels
1968 Camaro 6.2 w/ LSA, TR6060-Magnum hybrid and etc SOLD
1976 T/A LS1 6 Speed, and etc. SOLD
Follow me on Instagram: ryeguy2006a
09-18-2016 #83
Registered User
- Join Date
- Sep 2009
- Posts
- 2,711
I was still bumming out with the fitment of my door/rocker/quarter panels so when my father-in-law stopped by, he gave me a hand moving the panels around. We determined that when the rocker panel and quarter were put on, they got the welds too hot and it pulled the rocker panel and quarter both up and in which is mostly what is causing the fitment issues. I cut one of the welds and using the BFH, we persuaded the rocker panel down 1/8". This is what we ended up with.
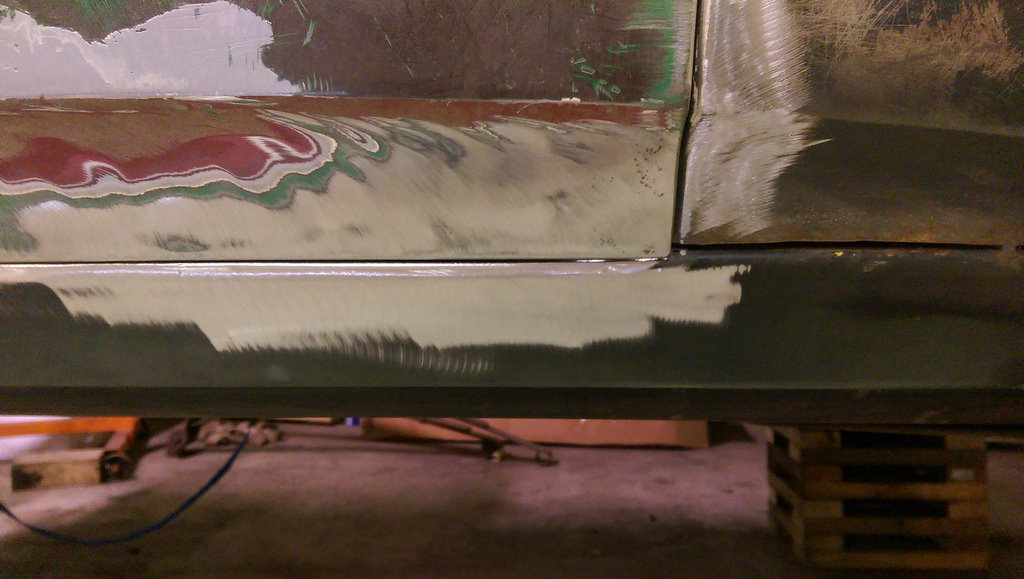
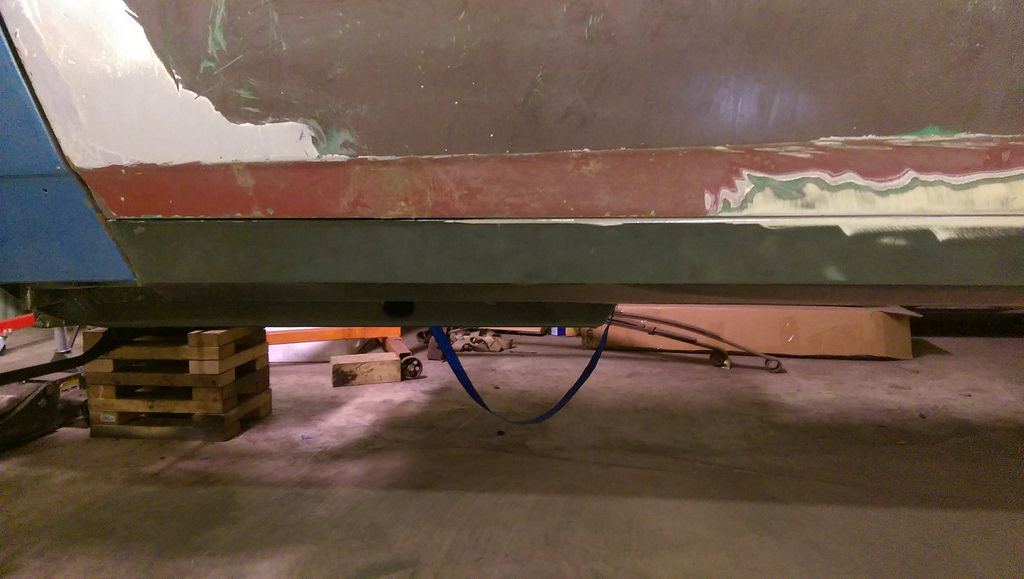
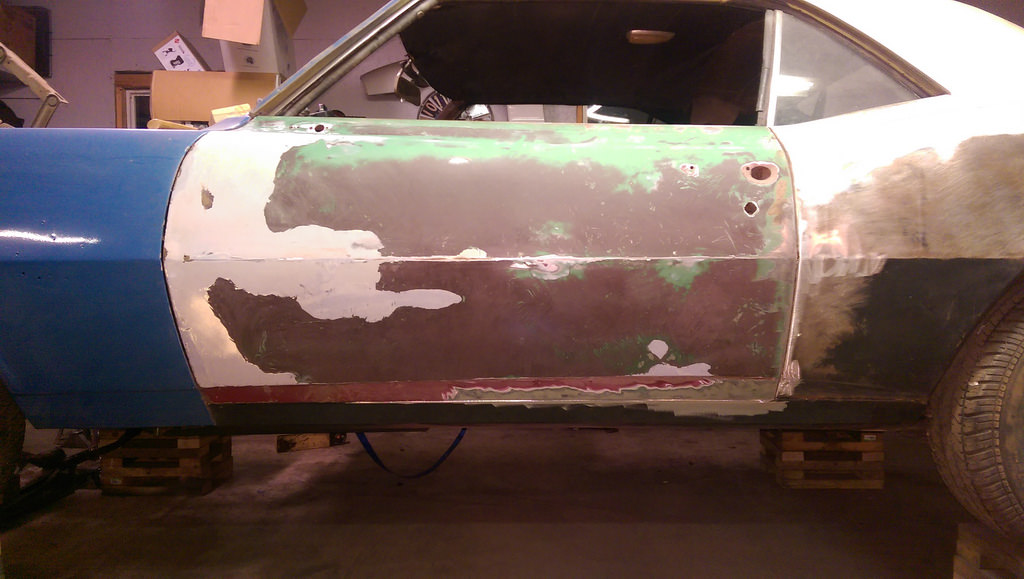
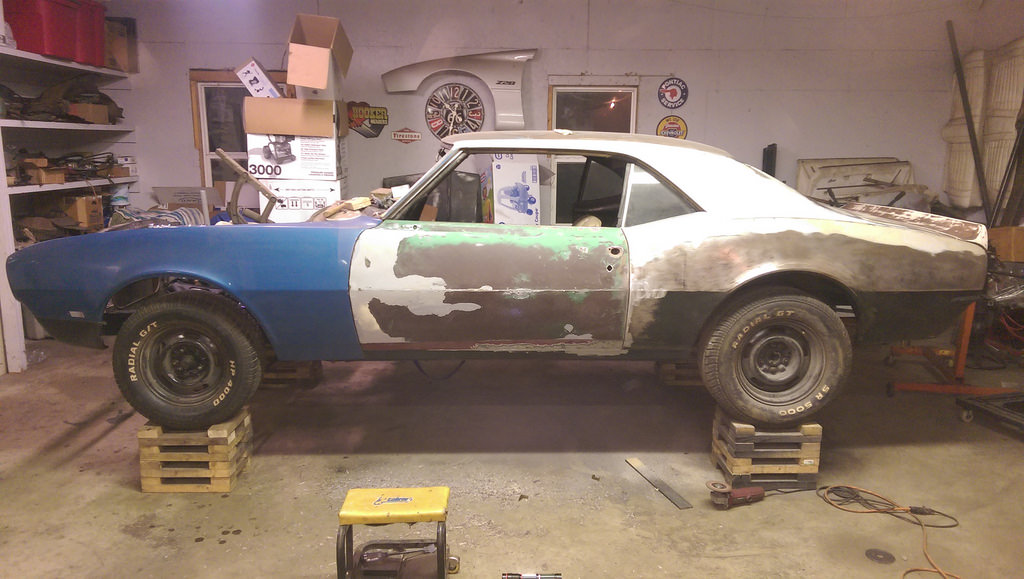
It is definitely not done, but is close enough that I won't need to do major modifications to the rocker and quarter panels. I am much happier knowing that with a little love, those panels will fit. I am so relieved as my mind was going to the worst case scenario (as I usually do), and pricing out full quarter panel and rocker panels for replacement to start over. I am glad that isn't the case.
Anyone out there looking to do a similar modification to your gas tank: PLEASE ATTEMPT AT YOUR OWN RISK!
I continued work on my fuel tank project and drilled my holes in both the fuel tank recess and the adapter ring. Once I bolted it down and I did a test fit in the car, it was clear that the panel needed to go down about an inch to clear everything. I also made sure to clock the fuel pump pick-up to ensure that it will be submerged enough.
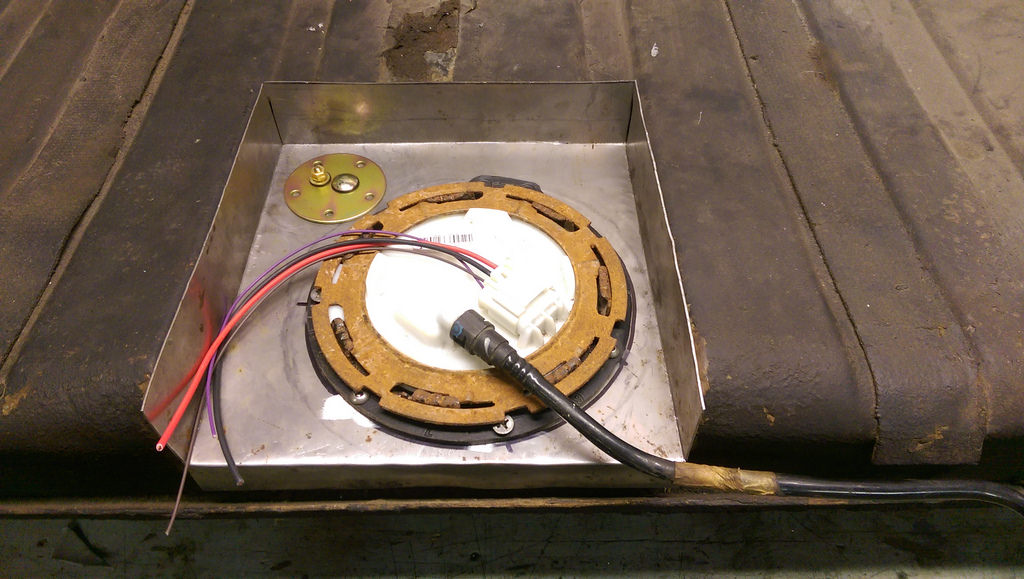
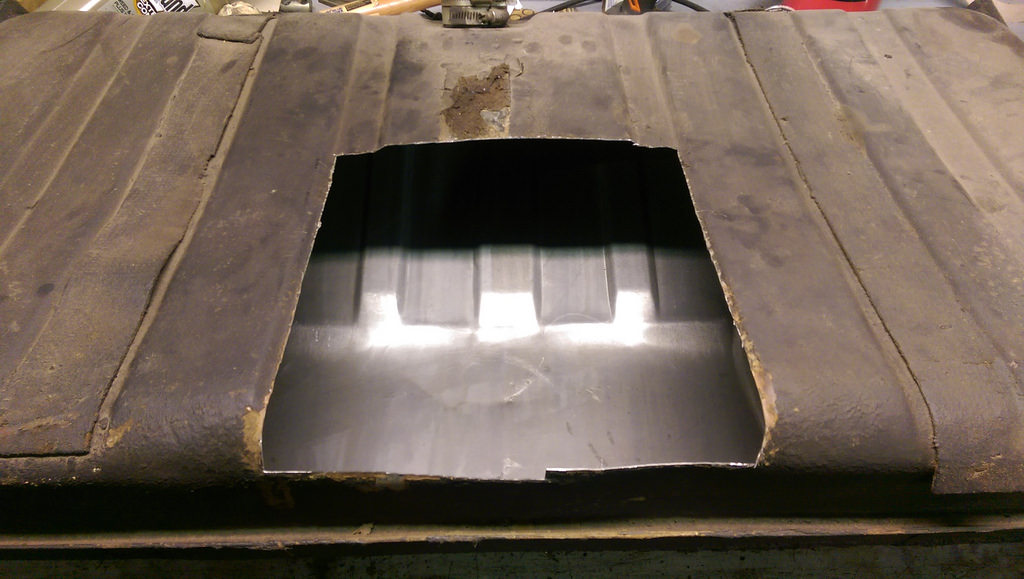
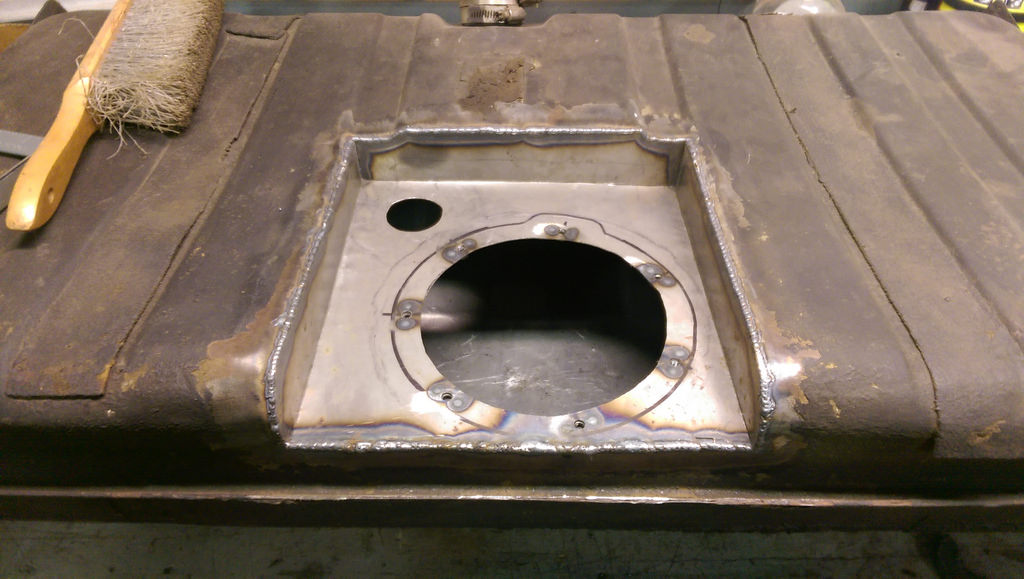
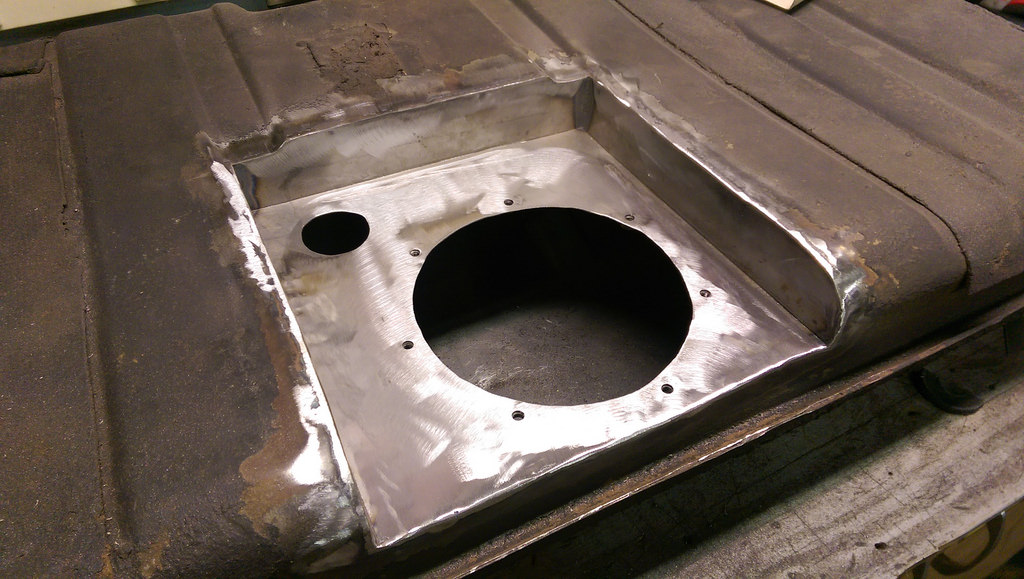
I cut the tank just a little more, and now the pump sits just slightly lower than the top of the tank.
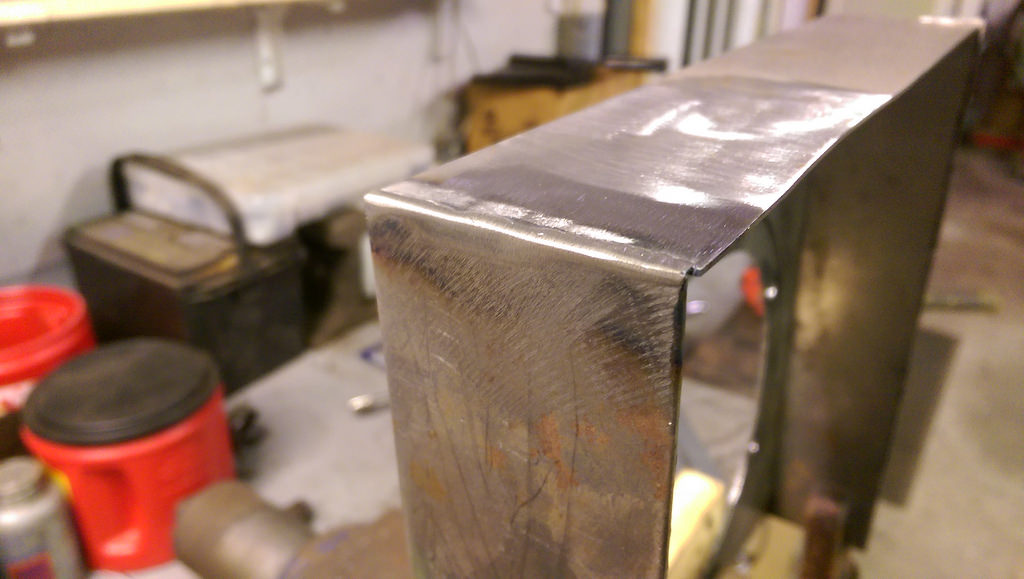
I used my square and made sure that it was perfect on both sides. I got the welder dialed in and this is how it turned out. Very smooth and excellent weld penetration.
Welded some nuts to the bottom side.
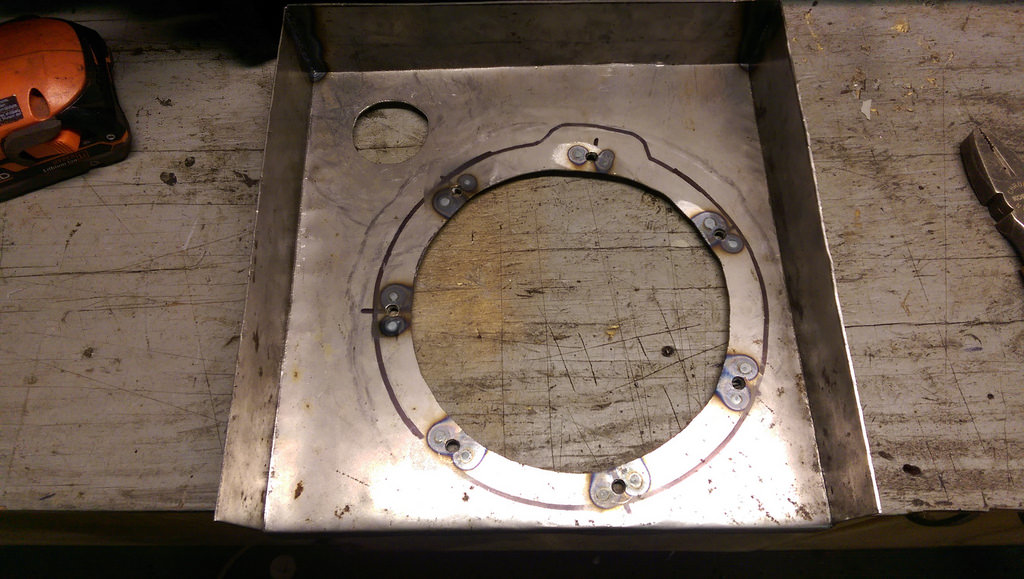
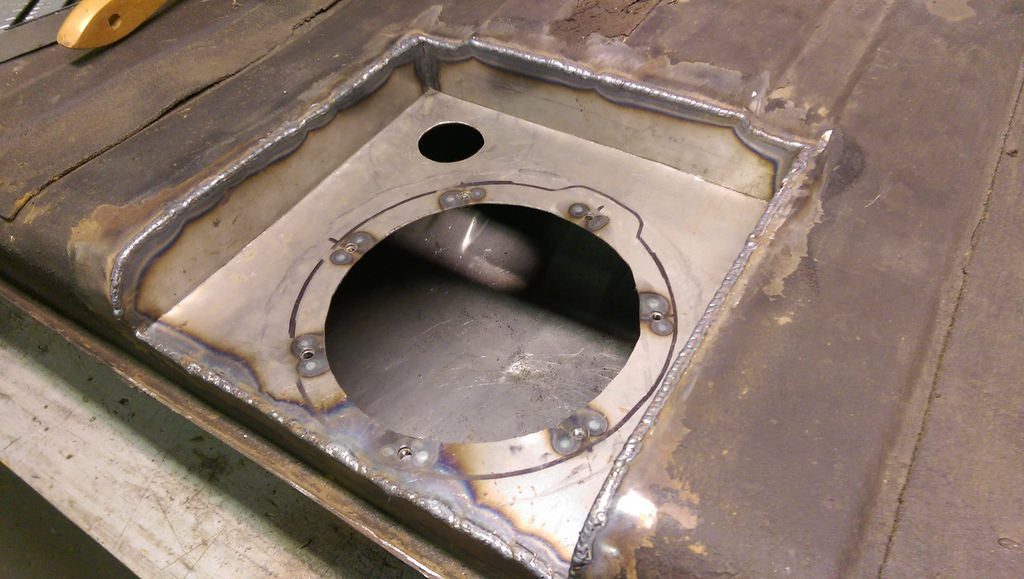
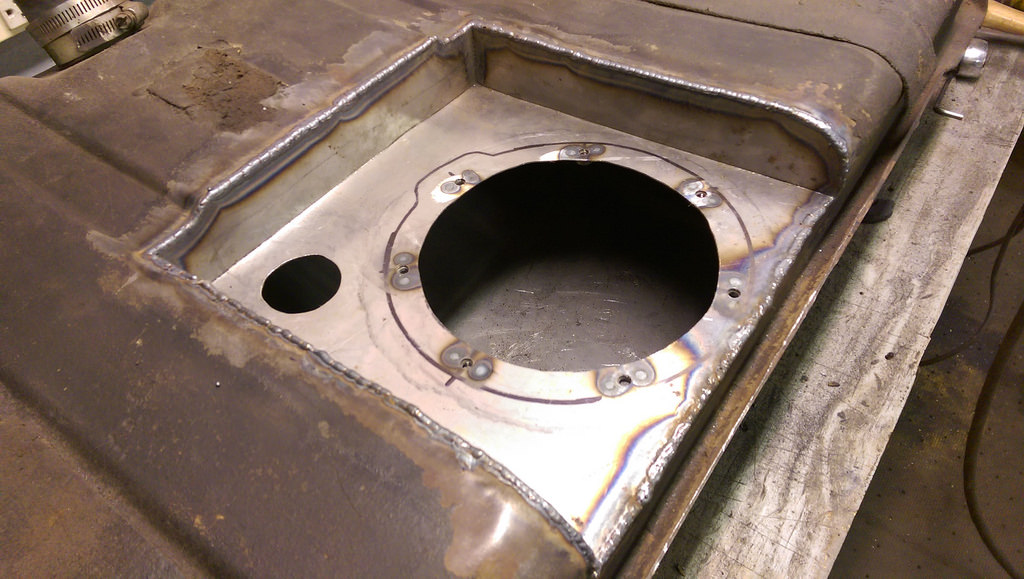
I made sure that everything was level and then tack welded in a few spots. One final test fit before I burned it in for good.
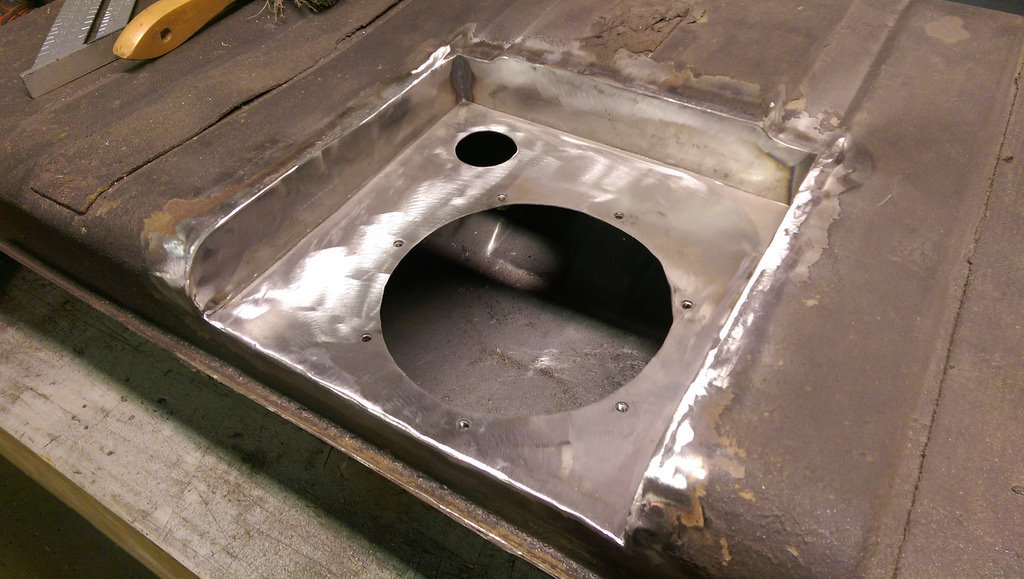
After I started working on everything I decided that I was going to give butt welding the panel a go to see what it would look like. After a few inches of weld, it was turning out better than I had expected. Then before I knew it I was done. It got excellent penetration and I believe that it is sealed up. Still need to get everything bolted together to verify.
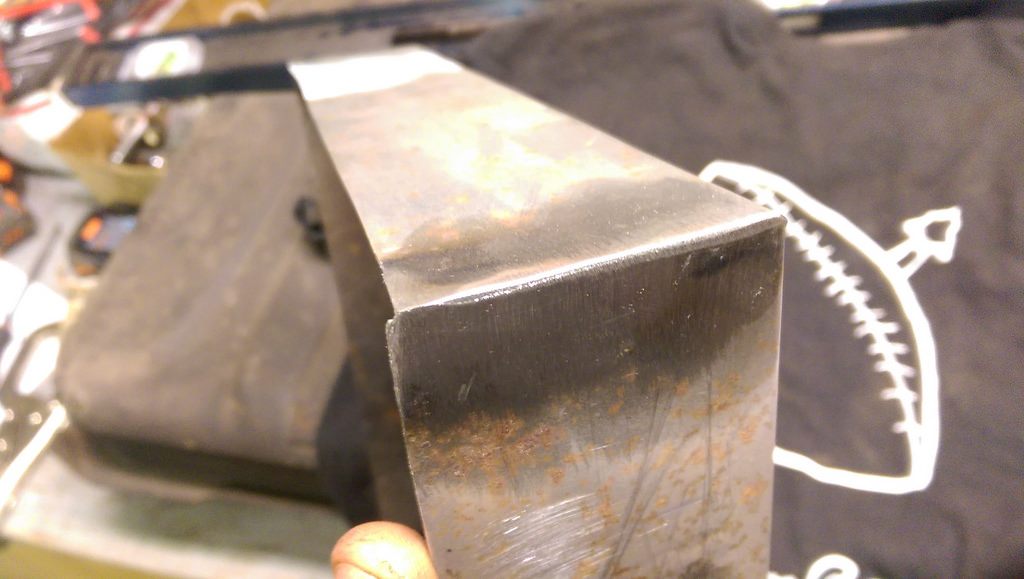
After a little love with the flap disk.
After primer and paint.
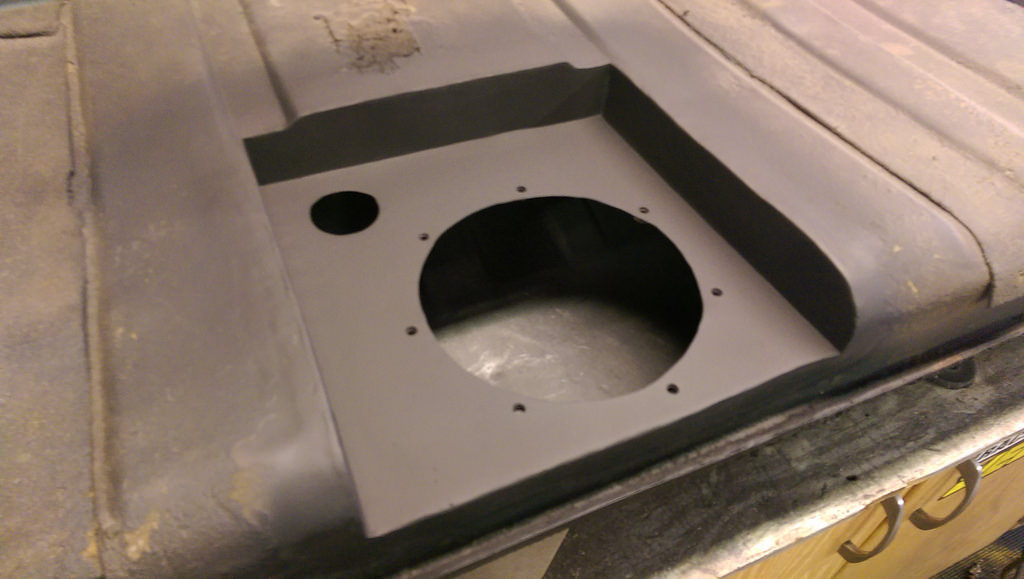
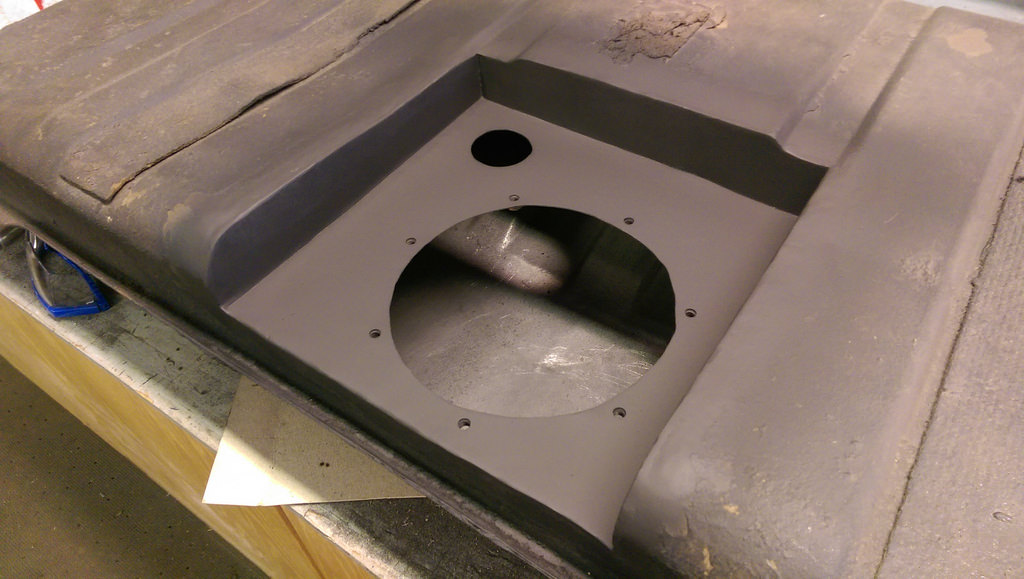
I am extremely happy with the way that it turned out. I still need to finish the mounting ring for the fuel level sender and modify the fuel pump to constant using the vaporworx kit. It is very close to be buttoned up.
Cheers,
Ryan
1955 Nomad project LC9, 4L80e, C5 brakes, Vision wheels
1968 Camaro 6.2 w/ LSA, TR6060-Magnum hybrid and etc SOLD
1976 T/A LS1 6 Speed, and etc. SOLD
Follow me on Instagram: ryeguy2006a
09-19-2016 #84
Registered User
- Join Date
- Sep 2009
- Posts
- 2,711
I went over to my Dad's house and used his cabinet blaster, and got the passenger side hinges all cleaned up. Here they are with some epoxy primer ready to be reassembled.
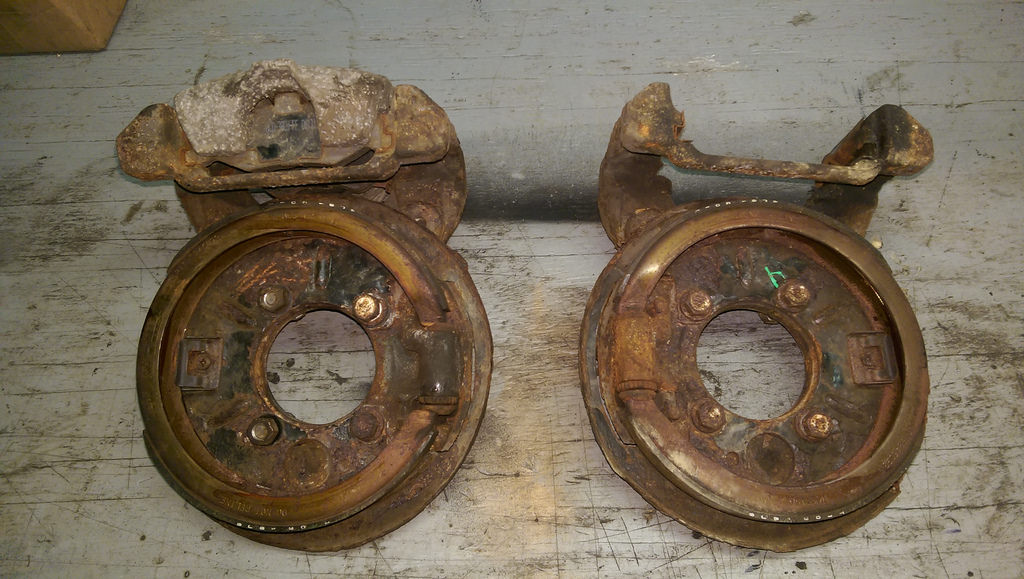
I also had to run back to the pick-a-part yard to return some stuff I didn't need for my truck, and while I was there I took a look in the yard. Wouldn't you know I found a 02 Camaro that wanted to donate parts. I figured the rear brakes would have been gone, but sure enough they were still there. Unfortunately, the NY winters have taken its toll on the dust shields but everything else looks to be in fair condition. Rusted, but nothing that won't clean right up. I got all of the hardware, brackets and hoses. I didn't bother with the rotors since I will just get those new. Not too bad for $30 bucks though.
I also robbed the clutch fluid reservoir and some metri-pack connectors to make quick disconnections on my engine harness.

I came really close to taking the front rotors, calipers and brackets to do the front disk brake conversion, but since I really want the C5 brakes from CPP I decided to hold off for now. Plus I would need to get bigger wheels and tires anyway, so that will be unnecessary at this point.
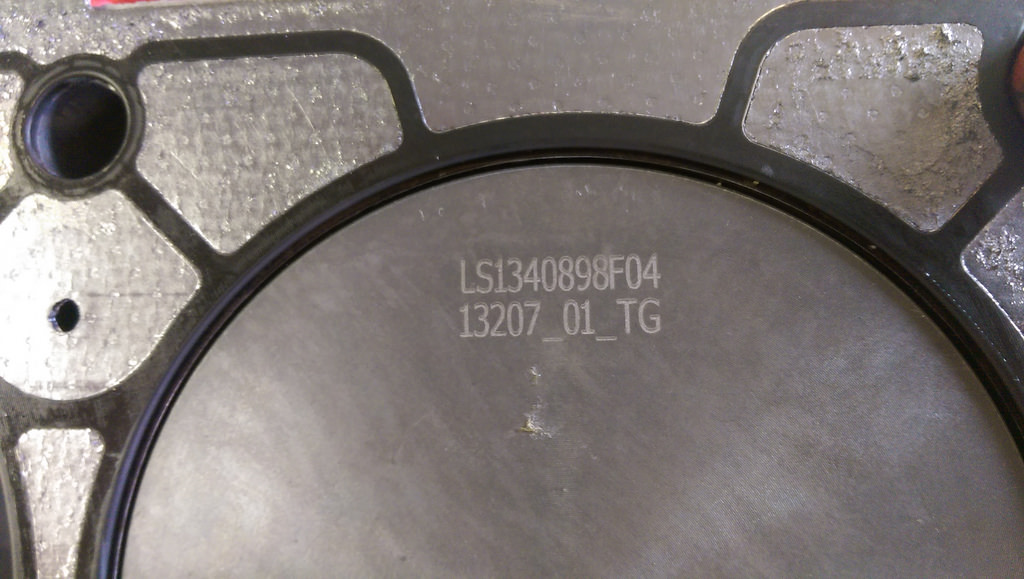
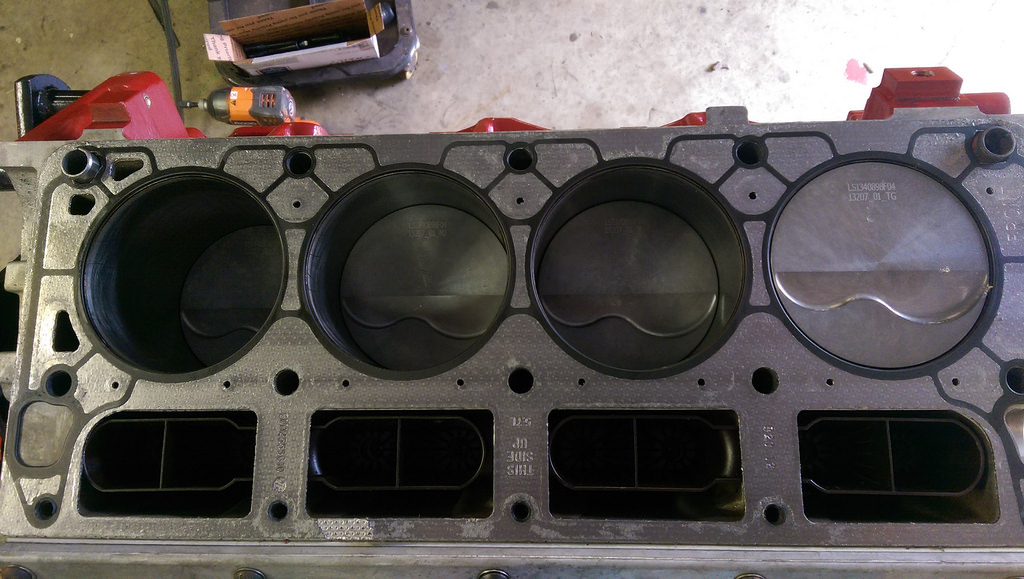
So after some thought, I decided not to keep the world heads that I got with the LS1 I picked up. I will not be installing this motor for a while, so the funds can be used elsewhere. Since we are saving for a new house, most if not all of it will likely be allocated in that direction. But, upon further inspection it looks like the guy I bought it from was honest and it does have Mahle pistons. They are a -4cc dish and fully forged for the 3.898 bore (stock) so the motor hasn't been bored which is a good thing to me.
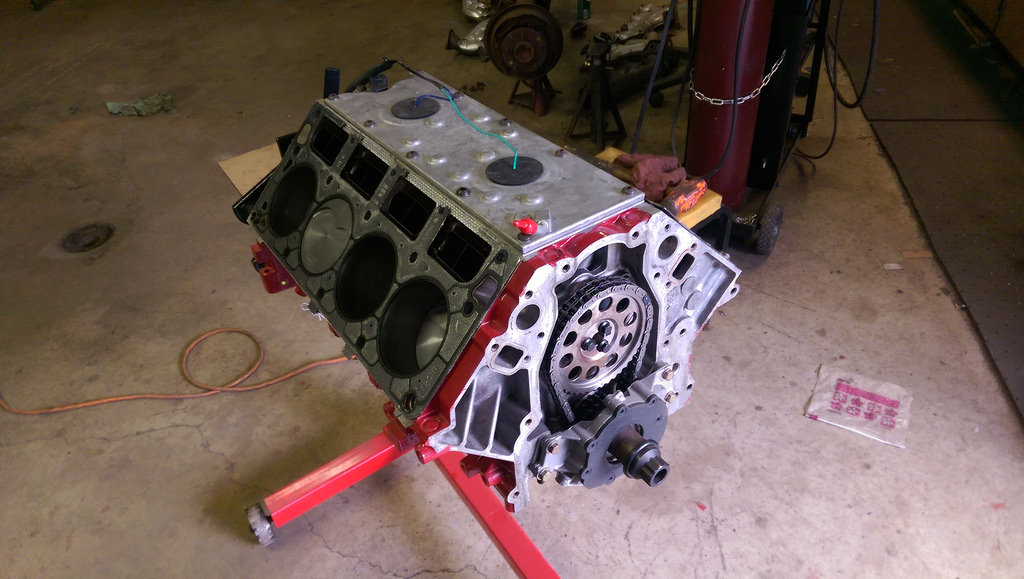
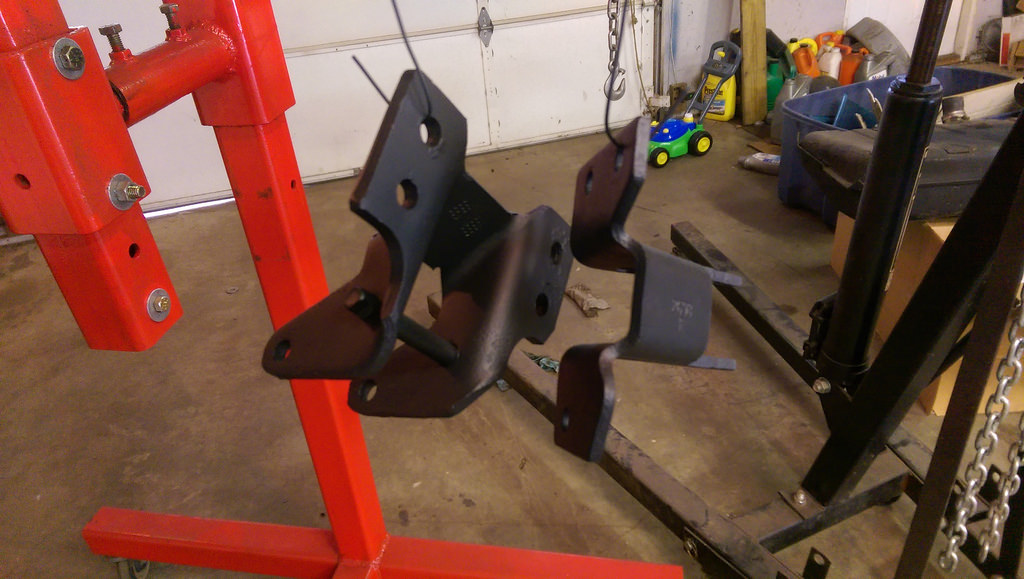
Sprayed the shortblock all over with WD-40 and wrapped it in plastic. Stored it for another day.
1955 Nomad project LC9, 4L80e, C5 brakes, Vision wheels
1968 Camaro 6.2 w/ LSA, TR6060-Magnum hybrid and etc SOLD
1976 T/A LS1 6 Speed, and etc. SOLD
Follow me on Instagram: ryeguy2006a
09-19-2016 #85 Registered User
- Join Date
- Sep 2004
- Location
- Vacaville, CA
- Posts
- 127
Nice work on the FEAD. I am using the same Holley mounts and f- body drive. I test fit a truck alternator and didn't like how close the output lug was to the frame. The Camaro alternator was a no go. I ended up using truck balancer, a spacer kit for the water pump, and made my own spacers for the alternator and power steering pump. It's a clean, economical solution if you don't want to notch your frame. Mine was already powder coated so I wasn't excited about cutting on it!
Tim
67 Camaro RS
64 Nova SS
09-19-2016 #86 Registered User
- Join Date
- Nov 2006
- Location
- Ma.
- Posts
- 5,567
Great job on the tank! The whole project looks great. Are you going to weld something to the tray to secure the fuel line? I wish there was something close to my connection on my Ricks tank.
Wayne
Car FINALLY home !!!!!! lol
Project FNQUIK https://www.pro-touring.com/showthre...ghlight=FNQUIK
09-20-2016 #87
Registered User
- Join Date
- Sep 2009
- Posts
- 2,711
It's funny that you mention that because that was almost exactly my thought. If the LS1 accessories were spaced out to the truck balancer, everything would fit perfectly. Do you have any pictures of the spacers you made, or finished installation pictures? Originally Posted by Chevy Kid

1955 Nomad project LC9, 4L80e, C5 brakes, Vision wheels
1968 Camaro 6.2 w/ LSA, TR6060-Magnum hybrid and etc SOLD
1976 T/A LS1 6 Speed, and etc. SOLD
Follow me on Instagram: ryeguy2006a
09-20-2016 #88
Registered User
- Join Date
- Sep 2009
- Posts
- 2,711
Thanks Motown. I haven't exactly decided how I want to finish the tank with a line, but I have been tossing around the idea of having a hard line running from the fuel pump that will run along the front side of the tank and exit on the driver's side. Then I can run a Nylon lines up to the fuel rail. Originally Posted by Motown 454
1955 Nomad project LC9, 4L80e, C5 brakes, Vision wheels
1968 Camaro 6.2 w/ LSA, TR6060-Magnum hybrid and etc SOLD
1976 T/A LS1 6 Speed, and etc. SOLD
Follow me on Instagram: ryeguy2006a
09-20-2016 #89 Registered User
- Join Date
- Aug 2007
- Location
- Jonesboro, Arkansas
- Posts
- 2,506
Man, I don't think I'd be gung ho about welding on that gas tank. I've seen them explode even after being filled with water and dried out for a while!!
Carl Wilson
1968 Camaro - T-56 6 speed - 383 Stroker, 2014 Mustang GT seats. FiTech EFI, Tanks Inc. Tank with Deutschwerks fuel pump.
09-21-2016 #90
Registered User
- Join Date
- Sep 2009
- Posts
- 2,711
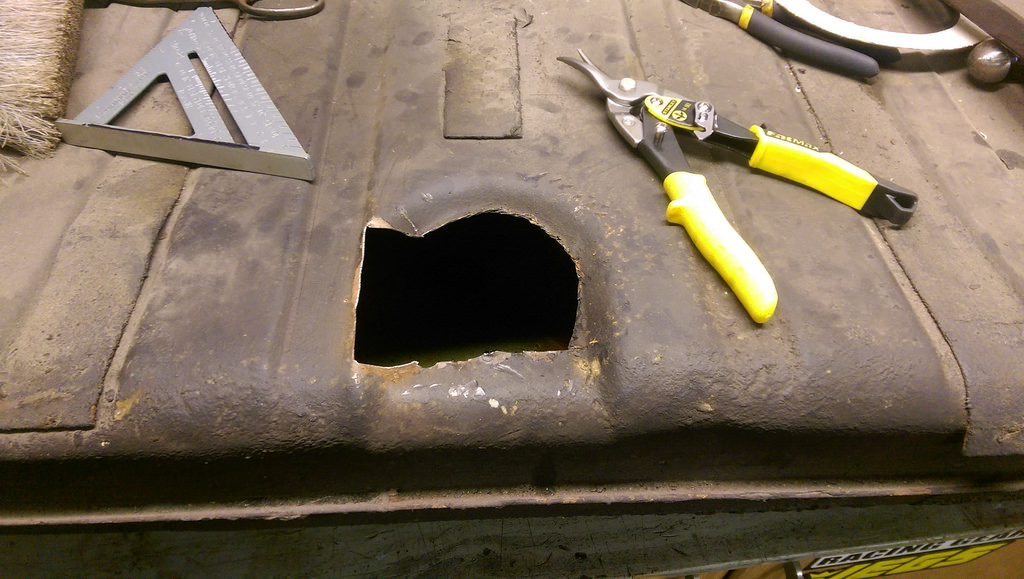
I was very cautious when I attempted this, but I made sure to take every precaution. I made sure to get all of the gas out of the tank that I could before I attempted anything. Then rather than using a tool that caused sparks. I used tin snips to get my rough shape then when the hole was large enough, I thoroughly cleaned the tank with shop towels. Should have probably put a warning on the first part of the thread before I welded, but for anyone out there:
PLEASE ATTEMPT AT YOUR OWN RISK!
1955 Nomad project LC9, 4L80e, C5 brakes, Vision wheels
1968 Camaro 6.2 w/ LSA, TR6060-Magnum hybrid and etc SOLD
1976 T/A LS1 6 Speed, and etc. SOLD
Follow me on Instagram: ryeguy2006a
09-21-2016 #91
Registered User
- Join Date
- Sep 2004
- Location
- Vacaville, CA
- Posts
- 127
Here's some pics. I'll try and get some better ones around the alternator. I had to trim the plastic cover slightly on the back of the alternator. I ended up using the f-body alternator along with the rear brace. Originally Posted by ryeguy2006a
For the a/c, I am making a bracket to mount a Sanden 7176 compressor. It will run on the stock 4 rib belt. I had one made and fitted, but it hit the sway bar! This side will also not be notched.
 Tim
Tim
67 Camaro RS
64 Nova SS
09-28-2016 #92
Registered User
- Join Date
- Sep 2009
- Posts
- 2,711
Thanks for posting those pictures Chevy Kid, I just saw those! They will make a great reference for when I get to that point of my build.
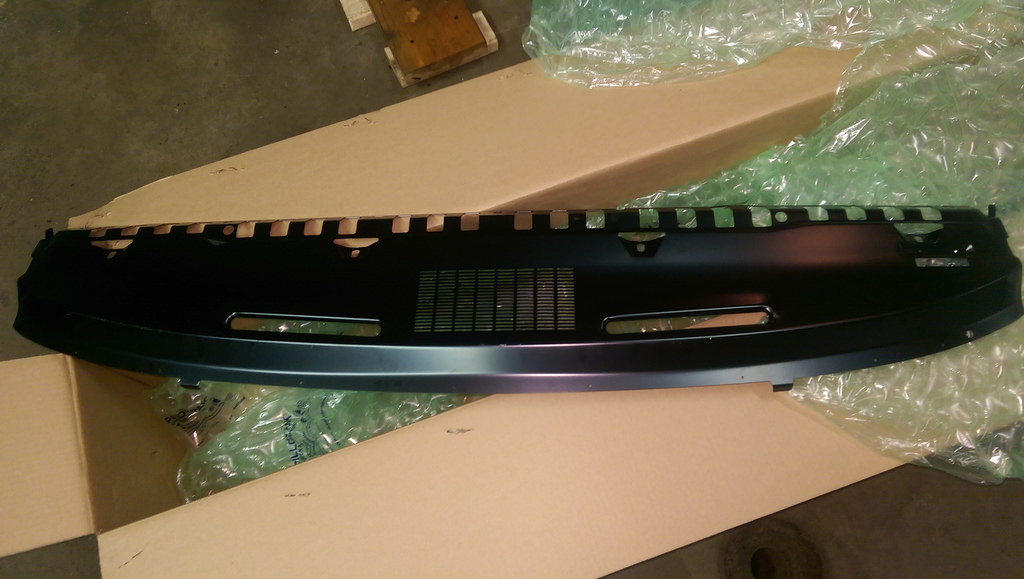
I haven't gotten much time recently to work on my car. I have been spending time with family and working on projects around our house. The big brown truck delivered a much needed piece for the car though. The car desperately needs an upper dash as it is severely rusted on the lower section. I'm actually looking forward to this piece as it "shouldn't" take that long to install. It is just spot welded along the edges and where the lower dash meets. The only unknown is how severe the rust is under the dash piece...
Ryan
1955 Nomad project LC9, 4L80e, C5 brakes, Vision wheels
1968 Camaro 6.2 w/ LSA, TR6060-Magnum hybrid and etc SOLD
1976 T/A LS1 6 Speed, and etc. SOLD
Follow me on Instagram: ryeguy2006a
09-28-2016 #93 Registered User
- Join Date
- May 2013
- Location
- Texas
- Posts
- 297
Okay, all caught up on the build thread and subscribed! Nice progress so far (especially the part where you put the project down and spend family time).
09-29-2016 #94
Registered User
- Join Date
- Sep 2009
- Posts
- 2,711
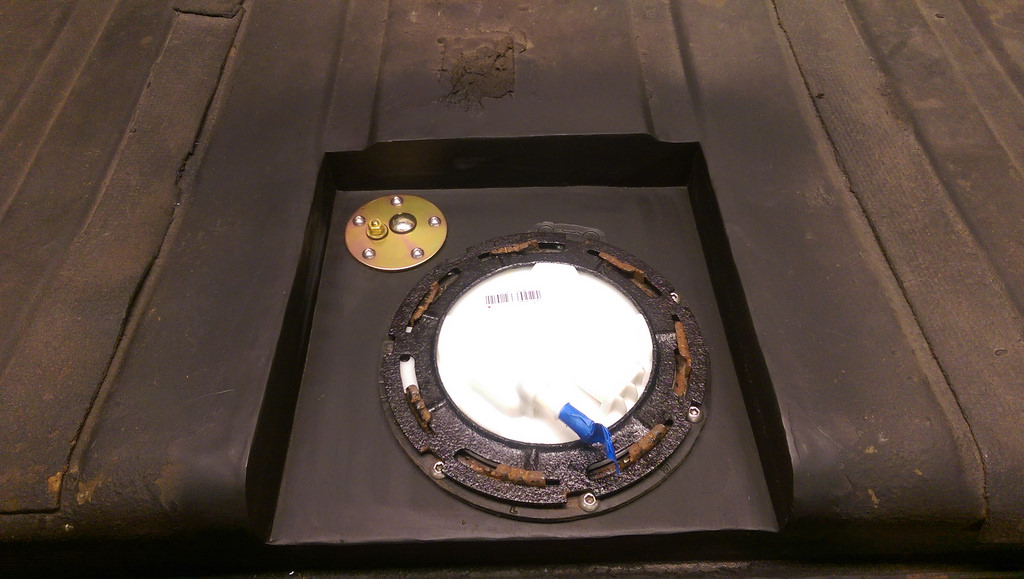
Well, the wife and baby were asleep by 8pm last night, so I snuck into the garage to get some work done. I wanted to focus on getting the fuel tank buttoned up. First thing that I addressed was drilling the holes for my fuel tank sending unit. I used the gasket for a template and drilled them out. After that, I filed any burrs and got to work with the inside of the tank. I used about 12 brand new shop rags, brake clean, and a magnet, but it cleaned up really nicely. I kept using the new rags to monitor how dirty they were when I was done wiping the tank. Once I saw satisfied, I re-installed my adapter ring for good with my Viton seal. (bought a 9" remnant from ebay and made my own gasket)
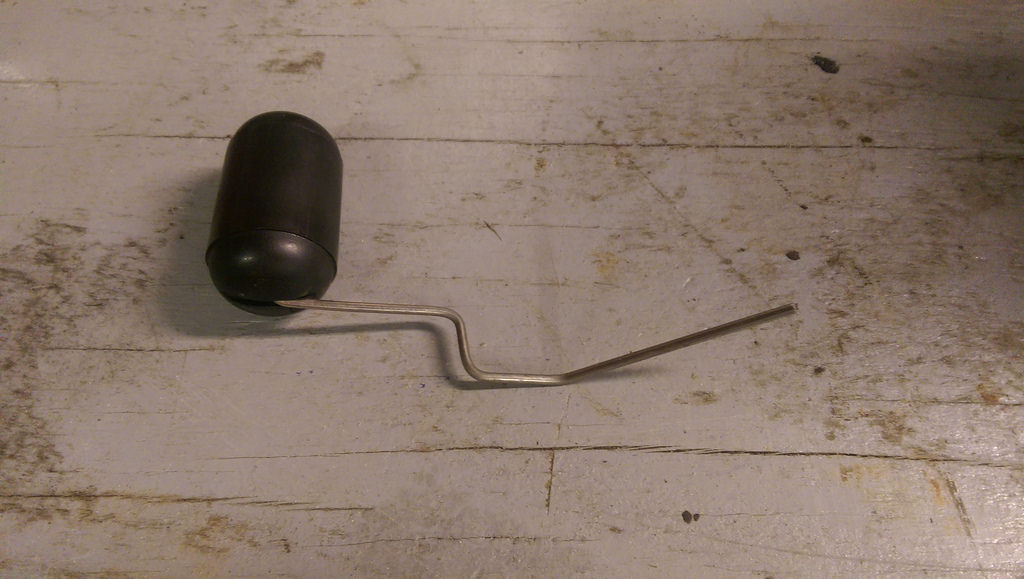
Once the fuel sending unit was in for good, I had to bend the level sender so that it would read empty and full while still clearing the recess panel. It took me a little bit to figure out the angles, but it turned out pretty good and I am satisfied that it will read correctly. Having a 5" hole in the top of the tank helps with making those small adjustments too.
All buttoned up and installed for a final time.
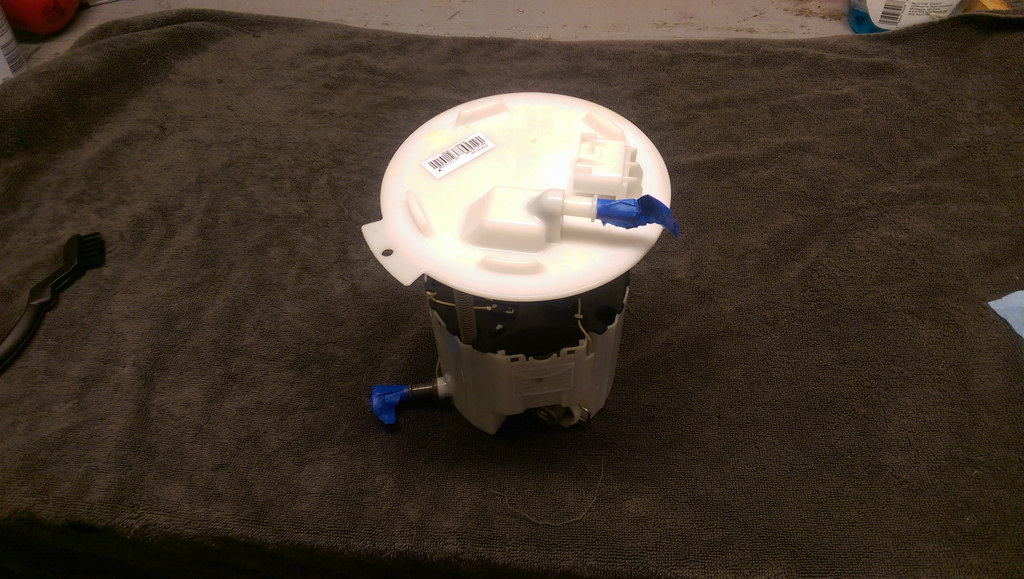
Now was the part that I was excited to start; modifying the stock fuel pump assembly to run at constant 58psi. I bought this kit a while back from Carl at vaporworx, and I have been patiently waiting for the tank to be done before I did anything with the pump. I used a little cleaner and a scrub brush to clean up the pump assembly and it looks brand new!
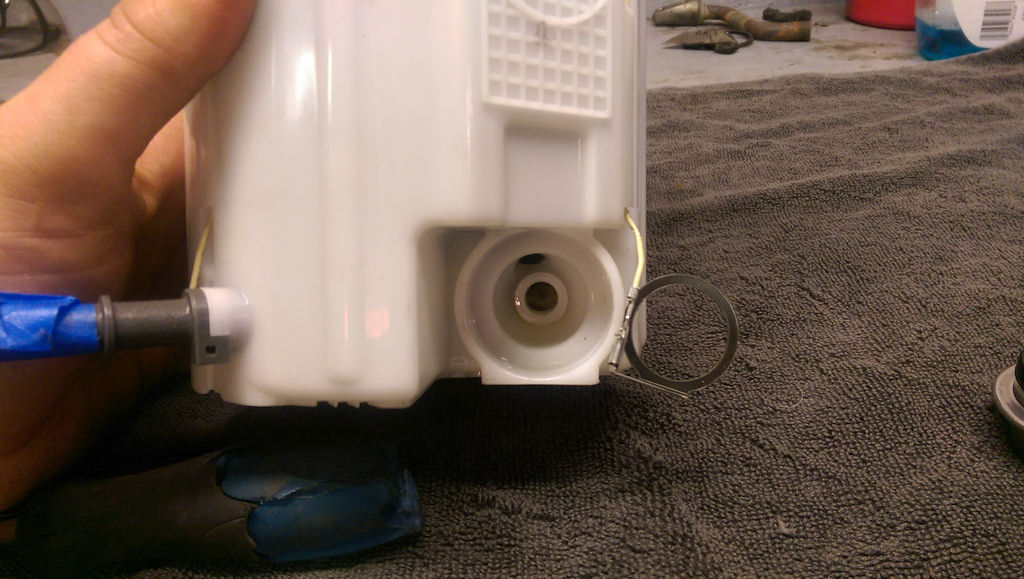
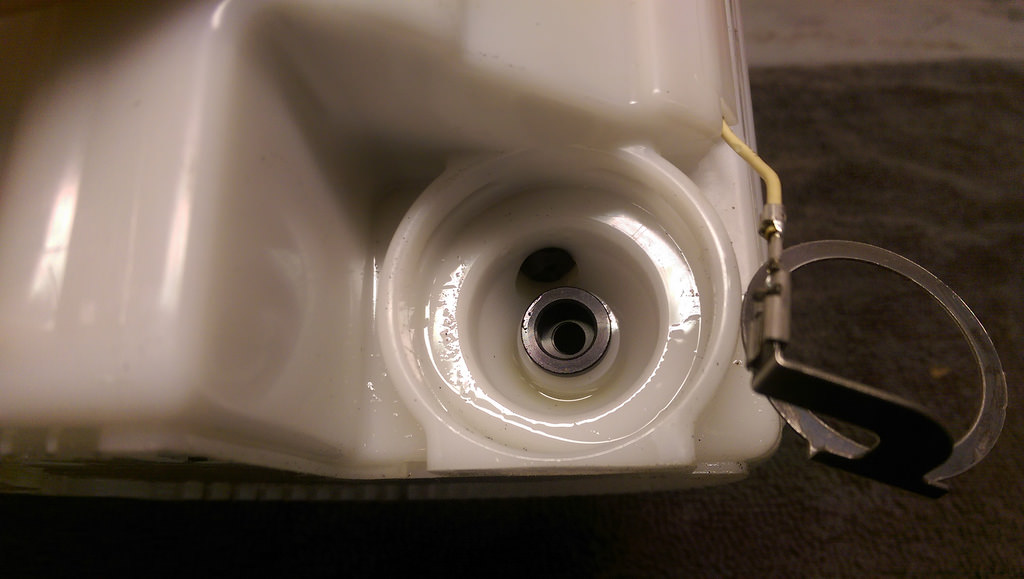
I followed along with the highly detailed instructions that were provided, and it was incredibly easy. First step was to remove the retaining ring and remove the stock fuel pressure reg.
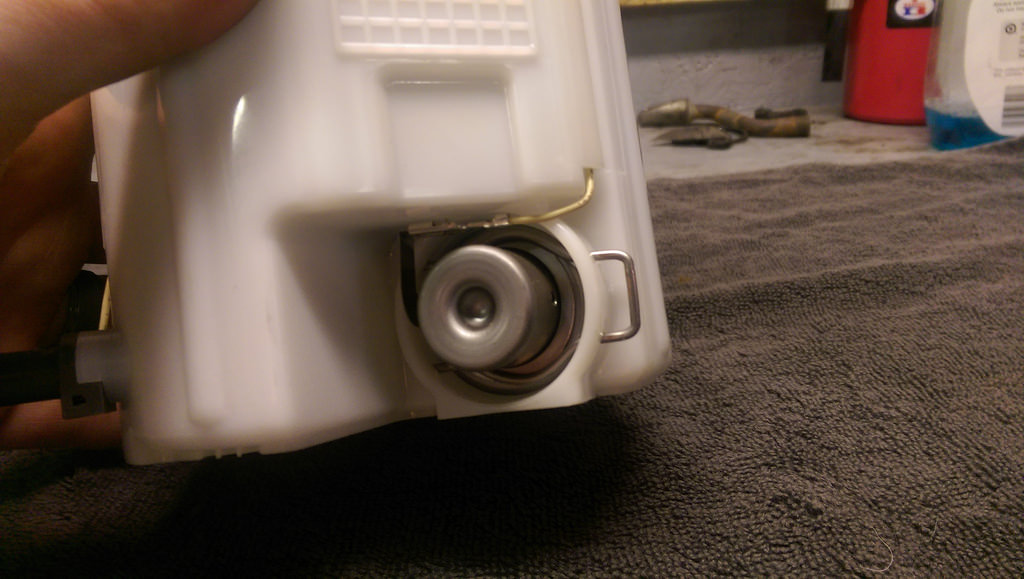
Once it is removed you end up with this. There is also the grounding ring that needs to be temporarily moved to the side.
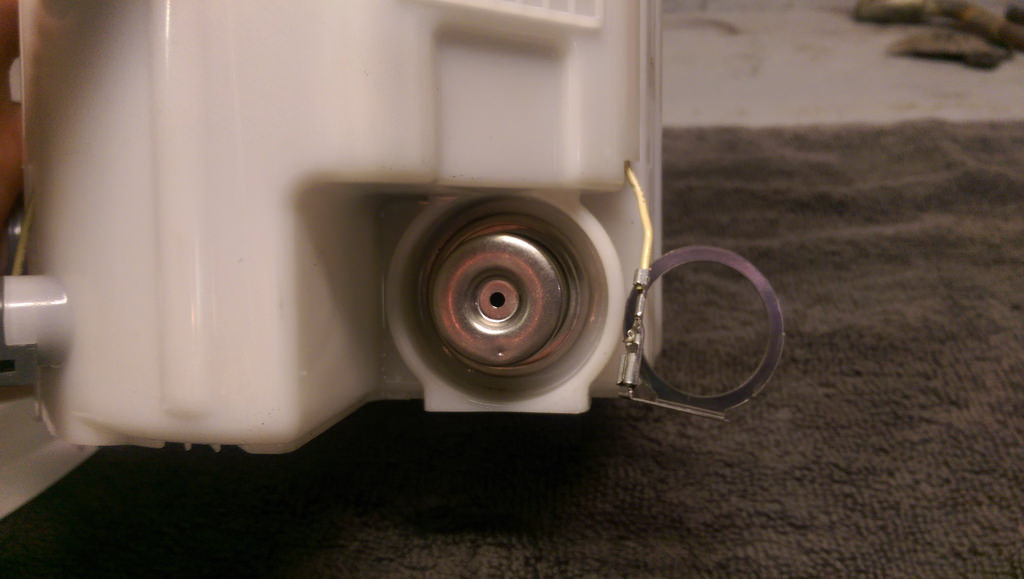
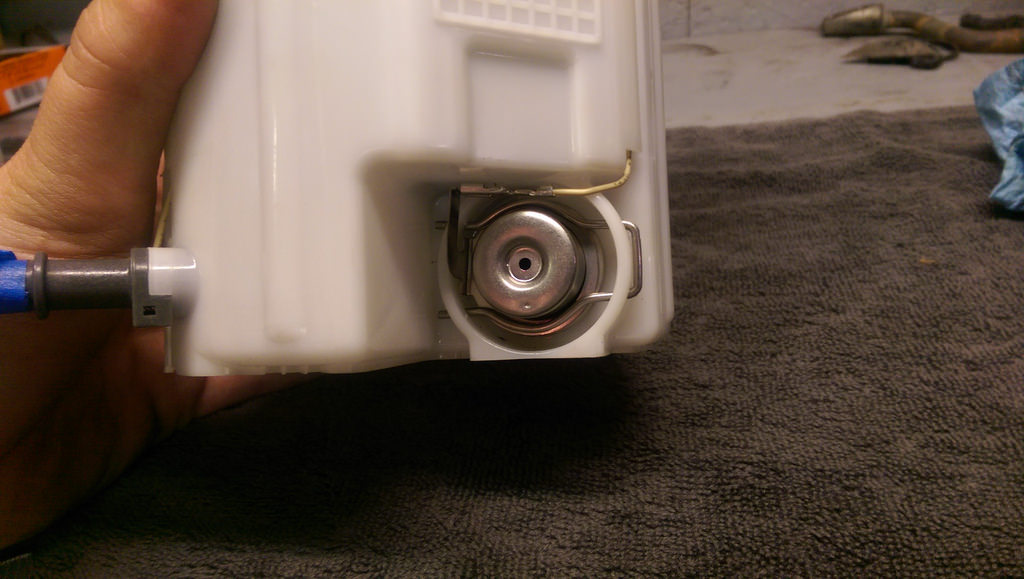
This is the heart of the conversion. This is an adapter that was developed by Vaporworx and is what allows for the new fuel pressure regulator to work properly.
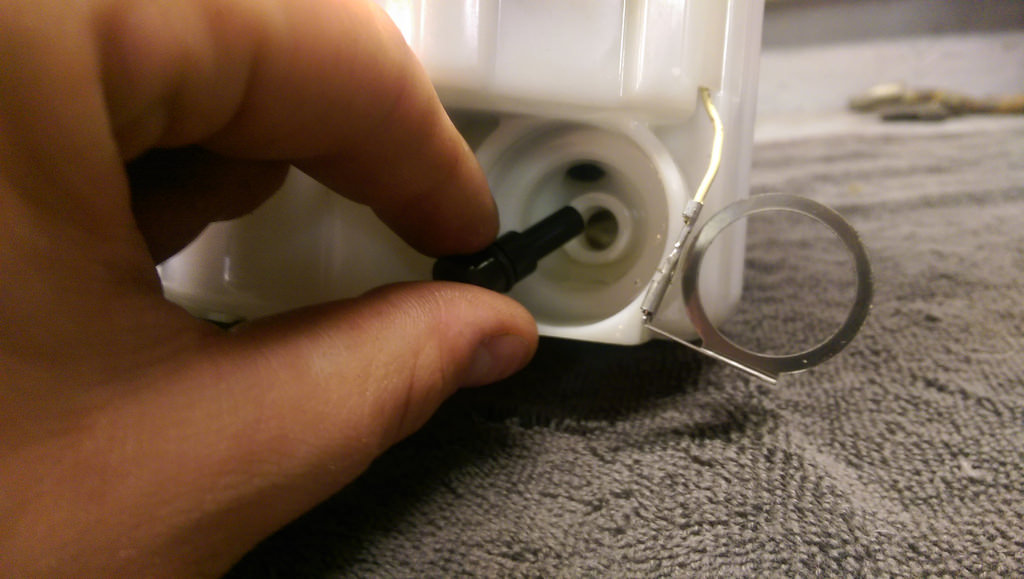
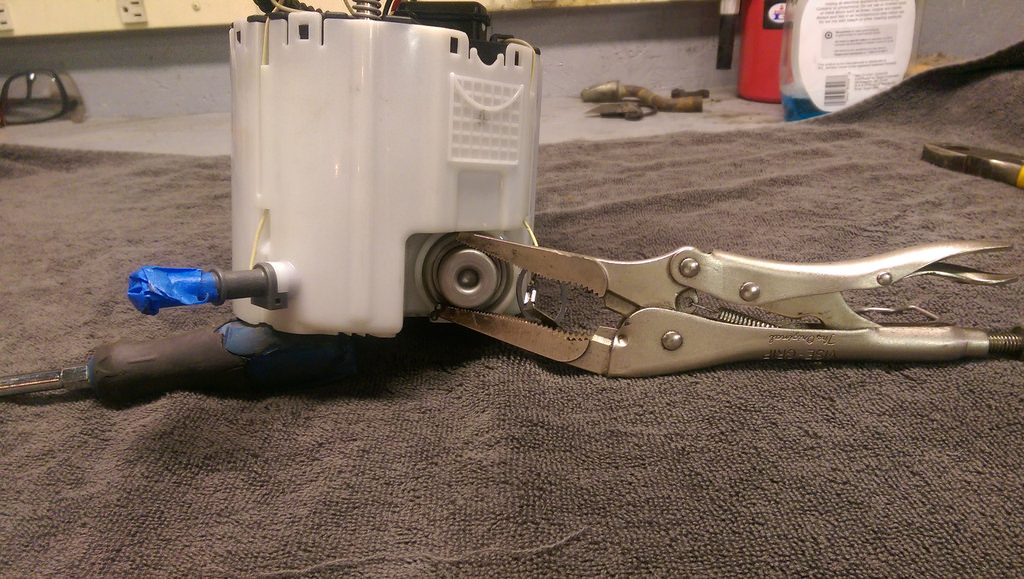
Like it mentioned in the instructions, the filter was in the way for the adapter to seat properly, so I had to gently move it to the side. I ended up installing it at an angle, and it worked like a charm. Hard to get a picture, but there is the filter in the way.
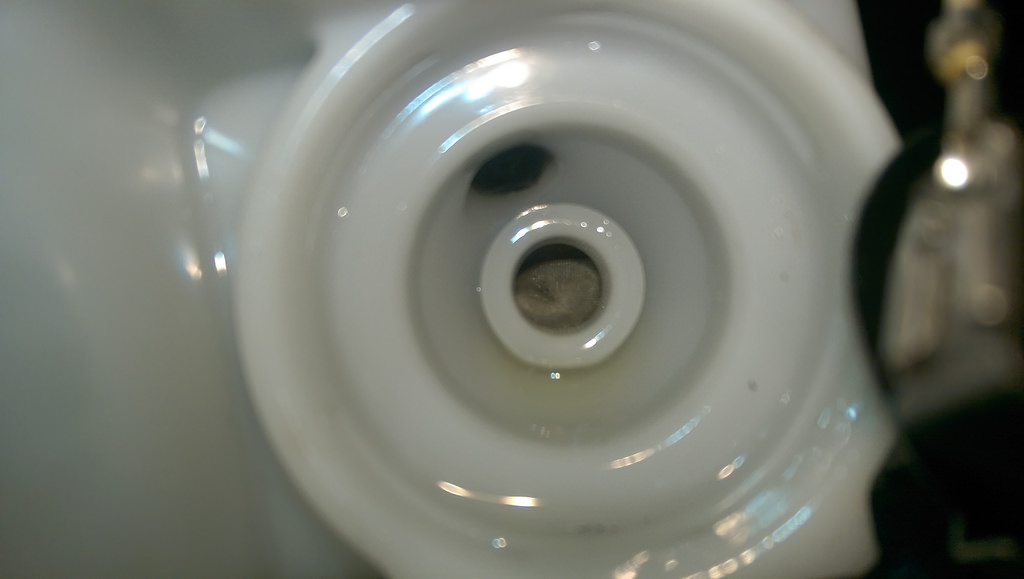
Adapter fully seated
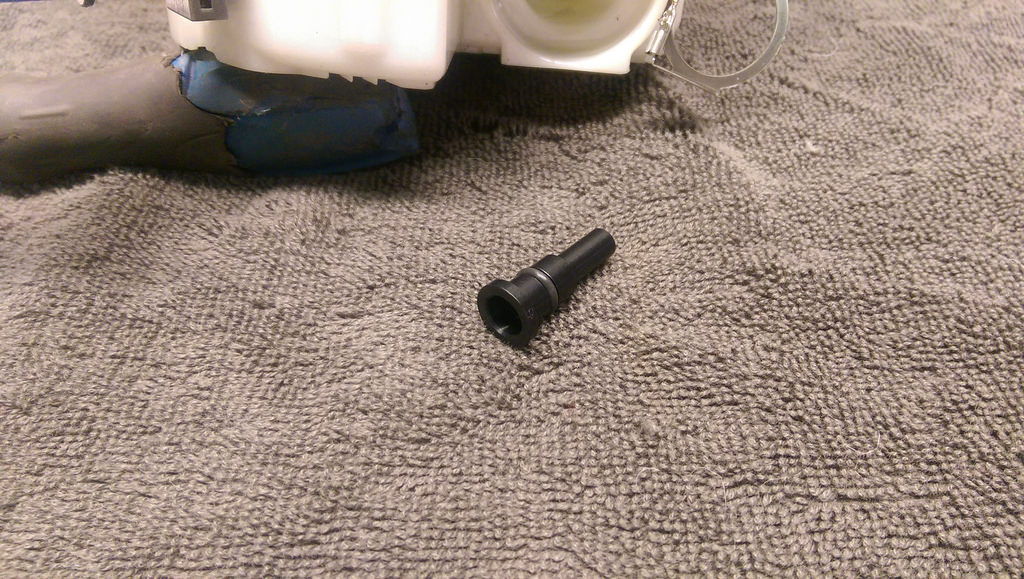
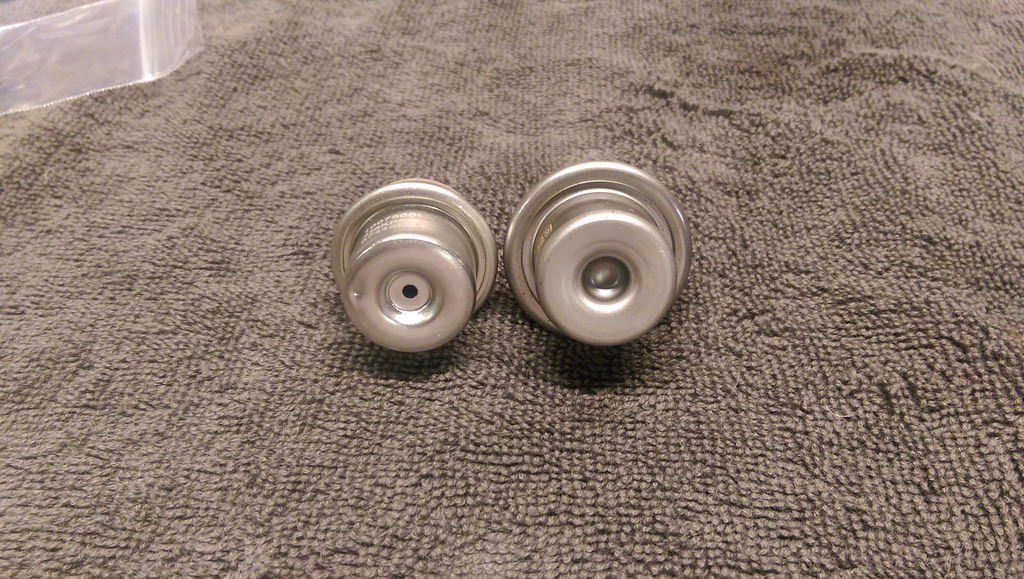
Here is a comparison of the 4th gen fuel reg vs. the stock one that came out. 4th gen on the left and stock on the right.
And fully installed. Don't forget to re-install the grounding ring.
 [/url]
Fully completed swap. Here are all of the tools that were required for the job too.
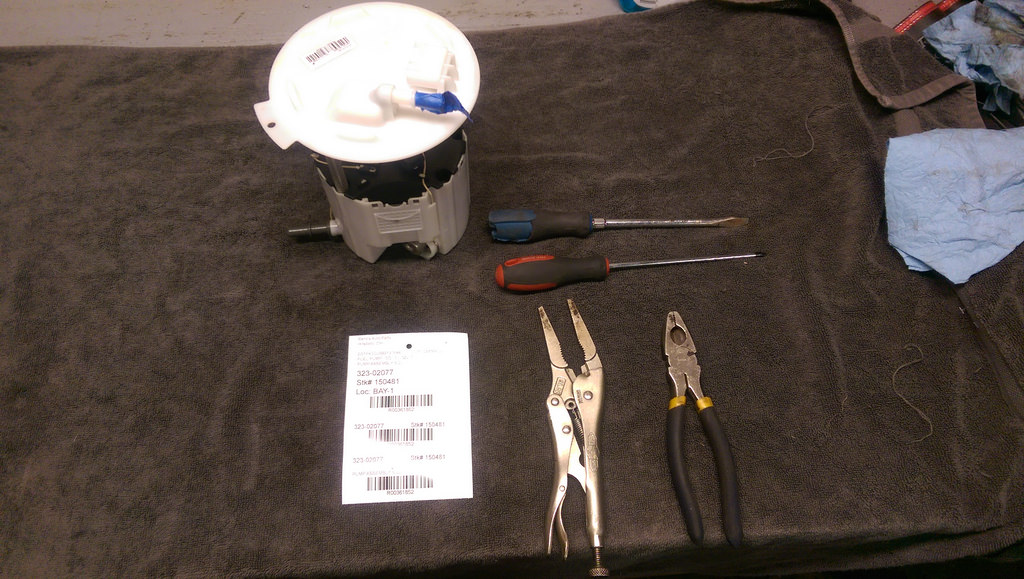
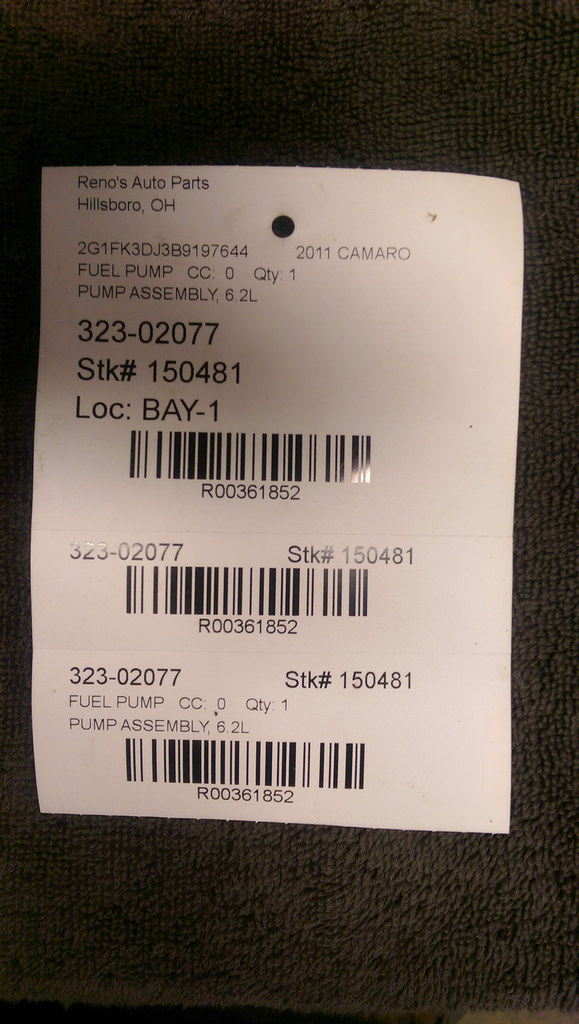
(this tag is for future reference)
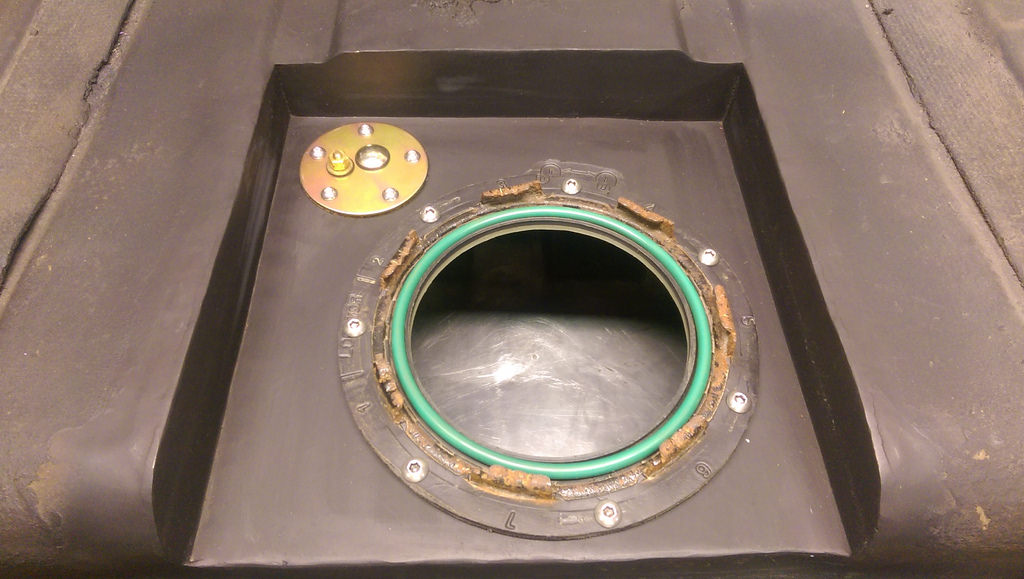
And here is the fully installed tank. I threw some paint on the stock retaining ring, but will get a new one before final install. For now it works fine to hold it down.
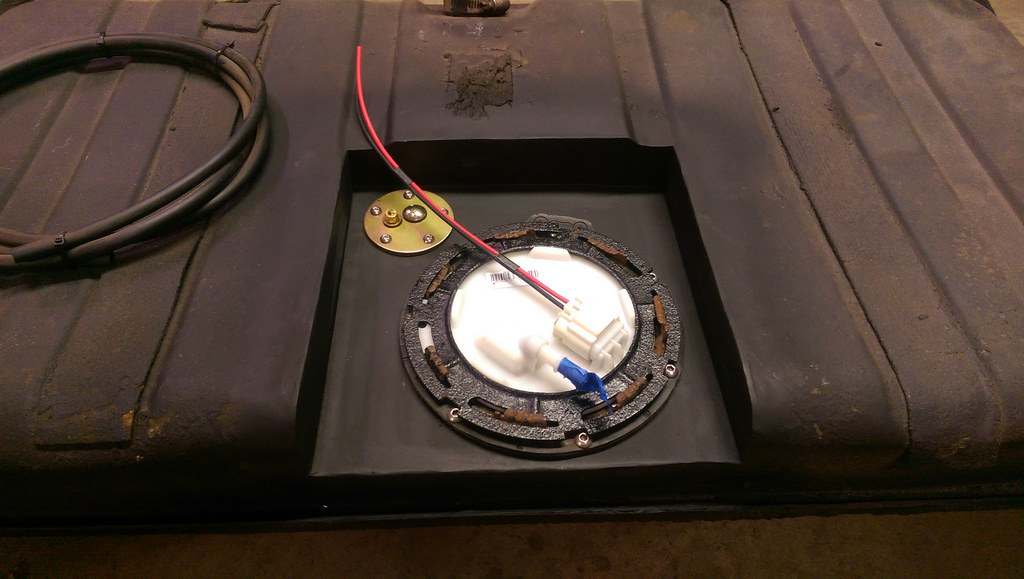
Ready to go into the car! The only modification I may make is to bend up a hard line from the pump assembly to the driver's side front of the tank for a cleaner install.

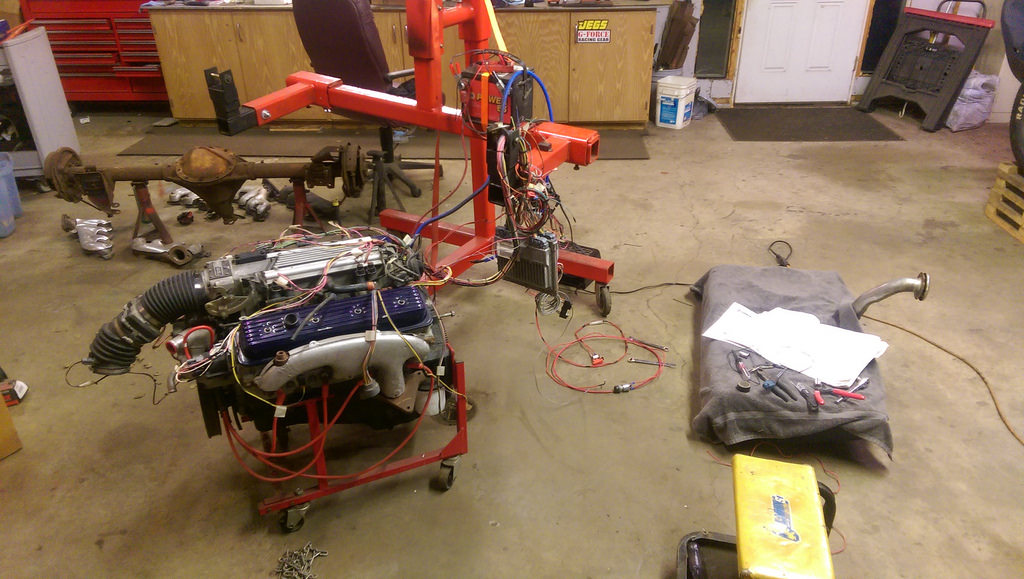
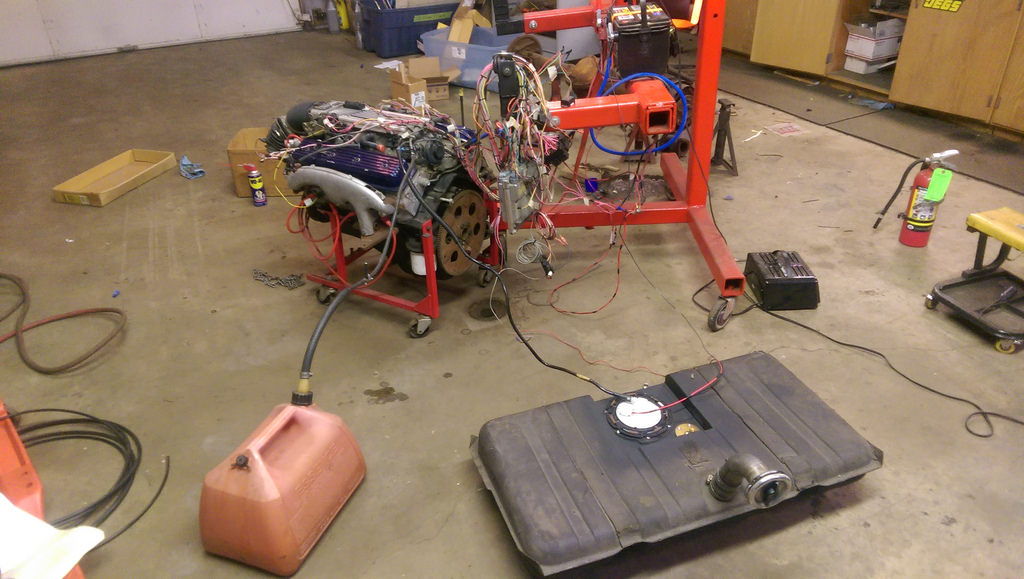
Now to change gears just slightly, I am trying to get this motor running for my Pa (wife's grandpa who I bought the car from). He has had this LT4 spec LT1 since around early 2000's and has never gotten it to run correctly. I'm going to give a shot at it.
That was part of the motivation for getting the tank done sooner than later. The LT1 rails are regulated with a return line but unlike the LS1, the LT1 needs around 43psi to run correctly. So, with the feed line giving 58psi it shouldn't be too difficult for it to regulate down to 43psi. At least that is my thought.
The problem he is having with the motor is something is not allowing the injectors to open and trigger as they should. I used a program a while ago to disable the VATS in the system, so that should be good to go, but for safe measure, we also have a VATS bypass module. I'm thinking that there is something like the neutral safety switch isn't grounded or similar that is causing the issue. I'm continuing to trouble shoot, and will update soon.
My wiring mess...
Cheers,
Ryan
1955 Nomad project LC9, 4L80e, C5 brakes, Vision wheels
1968 Camaro 6.2 w/ LSA, TR6060-Magnum hybrid and etc SOLD
1976 T/A LS1 6 Speed, and etc. SOLD
Follow me on Instagram: ryeguy2006a
10-03-2016 #95
Registered User
- Join Date
- Sep 2009
- Posts
- 2,711
Well no work on the Camaro, but I do have some good news on the LT1 engine. After a year or so of troubleshooting on and off I figured out that the issues with the motor not firing it came down to two things. Either the vats was still causing the engine to not fire or the injectors weren't working correctly. I confirmed that the motor was getting plenty of spark, but no fuel was pulsing from the injectors. I pulled the fuel rail, and everything was bone dry... :???: Even with the vats enabled, it should still have fuel delivered to the manifold. Vats kills the injectors after 2-3 seconds. I took one of my EV1 pigtails to my 5.3 motor to verify that the injector would click if activated and sure enough it did. Tried the same thing on the LT1 injector and nothing. AHH, I'm on to something. I tapped the injector lightly with a hammer, and it clicked and sprayed the residual pressurized fuel out! Did that to the rest of the injectors and verified they were all functioning. One more try, and it fired right off! I was stoked that it finally ran. I didn't get a video, but it was very quiet, but the throttle response was incredible. I was impressed.

So that's a win in my book. I was able to get that running for Pa, and now I can get that motor out of my garage to free up some more space.
Ryan
1955 Nomad project LC9, 4L80e, C5 brakes, Vision wheels
1968 Camaro 6.2 w/ LSA, TR6060-Magnum hybrid and etc SOLD
1976 T/A LS1 6 Speed, and etc. SOLD
Follow me on Instagram: ryeguy2006a
10-04-2016 #96
Registered User
- Join Date
- Sep 2009
- Posts
- 2,711
Now that the LT1 is running, I am sending it back to clear up some more room in my garage. I tore down my makeshift run-stand to free up some space. I decided that it was time to pull the frame one last time. I have several things that need to be done prior to installing it for a final time. I need to do some repairs to the firewall, cowl and replace the upper dash. Once that's complete I want to prime and trim out the window channels so that I can install the front and rear windows.
The other component that I want to spend time on is getting the frame completed. This includes building my transmission cross-member, brake lines, possible frame notch, and etc. First thing I want to focus on is building my own cross-member, as the aftermarket ones are just not in the budget right now. Still toying around with how I am going to attempt this as I have a few designs in my head that I have taken from many different designs.
One step forward, two steps back:
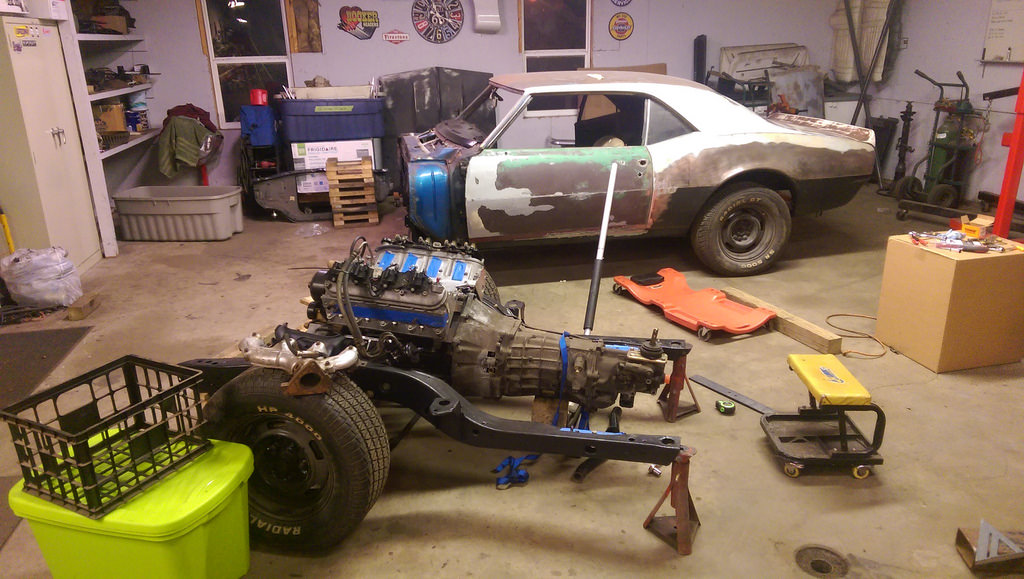
I'm going to try and work on the car a few hours a night as many nights as I can during the week as I will be losing my garage space in the near future. Not sure where I will be able to store the car in the meantime, so I am going to attempt to get the car into a running/driving state so that it can move under it's own power. Time will tell how close I can come to that.
1955 Nomad project LC9, 4L80e, C5 brakes, Vision wheels
1968 Camaro 6.2 w/ LSA, TR6060-Magnum hybrid and etc SOLD
1976 T/A LS1 6 Speed, and etc. SOLD
Follow me on Instagram: ryeguy2006a
10-08-2016 #97
Registered User
- Join Date
- Sep 2009
- Posts
- 2,711
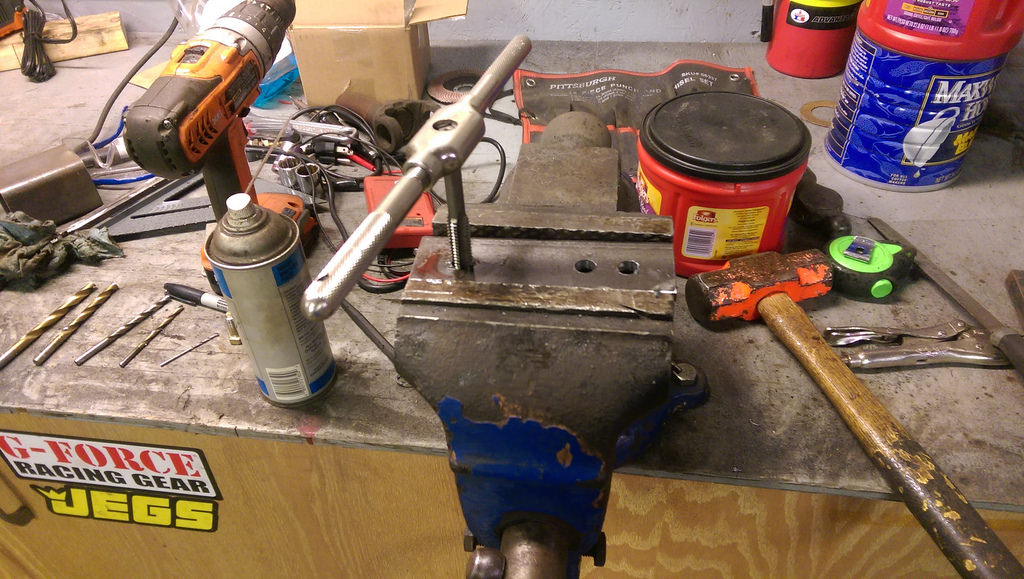
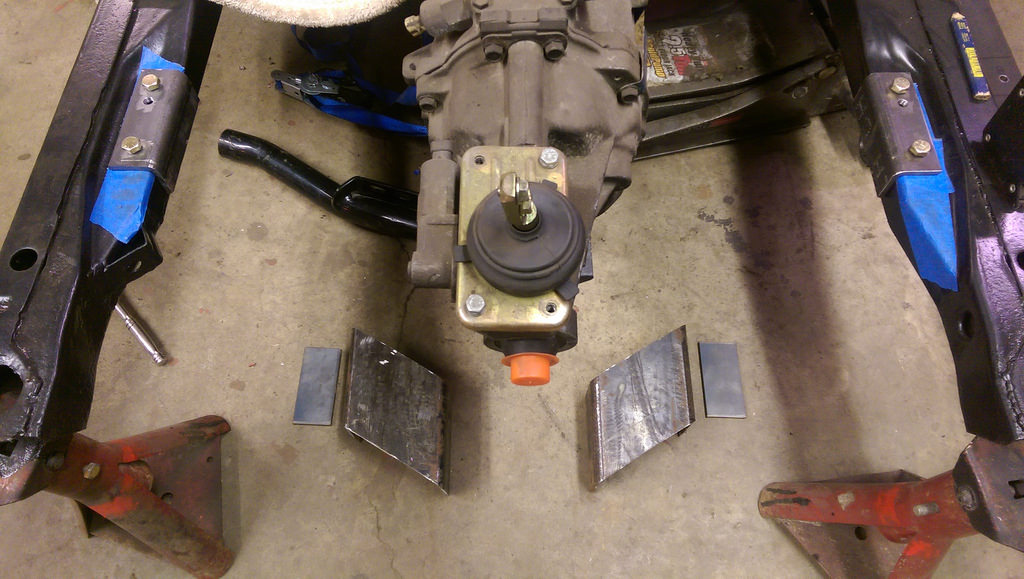
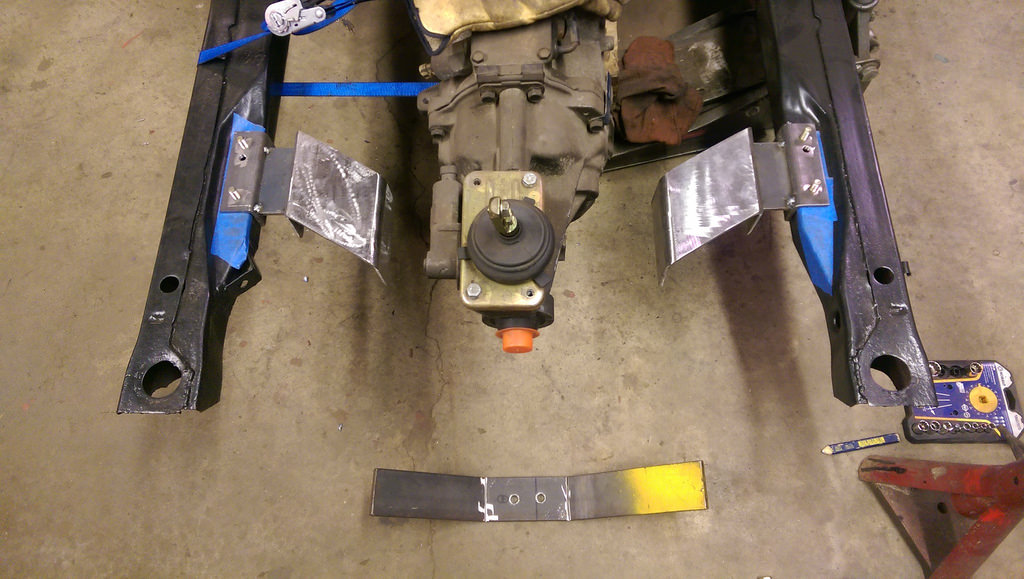
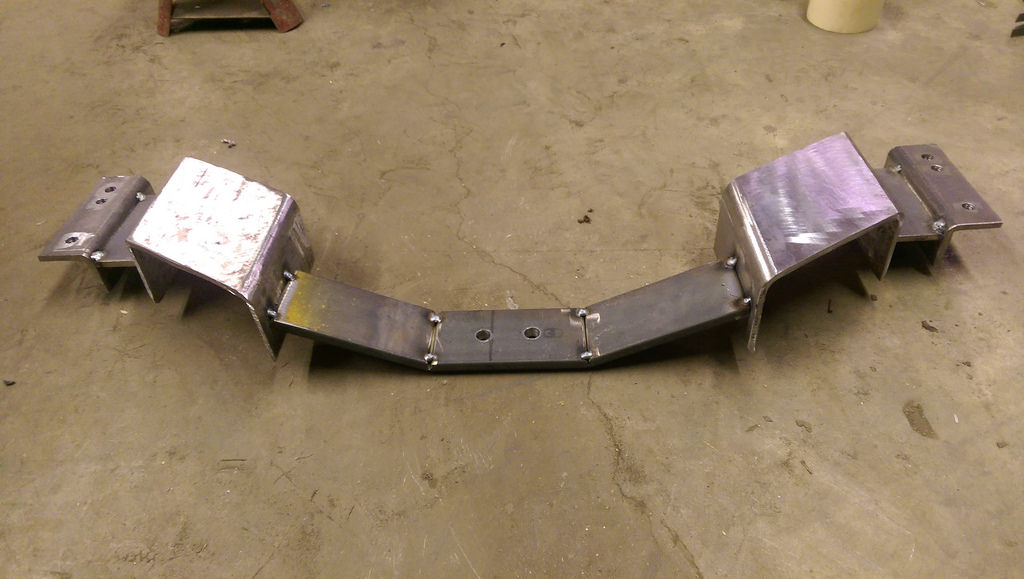
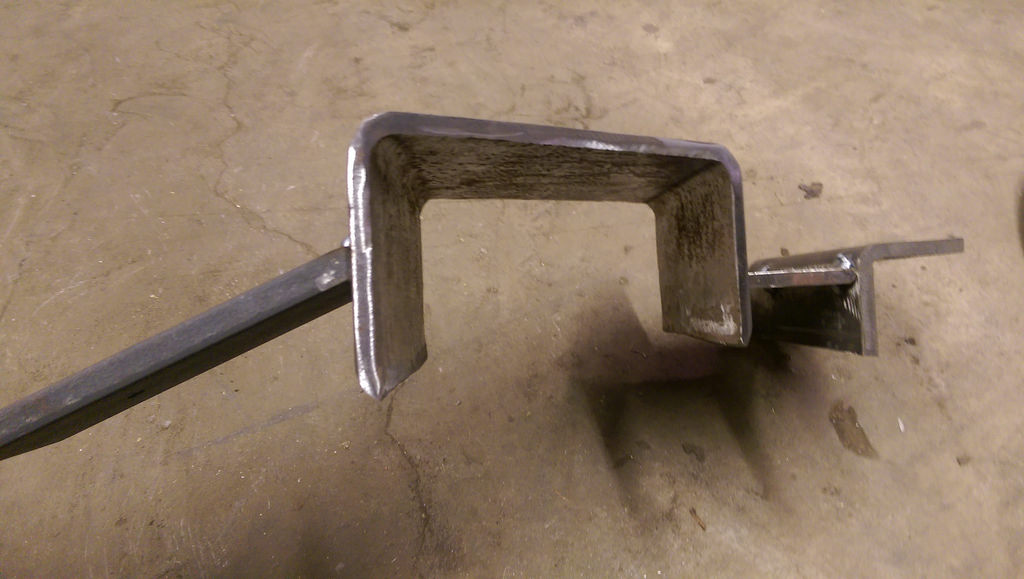
My first attempt I tried to use a universal mount that I had, but was just going to take more work that it was worth. So, I started from scratch and it took me a while to figure out how I wanted to build it and after a lot of searching, measuring and assessing what I have in my scrap bin I came up with a design. I really liked the looks of the G-Force crossmembers with the U channel to allow for the exhaust to run through. I decided to make my own version of that.
I started with some remnants from the rotisserie inserts that I made for the rear leaf spring mounts. I got it all lined up with the stock holes on the subframe. It is a 1/4" plate, should be enough to hold up the transmission.
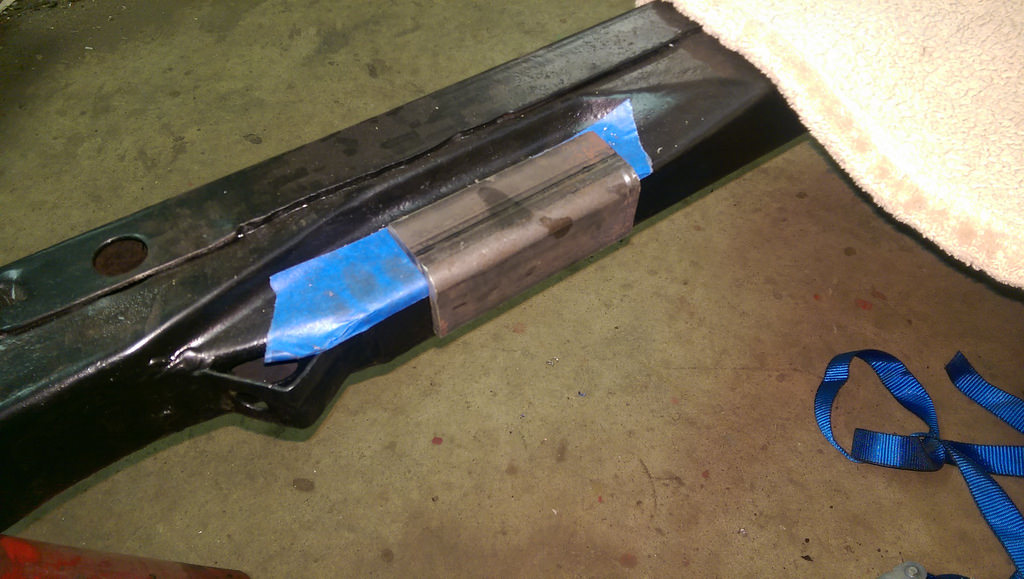
Drilled and tapped the holes.
Here is the piece of scrap that I had. It is a rectangular tube 5 x 3 that is 1/4" thick. That is what I'm using to make the channel for my exhaust.
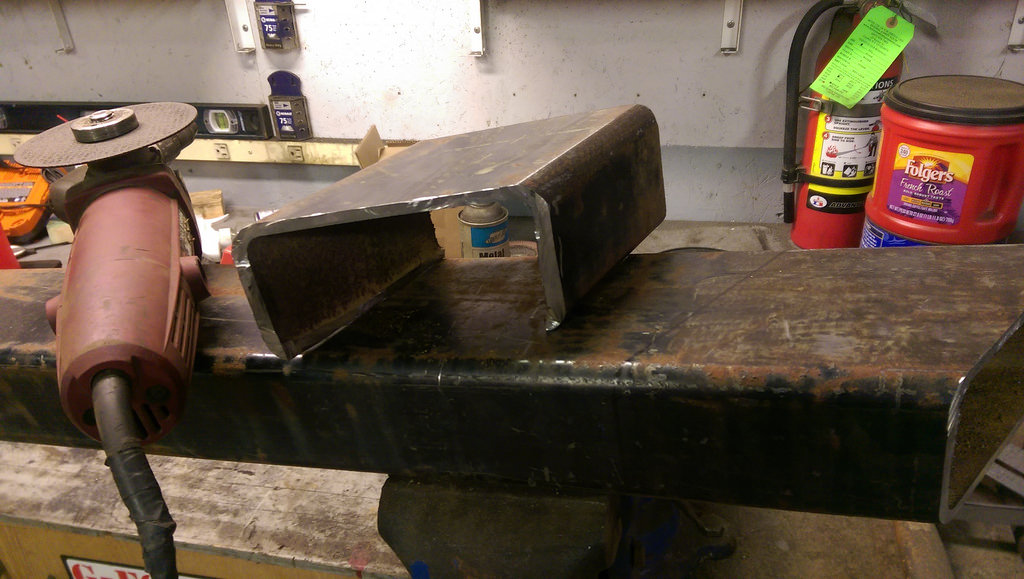
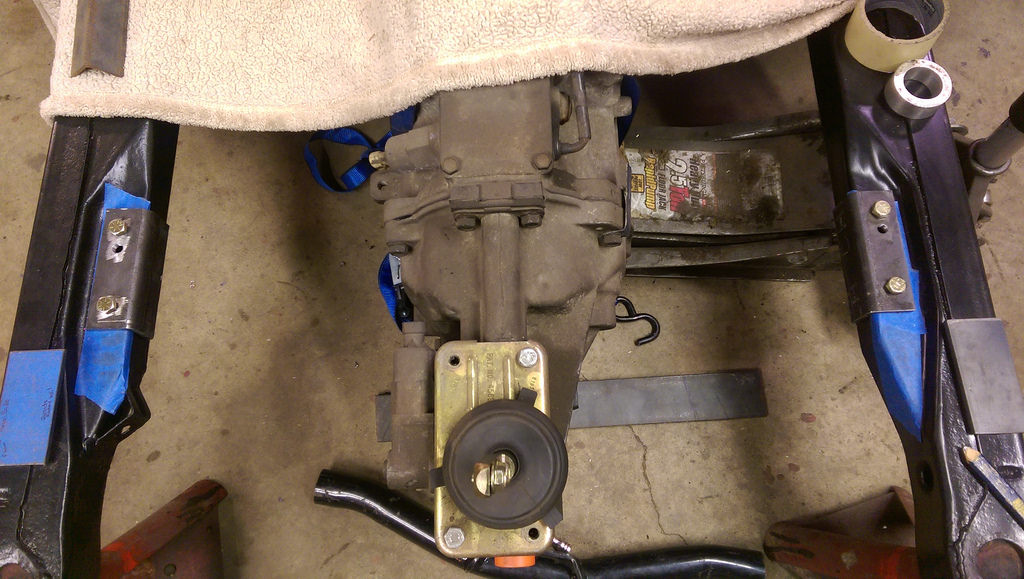
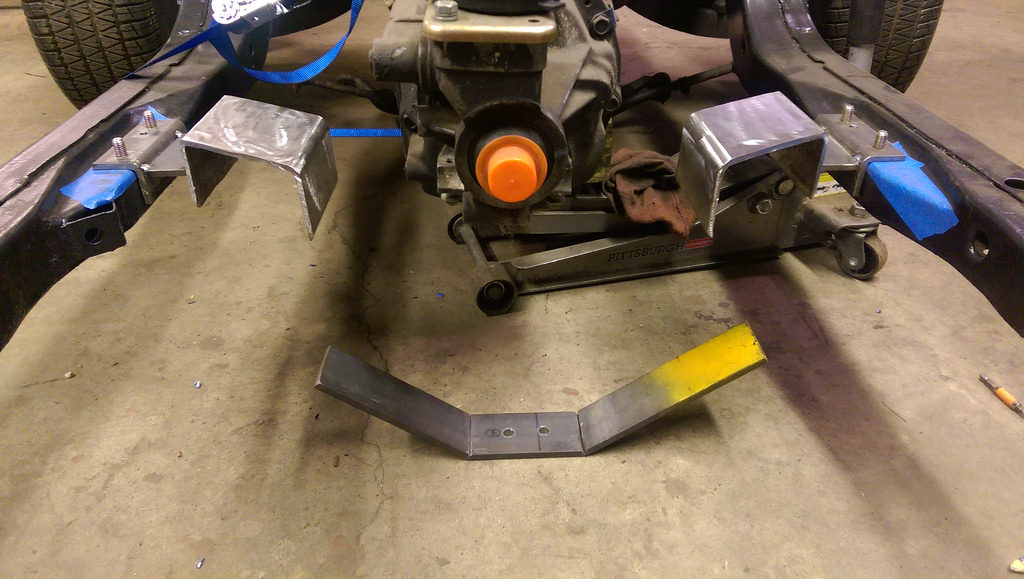
I used some jack stands to roughly test fit the channels.
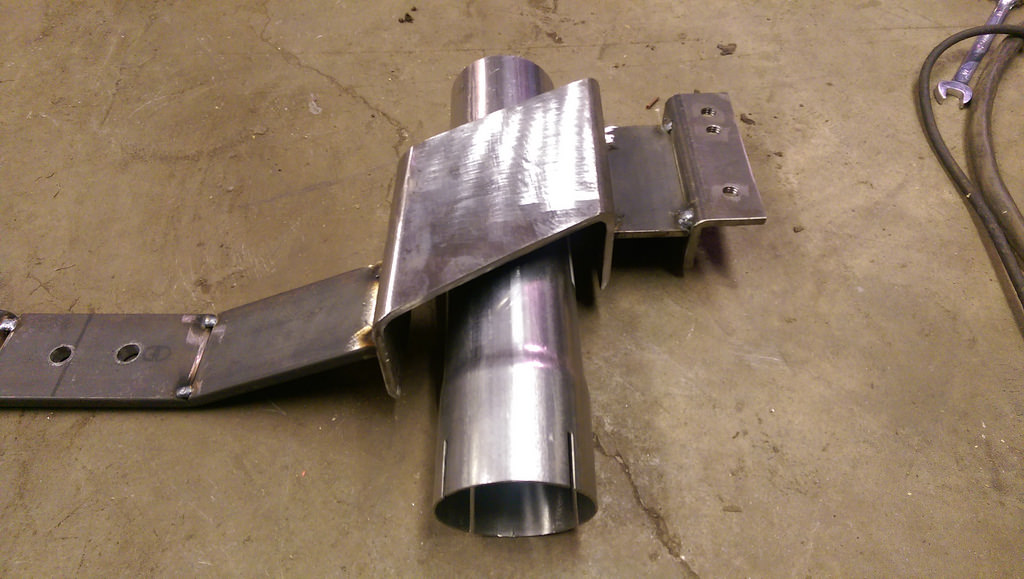
Once I was satisfied with the fitment, and all squared up I tacked them in place. After I test fit everything, I ended up raising the U channels up around an 1" for a little more clearance.

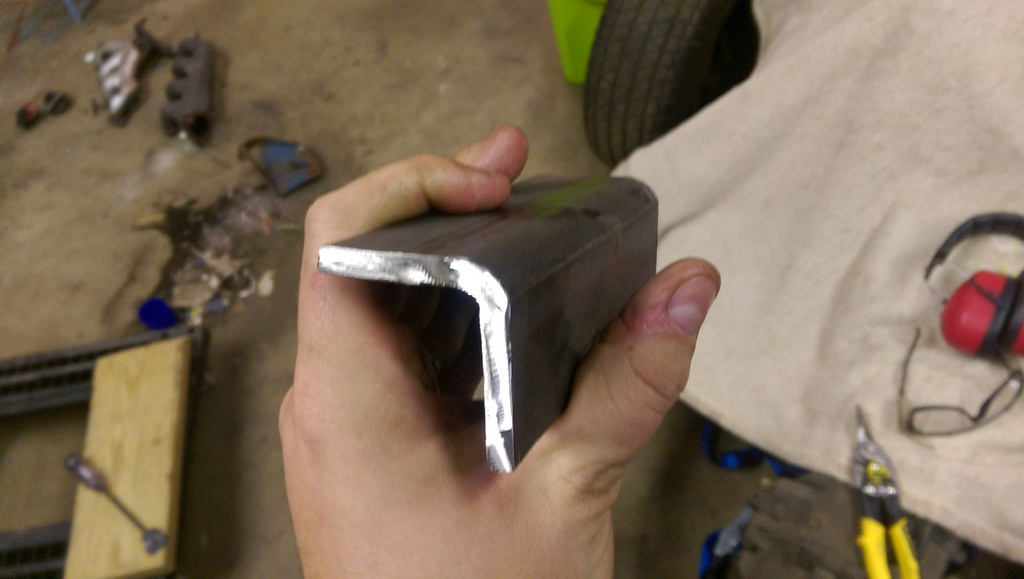
The center cradle is even thicker at 3/8" steel. I notched and bent the steel to right angle where I was happy.
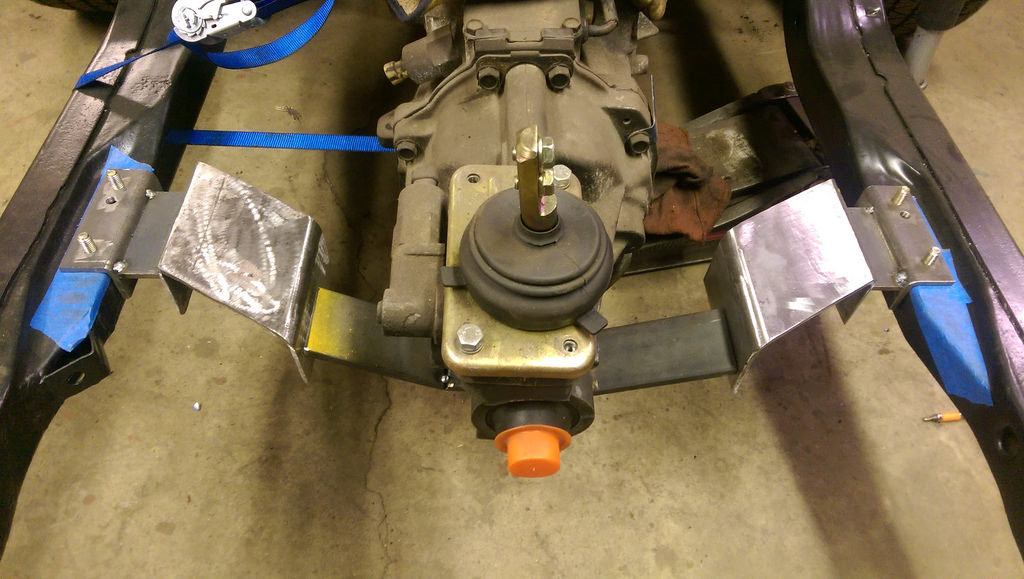
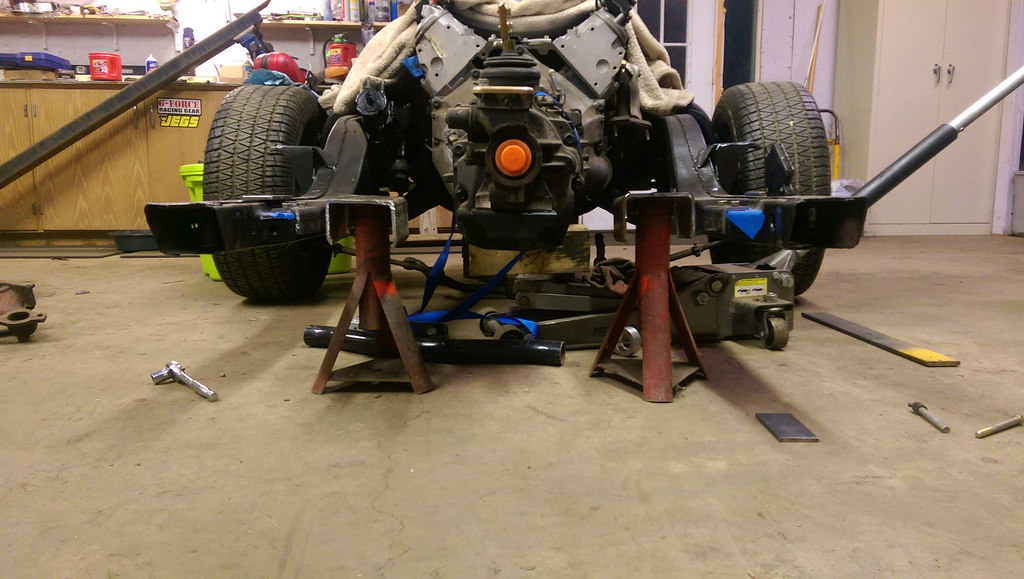
I took some final measurements making sure to ensure that the sub-frame was level and engine/trans were at the correct 3.5*.
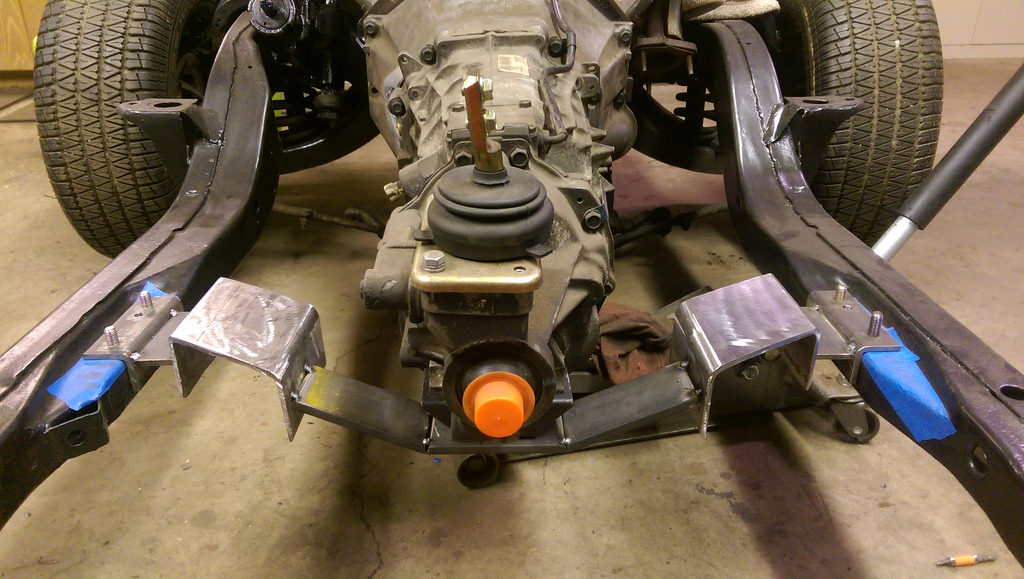
(picture makes it look like the crossmember slopes upward, but is flat)
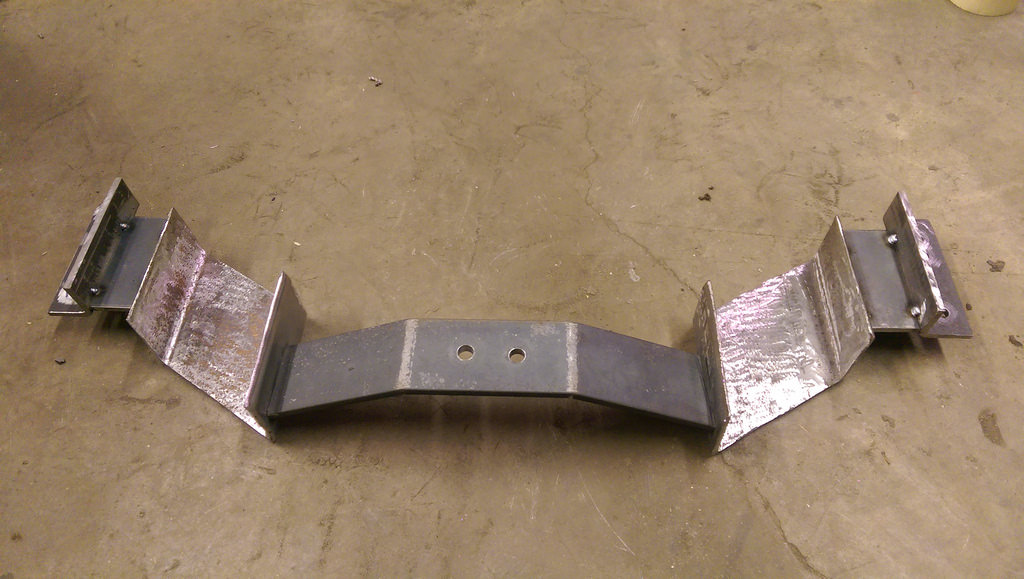
And all tacked up ready for a final weld.
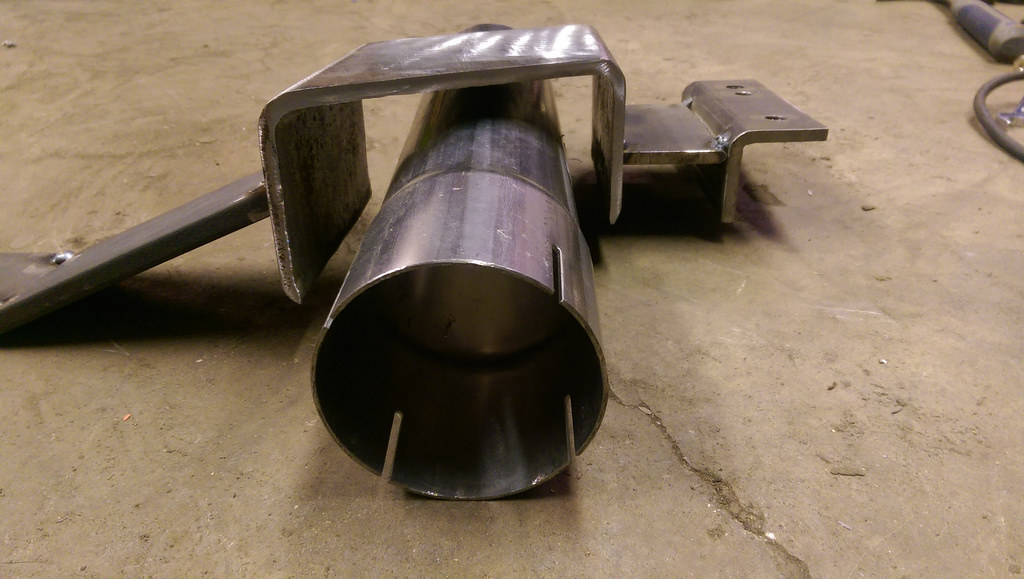
Test fitting 3" exhaust. It will tuck up very nicely when installed.
Unfortunately, I don't have a large enough welder to penetrate this caliber of steel. Fortunately my dad does.
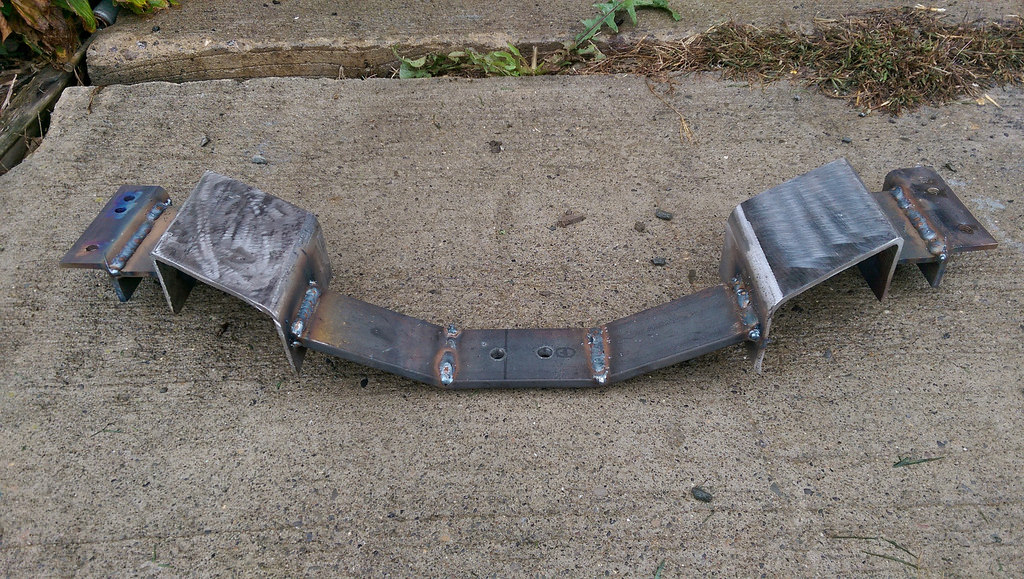
I am very happy with the way that the cross-member has turned out. I still need to clean up the weld spatter and smooth out some of the sharp edges, but it is very close to being finished. I was very concerned that the crossmember was going to warp when I welded it at my Dad's house, but I took all of the precaution and the warping was minimal. I test fit when I got home and it all still fit with minimal effort.
Thanks,
Ryan
1955 Nomad project LC9, 4L80e, C5 brakes, Vision wheels
1968 Camaro 6.2 w/ LSA, TR6060-Magnum hybrid and etc SOLD
1976 T/A LS1 6 Speed, and etc. SOLD
Follow me on Instagram: ryeguy2006a
10-10-2016 #98
Registered User
- Join Date
- Sep 2009
- Posts
- 2,711
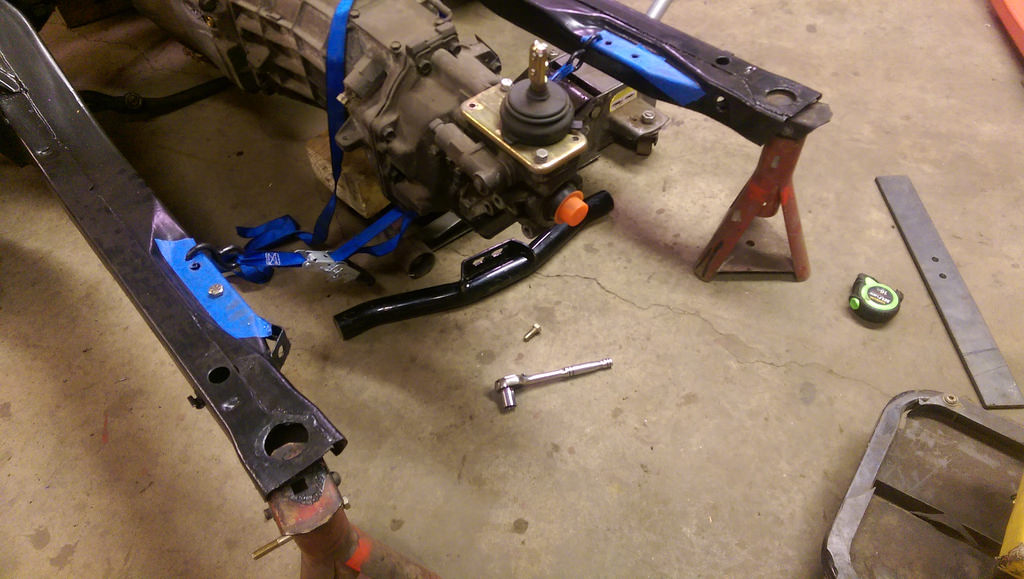
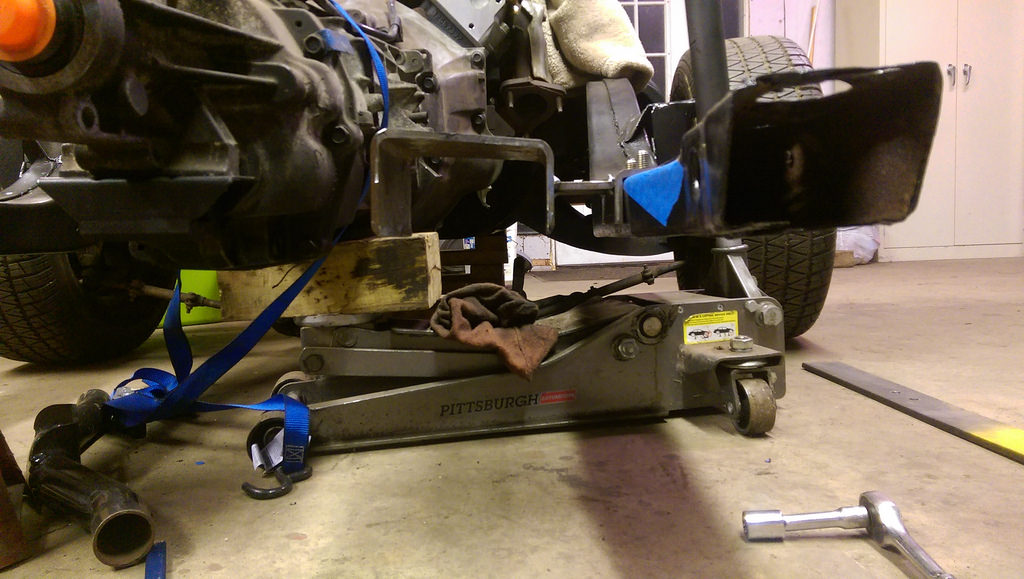
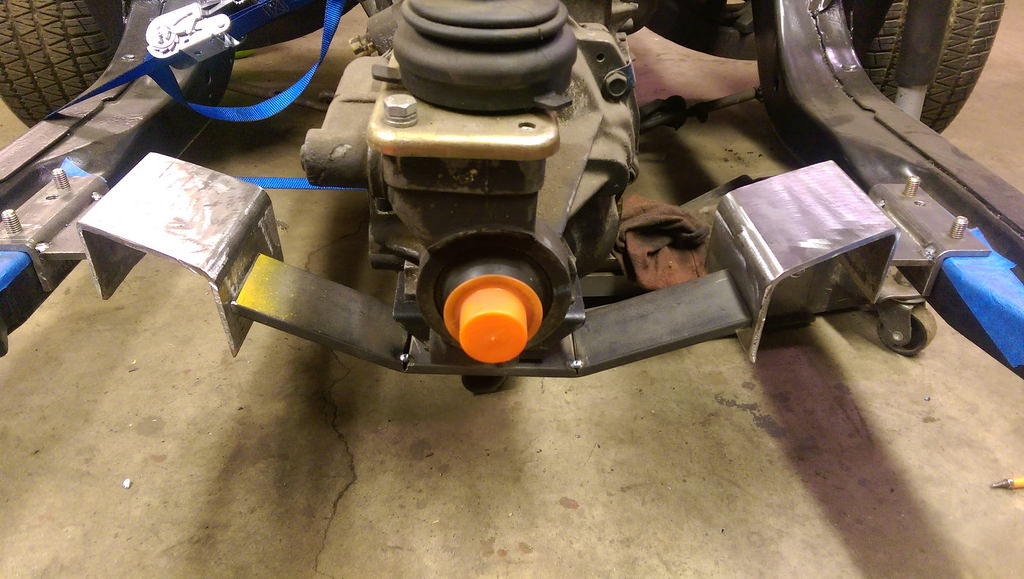
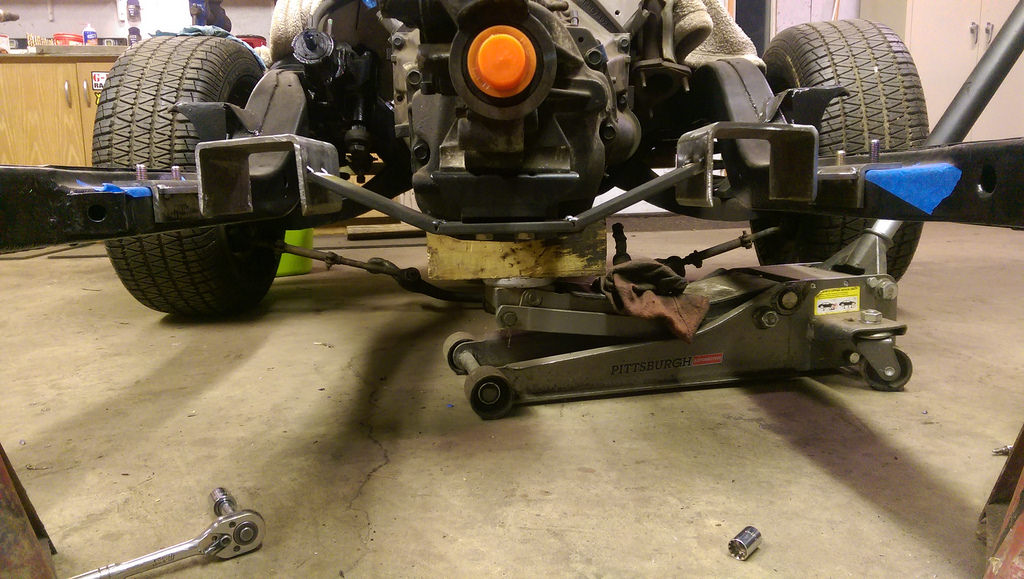
Well I suppose I will post up the bad along with the good. I swear that my measurements were spot on when I tacked the bracket together Friday night/Saturday morning, but somewhere along the way I angled the motor/trans too far downward. Yesterday I test fit the crossmember and was surprised that it was angled down so far? I was reading ~7.5*?? Not sure where I went wrong as I was shooting for 4* and then I could shim it upward slightly to get the perfect drive angle.
The only thing I can think of is either completely messed up while measuring, or after I was done I did a test fit with the full weight of the trans on the bracket when it was only tacked together it may have tweaked. Or the other very real possibility is by 2am while I was building this thing, I had been up for over 21 hours straight... :shock:
Enough with the excuses, what's done is done. This actually may be a blessing in disguise, as it will give me an opportunity to add a little more cross bracing. I need to make up the gap of roughly 1 3/4" from the top of the crossmember mount to the bottom of the trans mount.
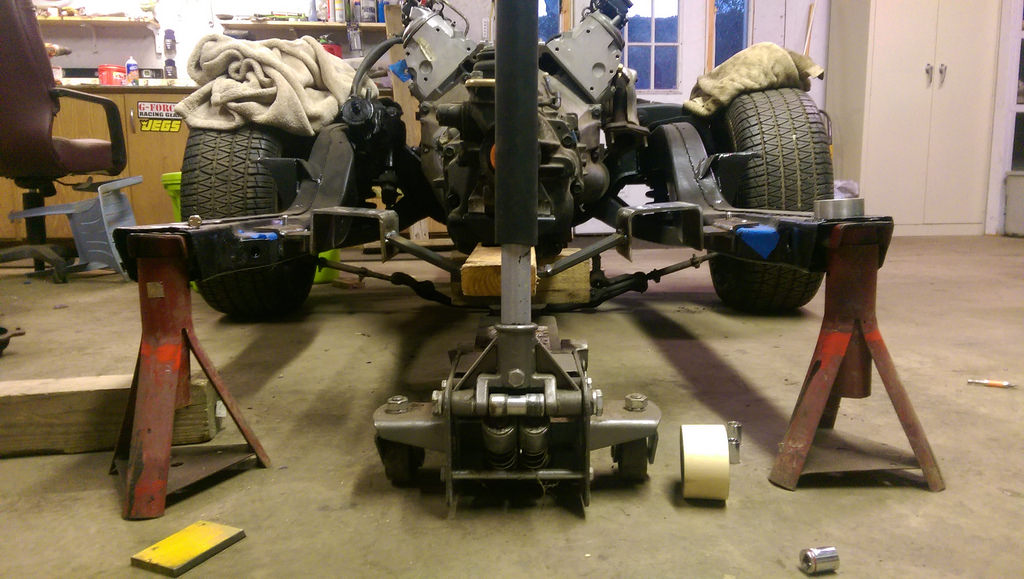
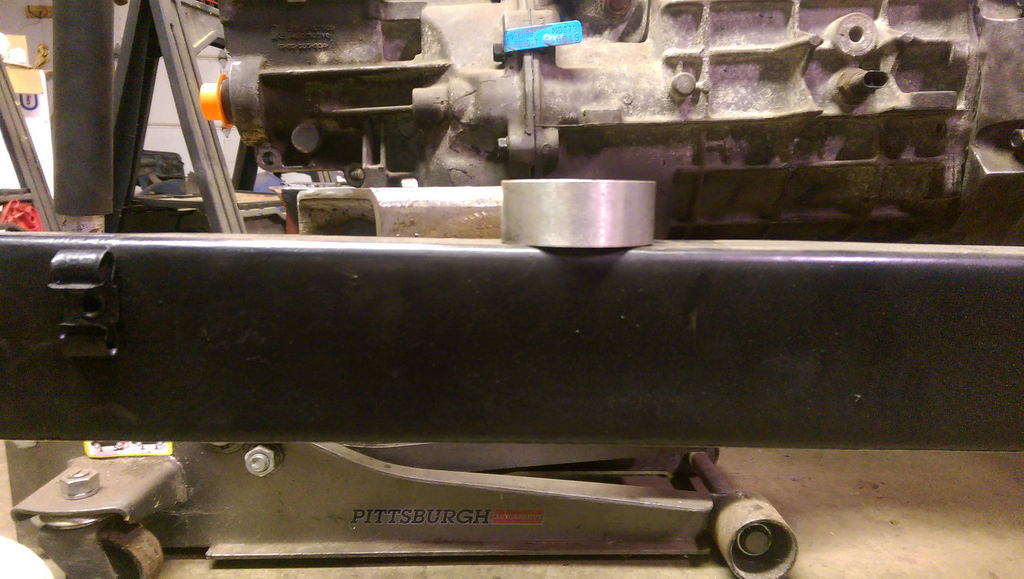
Frame is at exactly 0* and with the board and a 3/8" scrap piece I am sitting at exactly 3.5*. Which means I need to make up that difference in gap.
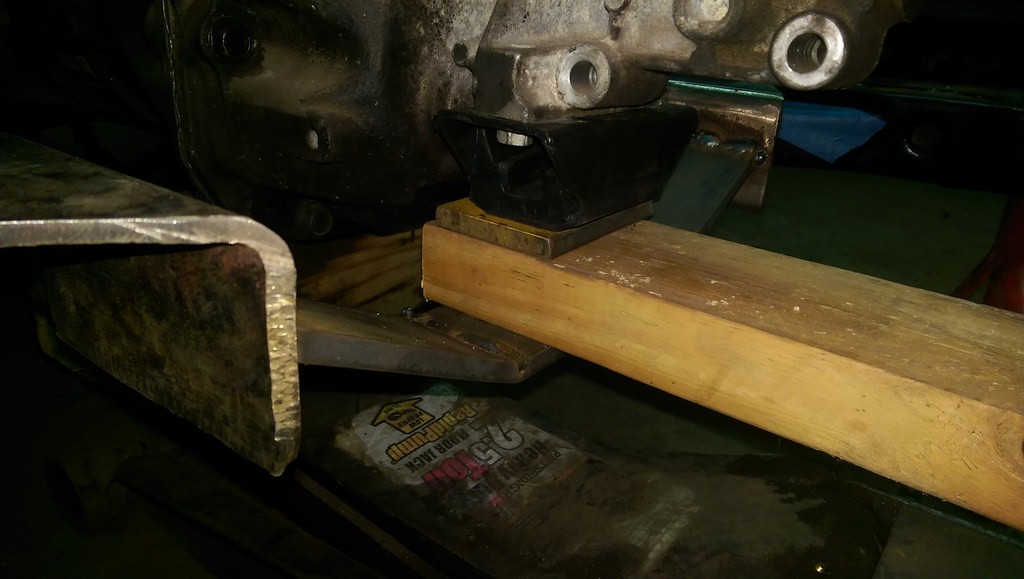
And for those that were wondering if the crossmember will hit the floor, here are some pictures with the solid body mounts. The floor is no lower than the mount, and is humped up right around the trans crossmember as well.
At least one of my measurements came out like I planned. I will update with how I solve this issue. Isn't building cars fun!
Ryan
1955 Nomad project LC9, 4L80e, C5 brakes, Vision wheels
1968 Camaro 6.2 w/ LSA, TR6060-Magnum hybrid and etc SOLD
1976 T/A LS1 6 Speed, and etc. SOLD
Follow me on Instagram: ryeguy2006a
10-10-2016 #99
Registered User
- Join Date
- Nov 2006
- Location
- Ma.
- Posts
- 5,567
Nice job! Miss measurement or not It's looking good.
Wayne
Car FINALLY home !!!!!! lol
Project FNQUIK https://www.pro-touring.com/showthre...ghlight=FNQUIK
10-10-2016 #100
Registered User
- Join Date
- Aug 2007
- Location
- Jonesboro, Arkansas
- Posts
- 2,506
I agree with Wayne, good job, keep it up!
Carl Wilson
1968 Camaro - T-56 6 speed - 383 Stroker, 2014 Mustang GT seats. FiTech EFI, Tanks Inc. Tank with Deutschwerks fuel pump.

 Reply With Quote


