

Results 621 to 640 of 808
-
11-30-2020 #621

 -Moderator/Sponsor-
- Join Date
- Apr 2001
- Location
- The City of Fountains
- Posts
- 15,975

Great update. You're doing an excellent job!
1970 GTO Version 3.0
1967 Cougar build
GM High-Tech Performance feature
My YouTube Channel Please Subscribe!
Instagram @projectgattago
Dr. EFI
I deliver what EFI promises.
Remote Holley EFI tuning.
Please get in touch if I can be of service.
"You were the gun, your voice was the trigger, your bravery was the barrel, your eyes were the bullets." ~ Her
-
11-30-2020 #622 Registered User
- Join Date
- Nov 2018
- Posts
- 645
I REALLY hate to bring this up, but... do the instructions say your main bearing bolts are reusable? If not, hopefully you used the old bolts for the plastigauge test, otherwise you might need a new set. Originally Posted by ryeguy2006a

https://www.underhoodservice.com/gm-...ner-use-reuse/
12-01-2020 #623 Registered User
- Join Date
- Sep 2009
- Posts
- 2,707
Hi Vimes, Thanks for the message. I'd have to look it up again, but somewhere in the GM service manual it states that the main and rod bolts are TTA(torque to angle), not TTY(torque to yield). They are torqued the same way, but the TTA are reusable, and the TTY are not.

1955 Nomad project LC9, 4L80e, C5 brakes, Vision wheels
1968 Camaro 6.2 w/ LSA, TR6060-Magnum hybrid and etc SOLD
1976 T/A LS1 6 Speed, and etc. SOLD
Follow me on Instagram: ryeguy2006a
12-01-2020 #624
Registered User
- Join Date
- Nov 2018
- Posts
- 645
Cool. I'd hate for your engine to come apart because of a plasti-gauging.
12-01-2020 #625
Registered User
- Join Date
- Sep 2009
- Posts
- 2,707
I'd hate for that to happen too!
1955 Nomad project LC9, 4L80e, C5 brakes, Vision wheels
1968 Camaro 6.2 w/ LSA, TR6060-Magnum hybrid and etc SOLD
1976 T/A LS1 6 Speed, and etc. SOLD
Follow me on Instagram: ryeguy2006a
12-02-2020 #626 Registered User
- Join Date
- Dec 2008
- Location
- Detroit
- Posts
- 2,585
Nice progress! What cam are you going to run?
Big dreams, small pockets....
Chris--
'72 Cutlass S LSA/T56 Magnum
Bowler Performance, Rushforth Wheels, ATS, Holley EFI, KORE3, Ridetech
Project Motor City Madness
12-02-2020 #627
Registered User
- Join Date
- Sep 2009
- Posts
- 2,707
Hey Chris, I'm going to be running the Summit 8715 Ghost Cam. Specs are 222/233 115+3, .600/.575. It's a little on the small side, but I've heard that it's easier to tune and has negative overlap to keep the boost in the cylinders.
1955 Nomad project LC9, 4L80e, C5 brakes, Vision wheels
1968 Camaro 6.2 w/ LSA, TR6060-Magnum hybrid and etc SOLD
1976 T/A LS1 6 Speed, and etc. SOLD
Follow me on Instagram: ryeguy2006a
12-02-2020 #628 Registered User
- Join Date
- Feb 2016
- Location
- SoCal
- Posts
- 475
That is a small cam but will play nice with the blower for sure. You should at least get a bit of rumble at idle. Your new setup is going to blow your mind compared to what you have now. Its well worth the money spent.
1970 VW Bug - Just your average mid engine Bug
Track toy - 06 Evo - E85 and lots of boost
Newest track toy - 2021 Supra
12-03-2020 #629
Registered User
- Join Date
- Sep 2009
- Posts
- 2,707
I'm really excited to see how this compares with the mild LS1 I had. I'm pretty sure it's going to be night and day. Plus I went with some PAC .660 springs, so if the cam isn't what I want I have room to grow with a bigger cam. I've watched several idle videos and the Ghost cam has a nice idle. TBH, I'd go for a cam with a more aggressive idle, but my family will ride in it frequently and I don't want something wild. I actually want them to ride in it with me haha.
1955 Nomad project LC9, 4L80e, C5 brakes, Vision wheels
1968 Camaro 6.2 w/ LSA, TR6060-Magnum hybrid and etc SOLD
1976 T/A LS1 6 Speed, and etc. SOLD
Follow me on Instagram: ryeguy2006a
12-03-2020 #630 Registered User
- Join Date
- Jul 2008
- Posts
- 454
I'm running a 220/224 .575" 112 LSA in my LQ4 and love it. It has power everywhere.
*Jeff*
Project Salty - 1964 4 door Malibu, beaten, neglected, red headed foster child
Cammed LQ4 / T56 Swap Project Thread <-click to read! 😁
12-15-2020 #631
Registered User
- Join Date
- Sep 2009
- Posts
- 2,707
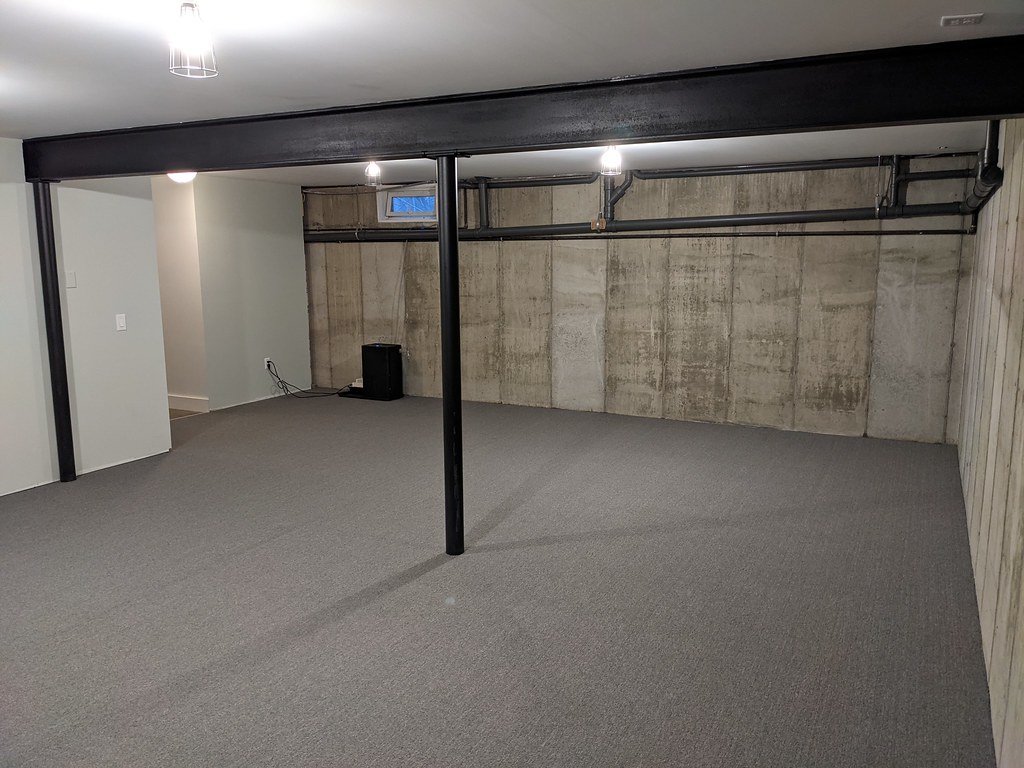
I haven't gotten any work done on the car lately as my wife and I have been busy finishing off our basement. What better thing to do together when we are stuck in the house haha. It has been a fun project and something that we have gotten to do together which is nice. The main thing was to create a space that was safe for the boys to run around and be rough because that's what boys do haha. Before the little guy kept slipping and that wasn't any fun.
This is what it looked like when we started.
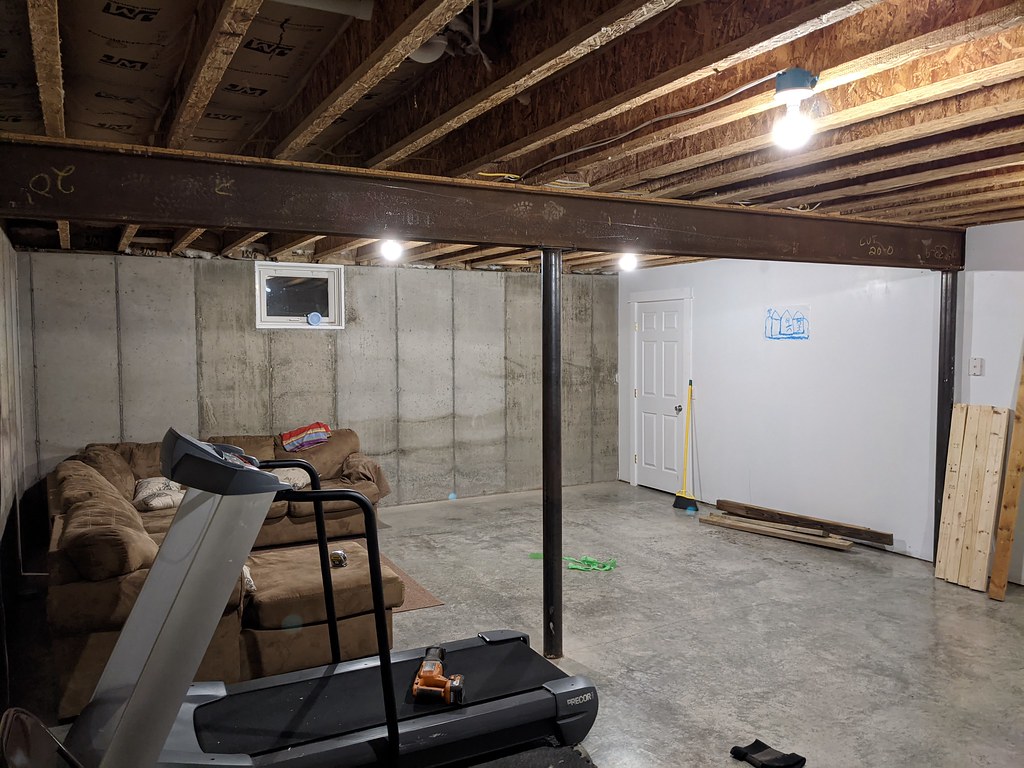
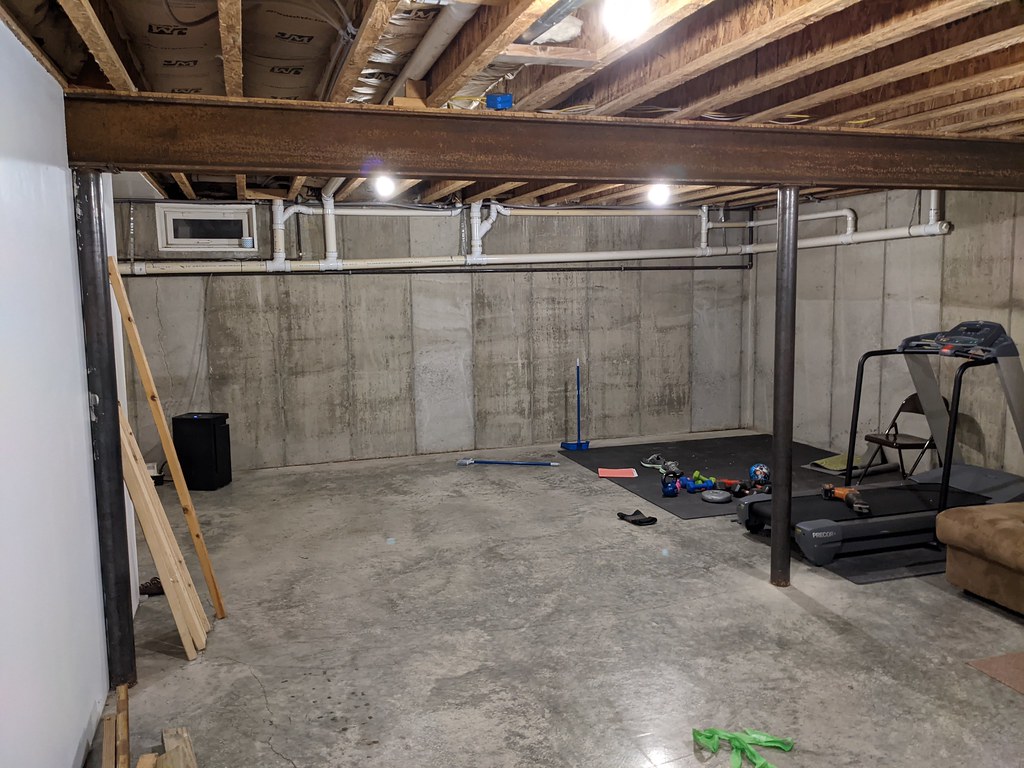
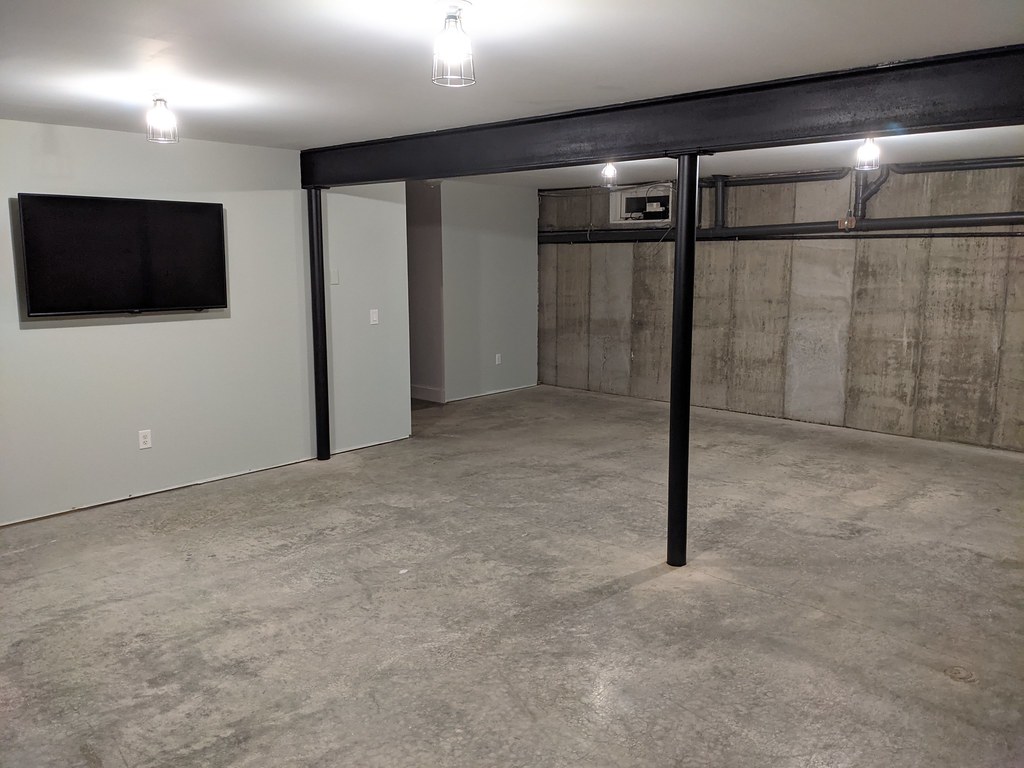
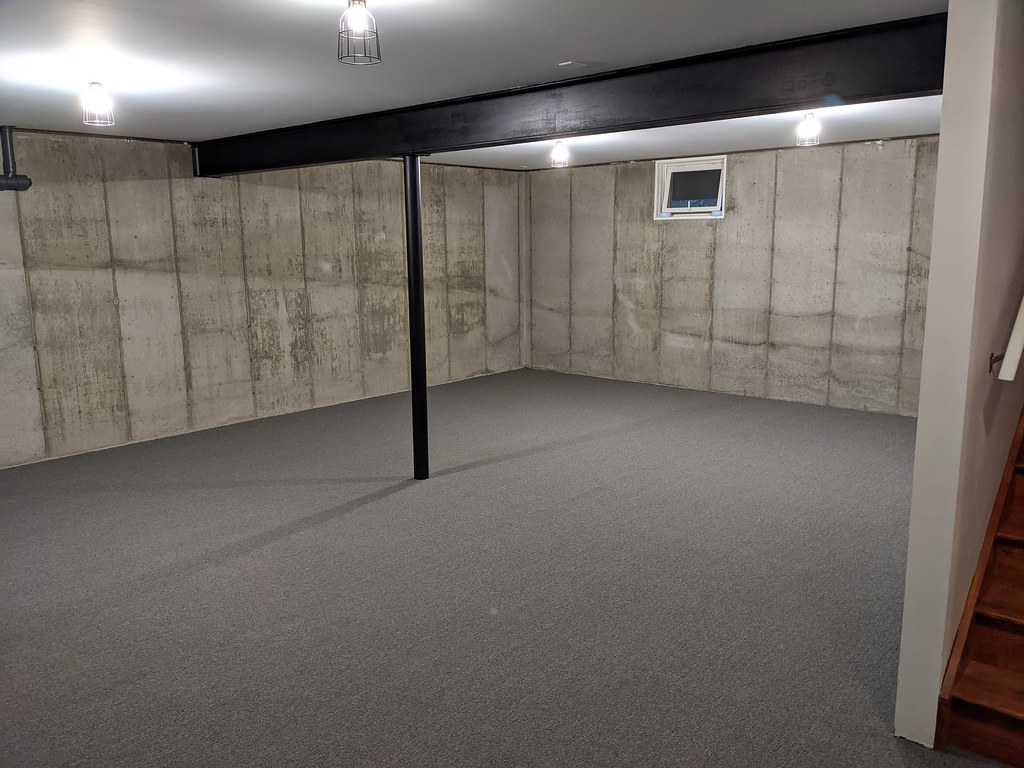
I hung all of the drywall my myself which was a fun and interesting experience. I had a contractor friend come in and tape/mud it after it was hung. I usually prefer to do it all myself since I really don't like paying other people to do something I know I can do. In this case, he knocked it out in just a few days. It would have taken me probably a month to do what he did in a few short days. In this case, well worth the price we paid him. We had just finished painting and prepping it for carpet for the first picture. The carpet was installed yesterday and it turned out really nice. To be honest it was actually nicer than I had expected. Really happy with how it turned out.
Now that I'm done with my part of the project it's time to jump back on my engine rebuild. My wife bought several little things like a toy box and book shelf to keep it all organized down there.
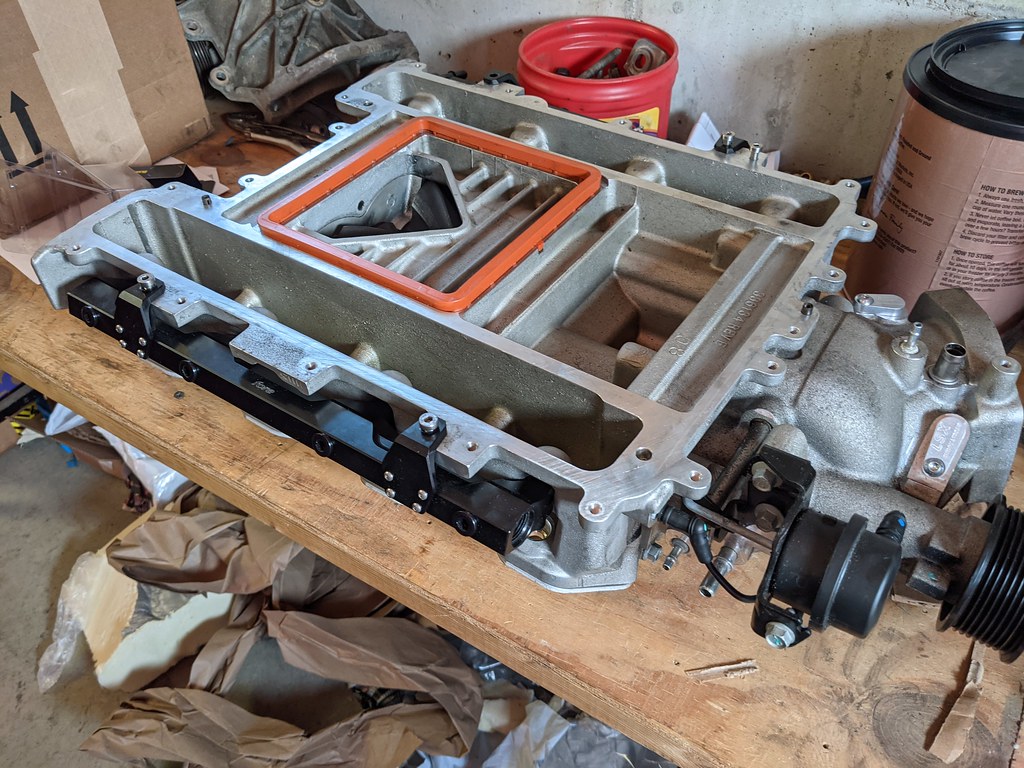
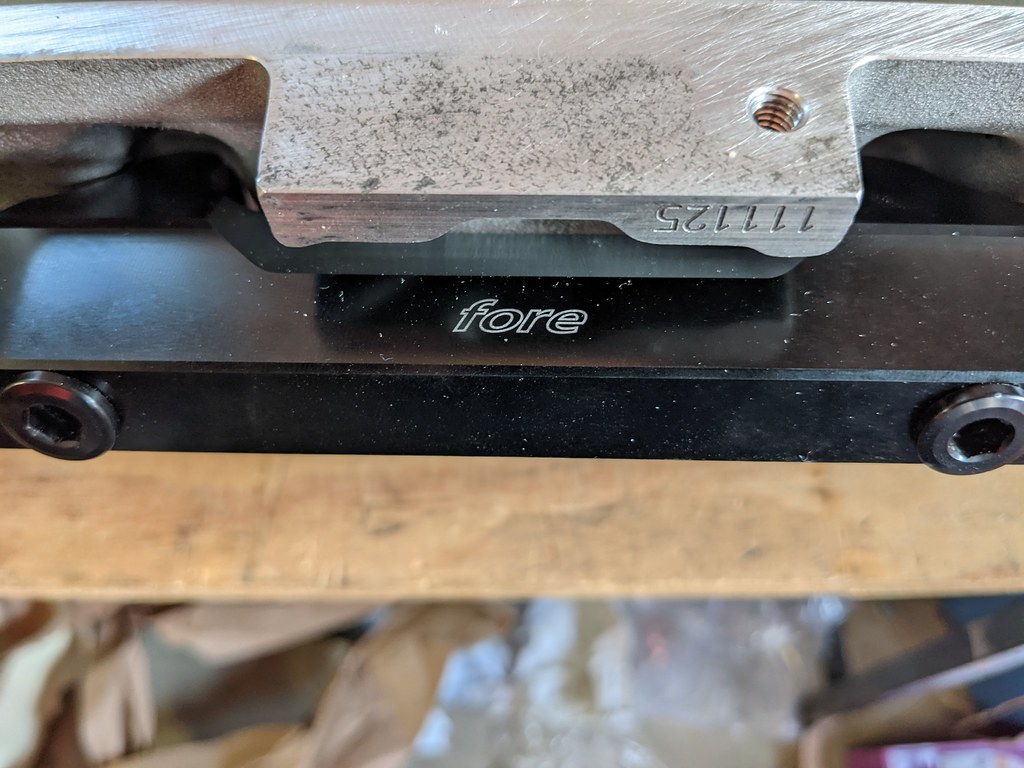
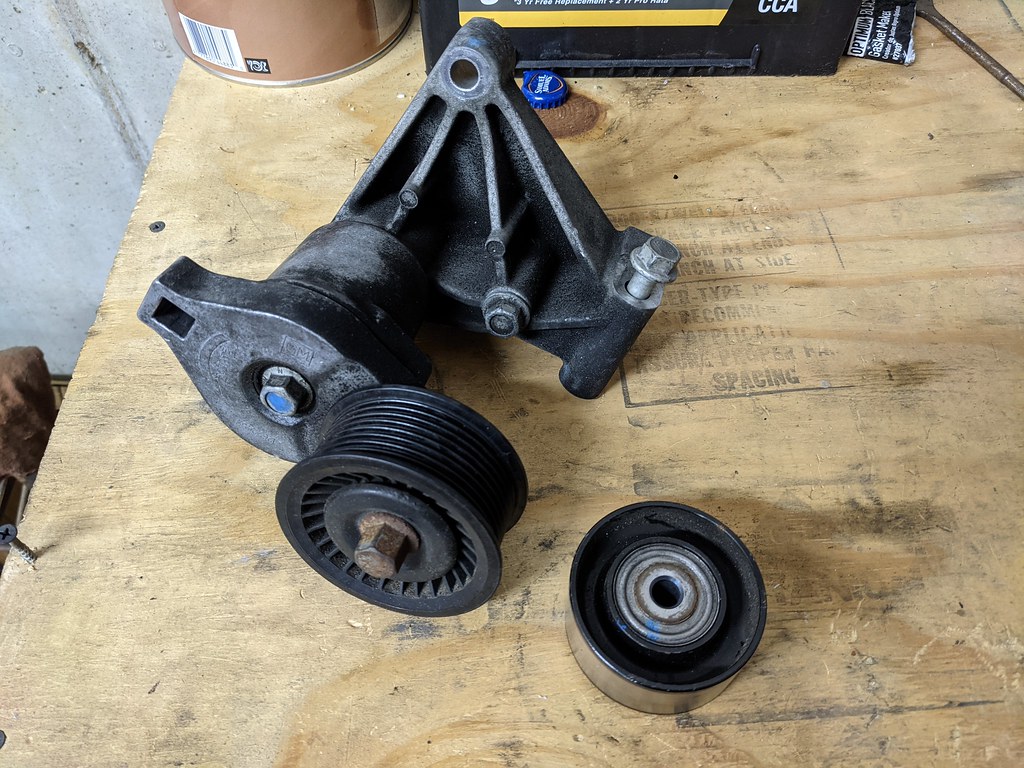
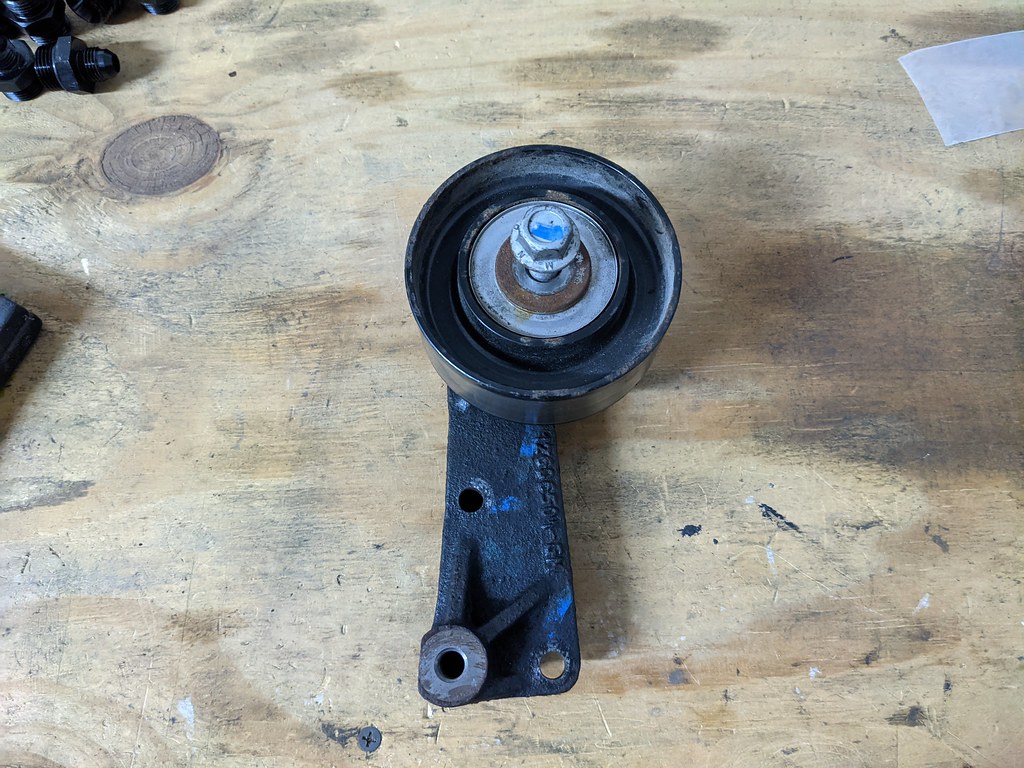
It's not a major update, but I finally tracked down a great price on a set of fuel rails. Pretty stoked about this deal, the retail on the Fore LSA fuel rails is ~$600, plus $160 worth of AN fittings and the guy sold them all to me for $200 bucks! If I play my cards right, maybe I can sell the fittings I won't use and get close to getting them for free! The same guy gave me an incredible deal on an 8 rib tensioner, brackets, idlers and idler bracket. So good that I'm going to just upgrade to the 3 belt setup.
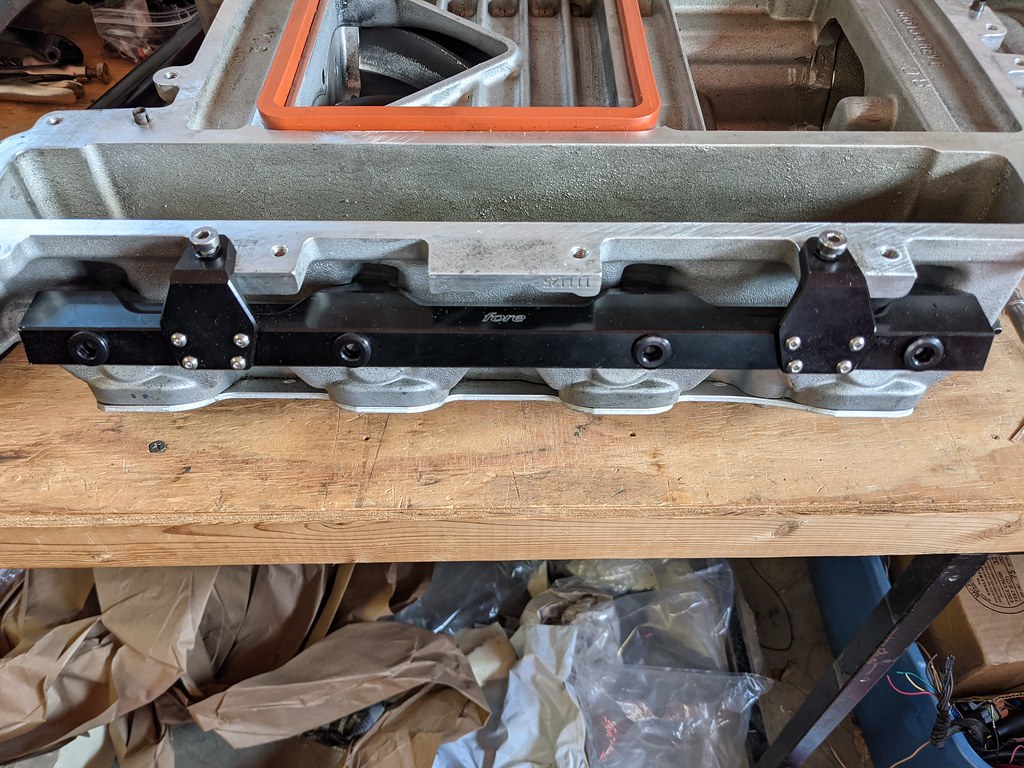
Tensioner bracket
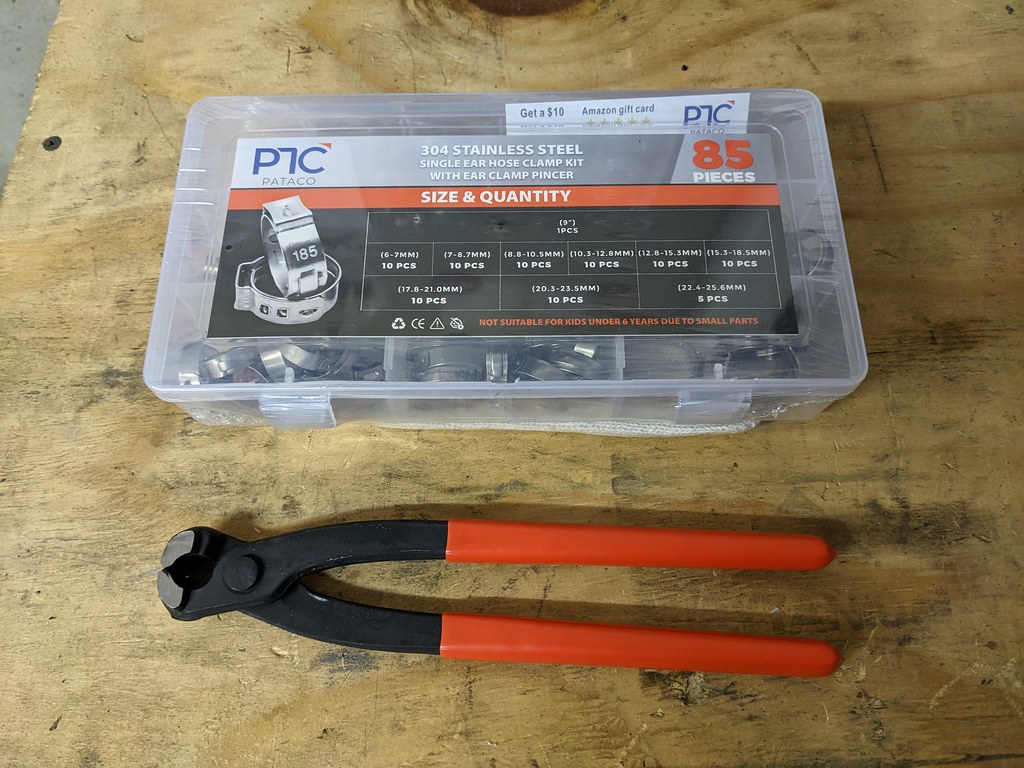
The last piece that I needed to finish my fuel pump was a new corrugated fuel line and these Oetiker clamps. I grabbed a kit with SS clamps on Amazon.
Hoping to make some good progress between now and the New Year!
Thanks,
Ryan
1955 Nomad project LC9, 4L80e, C5 brakes, Vision wheels
1968 Camaro 6.2 w/ LSA, TR6060-Magnum hybrid and etc SOLD
1976 T/A LS1 6 Speed, and etc. SOLD
Follow me on Instagram: ryeguy2006a
01-04-2021 #632
Registered User
- Join Date
- Sep 2009
- Posts
- 2,707
Happy new year to all! I'm stoked to finally have an update that isn't just about buying parts or home repairs. My goal over the holiday break from work was to get the short block fully assembled, so I'll start from the beginning.
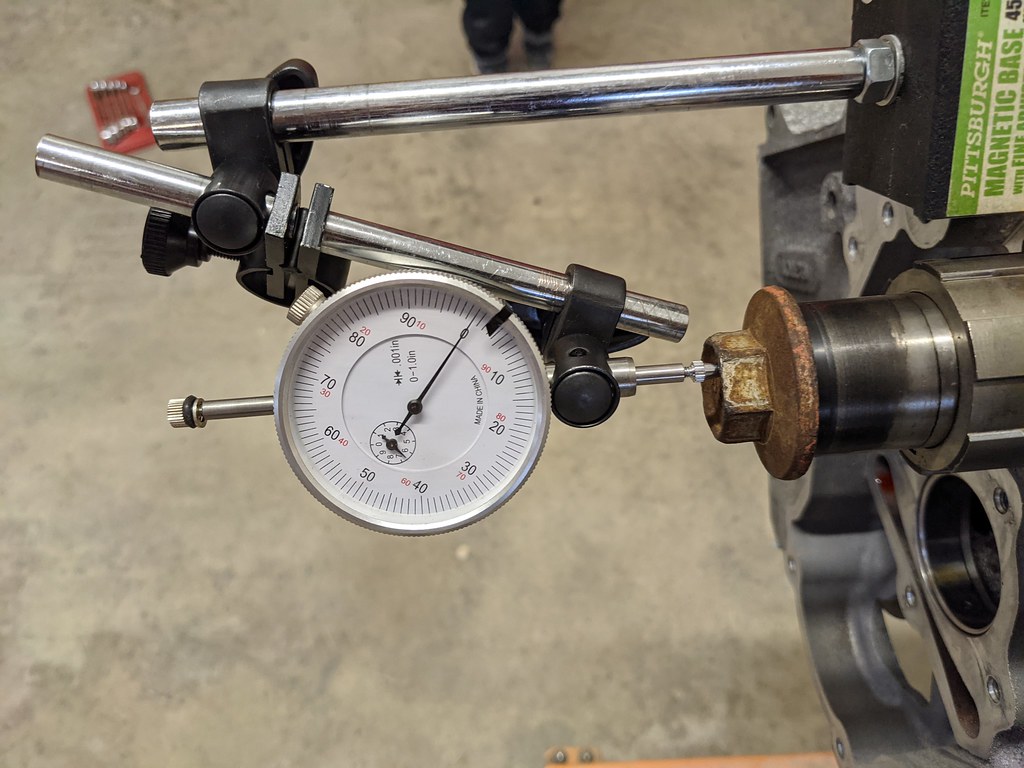
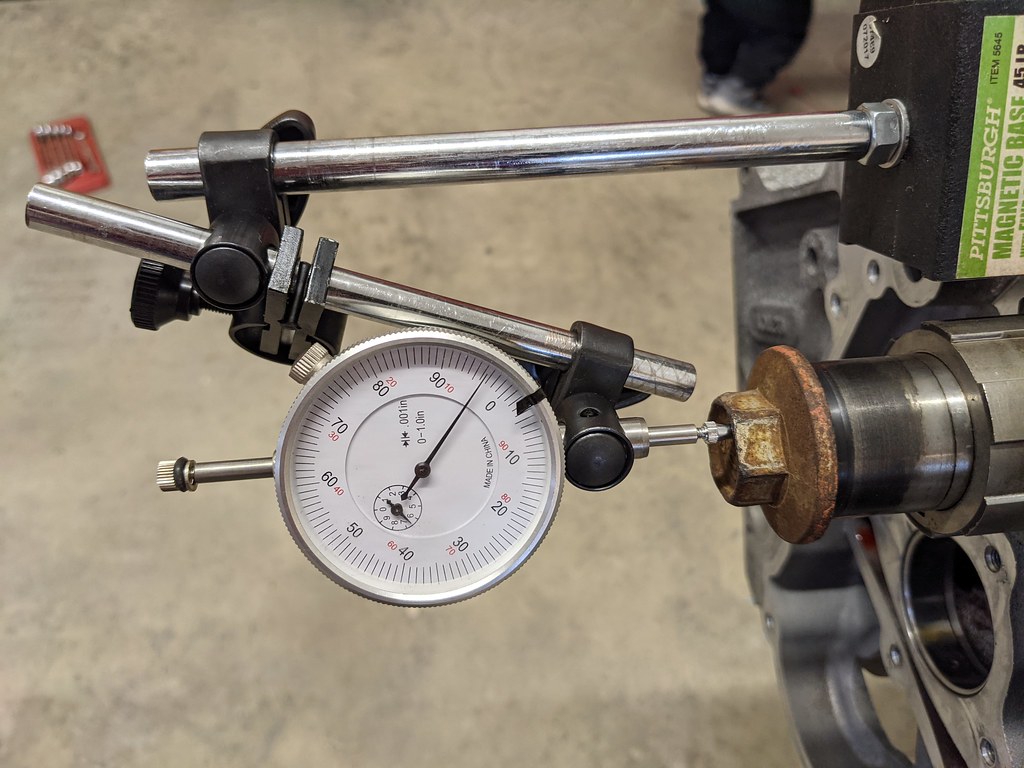
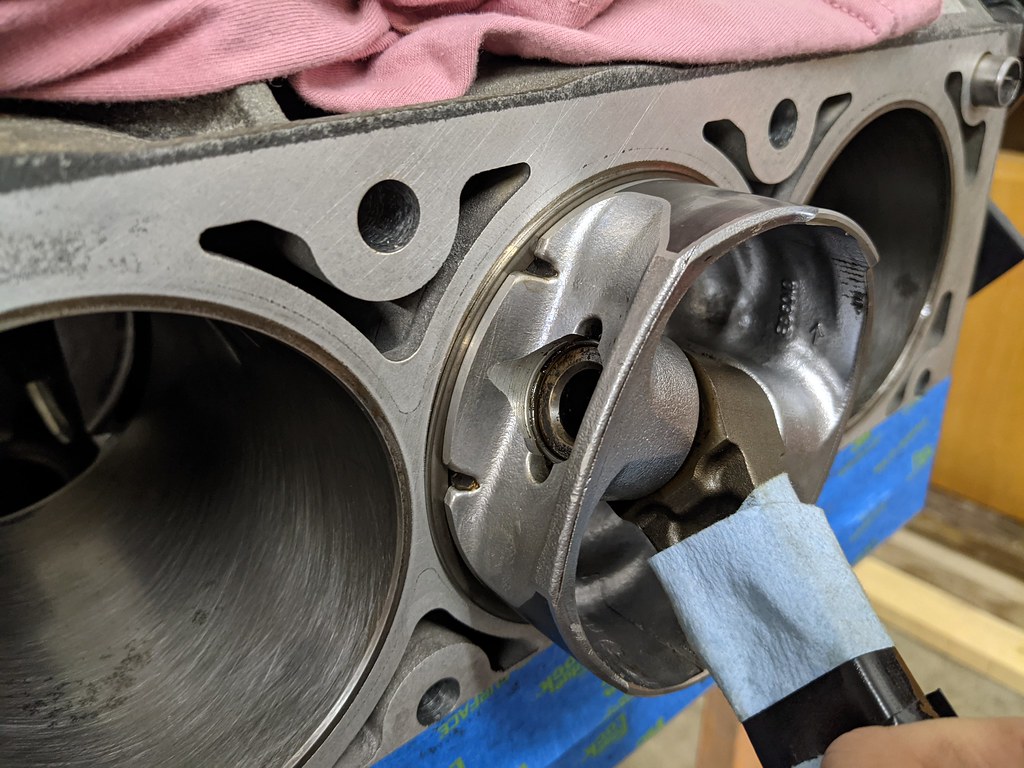
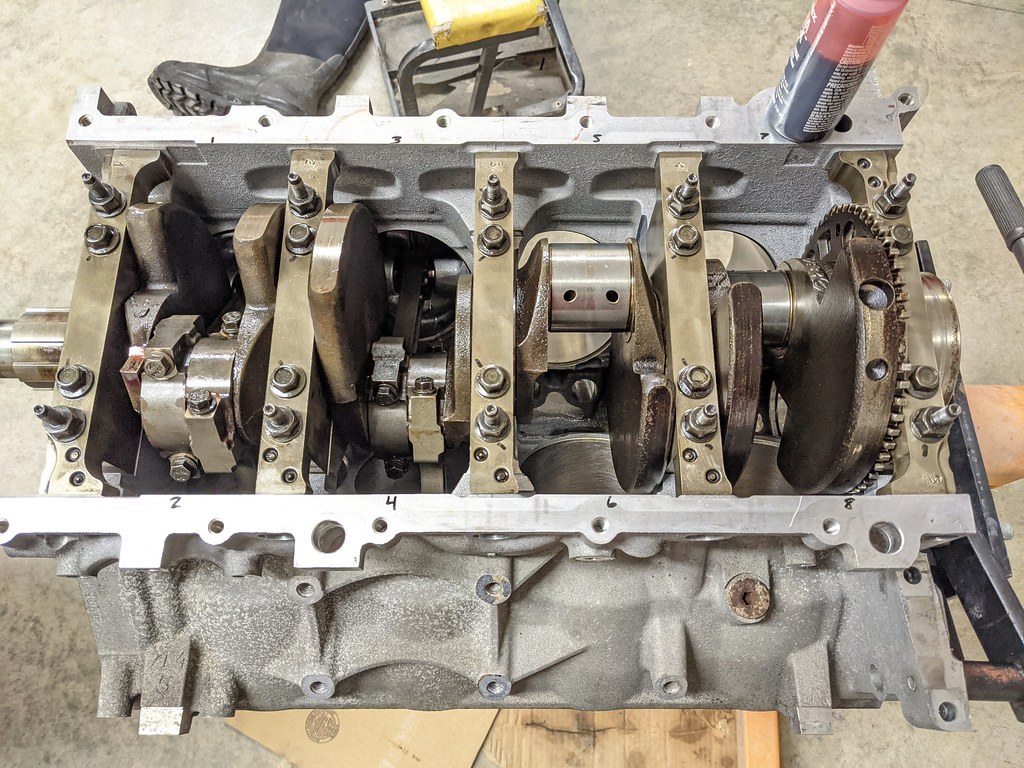
I left off last month by confirming with the Plastigauge that my bearing clearances were within specs for the motor. Next up was to confirm that after the crankshaft main caps were torqued, that thrust checked out. That required a dial indicator and measuring the forward to rear movement of the crank. I had my inspector there to make sure I was doing it correctly.

LS motors require a .004 - .008 clearance to be within specs. Thankfully mine came out around .005, so I'm on the tighter side but within the specs. Must be the angle I took the picture, but it was .005. The picture makes it look more like .0035, but for those concerned, it was measured correctly.
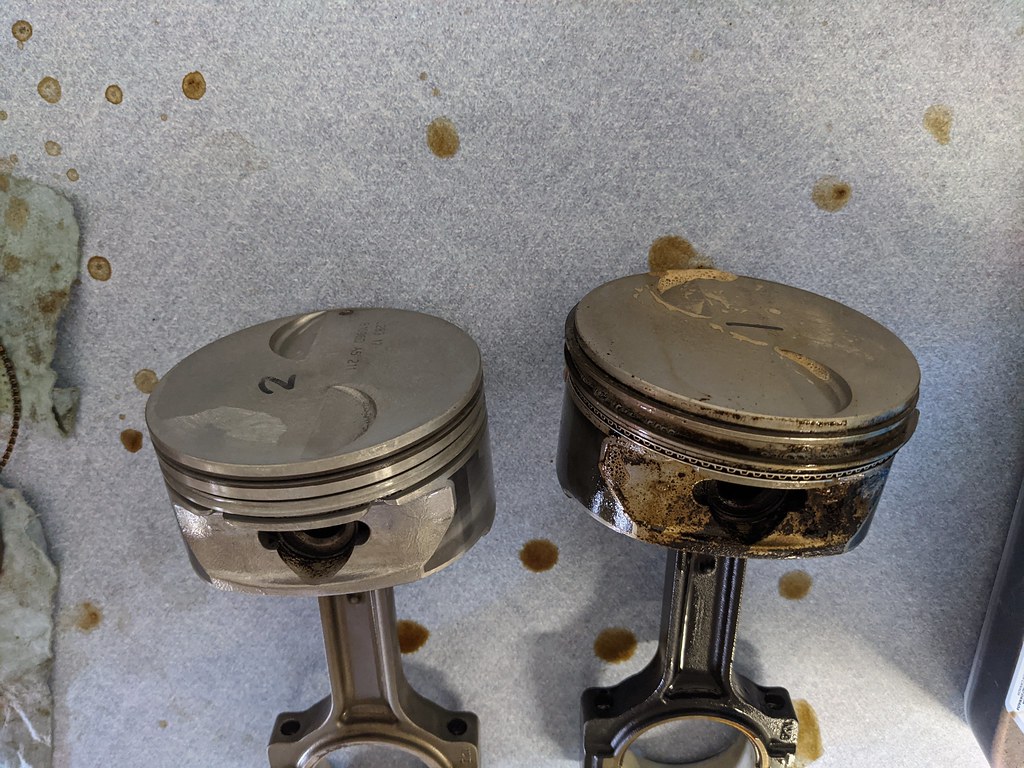
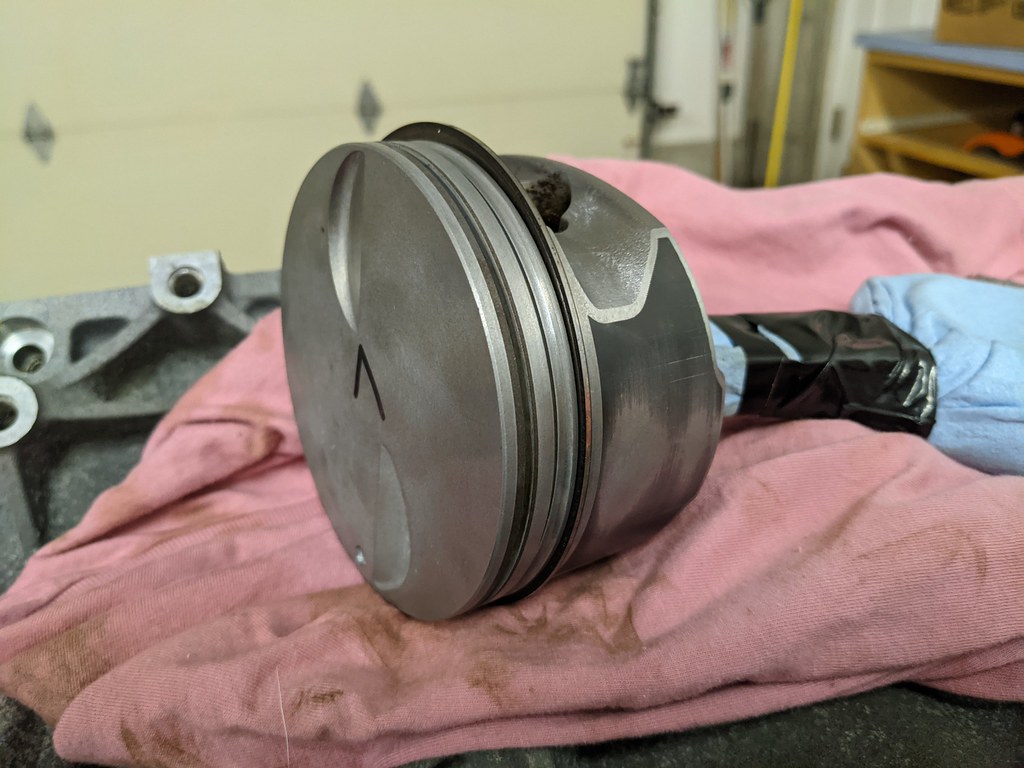
Moving on was getting the pistons/rods ready to assemble. Step one was to get them cleaned up. There was a ton of carbon built up that needed to go. Especially in the ring grooves. Spent several hours cleaning them all up.
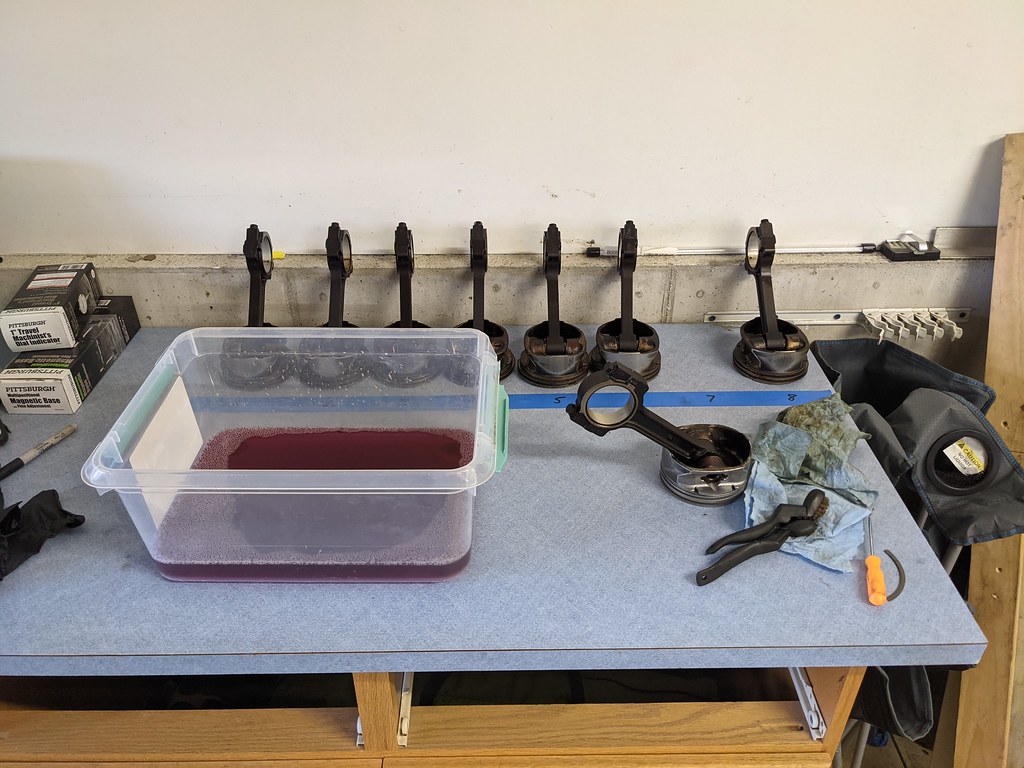
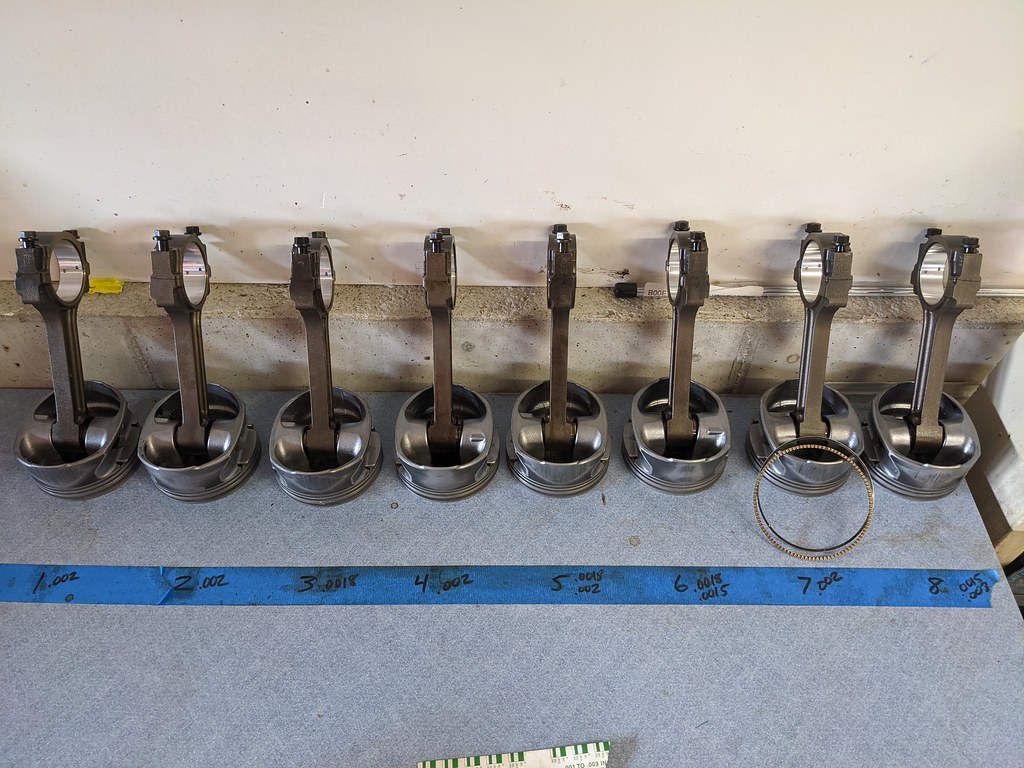
After they were cleaned up, I installed them all without rings to check the new bearing clearances. Thankfully they all checked out to be right within the specs using plastigauge, and I could move on. I noted all the measurements on the tape line. I should also mention that the Summit rod bearings I bought were also King brand just like the main bearings.
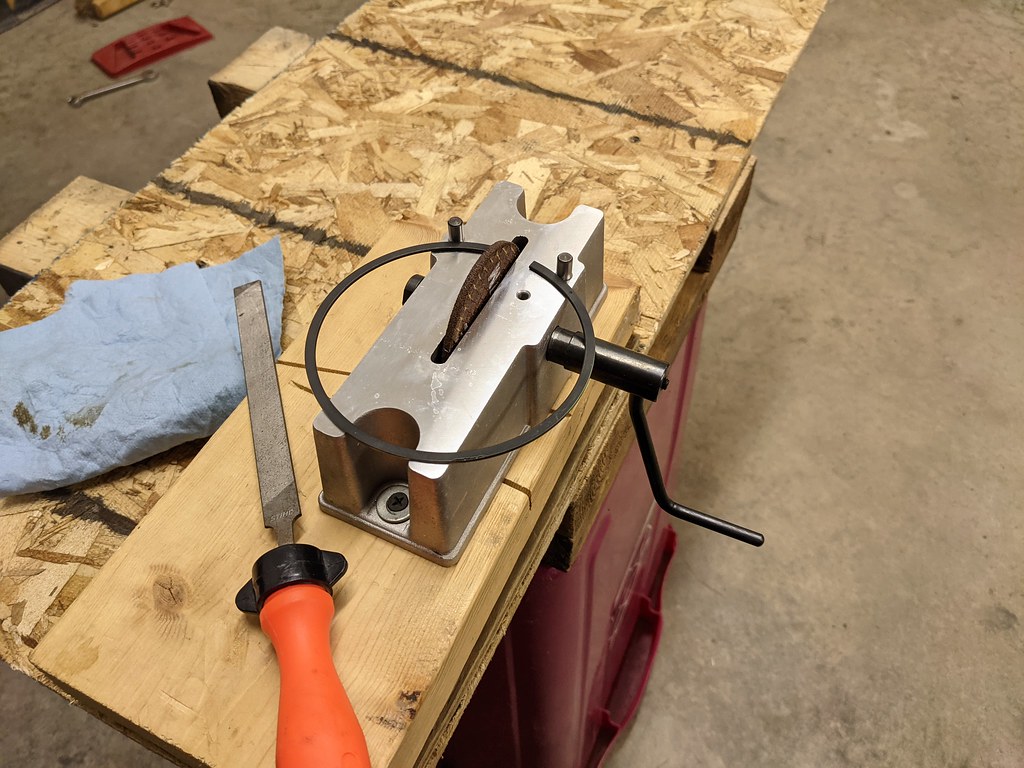
Since I'm going to be running boost, I decided to open up the ring gaps on the top and second rings. After a ton of research seeing what others have done, I decided to just stick with what Mahle recommended for their rings. Using their calculation for supercharged applications, I came up with .024 top and .026 second rings. I bought a ring filer and decided to do it myself. Here's a tip that I used for measuring the ring gaps. I put an old ring on a piston so that when you install the ring in the bore it puts it at a consistent spot each time.
I ordered a ProForm ring filer and it worked perfectly. I liked that method doing it the first time because it allows you to take a very small amount off at a time. The initial measurements were .019 gaps, and it took around 40-50 rotations to increase the gap to .024 for the top rings.
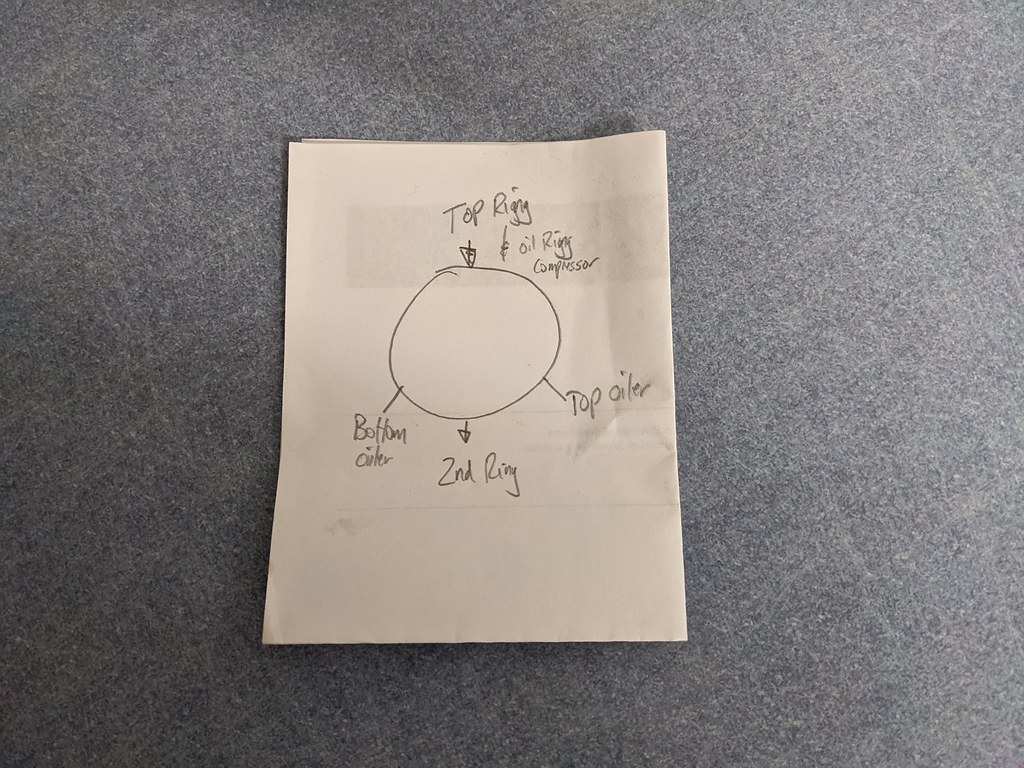
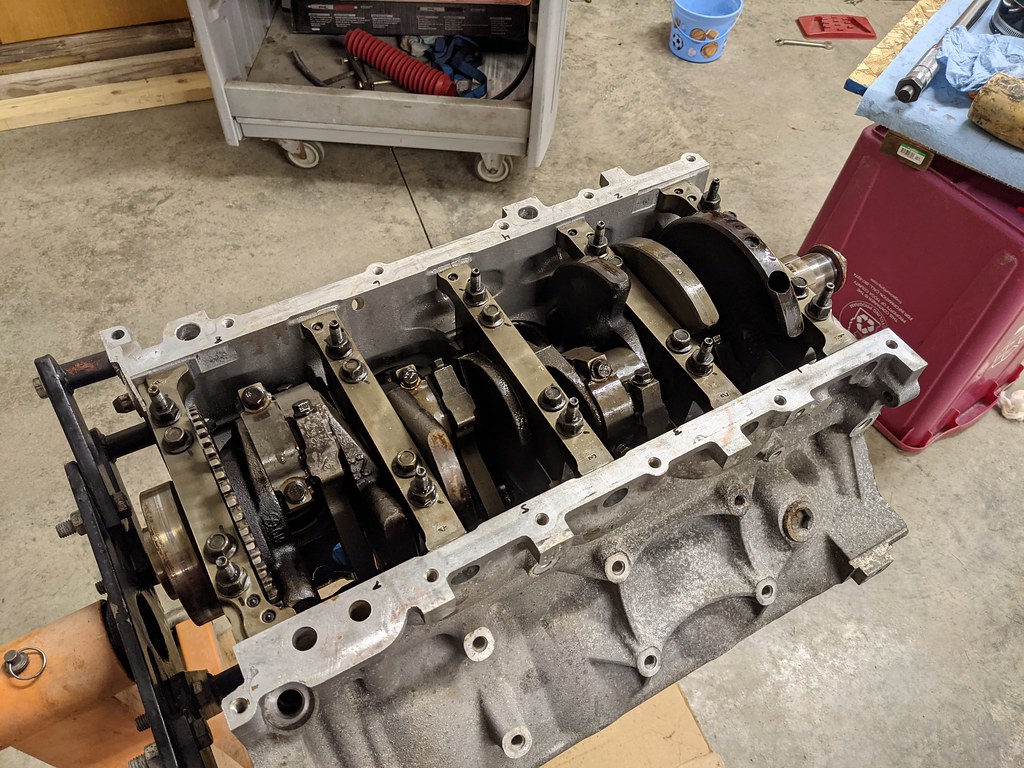
Once the rings were all gapped and organized, I hung them on the pistons and installed them in the motor. I found this nice diagram from Mahle on their instruction page to set up the piston rings. I set it up just like this on all of the pistons.
Halfway there
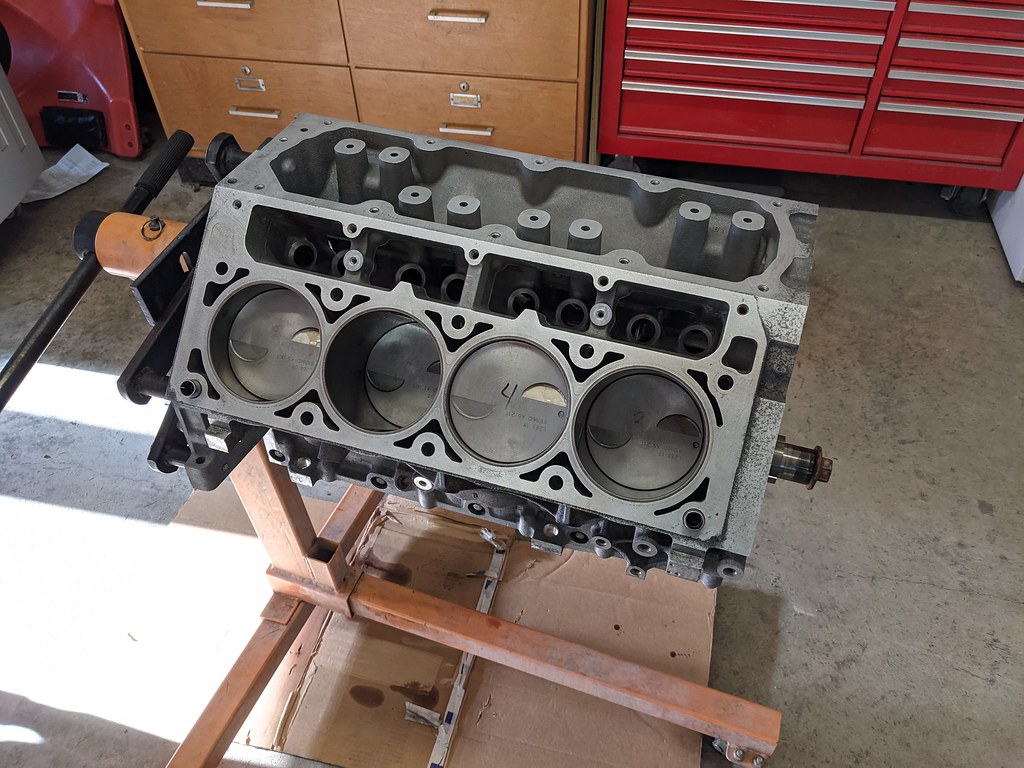
And we have a short block.
To be continued...
1955 Nomad project LC9, 4L80e, C5 brakes, Vision wheels
1968 Camaro 6.2 w/ LSA, TR6060-Magnum hybrid and etc SOLD
1976 T/A LS1 6 Speed, and etc. SOLD
Follow me on Instagram: ryeguy2006a
01-04-2021 #633
Registered User
- Join Date
- Sep 2009
- Posts
- 2,707
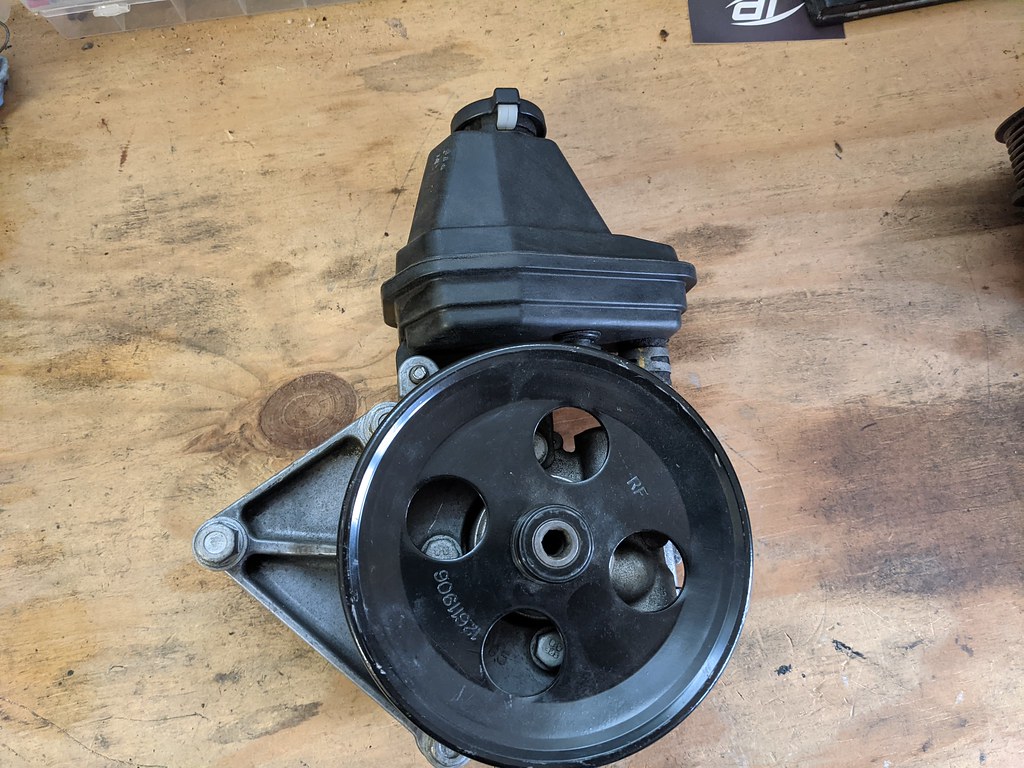
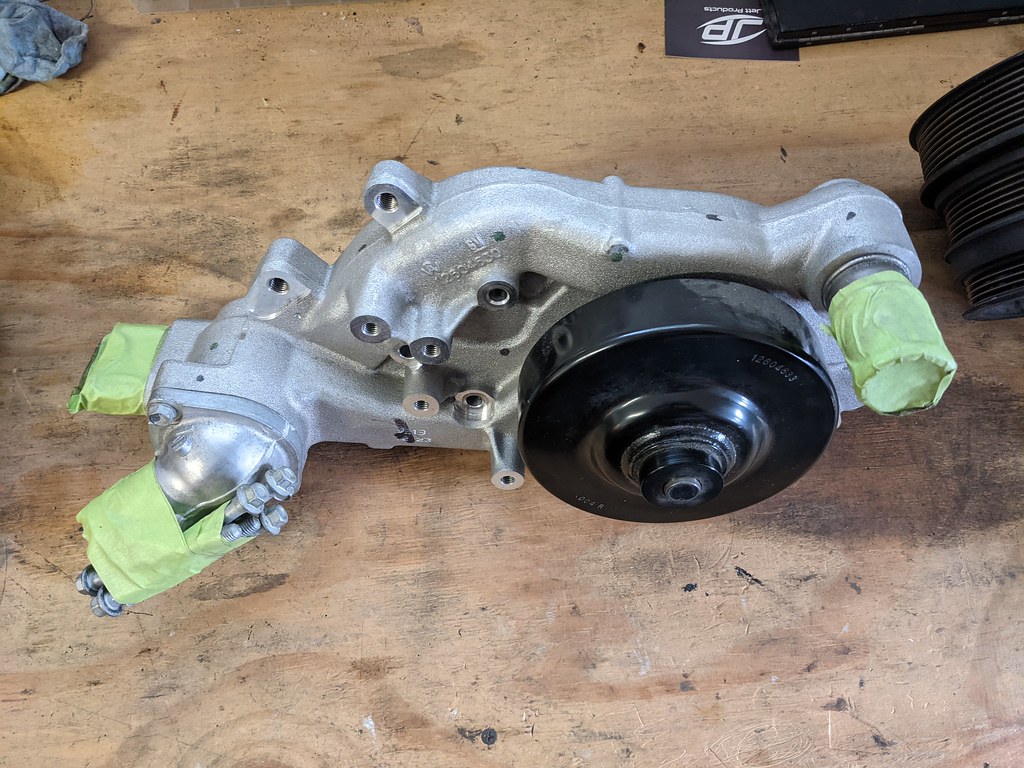
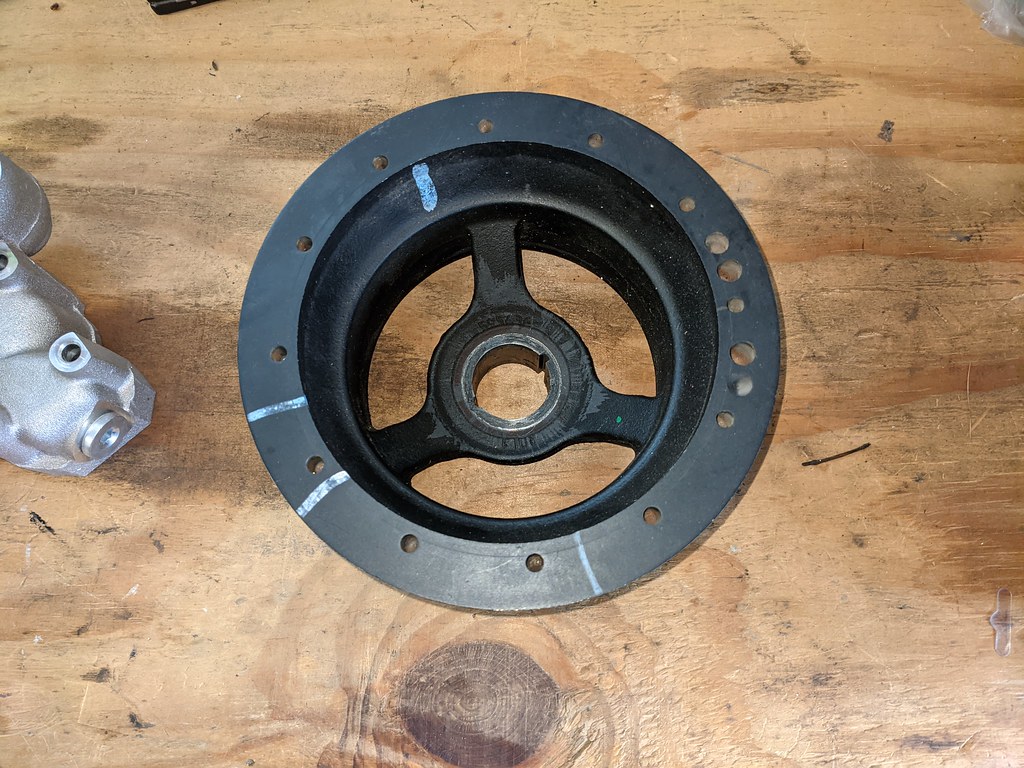
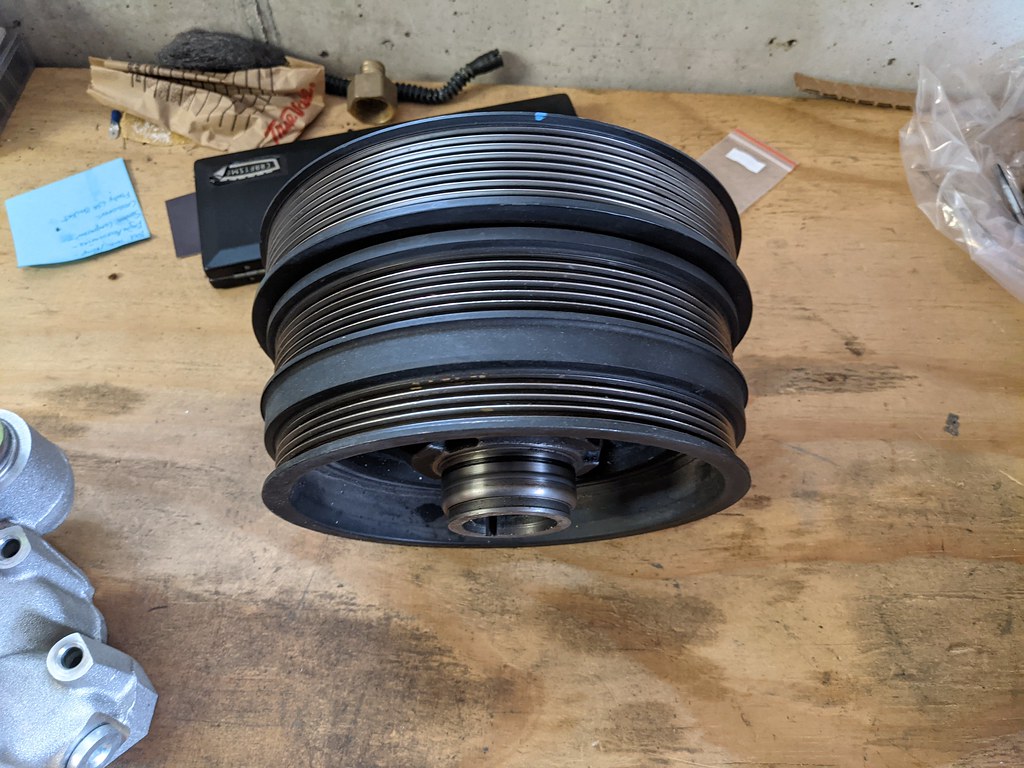
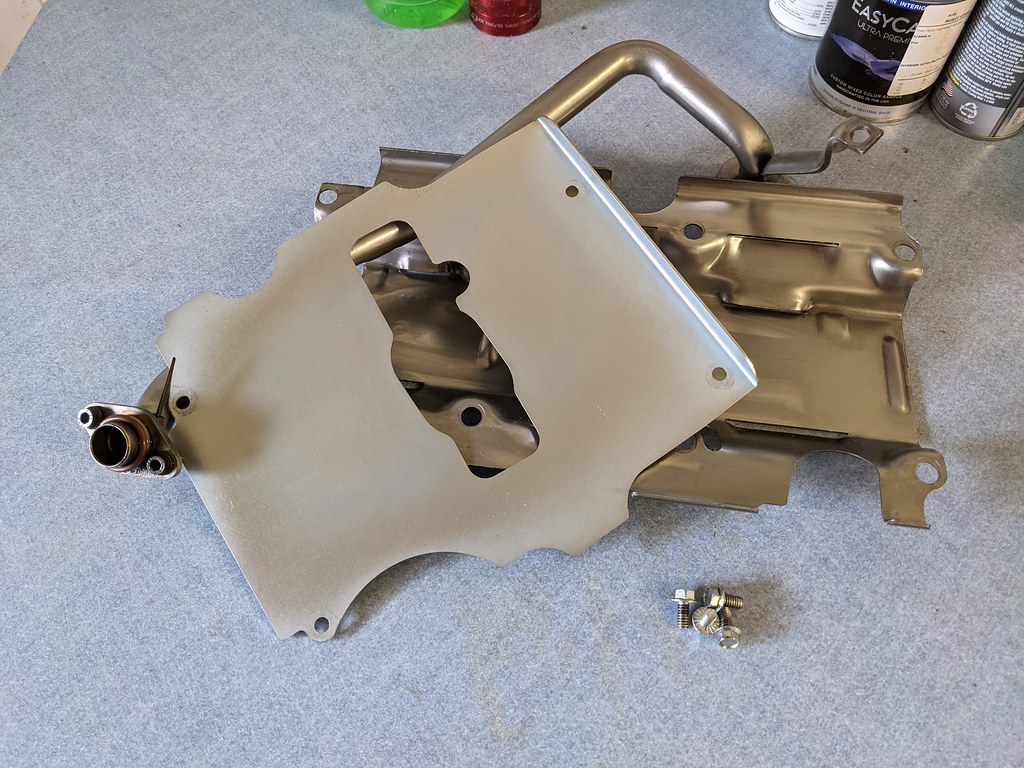
With this last batch of parts, I'm hopefully very close to being at the end of my purchasing... I have sold a bunch of parts to offset these purchases as well as gotten some fantastic deals from people all over the internet. After mulling over what engine accessories to get, I opted to start searching for the stock LSA accessories. I found a guy who sold me the balancer, brand new water pump and a power steering pump for a smoking deal. Then the same guy who I bought the fuel rails from, also sold me the idler bracket. So with the exception of an alternator bracket, I have the complete engine accessories that will give me a true 3 belt setup for the supercharger to run on it's own belt. Much less of a chance for the belt to slip with this setup.
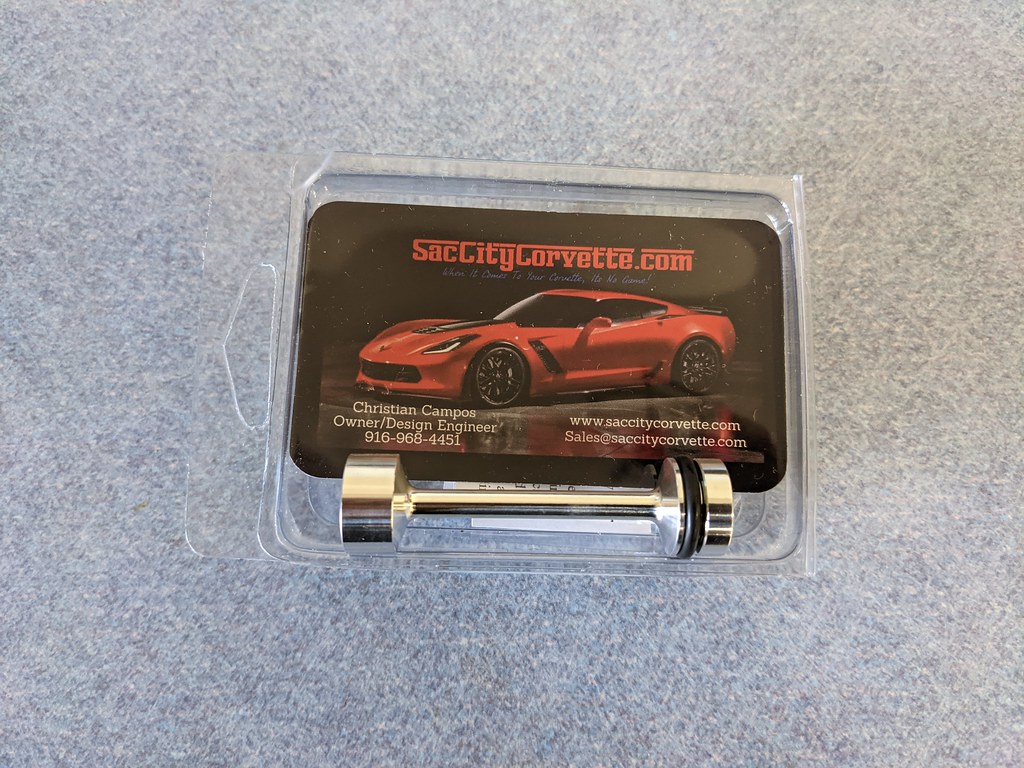
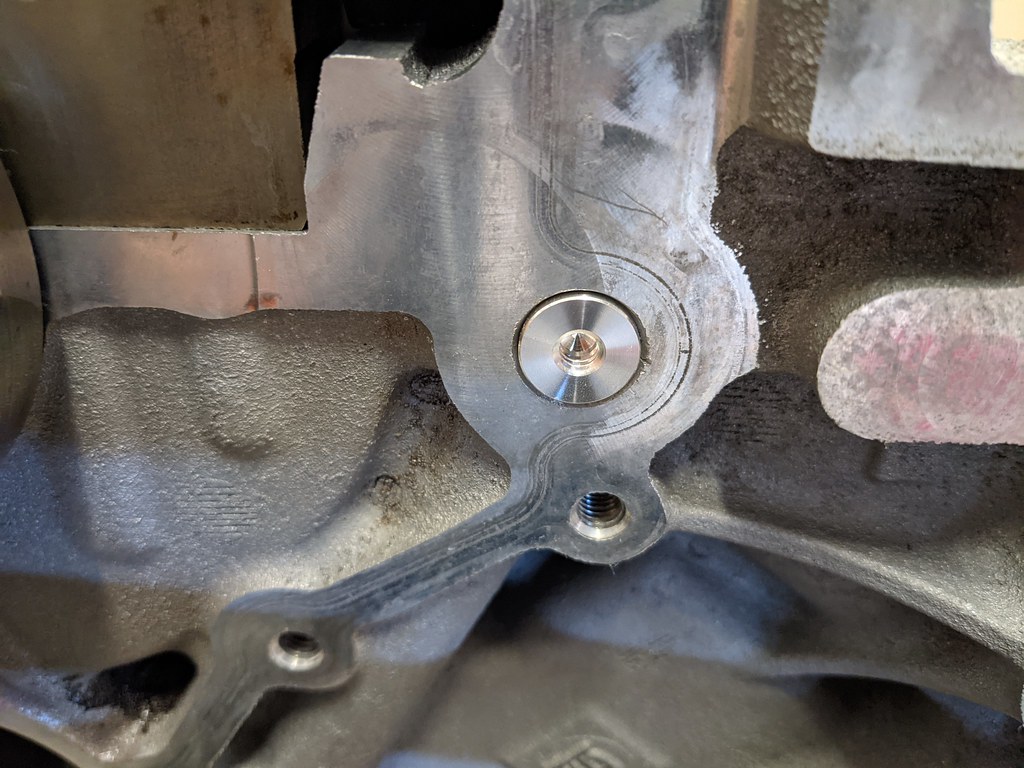
Now, back to the shortblock build. Not sure if it will help or not, but many people say that the Sacc City barbell upgrade is worth it and while I had it this far apart, I figured why not. Supposed to help with oil pressure and filtration.
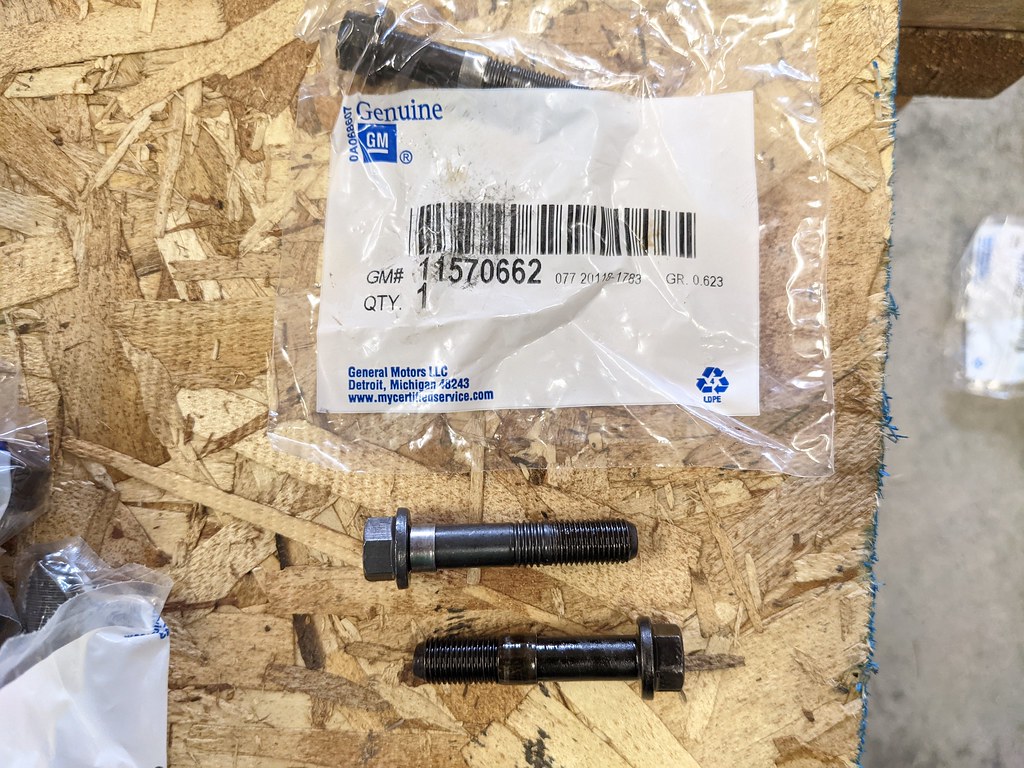
Now before the final torque, I got a bunch of mixed feedback online about whether or not the factory rod bolts are re-usable. I opted to just replace them rather than chance it. I would have opted for ARP bolts, but they change the clamping load and would require that I machine them, and I didn't want to open another can of worms. People have made crazy 1000+ HP numbers on the factory rod bolts, so I'm sure I'll be fine. The factory rod bolts have a bushing that keeps them installed into the cap so they won't come out easily. I opted to finish a project I have been putting off. Adding a pair of vice grips to my slid hammer.
5/16-18 Tap for those who are interested.
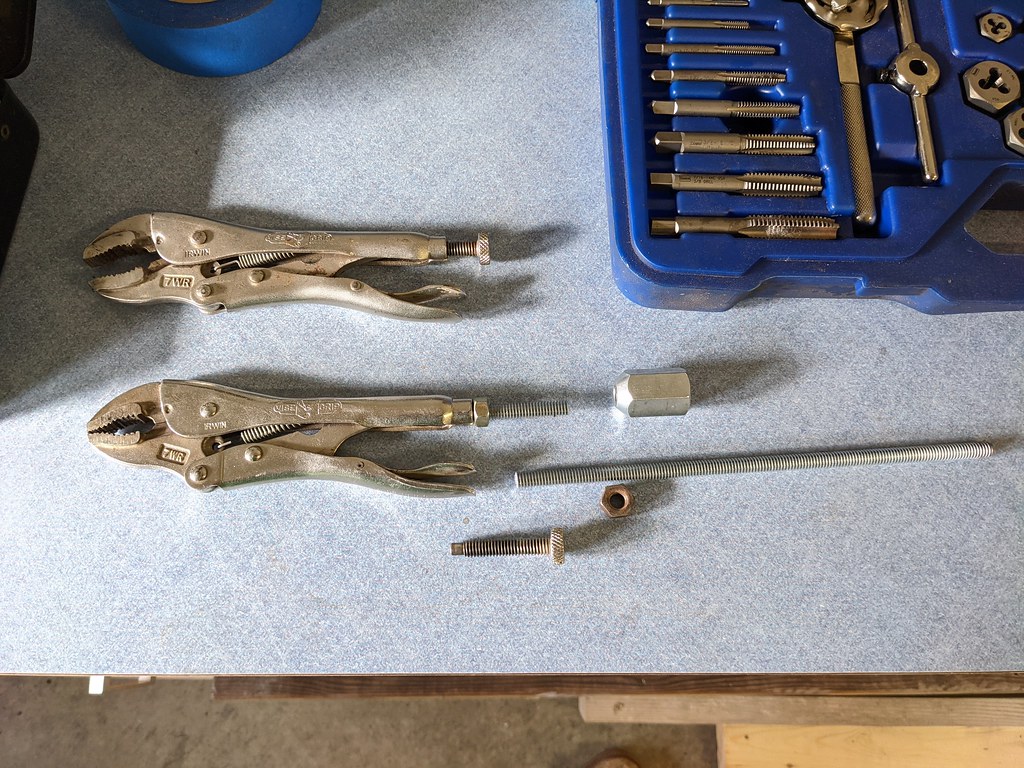
I kept one side of the rod cap tight and then clamped on the other side. A quick little tap with the slide hammer and they popped right out.
Once I got the final approval from the boss, the shortblock was final assembled and torque'd to spec. A torque angle dial is required for that, which I have earlier in the build.

To be continued...
1955 Nomad project LC9, 4L80e, C5 brakes, Vision wheels
1968 Camaro 6.2 w/ LSA, TR6060-Magnum hybrid and etc SOLD
1976 T/A LS1 6 Speed, and etc. SOLD
Follow me on Instagram: ryeguy2006a
01-05-2021 #634
Registered User
- Join Date
- Sep 2009
- Posts
- 2,707
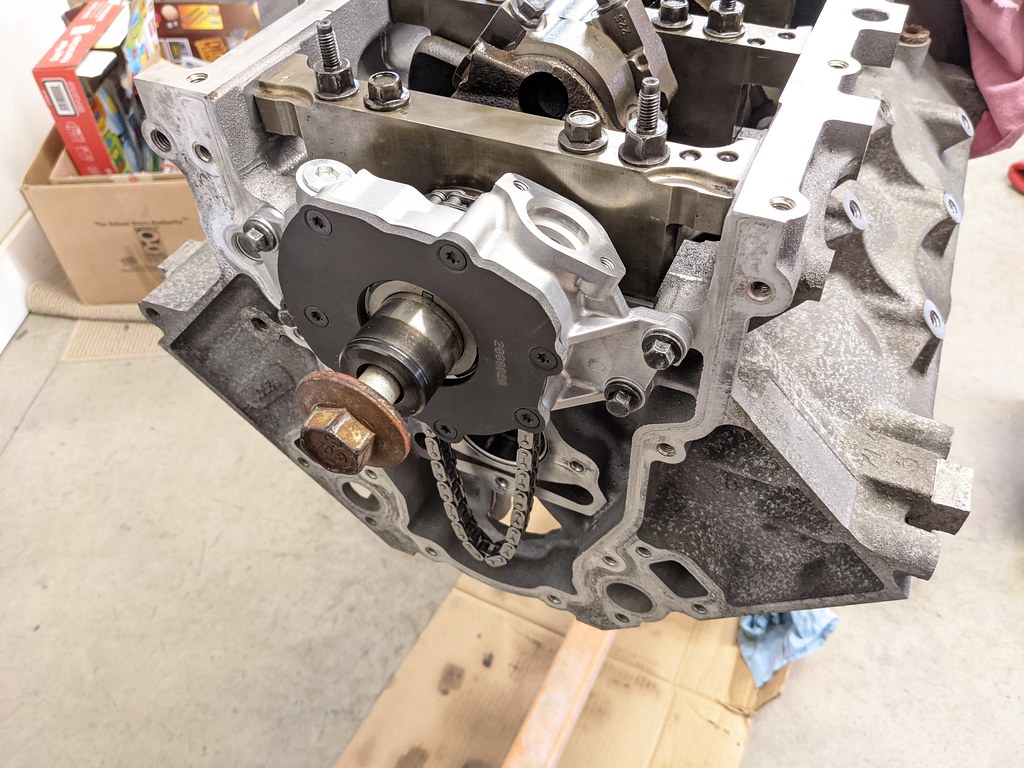
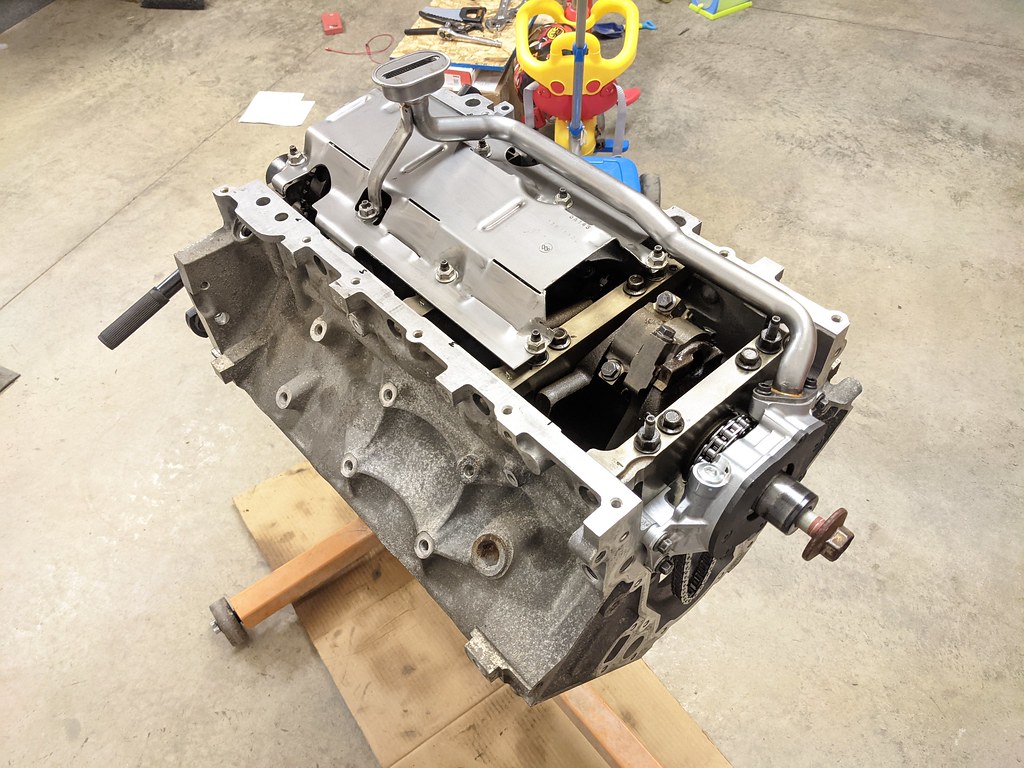
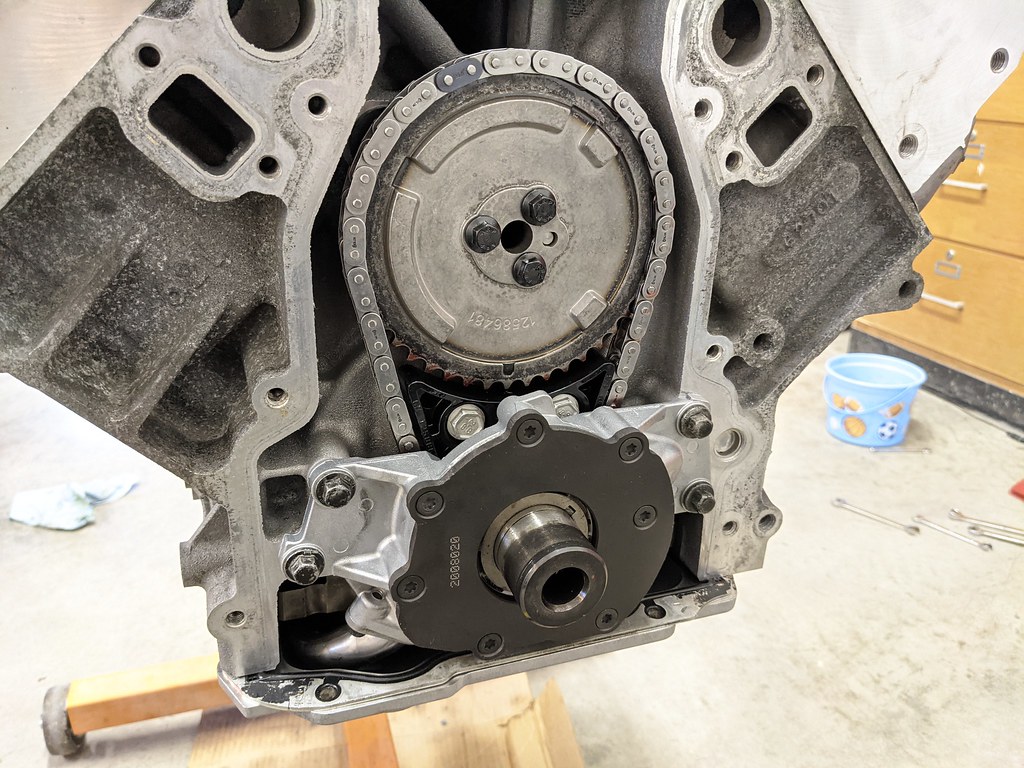
The shortblock is now together and ready for the rest of the bolt ons. Please note that I assembled things out of order, so I had to pull the oil pump back off to get the chain damper installed. I'm going to post the pictures in the order that I took them, but wanted to make note for anyone assembling a motor that the chain, timing gear and damper need to go on before the oil pump.
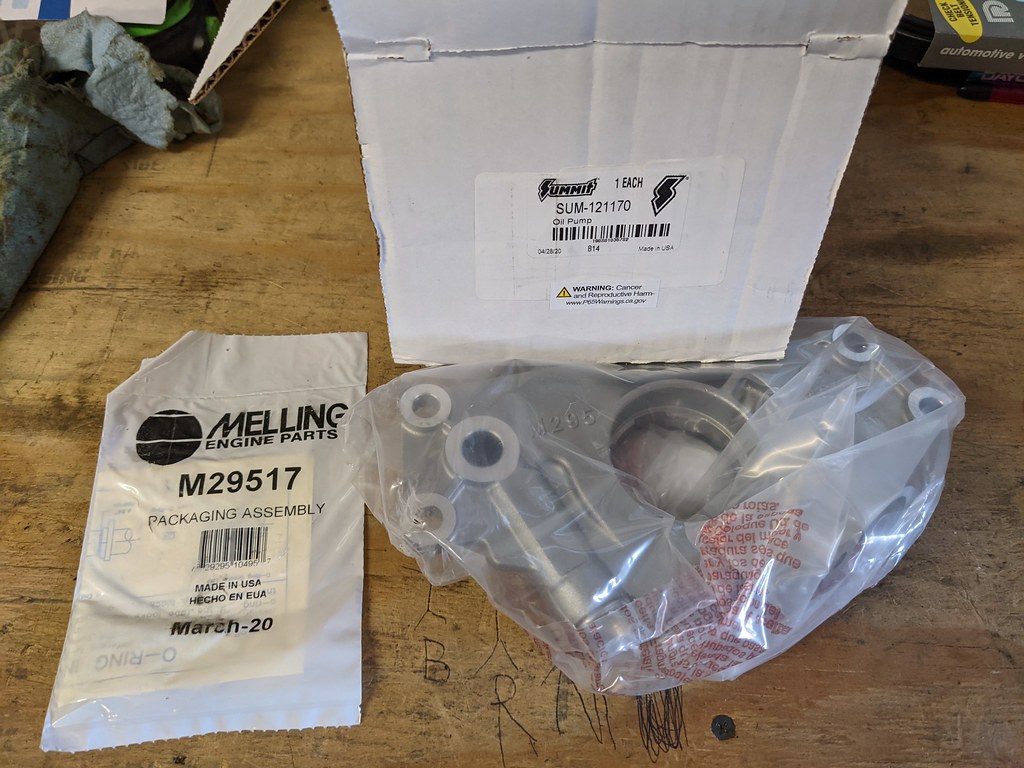
This is the more fun part of the engine building process for me. Bolting on the parts as I unbox them. Much better than cleaning up used parts before they are installed. I thought I would share that I bought the Summit Racing oil pump and it turns out that they are re-boxing Melling pumps. M295
Next up was cleaning up the Holley 302-3 oil pan, windage tray, internal baffle and oil pickup. Now that the shortblock is assembled, I wanted to get it buttoned up to keep any debris out of it. Too much time spent cleaning to mess it up now.
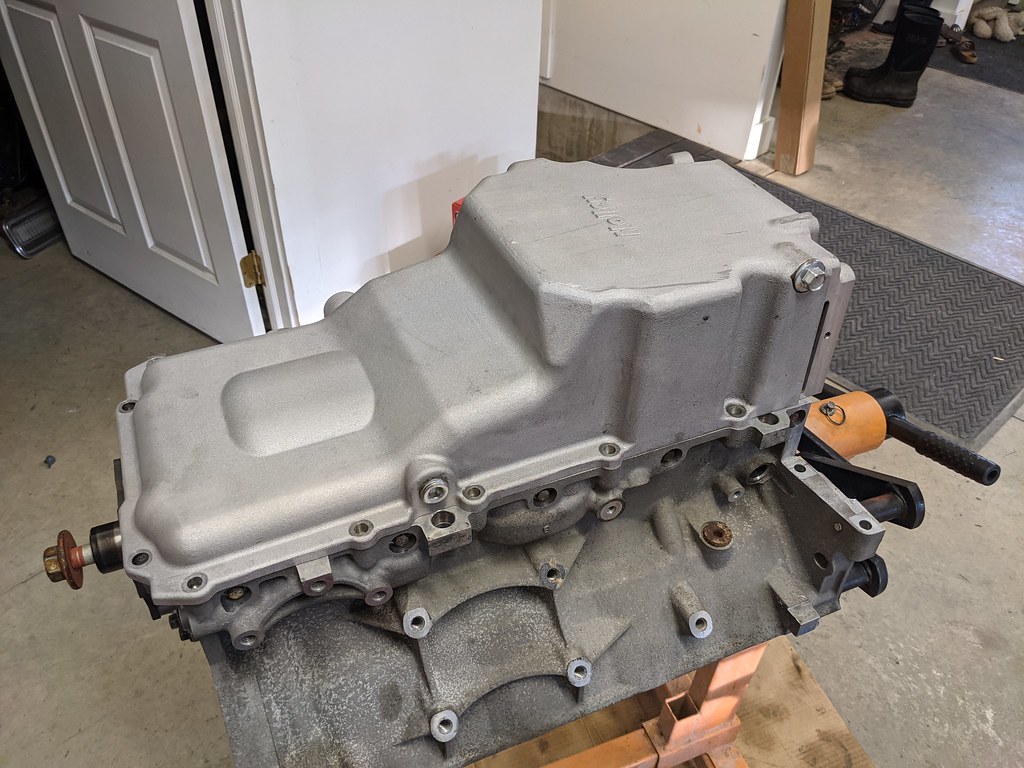
Most of this had to be taken back off to get the damper on.
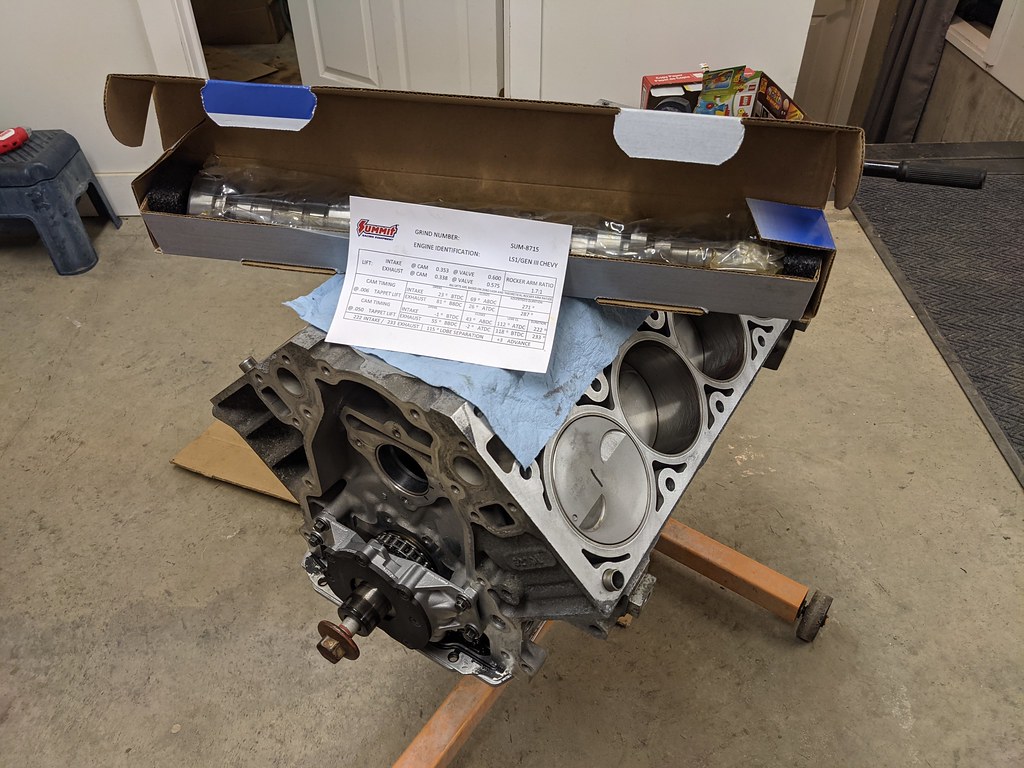
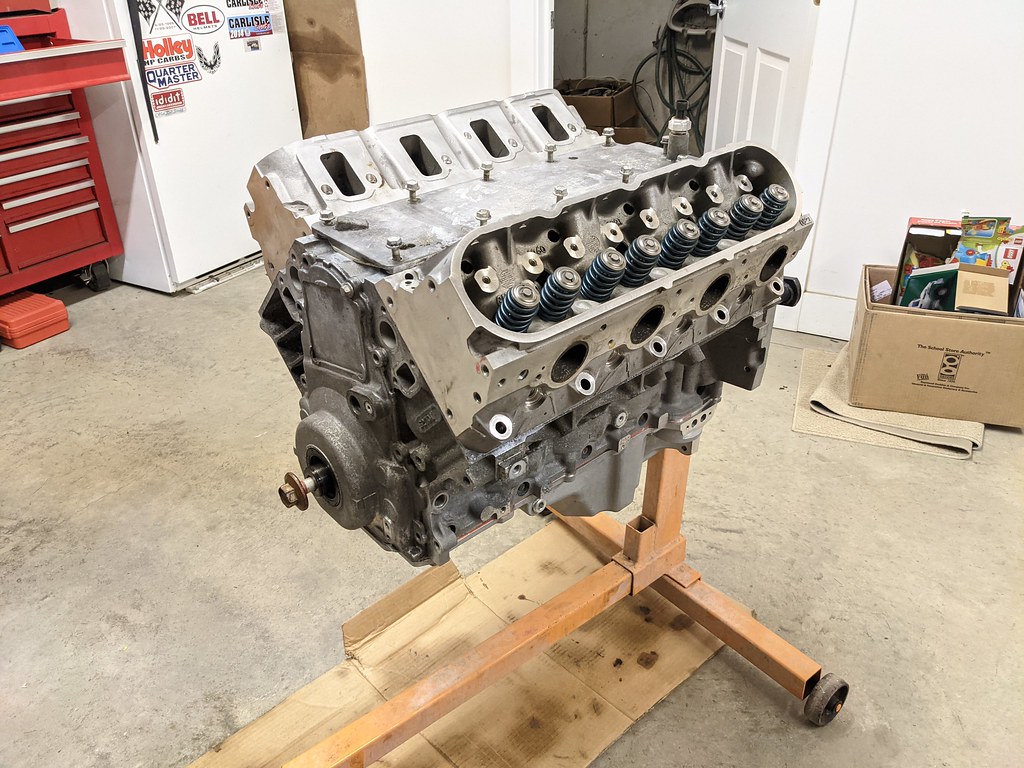
I was probably distracted since I was really looking forward to installing the cam! I went with the Summit Racing 8715 which is the stage 1 boost cam that is nicknamed the Ghost Cam. The specs are 222/233 115+3, .600/.575. I've heard really good things about this cam, and one of the things that sold me is that it has a negative overlap which will keep the boost inside the cylinders rather than bleeding off. I also didn't want to go crazy with a huge cam since this will be on a supercharged motor. Should have a nice idle too.
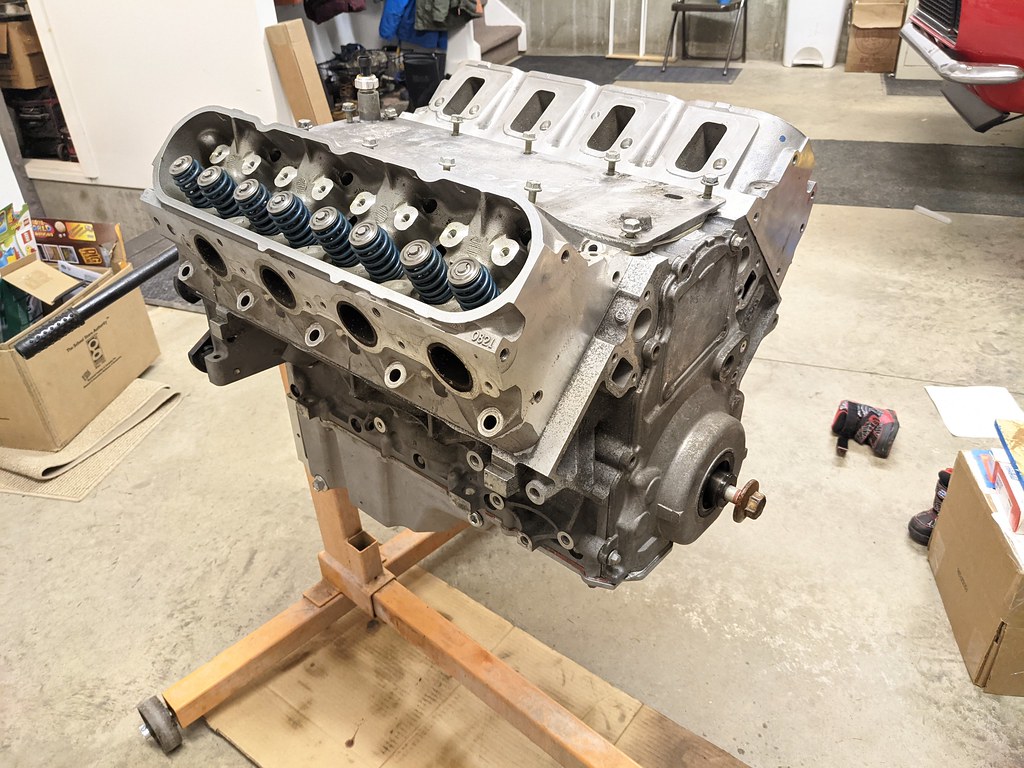
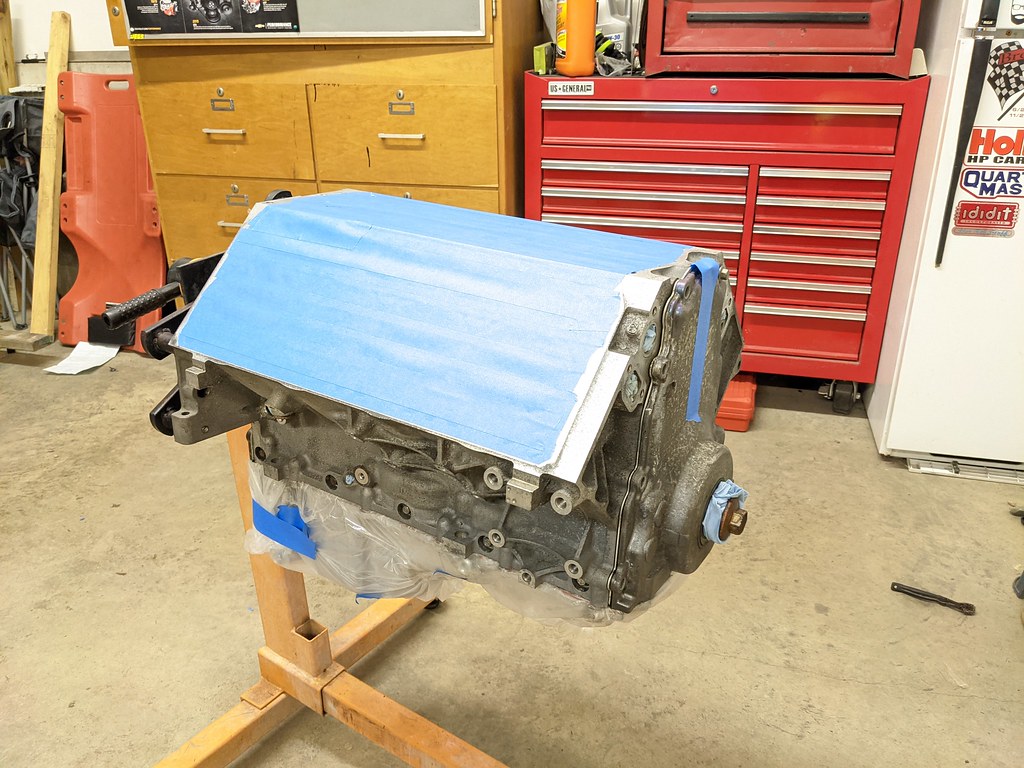
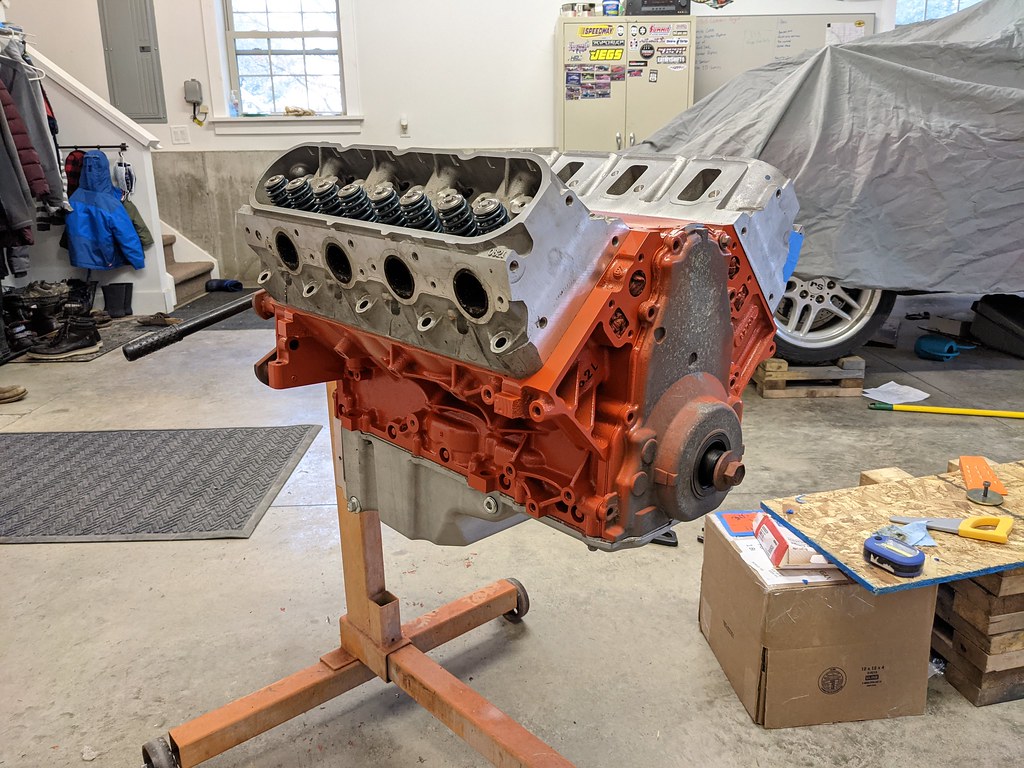
This is where I noticed that the damper wouldn't fit. I didn't care though, I had to toss my heads on to see what the long block looked like. Very happy I'm at this point, but the appearance of the block leaves a lot to be desired.
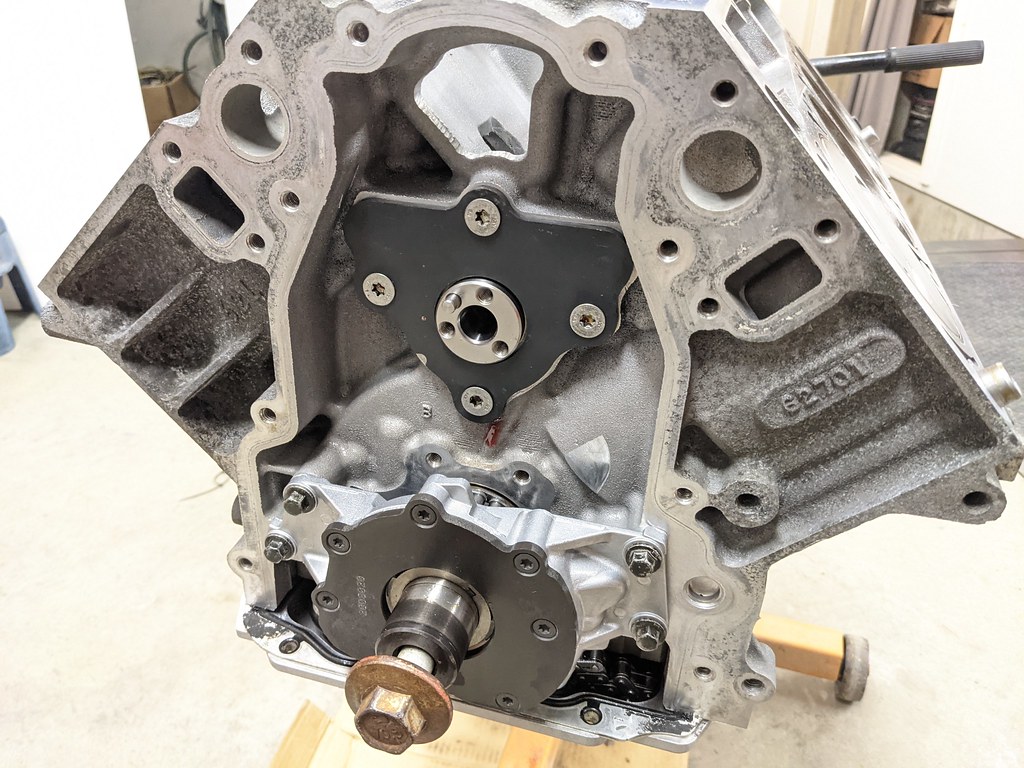
Next morning I pulled the pump and pickup back off and installed the chain damper with some blue Loctite. Repeated the process with the cam plate and cam sprocket. All back together now.
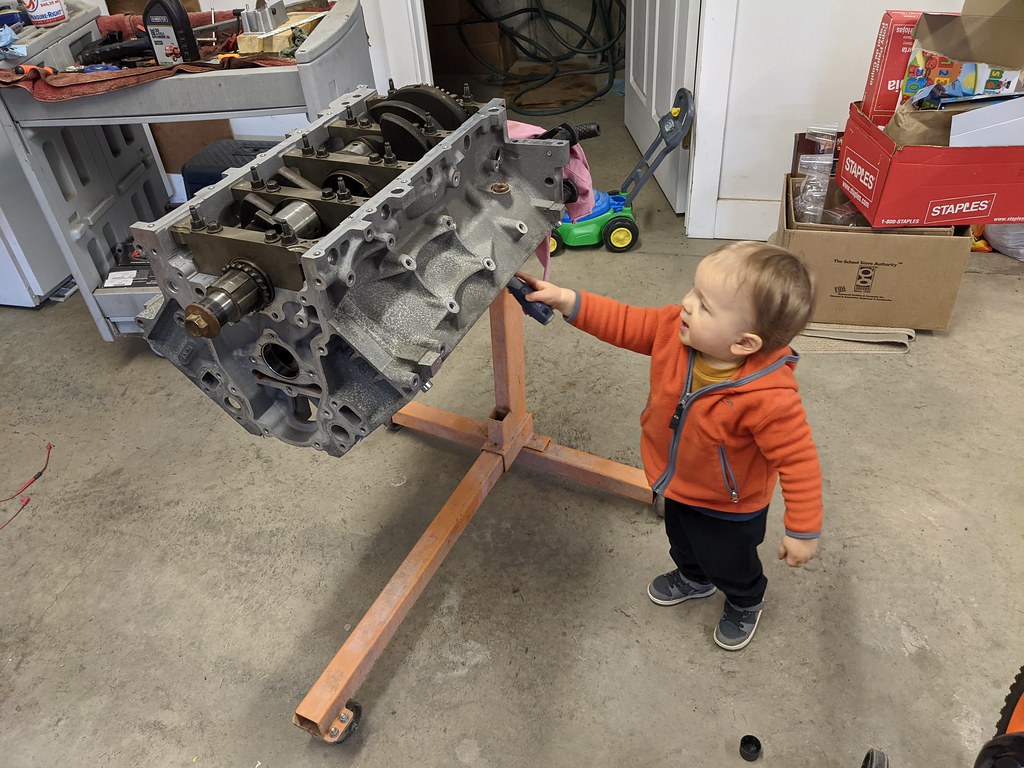
But that block was really bugging me. I had power washed it several times and hit it with Purple Power a bunch and it wasn't cleaning up like I hoped. So it was time to get out the soap and water and scrub it down for paint. I had my little helper buddy out there scrubbing on the block too which was really cool. Didn't get a picture though...
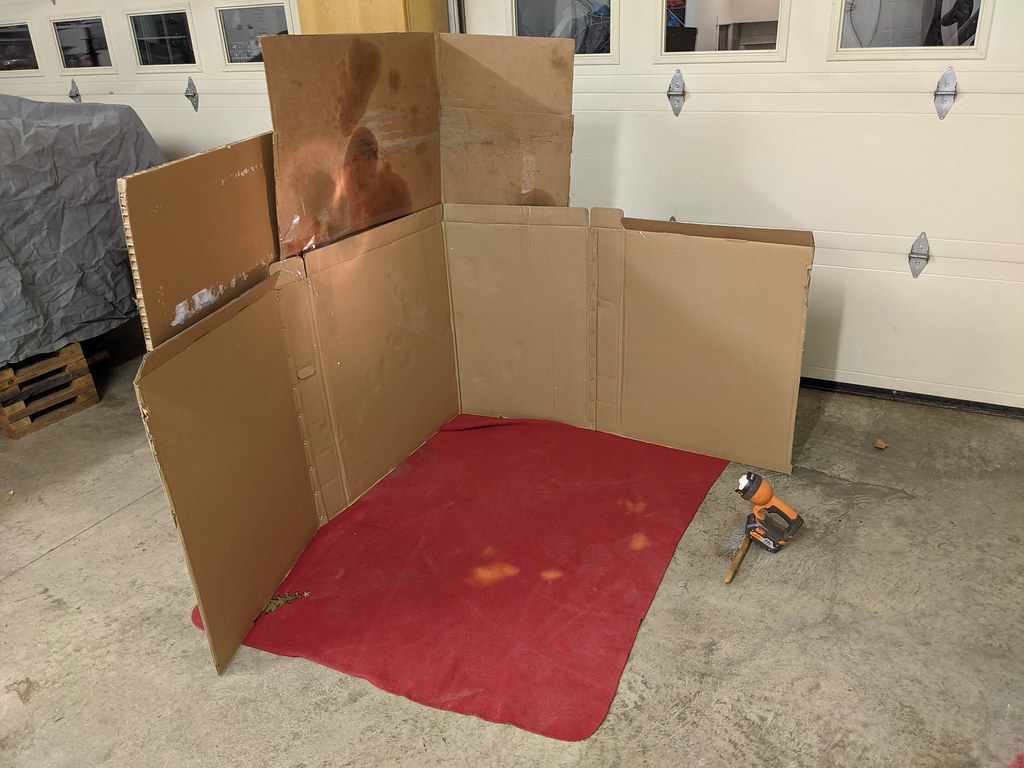
Since it was so cold out, I had to make a little spray booth in the garage to minimize the overspray. It worked really well in conjunction with cracking the garage door and opening a window. It sorta worked like a downdraft booth since the cold air came in through the window and out the garage door.
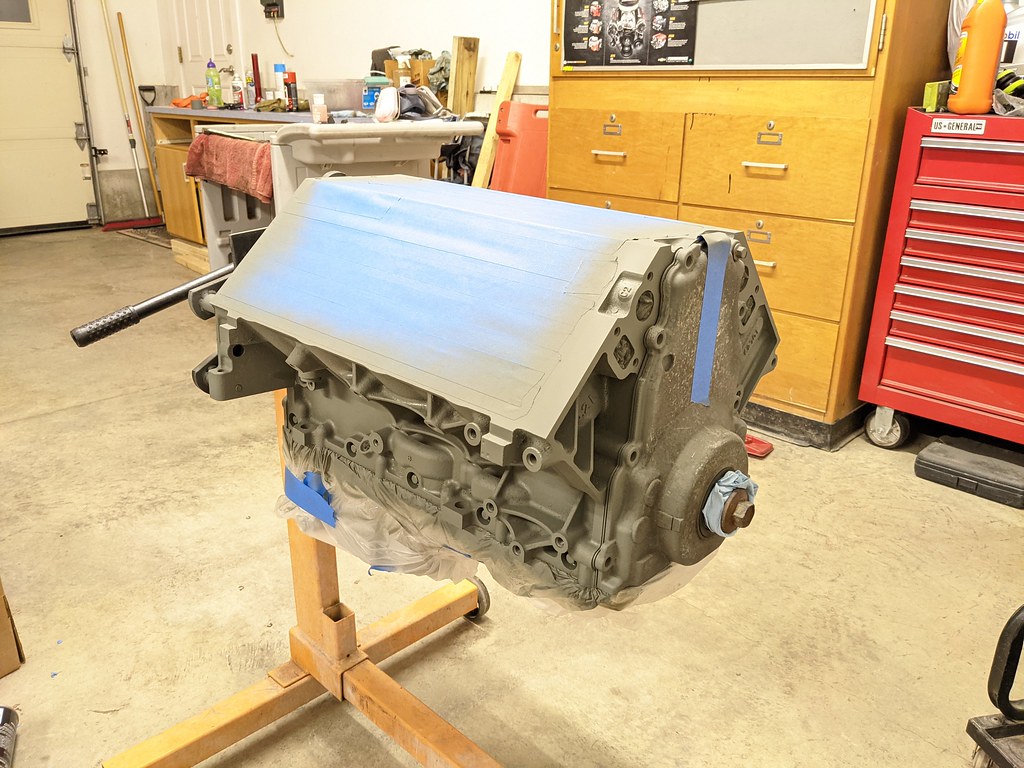
I read up on this a bunch and decided to try some Self Etching primer as a base rather than the VHT primer. Aluminum is different than steel and needs a better base to really stick. So I figured I'd give this a try.
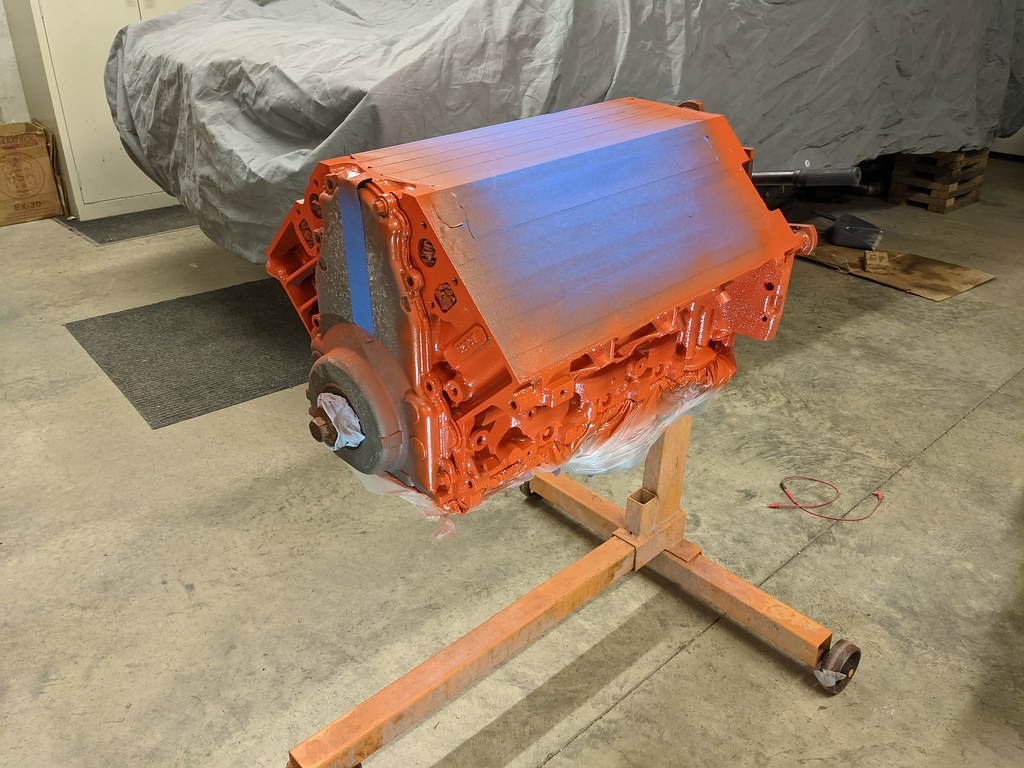
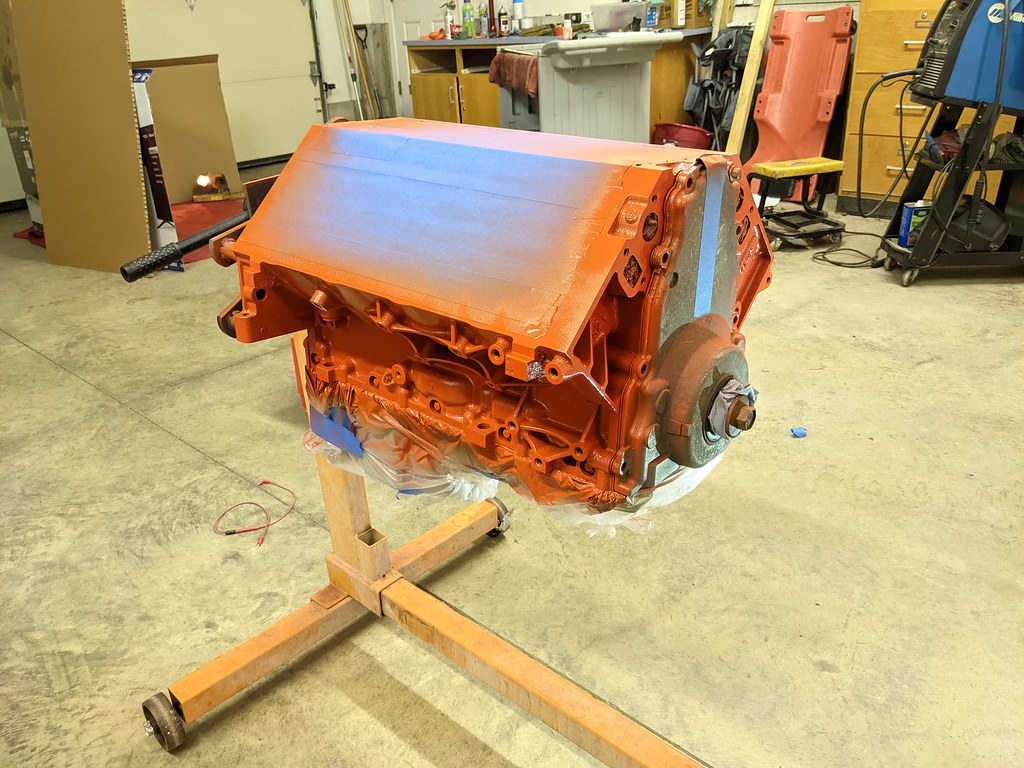
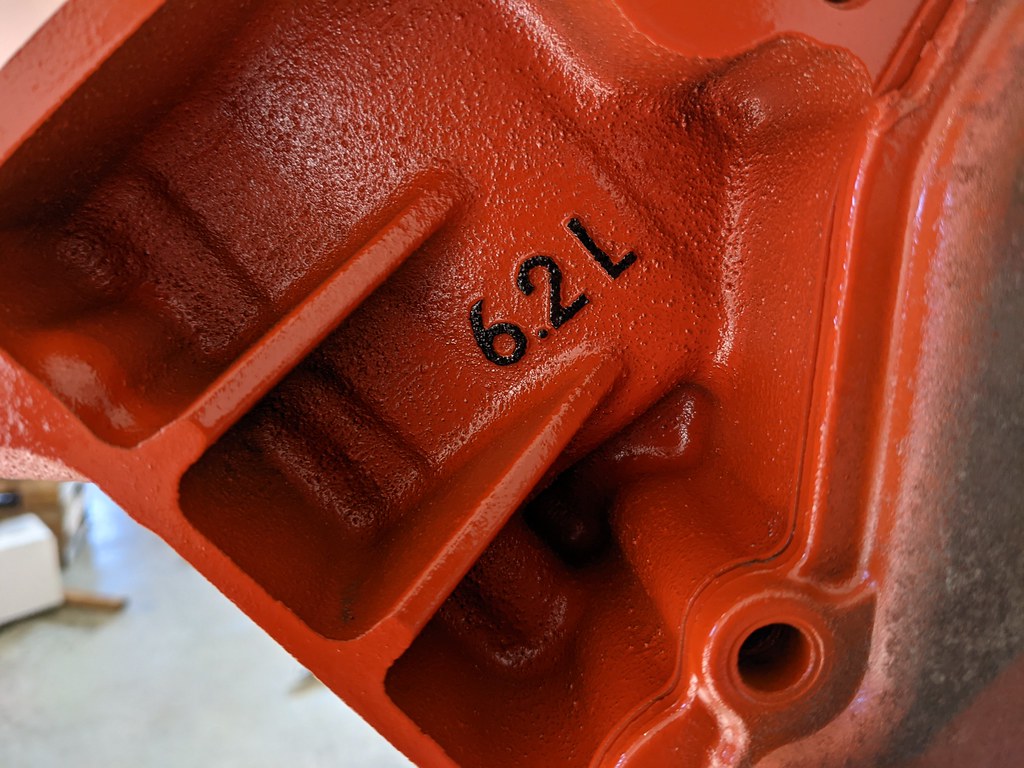
Finally the color coats. I went with the tried and true Chevy Orange. I really liked it when I put my first motor in the car with the 5.3, and wanted to do it again. Very happy with the results and hopefully with the etching primer it has a really durable finish. I also have my boiler room attached to my garage which is a very tiny room that I use for storing car parts, but when the door is closed will get very hot, probably in the 130-140 range and thought this would be perfect to let the motor dry in overnight. Hopefully it helps with the curing process.
So much better than the corroded aluminum look!!
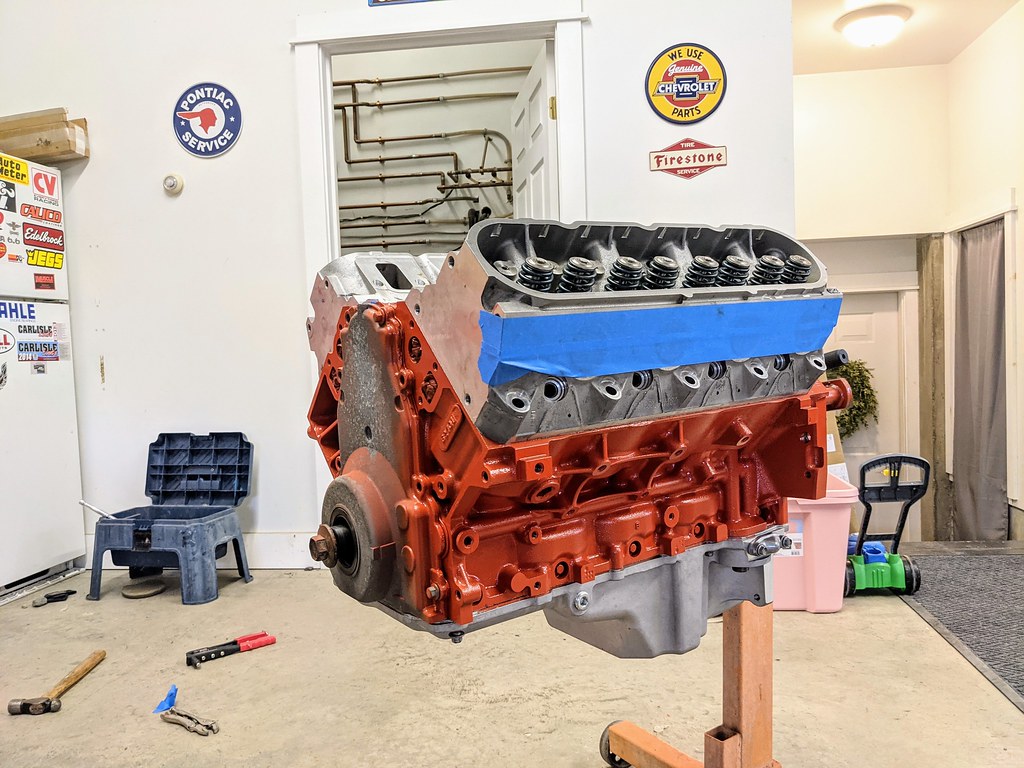
Timing cover wasn't ready for paint and sorta takes away from it, but it looks really good with the aluminum heads. I'm keeping this look, but all of my accessories will be painted satin black. I think it will give a nice throwback look.
That's where I'm at now, and very happy to have gotten the block assembled during the winter break from work. Now I can slowly clean up parts and hopefully get the motor installed back in the car soon.
Cheers,
Ryan
1955 Nomad project LC9, 4L80e, C5 brakes, Vision wheels
1968 Camaro 6.2 w/ LSA, TR6060-Magnum hybrid and etc SOLD
1976 T/A LS1 6 Speed, and etc. SOLD
Follow me on Instagram: ryeguy2006a
01-05-2021 #635
-Moderator/Sponsor-
- Join Date
- Apr 2001
- Location
- The City of Fountains
- Posts
- 15,975
Good looking engine!
Andrew1970 GTO Version 3.0
1967 Cougar build
GM High-Tech Performance feature
My YouTube Channel Please Subscribe!
Instagram @projectgattago
Dr. EFI
I deliver what EFI promises.
Remote Holley EFI tuning.
Please get in touch if I can be of service.
"You were the gun, your voice was the trigger, your bravery was the barrel, your eyes were the bullets." ~ Her
01-05-2021 #636
Registered User
- Join Date
- Jul 2008
- Posts
- 454
Aww man, should have tried the aluminum brightener before you painted it. It wouldn't have gotten rid of the corrosion but it would have woke up the look a lot.
If you don't want to waste time smoothing all the brackets and timing cover down, try rustoleum hammered paint in the fancy grip cans (lowe's/home depot carry them). I ran hammered silver on my current LQ4 and am really happy with the results, covers blemishes nicely.
This is rustoleum hammered silver (tins), duplicolor chevy orange DE-1620 (block), and rustoleum satin black paint/primer in one spray bomb (fasteners and crank pulley) - running links so I don't blemish your thread: https://hosting.photobucket.com/albu...unds&crop=fill
I'm running an Elgin E1839P cam in my 6.0. It's 220/224 .575" 112 LSA, little smaller than yours, but you'll be getting plenty of attitude at idle. I'm just about a bobble head at traffic lights idling at 750rpm. (stupid video of idle: https://www.youtube.com/watch?v=fU9QXOG1E4A )
If you're programming the car set the idle timing flat, if not the ecm will be bouncing idle timing around and the cam will sound like it's 20 times larger than it actually is, makes it hard to get a steady idle coming to a stop.
Keep up the action, can't wait to see it rolling!*Jeff*
Project Salty - 1964 4 door Malibu, beaten, neglected, red headed foster child
Cammed LQ4 / T56 Swap Project Thread <-click to read! 😁
01-05-2021 #637
Registered User
- Join Date
- Dec 2008
- Location
- Detroit
- Posts
- 2,585
Nice progress!
Big dreams, small pockets....
Chris--
'72 Cutlass S LSA/T56 Magnum
Bowler Performance, Rushforth Wheels, ATS, Holley EFI, KORE3, Ridetech
Project Motor City Madness
01-05-2021 #638
Registered User
- Join Date
- Sep 2009
- Posts
- 2,707
Thanks guys, I appreciate it.
Hotwire, your motor looks great! I really wanted to paint the block orange, so I wasn't too concerned about cleaning up the aluminum.
1955 Nomad project LC9, 4L80e, C5 brakes, Vision wheels
1968 Camaro 6.2 w/ LSA, TR6060-Magnum hybrid and etc SOLD
1976 T/A LS1 6 Speed, and etc. SOLD
Follow me on Instagram: ryeguy2006a
01-11-2021 #639
Registered User
- Join Date
- Sep 2009
- Posts
- 2,707
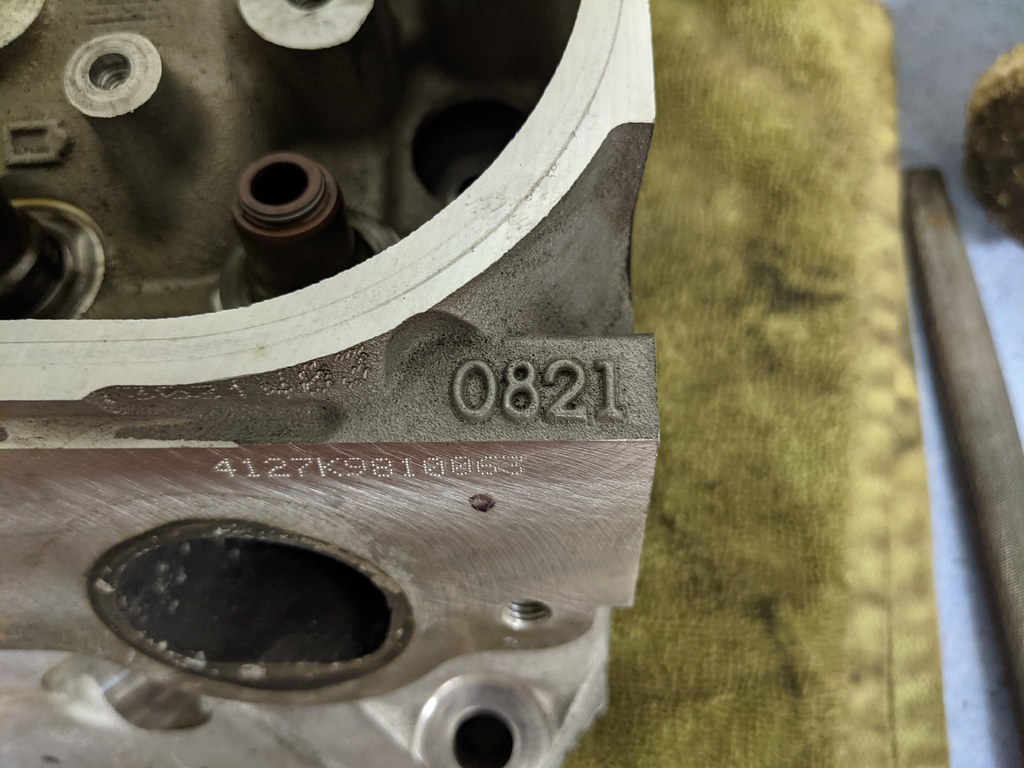
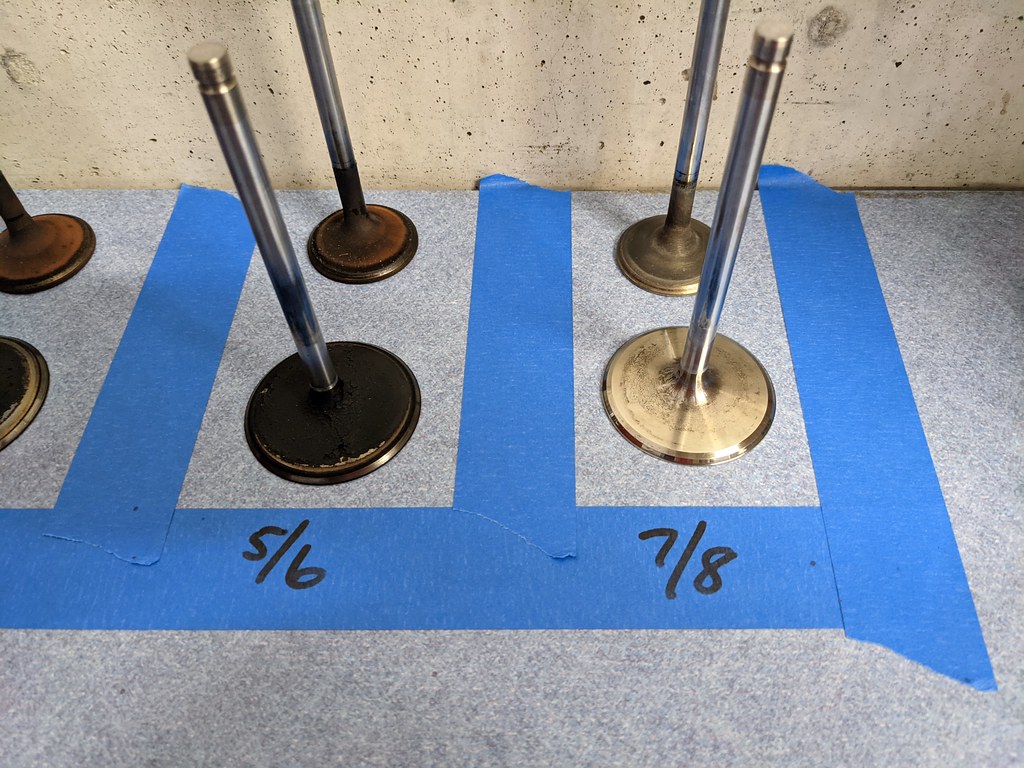
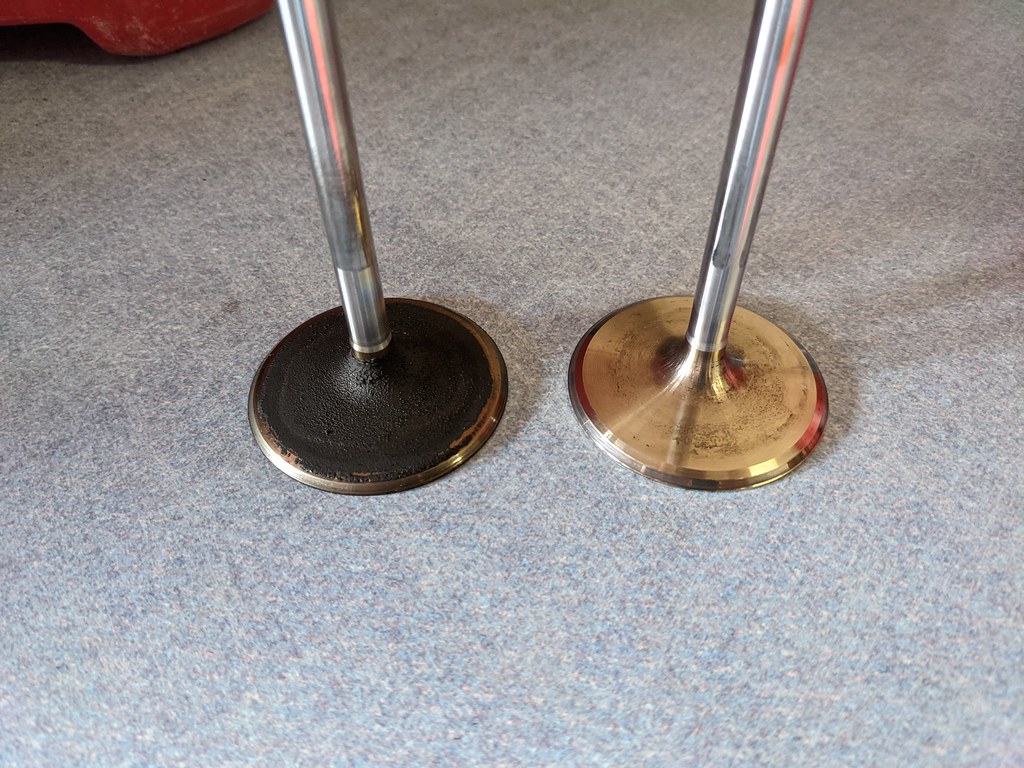
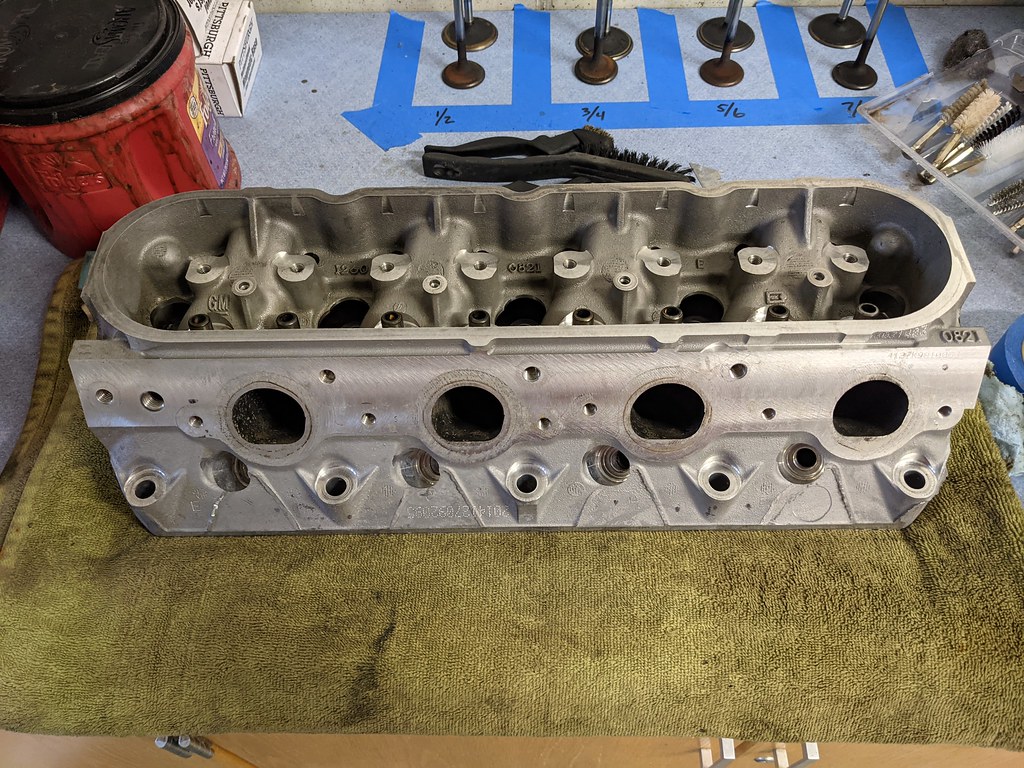
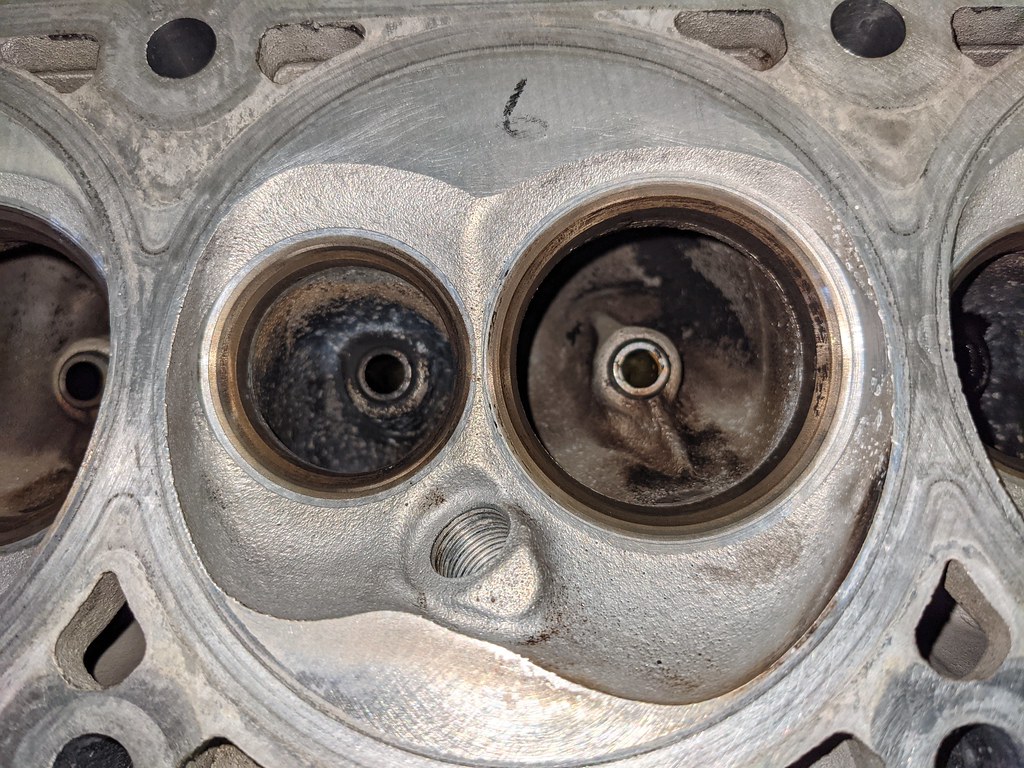
I'm continuing the engine build by getting my heads ready for install. I had originally planned on doing a light port work and bowl cleanup on the heads, but realized that with boost, I think it's really less important than before when I was planning an N/A build. Plus I kinda chickened out haha. The heads are low mileage LS3 0821 heads, and the plan is to clean them up and reinstall. First up is to clean up all of the carbon build up off of the intake valves. It was pretty caked on there. I was actually surprised based on the overall condition of the heads. I didn't think there would be as much build up as there was.
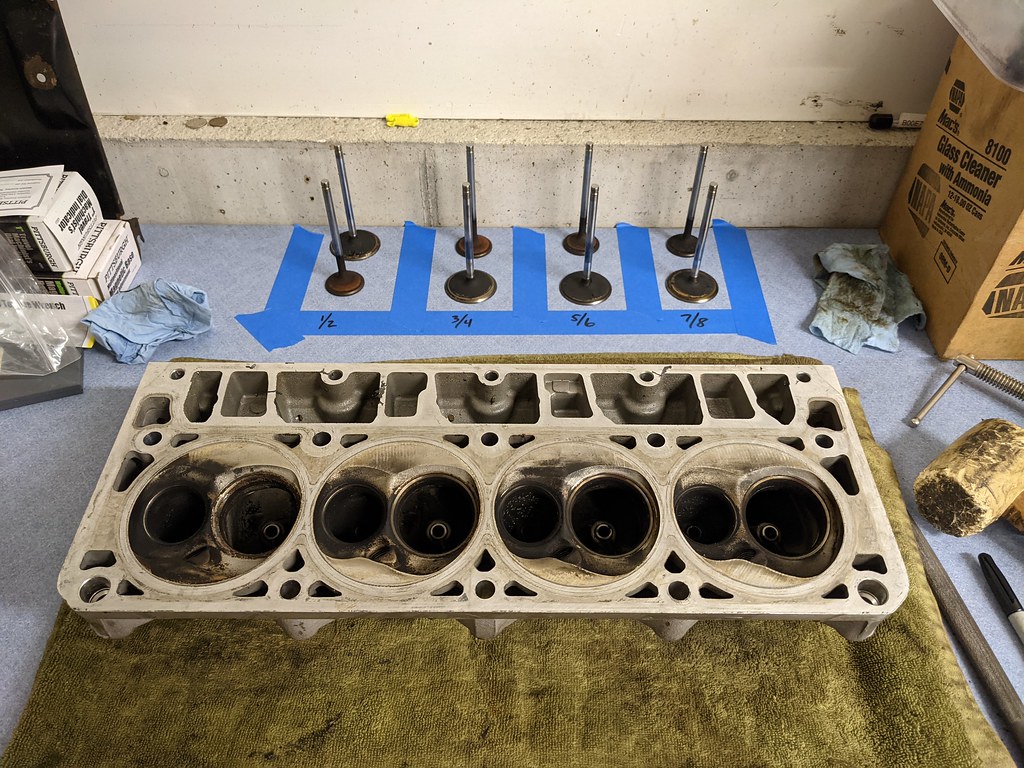
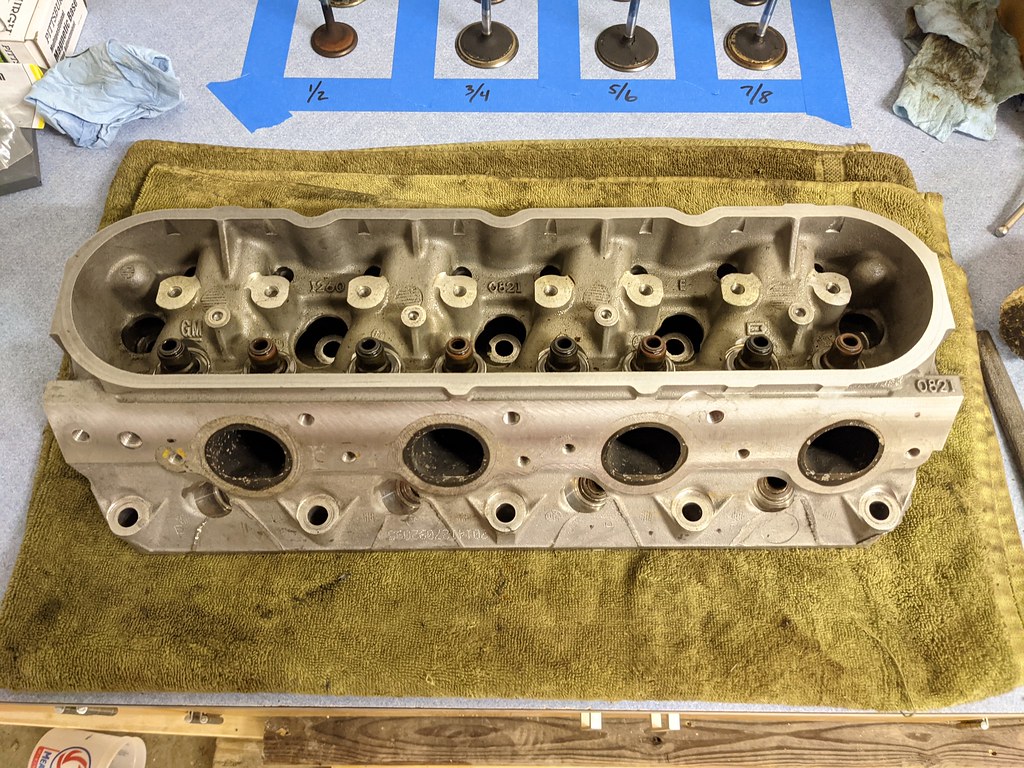
Here's a few before and after. Pretty gummed up. Really glad that I pulled the valves and didn't just swap over the springs.
By no means is it perfect, but did a few rounds of Purple Power and it cleaned about 90% of the gunk out of the runners. I know that it will not stay clean inside so I didn't spend too much time there. Really mostly concerned with the outside cleanup. Overall they heads are in excellent condition.
Once the accessories are installed no one will see this, but I like the detail work.
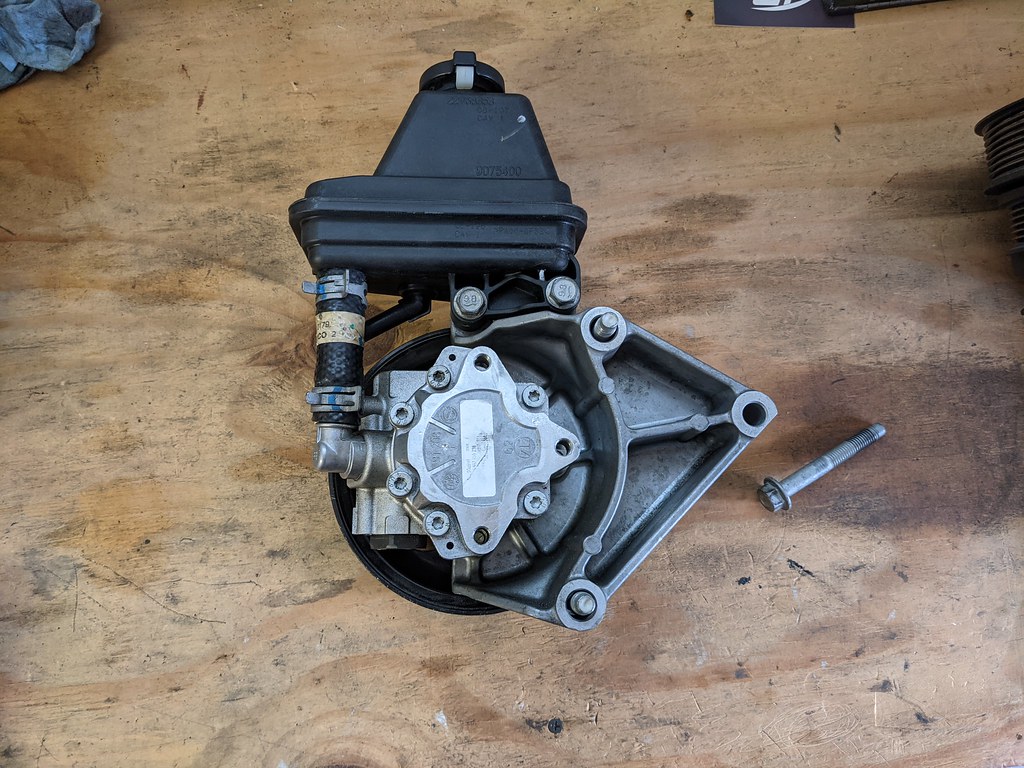
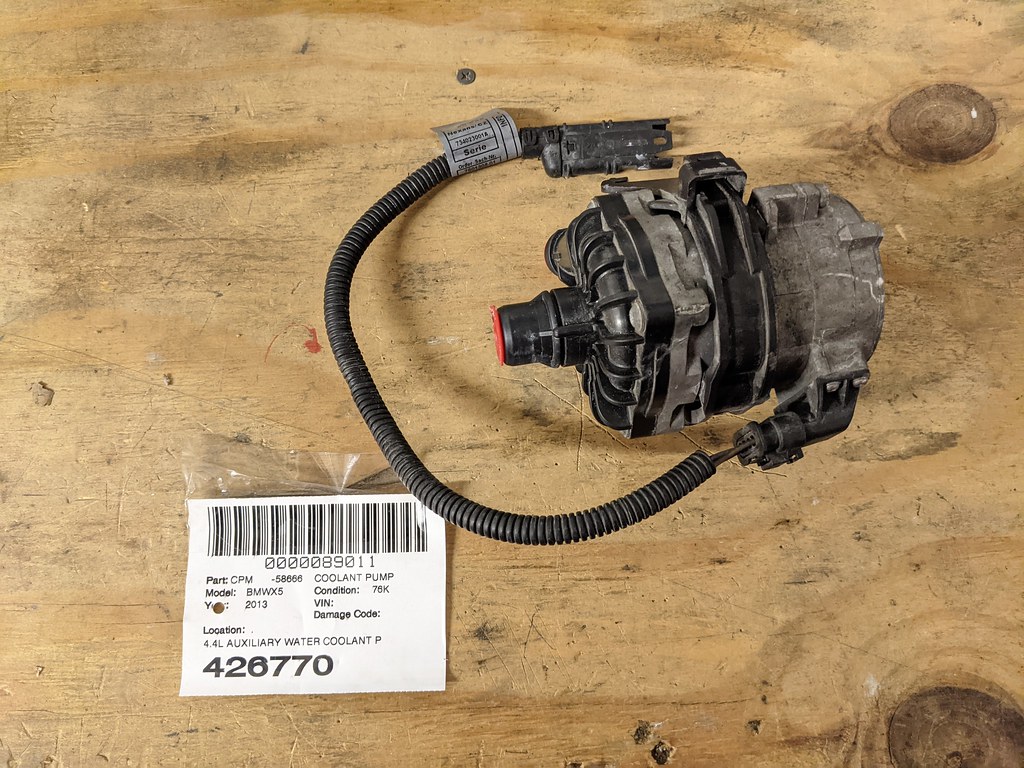
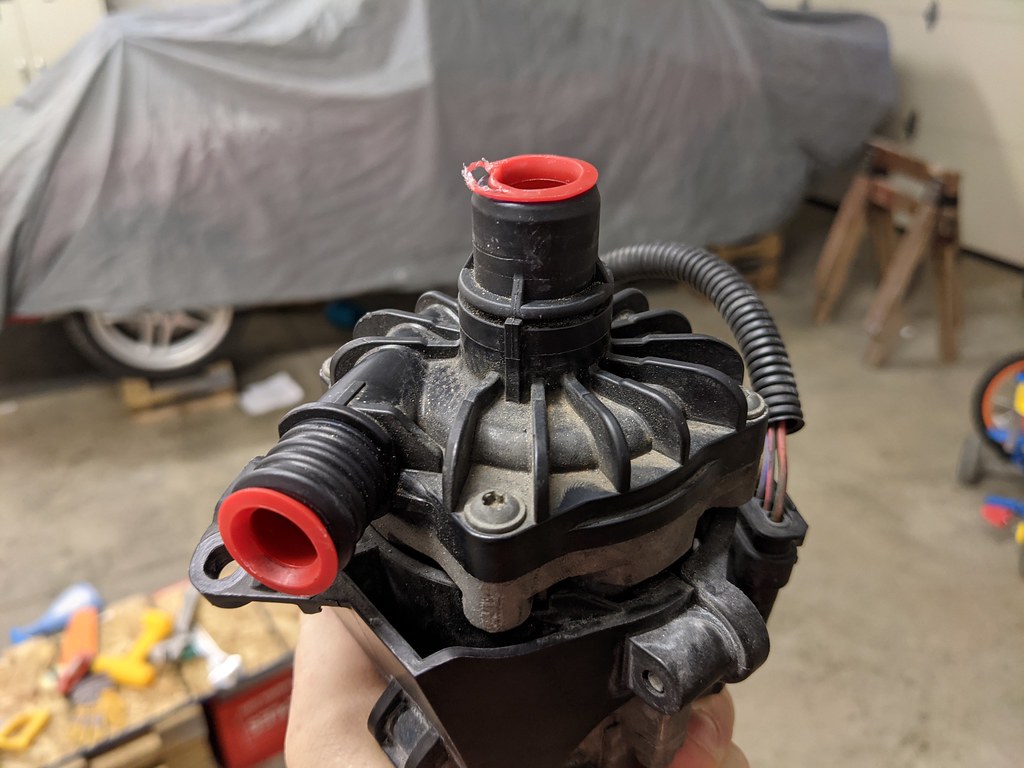
I was doing some research and settled on the heat exchanger circulation pump. Being the budget conscious person I am, I was trying to find an alternative to the the Varimax pump that seems to be the go to pump for most LSA swaps. What I found is a comparison of a bunch of pumps and found that the Pierburg CWA50 pump that is found on several OEM cars (mine came from an X5 BMW 4.4 Turbo) and performs as good as the Varimax pump, but I picked mine up for $60 rather than $450. Plus mine came with a mounting bracket and a harness. I was also shocked by the size of it. It's roughly the height of a beer can, and maybe twice the diameter. It's also supposed to be nearly silent, which is a win.
Next up is disassembling the rockers and getting them cleaned up for install. I bit the bullet and bought the CHE bronze Trunnion upgrade. They are supposed to be the best upgrade for the stock rockers other than going to a full on shaft rocker. What really sold me is that they don't require the bronze to be pressed in, but rather a free floating design that allows for the bushing to float and have oiling grooves for a smoother movement. Hope to have my rockers all disassembled and clean for when the show up. Then I can measure for my pushrods and button up the motor.
I'm really looking forward to tearing into the TR6060 to swap to the Magnum tailshaft. Should be interesting as it's something I've never done before.
Cheers,
Ryan
1955 Nomad project LC9, 4L80e, C5 brakes, Vision wheels
1968 Camaro 6.2 w/ LSA, TR6060-Magnum hybrid and etc SOLD
1976 T/A LS1 6 Speed, and etc. SOLD
Follow me on Instagram: ryeguy2006a
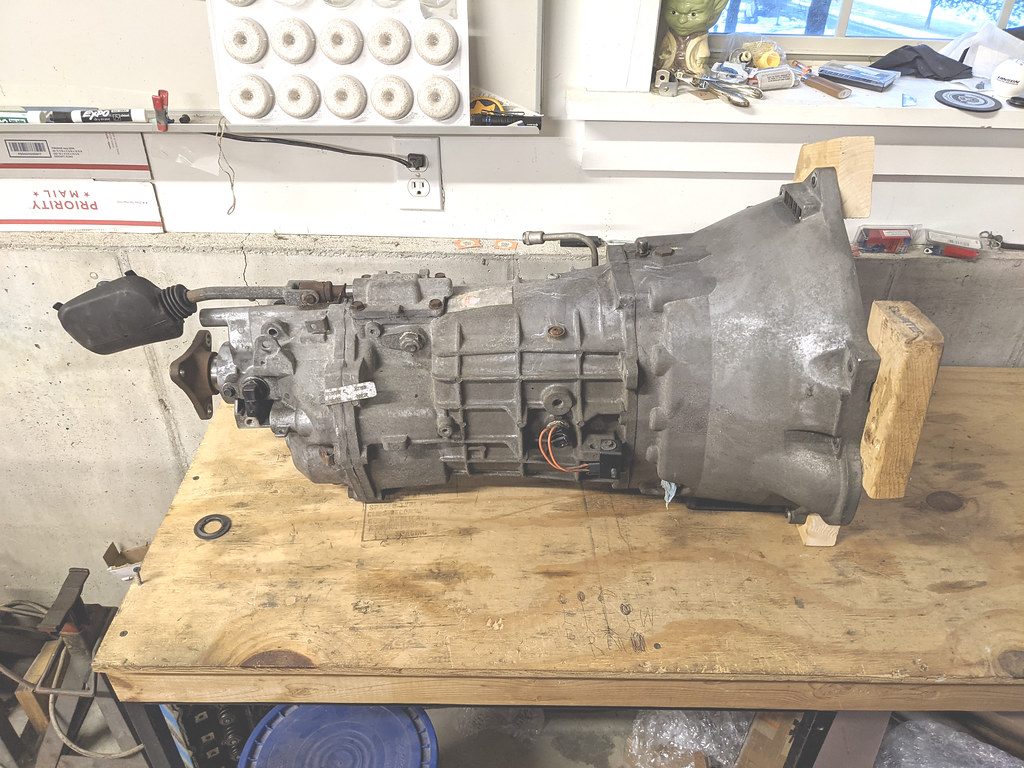
01-21-2021 #640
Registered User
- Join Date
- Sep 2009
- Posts
- 2,707
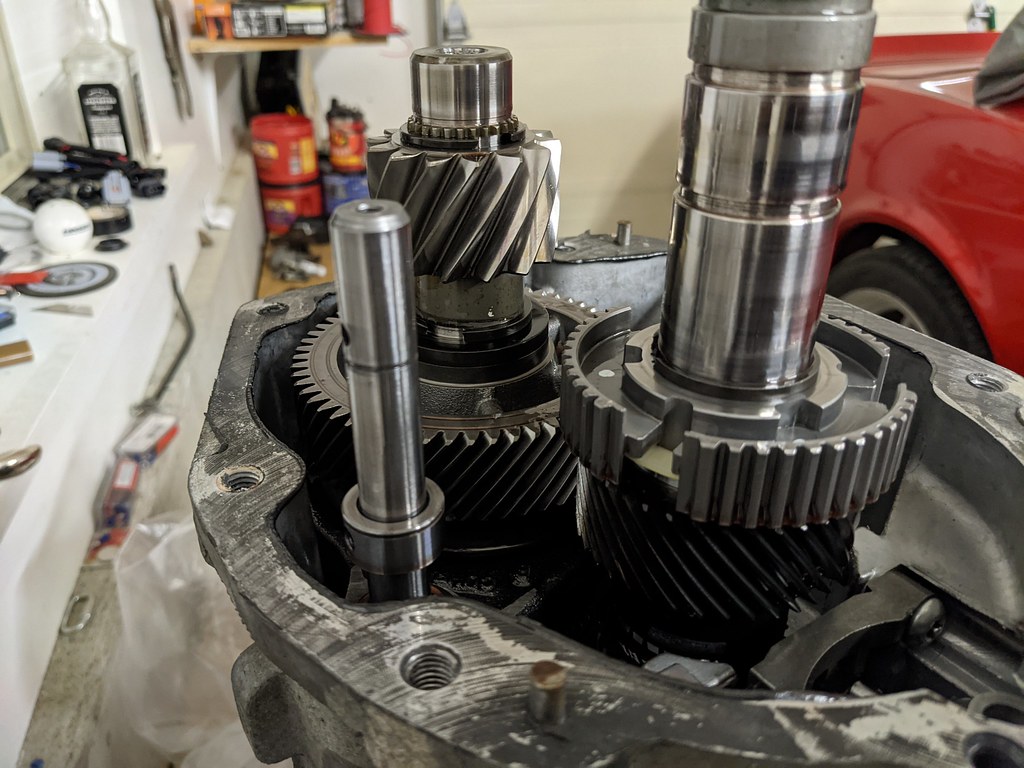
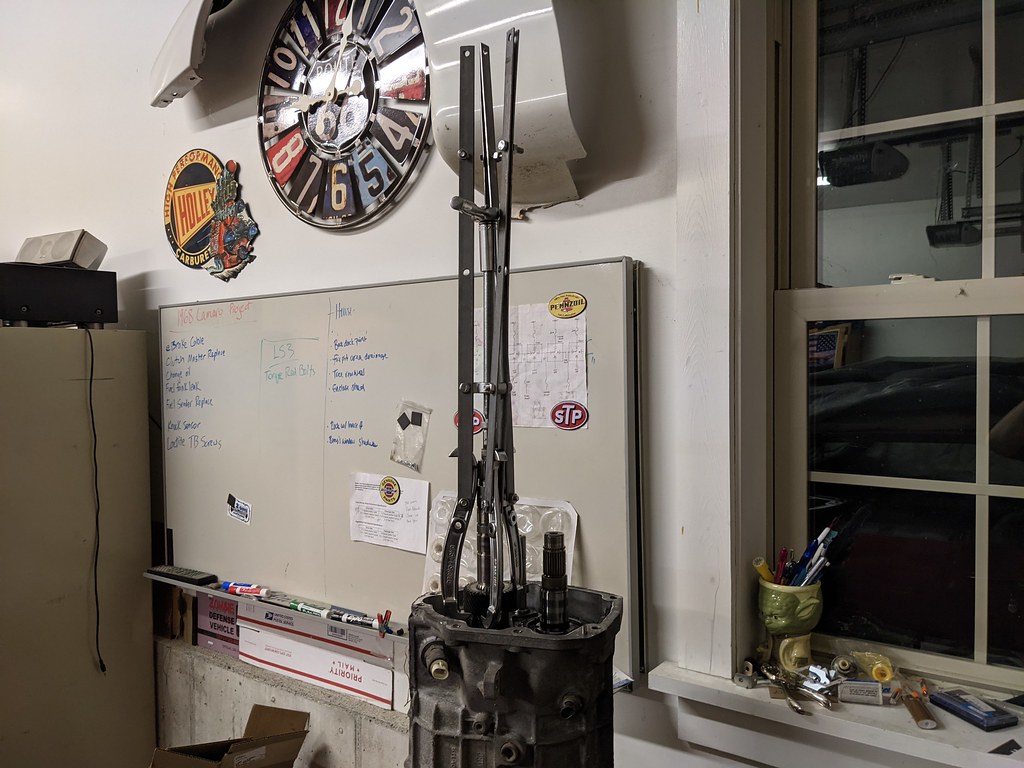
Well at the moment, I'm waiting on a valve spring compressor to continue on with my engine build so I've decided to take another step forward, but in a different direction. I've been doing a lot of reading and finally feel that it's time to attempt the transmission. I'm starting with a low mileage LS3 TR6060 out of a 2010 Camaro. After searching online, reading other write-ups, calling sponsors and talking to friends who have build transmissions, I'm ready to attempt the T56 Magnum Tailshaft conversion. At a high level this involves disassembling the transmission down enough to remove the mainshaft, remove everything from the 5th gen mainshaft, swap it all back onto the T56 Magnum mainshaft, then reinstall using the new T56 Magnum extension housing. I took about 100 different photos on just the disassembly, but I'll just post a few to give you an idea what all is involved.
Here's what I started with:
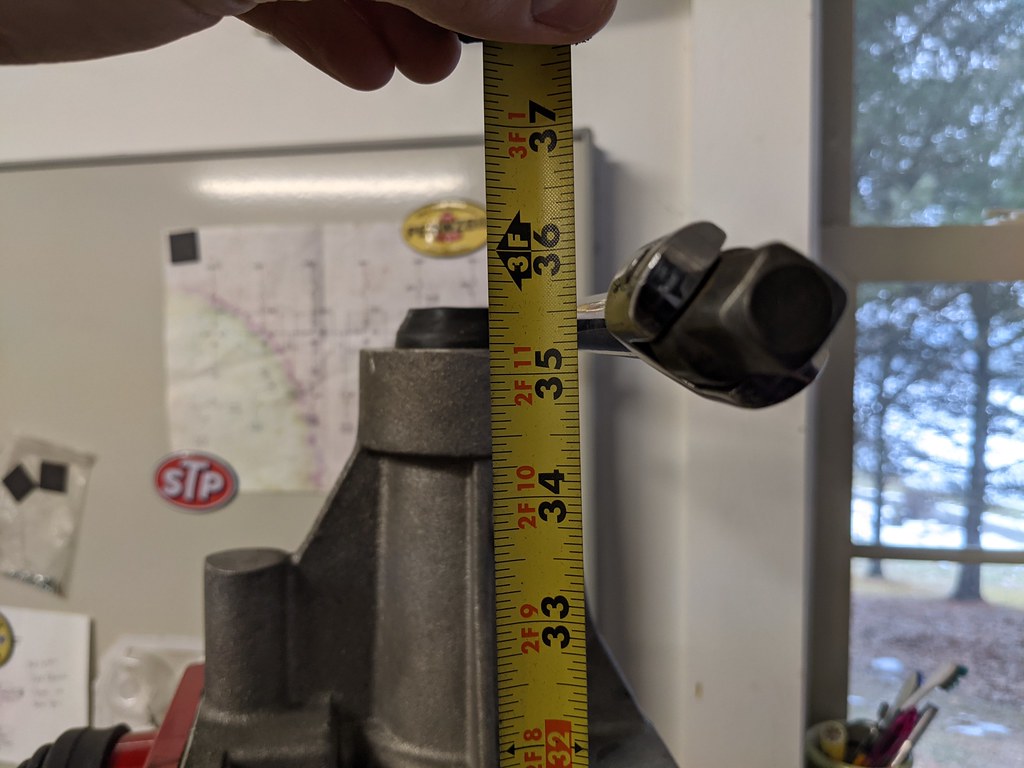
Removed the tailshaft housing first. Then I test fit the new housing to get a ballpark of where the shifter will land.
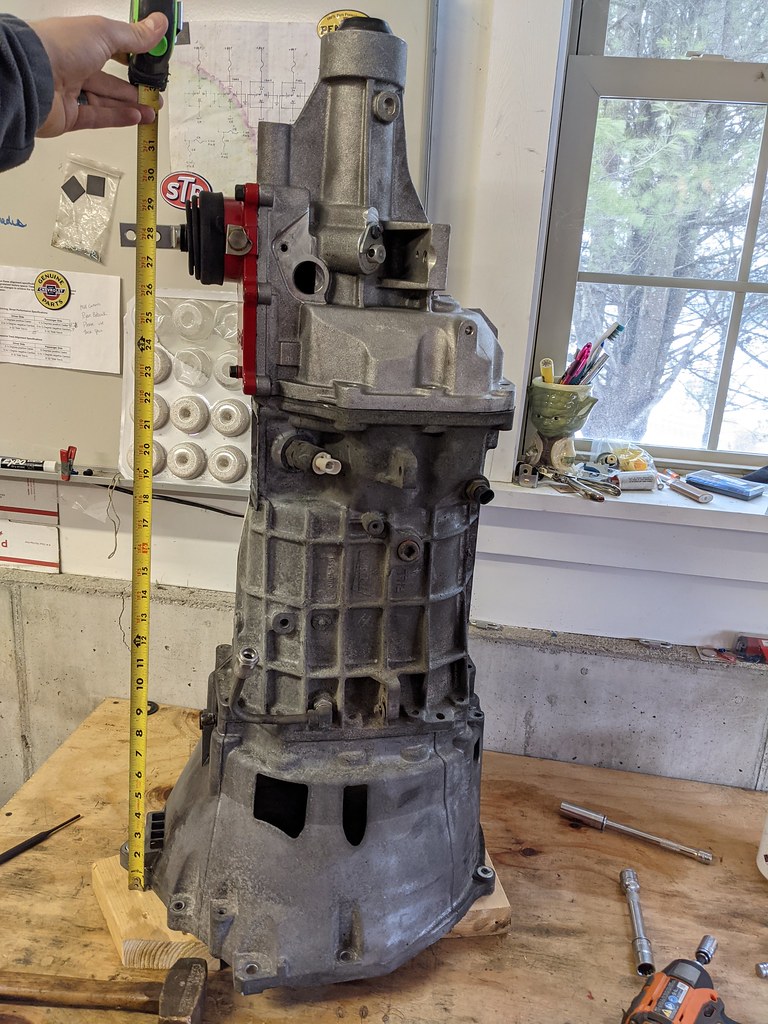
Every bit of information I could find online about the T56 Magnum shows that the rear shifter location is 26.6" from the bellhousing and the Magnum-F is 29.4". My car was set up for a 4th Gen T56 which is set up to be a drop in for the Magnum-F, so I had originally assumed that I would need to use one of the Sikky setback shifters. Now what is very interesting to me is that the TR6060 with magnum Tail shaft housing measures out to 28" on the dot, with an overall length of roughly 35.25". That means that with the stock Magnum shifter that I should be only about 1.4" forward of my old shifter location. Maybe someone who builds these transmissions can chime in, but I'm assuming that this has something to do with the larger bellhousing for dual friction clutches and the built in cooler pump.
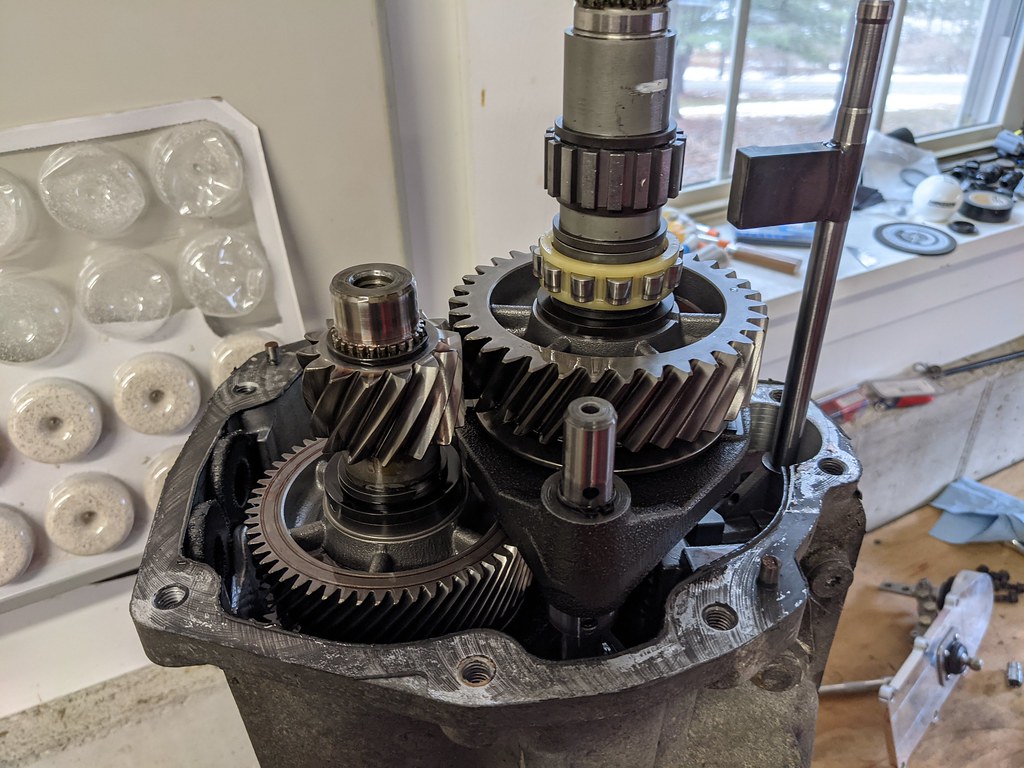
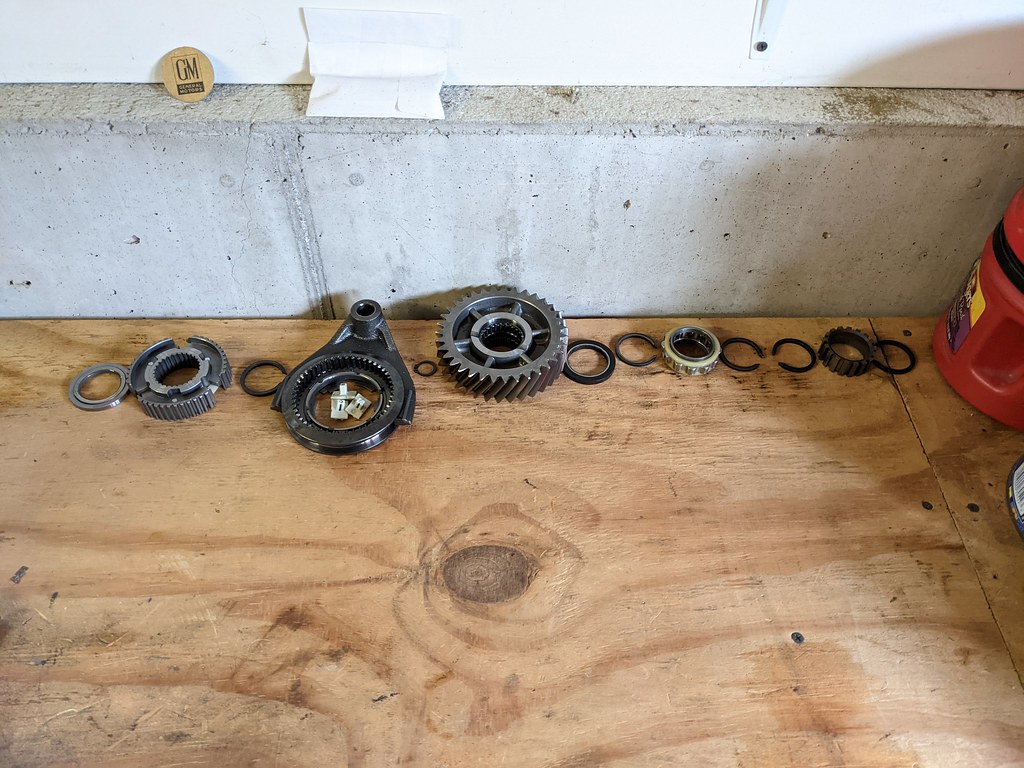
Now the real disassembly starts. I made sure to clean off my bench really well and took the advice of those that have done this before and laid everything out in a line as I remove it.
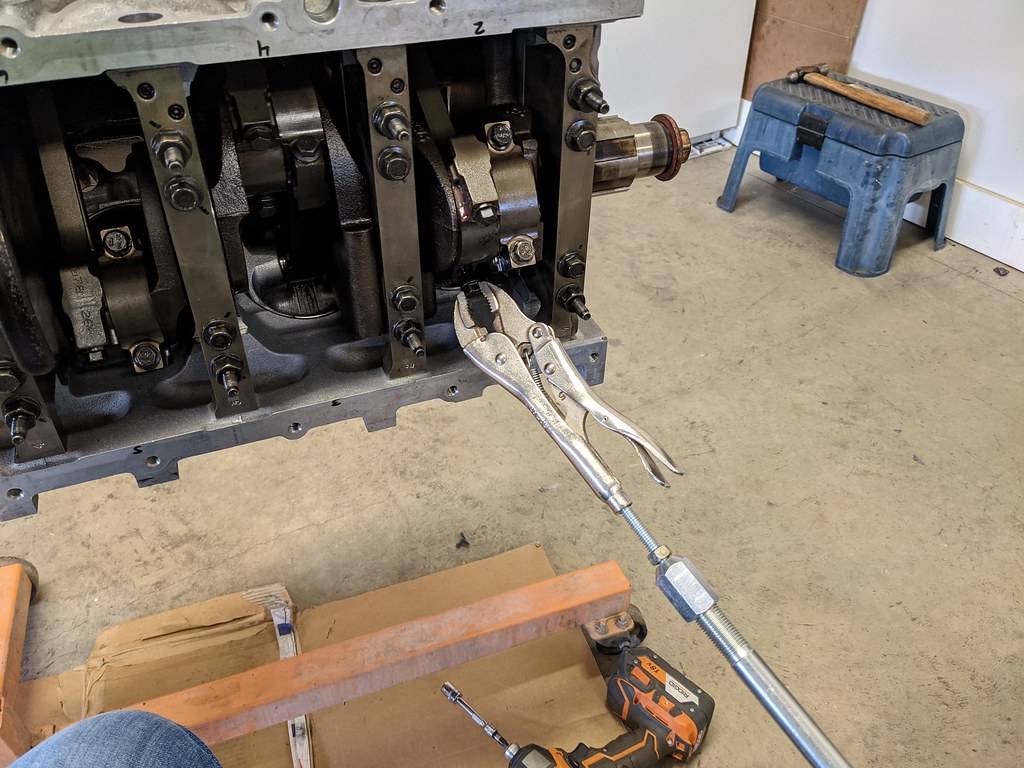
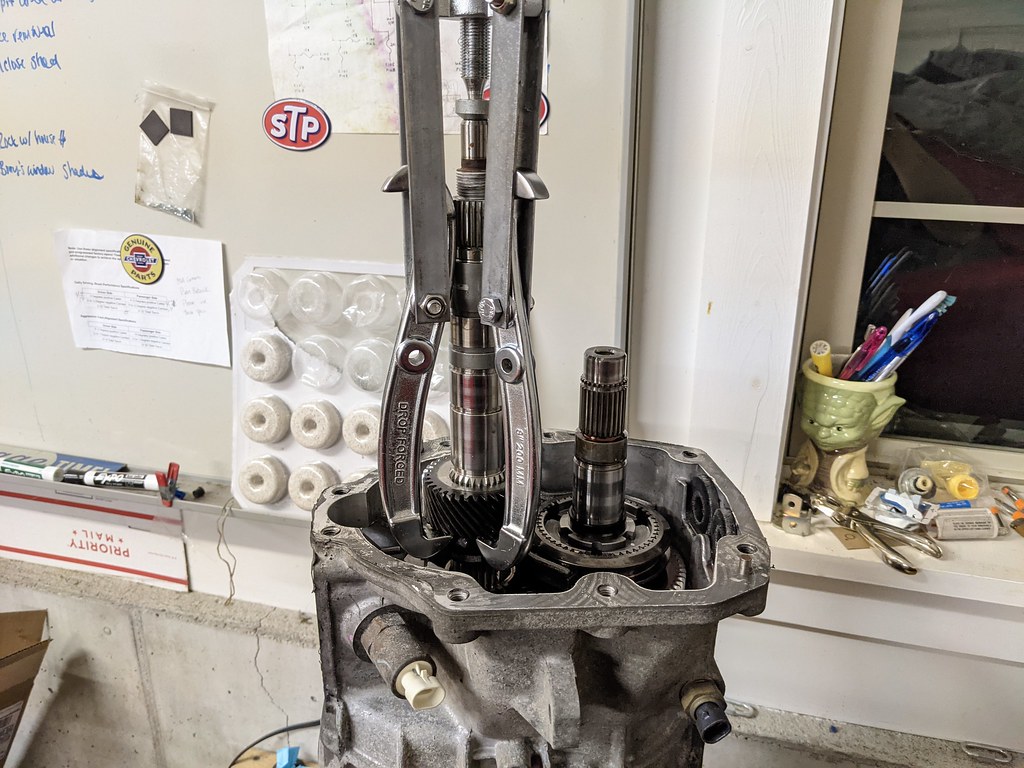
Now, I didn't have the special long jaw puller tool that is necessary for this job, but I got creative and build some extensions to my 8" jaw puller. Worked like a champ.
More to come...
1955 Nomad project LC9, 4L80e, C5 brakes, Vision wheels
1968 Camaro 6.2 w/ LSA, TR6060-Magnum hybrid and etc SOLD
1976 T/A LS1 6 Speed, and etc. SOLD
Follow me on Instagram: ryeguy2006a

 Reply With Quote


