

Results 41 to 60 of 394
-
11-26-2017 #41

 Registered User
- Join Date
- Dec 2013
- Location
- Down Under
- Posts
- 18

Awspome build,..yep we got more work here in Aussie because of our rego laws,,,...
Is it easier to start with a chassis say Pre 74 ,..as you wont need to comply with a heap of ADRs...
I building a 64 F100 with Jag front suspension n modified F100 rear,.probably heading towards 3 or 4 link rear,..but I know my Engineer say, its Pre 74,..dont need that,...dont need that...
Im Also in the bush,..Riverina NSW,,so Im hearing your frustration about bits..
Keep Posting,,,,Subscribed now..
Al
-
11-26-2017 #42
Registered User
- Join Date
- Dec 2014
- Posts
- 188
Cheers, Al!
I was disappointed as my cab has a VIN plate for which I have the import papers. But that does not meet their requirements. I have to go by the VIN on the chassis. With it being an 81 model, there are more ADR's than like you say, earlier on. But the Bronco is classed as a commercial vehicle which therefore has only a handful of ADR's and restrictions to meet compared to a passenger vehicle of the same era. Most of them are just common sense stuff like lights, blinkers, wipers and etc. But I do have to install new seat belts and change the door locks. That's about it really.
I was happy that I found a Bronco chassis as its wheelbase is nearly the same as the Audi. I looked at a few other truck ones and also some F1 chassis but they either didn't suit or the F1 chassis were about 3-4k. I was not paying that. I got the Bronco chassis for $250.
Nice project you have! Do you have a build thread here on it?
I'm in the Hunter NSW area. You're in a nice spot down that way.
11-27-2017 #43
Registered User
- Join Date
- Dec 2014
- Posts
- 188
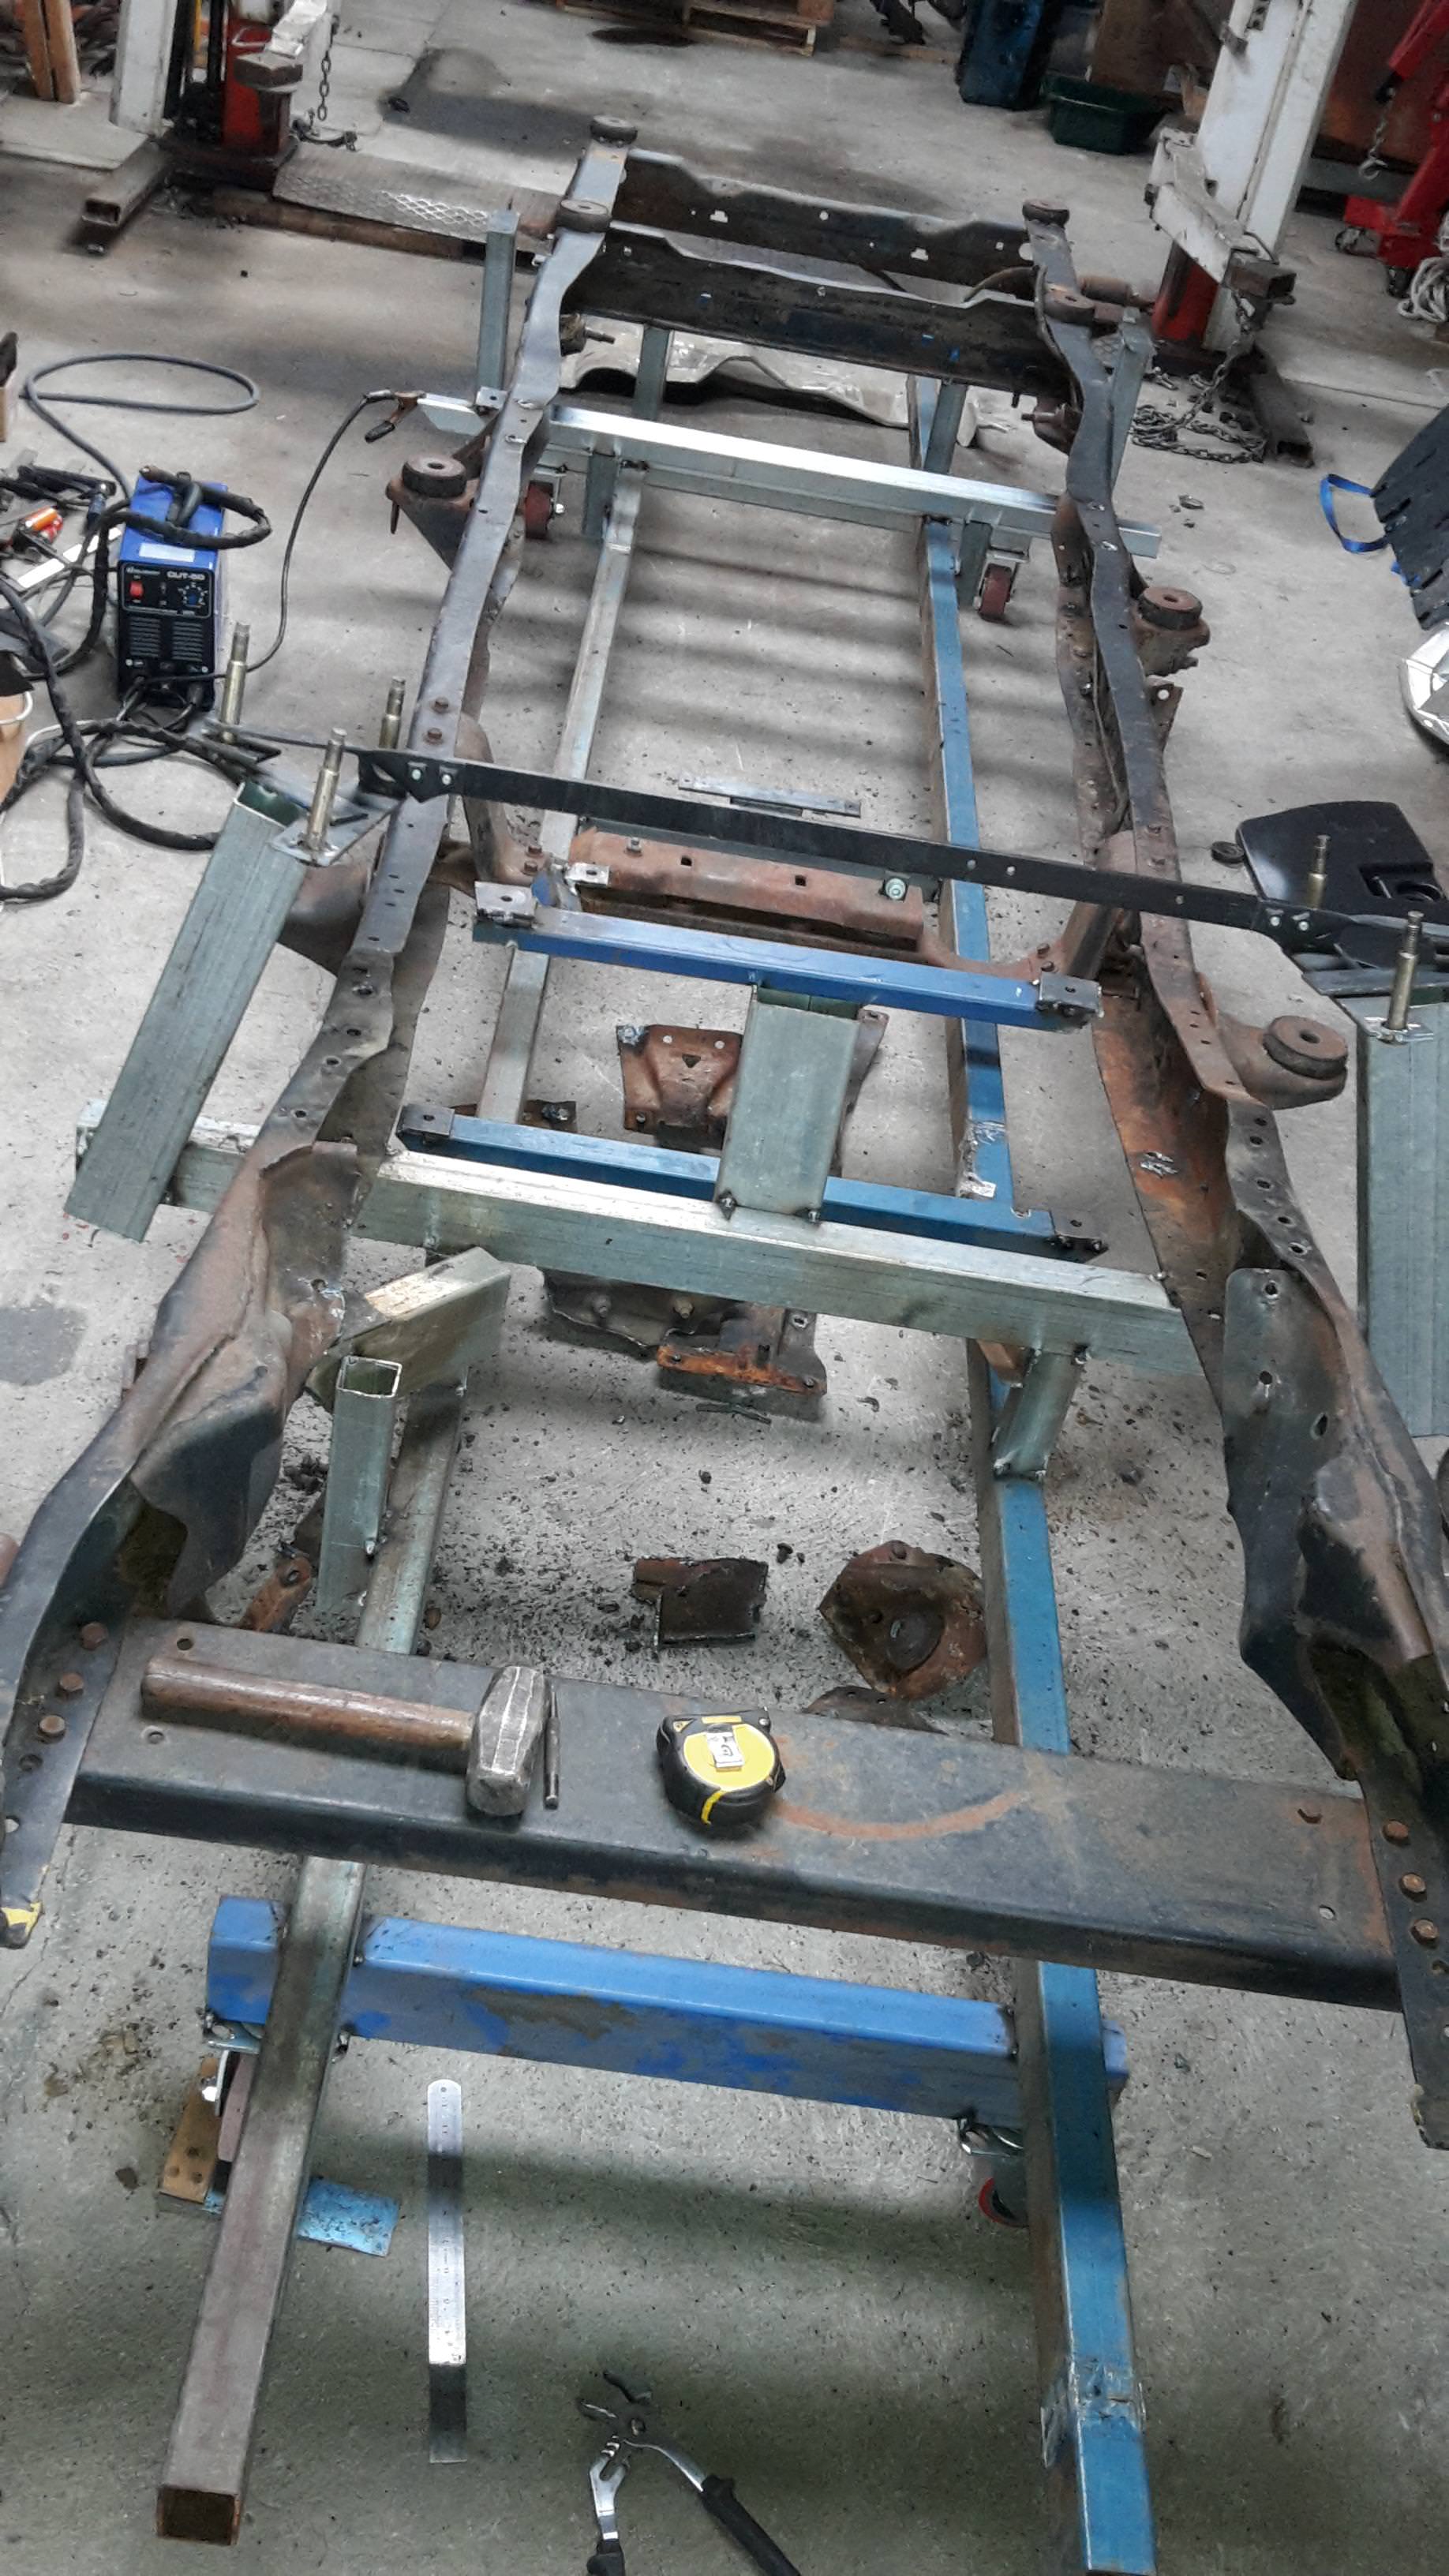
Most of the fat has been trimmed from the chassis now. I love my plasma cutter.
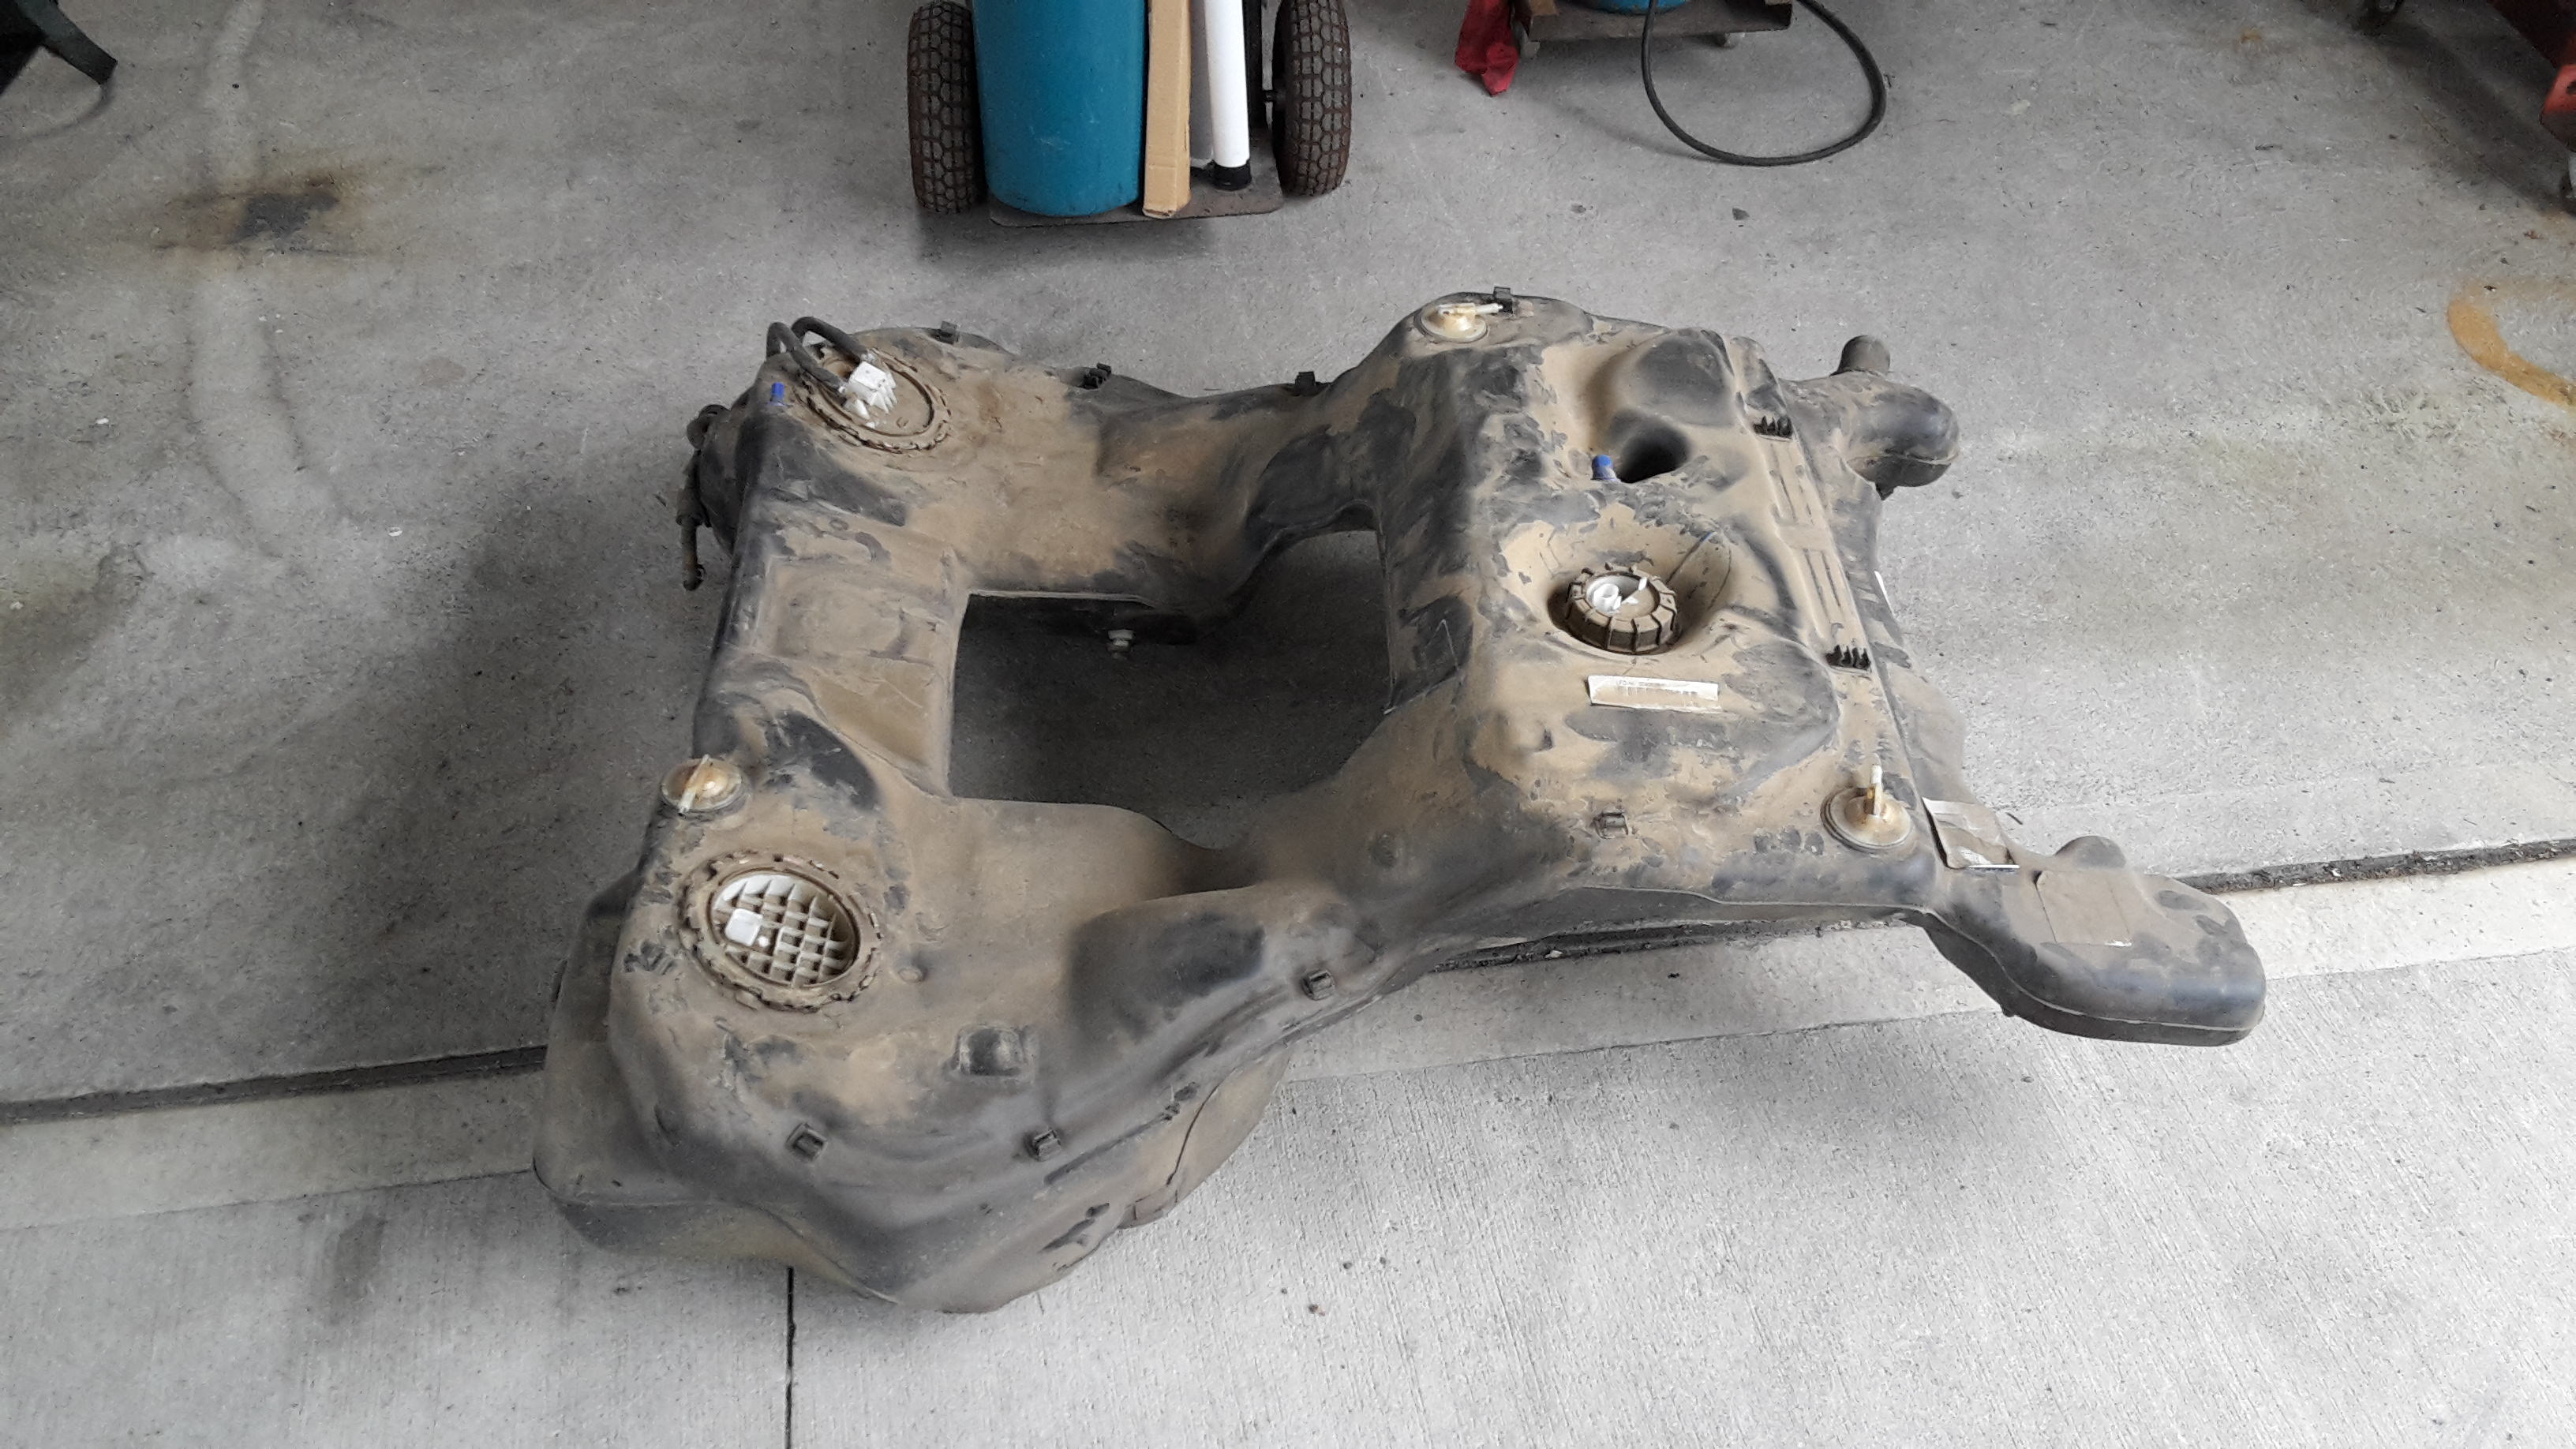
The second rear cross member will need to be either removed or moved backwards to allow room for the plastic fuel tank. I'm going to use the RS6 tank. It's quite an odd shape but it will actually slip in between the chassis rails at the top half of it and then slip under the rails for the lower front section.

11-27-2017 #44 Registered User
- Join Date
- Sep 2009
- Posts
- 2,707

Very cool project.

1955 Nomad project LC9, 4L80e, C5 brakes, Vision wheels
1968 Camaro 6.2 w/ LSA, TR6060-Magnum hybrid and etc SOLD
1976 T/A LS1 6 Speed, and etc. SOLD
Follow me on Instagram: ryeguy2006a
11-27-2017 #45 Registered User
- Join Date
- Feb 2005
- Location
- Minneapolis, MN
- Posts
- 195
This is looking awesome, glad you're getting back on it. For the seats, I think its going to be tough to fit the Audi front seats plus a 3rd seat. I'll be watching to see what you figure out, as I'm looking into 3rd seat options too. With being more of a cruiser truck, I think I'm going to go back to a bench seat in my 1950 F-1. I have a pair of buckets in it now, but I'm leaning towards using the 2nd row seat out of a 2014-ish Ford Explorer. Would even make it easy for me to mount the kids seat.
11-27-2017 #46
Registered User
- Join Date
- Dec 2014
- Posts
- 188
Cheers, guys!
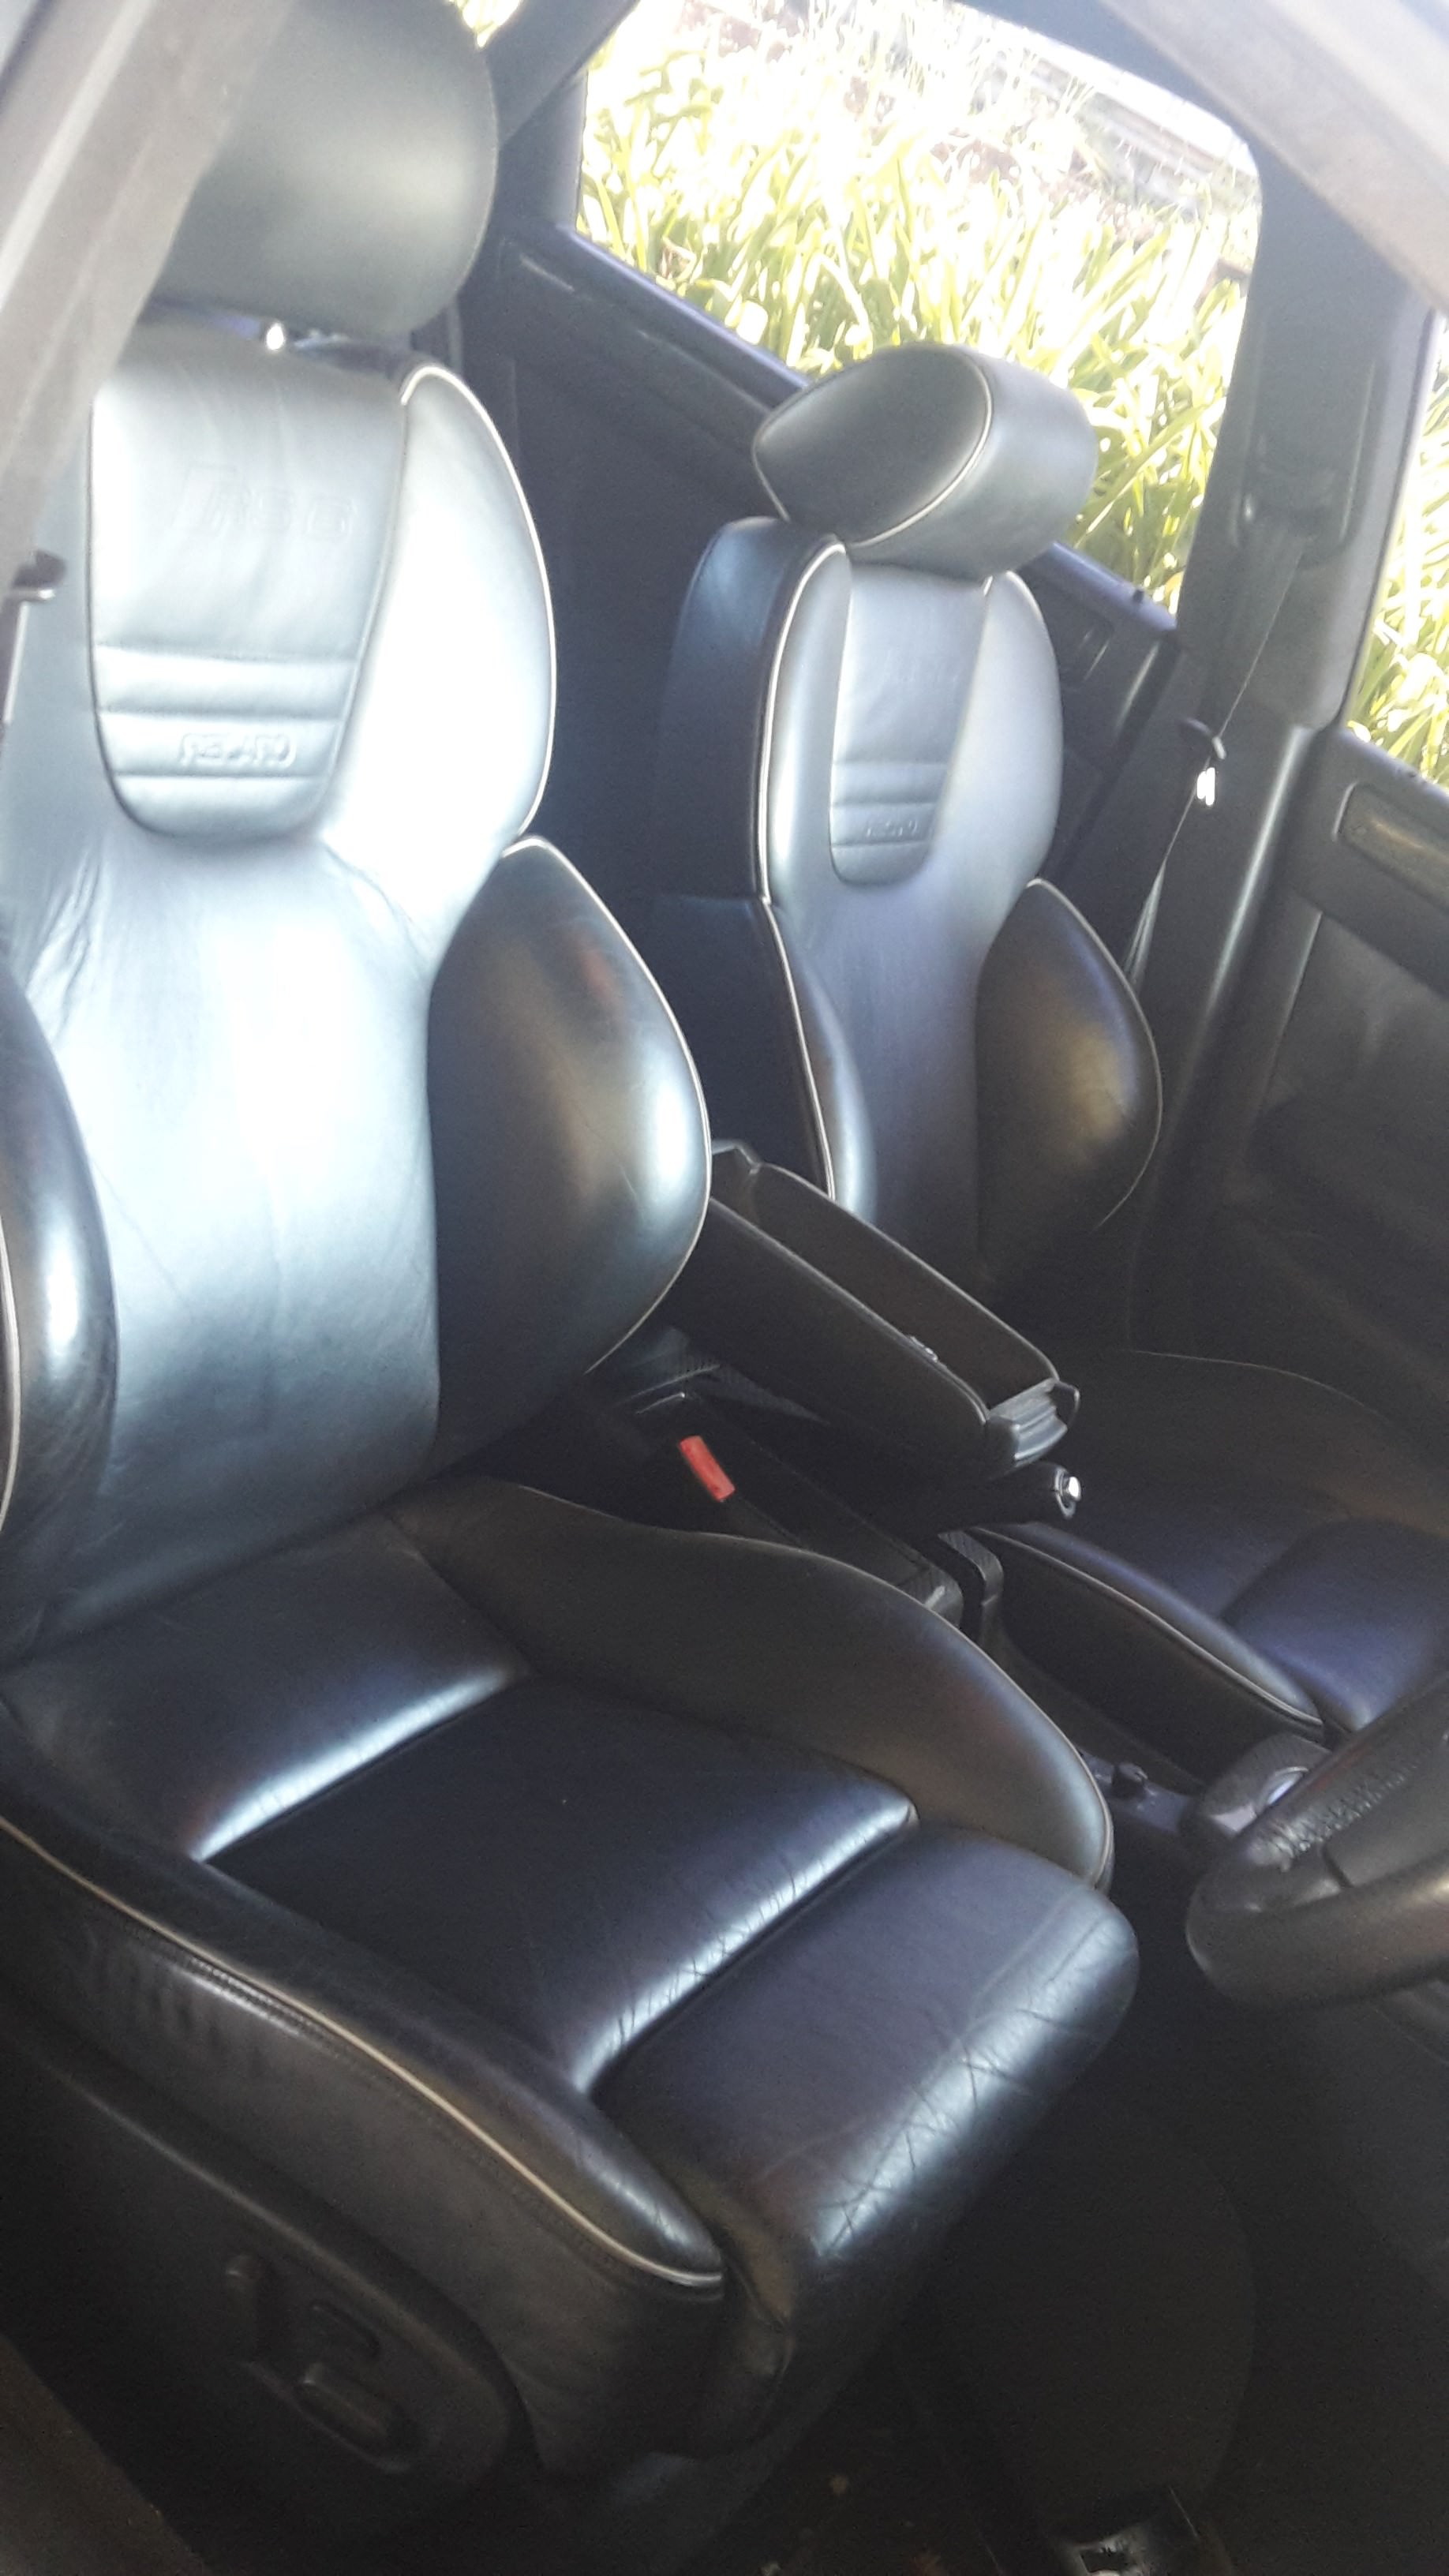
Brawls, it'll be the rear Audi seat I'm looking to use for the 3 seat option. Here it it. They, like the fronts, are Recaro and are also heated.
You have a nice truck there too. I love the colour. And I know all about kids taking over all of your time. My youngest is now 8 so I've done more on my cars in the last 12 months I reckon than the many years before that.
Your e-brake setup is very interesting too. I hadn't seen that concept before. Is it basically just a tap to lock out the rear brake cylinders?
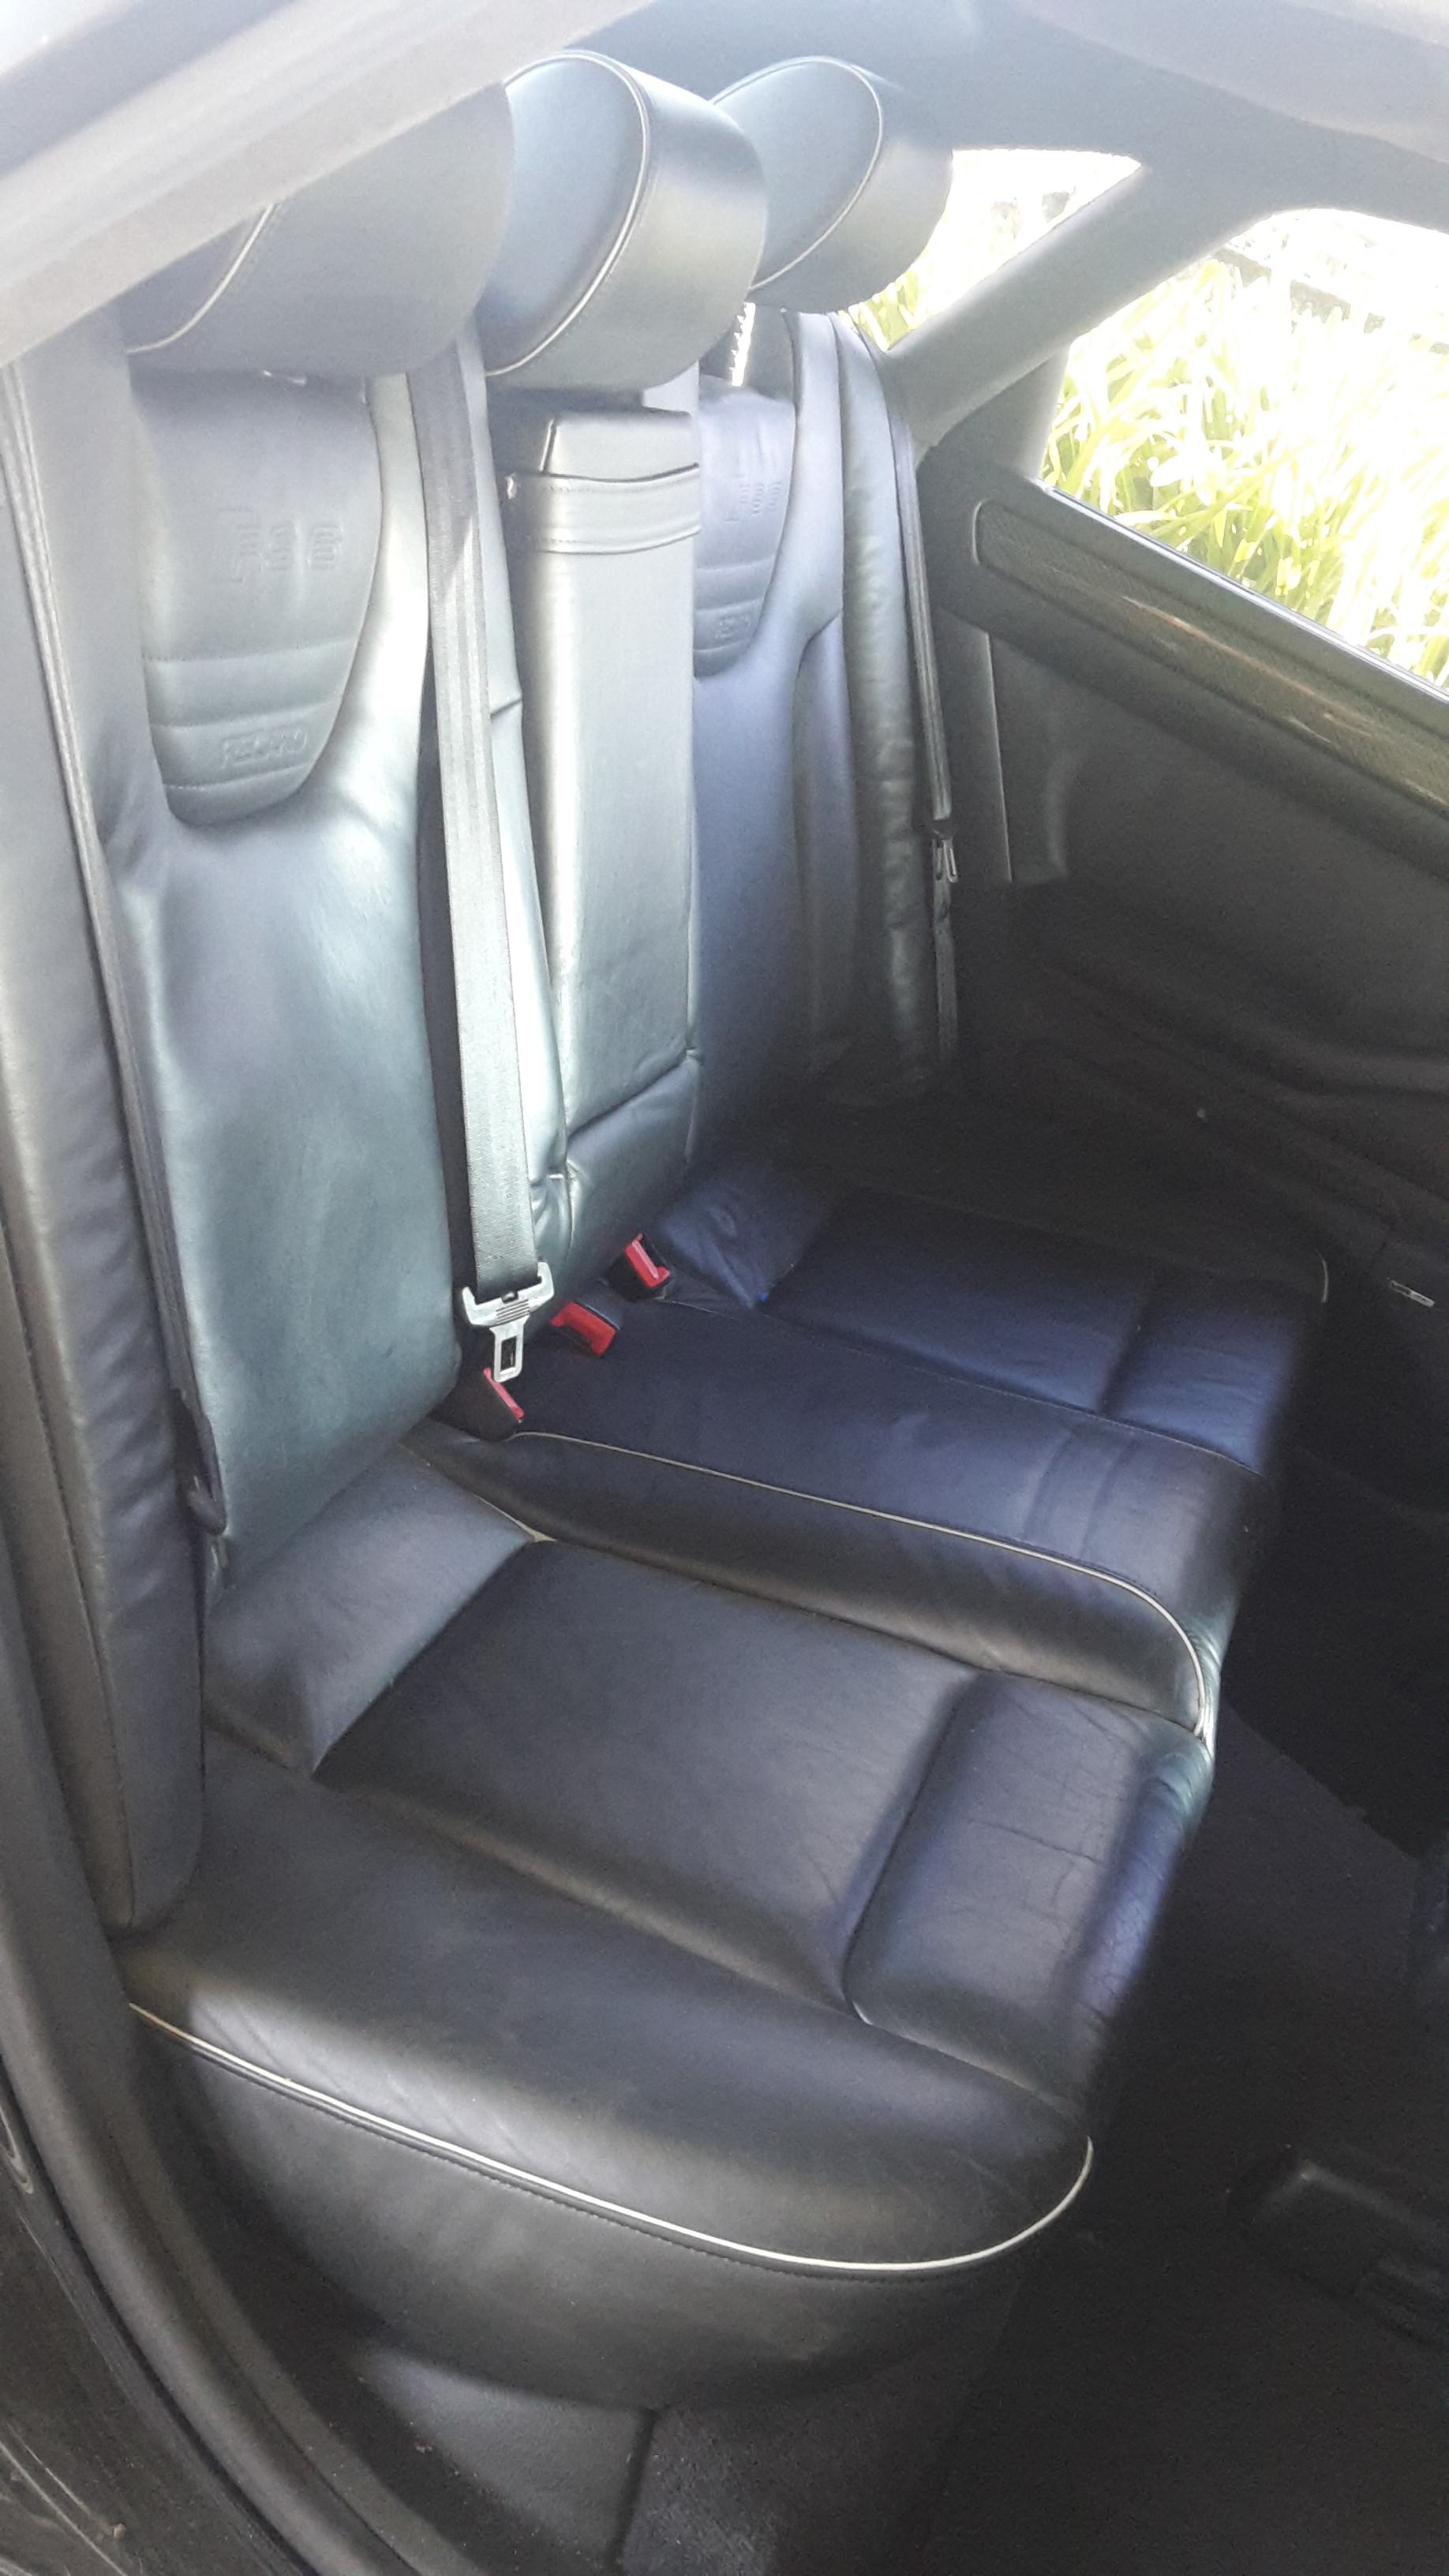

These are the fronts
11-27-2017 #47
Registered User
- Join Date
- Feb 2005
- Location
- Minneapolis, MN
- Posts
- 195
That's a nice looking back seat! I'll be interested to see how it tucks in, might have to look for one of those instead of the Explorer. Fronts remind me of the seat in my old SVT Ford Focus. Recaro seats are awesome. Love that even the rear seats are heated!
Yeah its essentially a line lock for the rear calipers. I saw that some Cobra kit cars used the setup, so I thought I'd give it a try. I had a center mounted e-brake but wanted to get rid of it in preparation for the bench seat, and I didn't really want another thing down under the dash. We'll see how it works.
11-27-2017 #48
Registered User
- Join Date
- Dec 2014
- Posts
- 188
Measuring the internal cab width and the seat base width, it'll fit. Once I get to the point of removing it and having a go at fitting, I'll know more. But for now I'll leave them in place to protect them.
They are very comfy and feel very nice.
Cool, I like it. I'll need to look into a space saving concept as well to use the bench seat. I'll need to get in touch with my engineer though and see if he is happy for a line lock to be used as an e-brake. We can't do things the way you guys can. Everything has to be inspected and approved, then signed off on. All for registration purposes.
11-27-2017 #49
Registered User
- Join Date
- Feb 2005
- Location
- Minneapolis, MN
- Posts
- 195
That would be hard having to get everything approved. I've seen some other kits for electronic e-brake systems too. It looked interesting but expensive iirc, it was called E-Stopp. Mounts a module under the car/truck, where the cables y-split off. It has something internal that does the pull, you just push a button. Might be easier to get approved?
I'm on the look out for some of those seats now, can't wait to see you get them mounted.
11-27-2017 #50 Registered User
- Join Date
- Aug 2008
- Location
- jacksonville,fl
- Posts
- 970
Definitely an odd shaped fuel tank there. With all the engineering the factories put into these tanks it's a good thing to stick with them.
I was looking into electric e-brakes a few years ago. The e-stopp unit is pretty much a linear actuator in a box with a brake cable attached to it & a fancy controller. https://www.speedwaymotors.com/E-Sto...AaAjkaEALw_wcB
Seen some other versions, but weren't quite as compact looking. My personal thought for an e-brake future upgrade for myself would be a 2nd set of disc calipers on the rear with a long handle to a manual brake master cylinder. This would give me the rear brake hand control power of a drift car as well as being independent of a failure in the main braking system. https://www.google.com/search?q=hydr...lqwJpVhXphkhM:
https://www.google.com/search?biw=16...PJUUMZ1Up-dSM:
My current el camino e-brake handle is a unit from Pontiac fieros, which I fit between the bench seat & door, which is another diy mounting location that could work for you possibly with the factory unit..
11-28-2017 #51
Registered User
- Join Date
- Dec 2014
- Posts
- 188
That E-stopp system I have seen and by the time I get it here to Aus, it's about $700 AUD. Which is too much for what it is. I like the idea, but the price is too high. Originally Posted by brawls43

I've thought about this conversion a bit with my 69 Mustang. I didn't want the factory foot lever. I looked into electric systems as my wife's VW had an electric park brake and it worked great. But the calipers they use are quite specific and were also expensive at the time. As JL says in the next post, it's basically an actuator with a fancy controller. Not a lot to it. Surely there could be something else utilised to do the same job.
I like the second caliper idea, I've seen this done a bit. I saw a new McLaren on the weekend with this very setup. Or at least I assume that's what the smaller second caliper was doing. Originally Posted by jlcustomz
That's a neat little unit in that google image. It's quite compact. Nice.
I'm about to do a 3rd seat conversion using this parts car for my wife's Falcon ute. It too uses a side mounted lever. I'm not sure if I'll have the space for something like this in the F1 cab. But if I do, this would be a very easy solution as it already uses a single into two line junction for the cable, just like the Audi does.
This will look odd to you over the pond guys with it being on this side of the seat but it's the same concept.
11-28-2017 #52
Registered User
- Join Date
- Dec 2014
- Posts
- 188
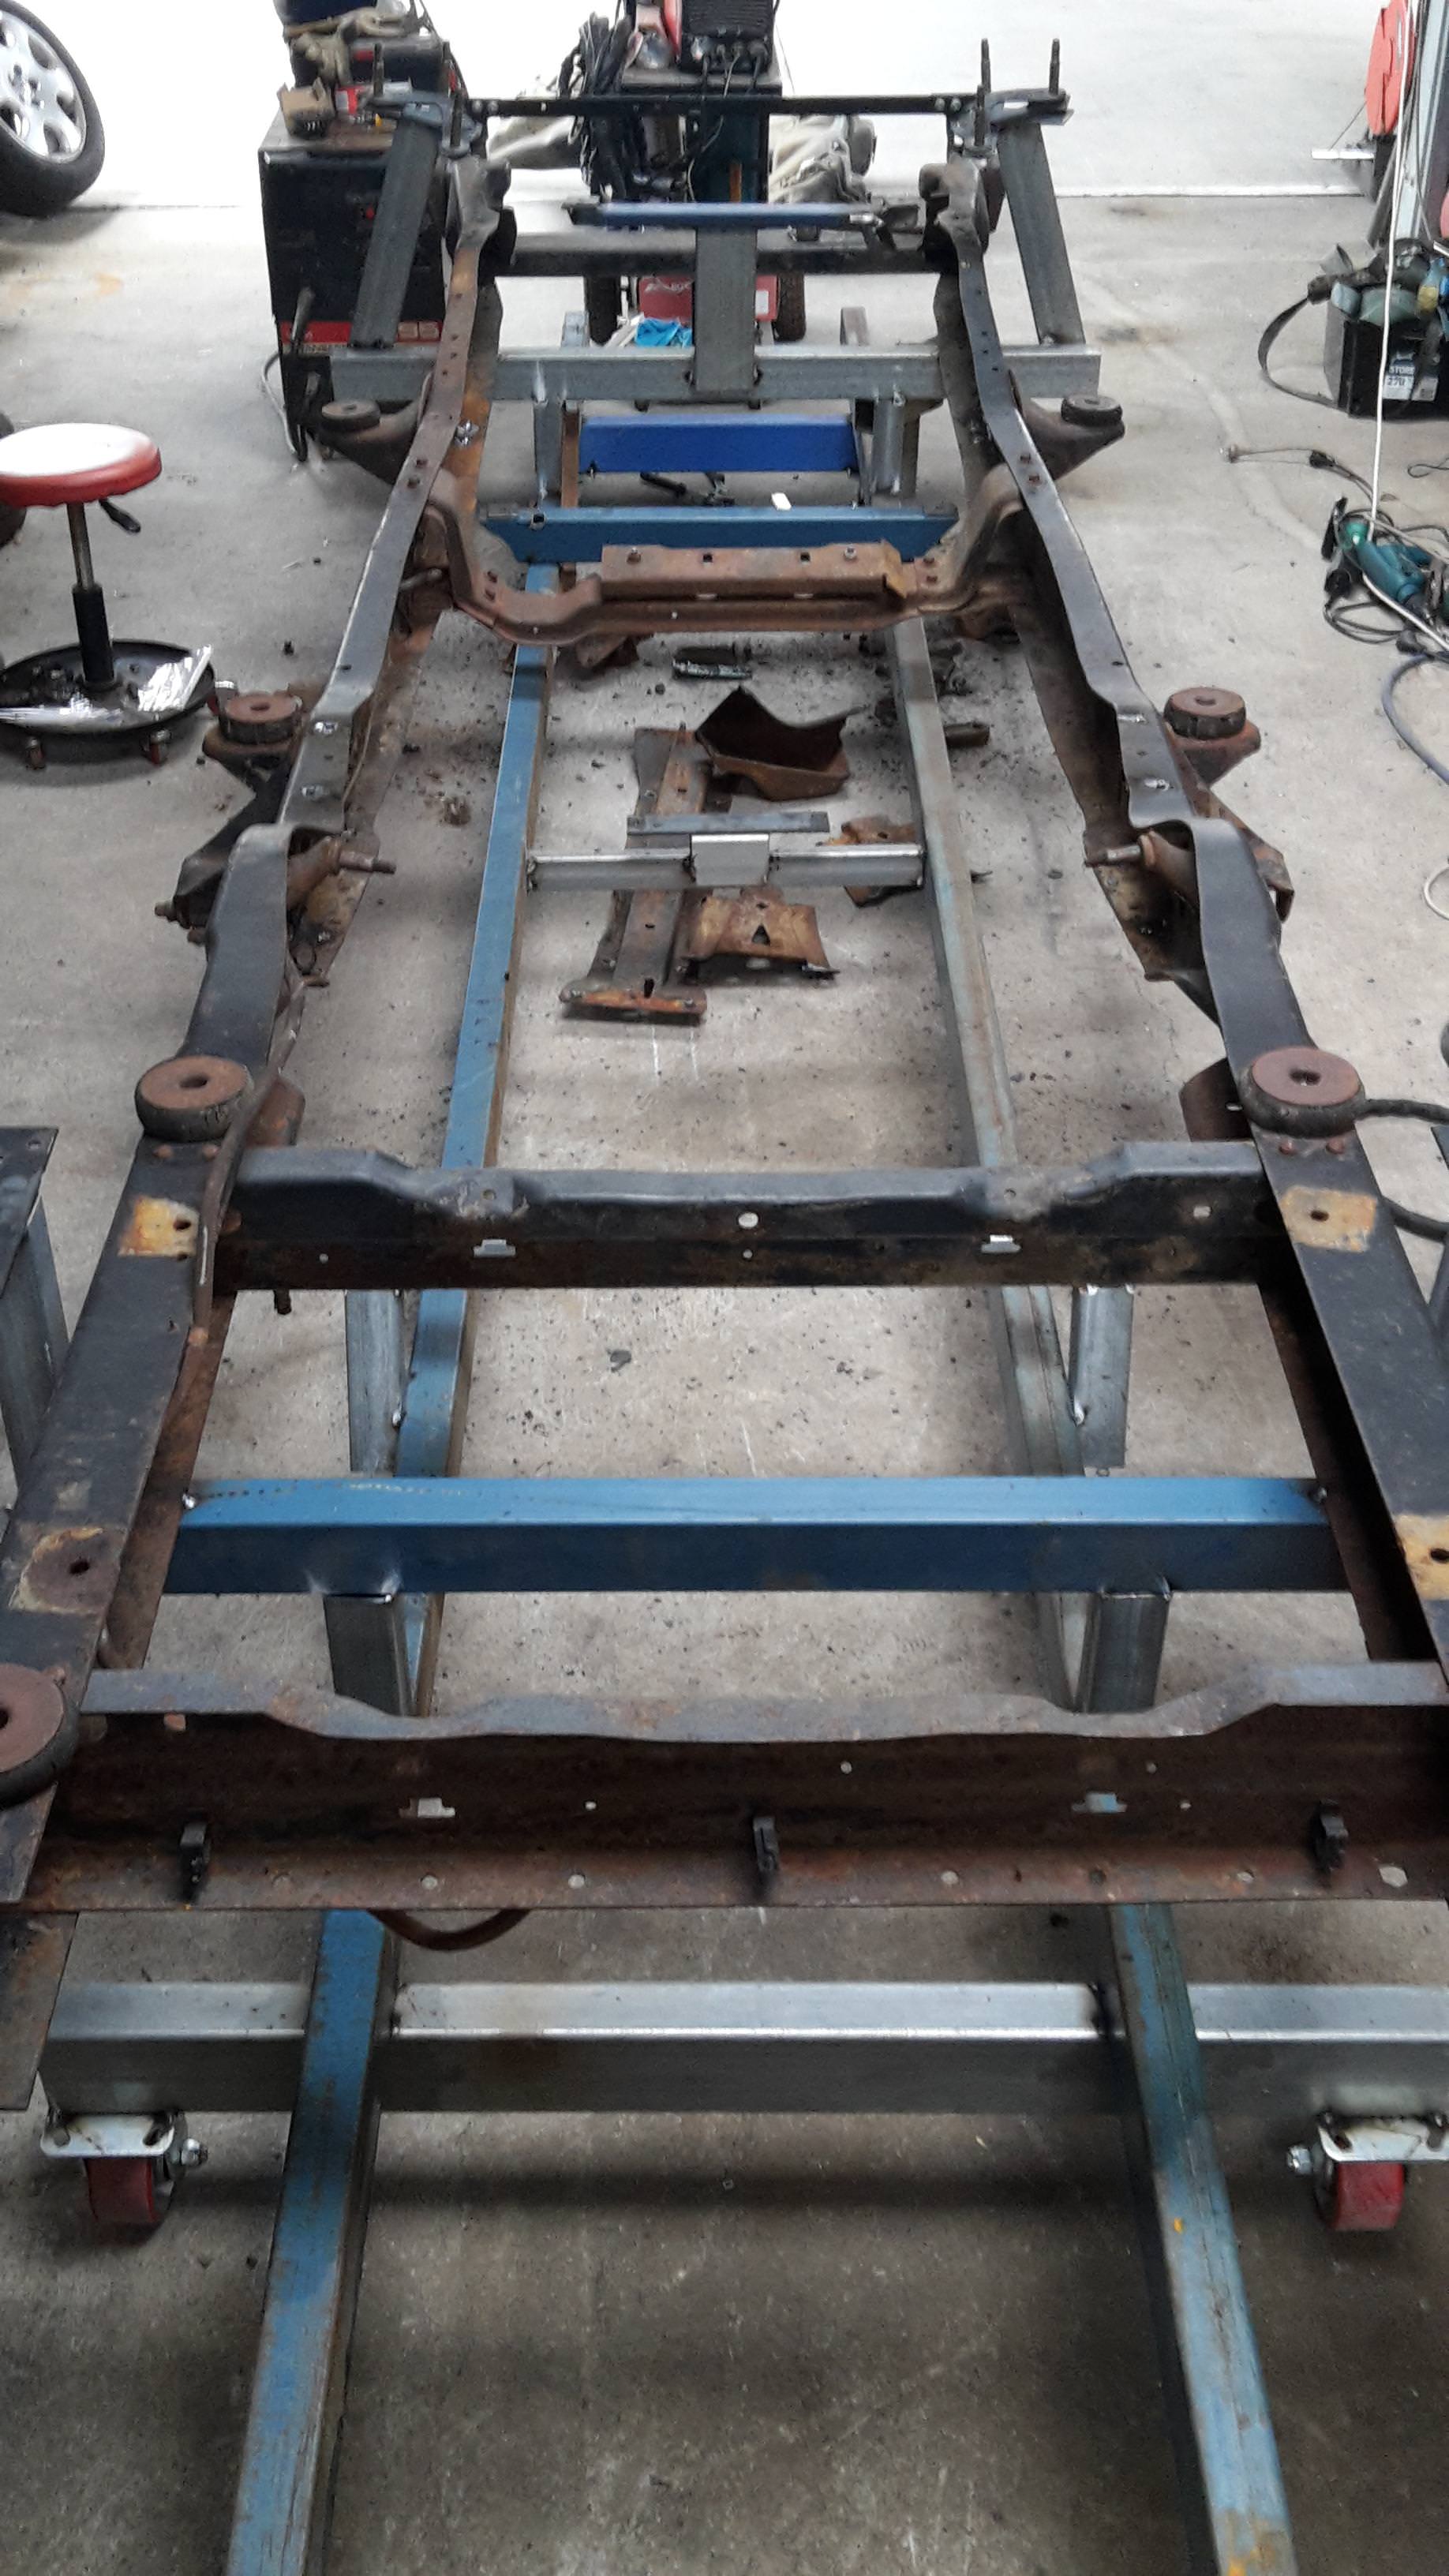
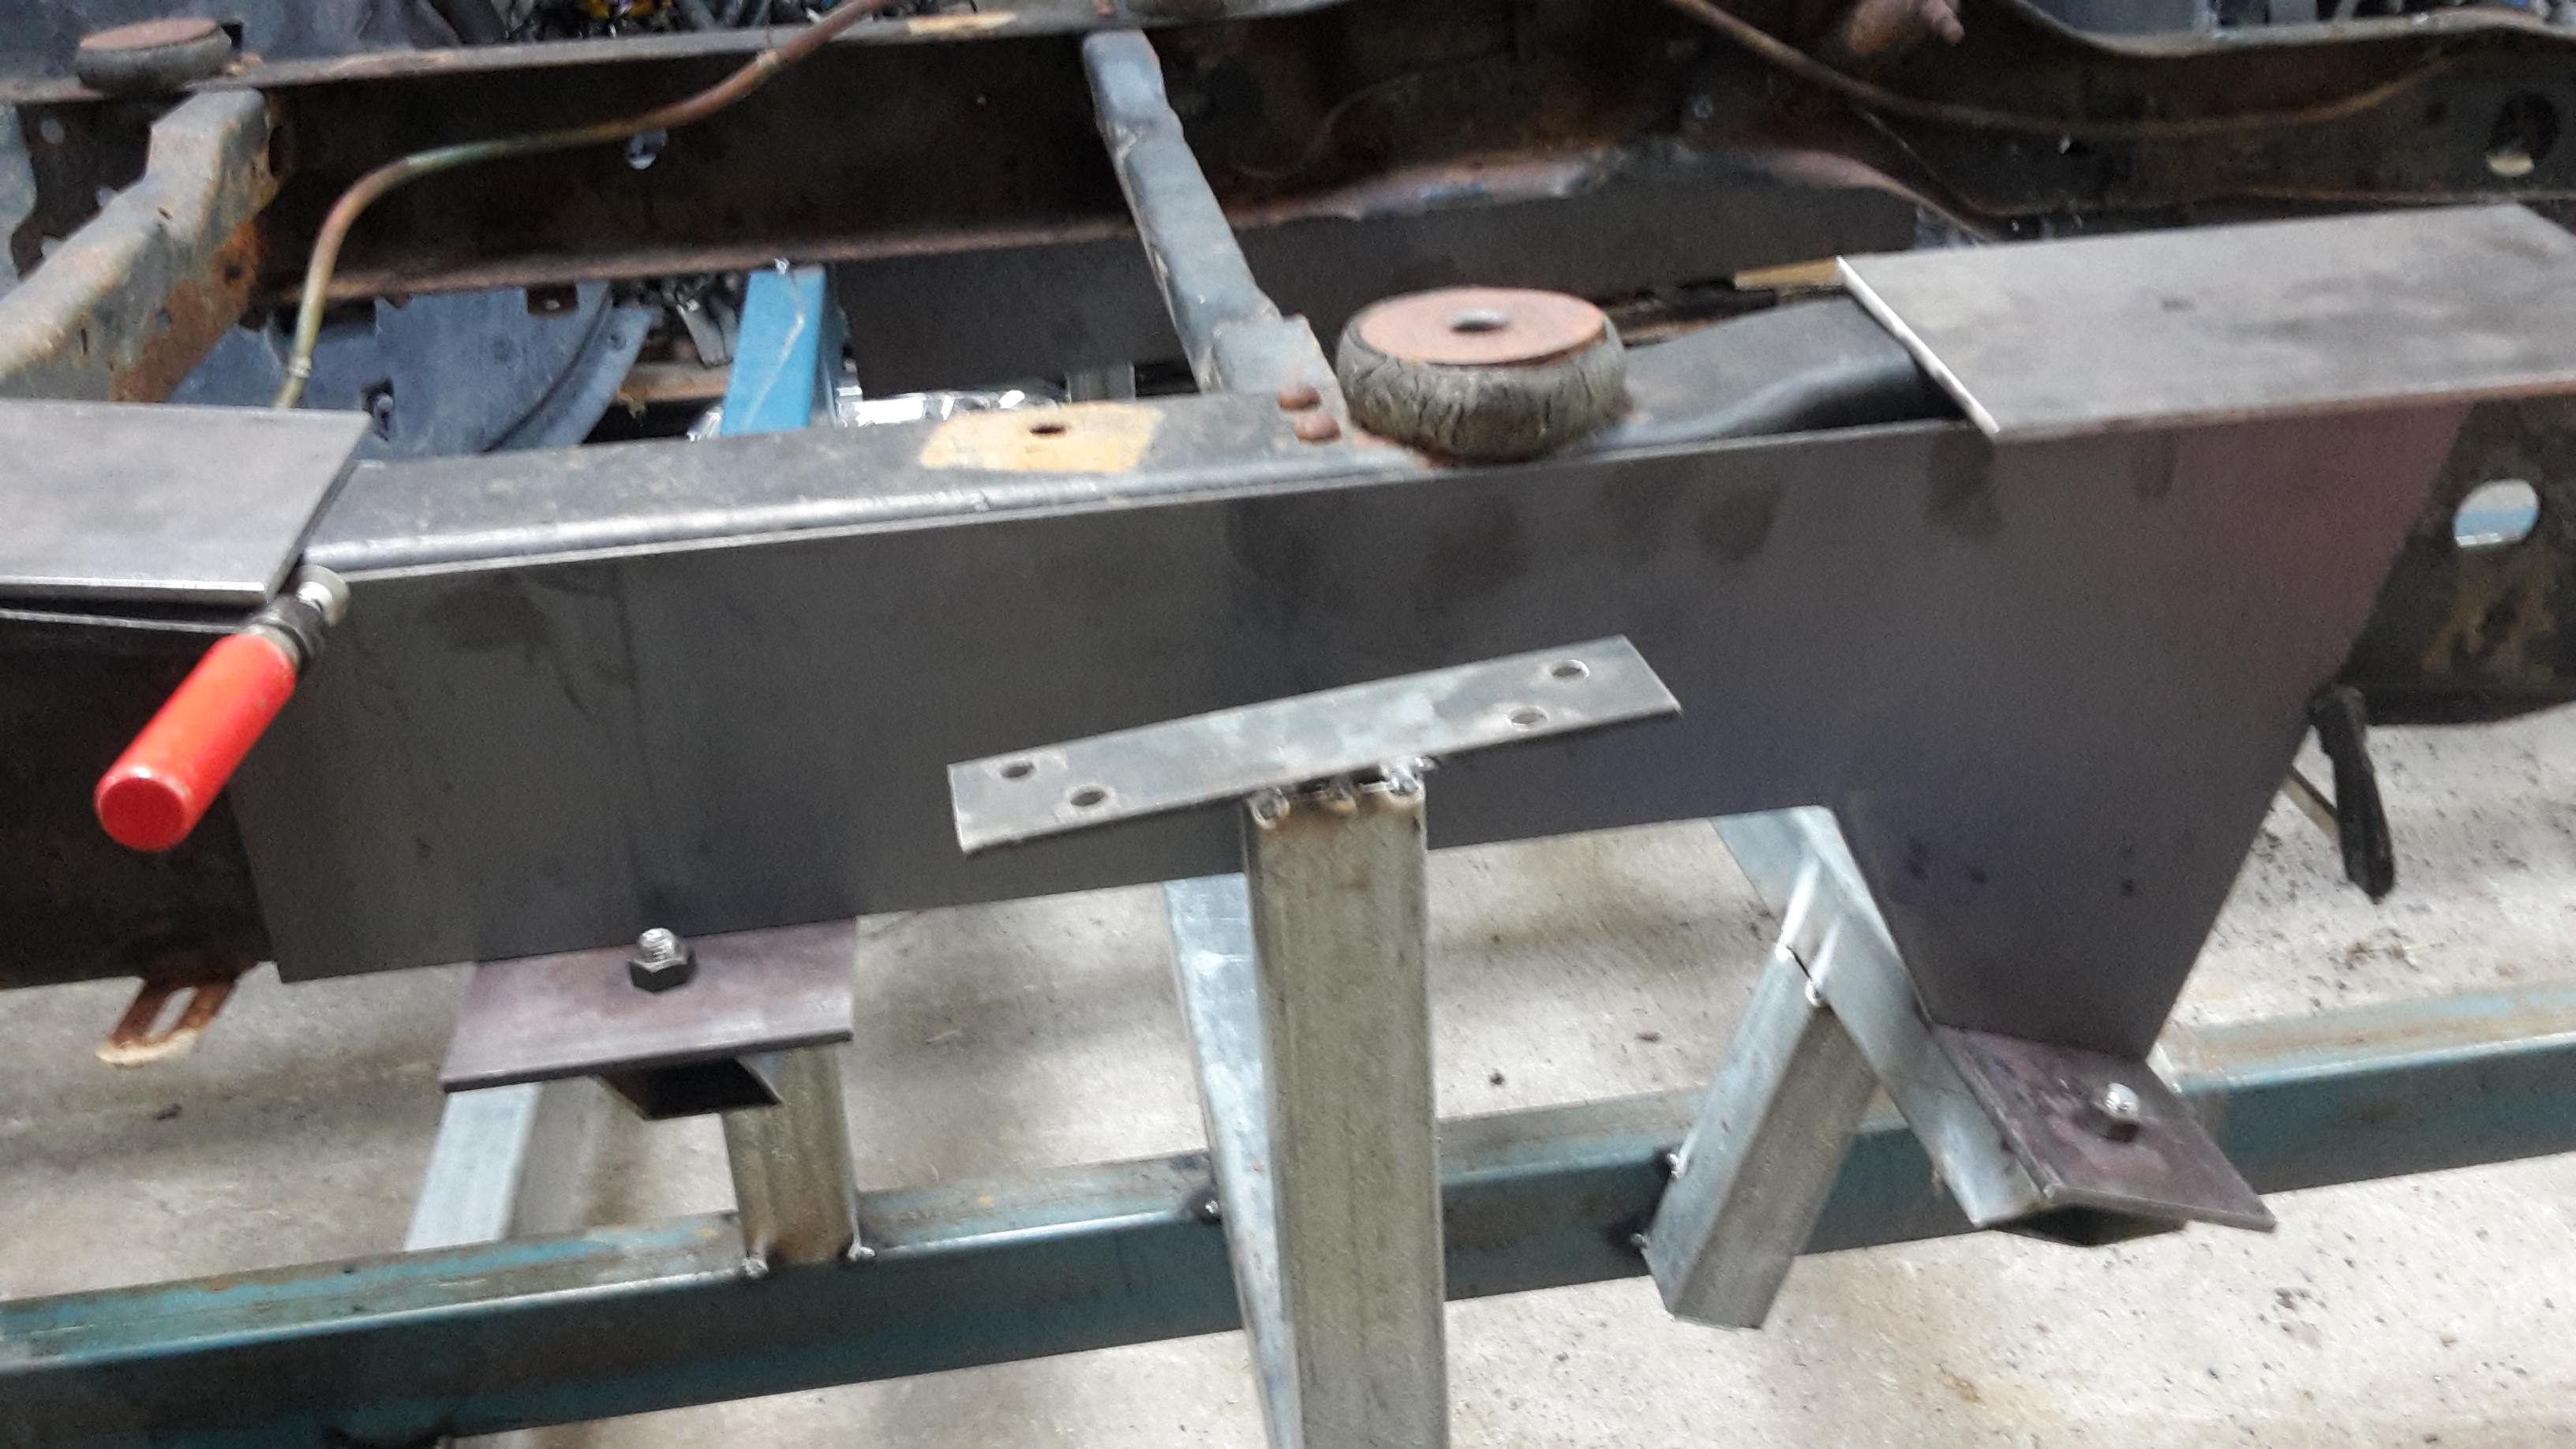
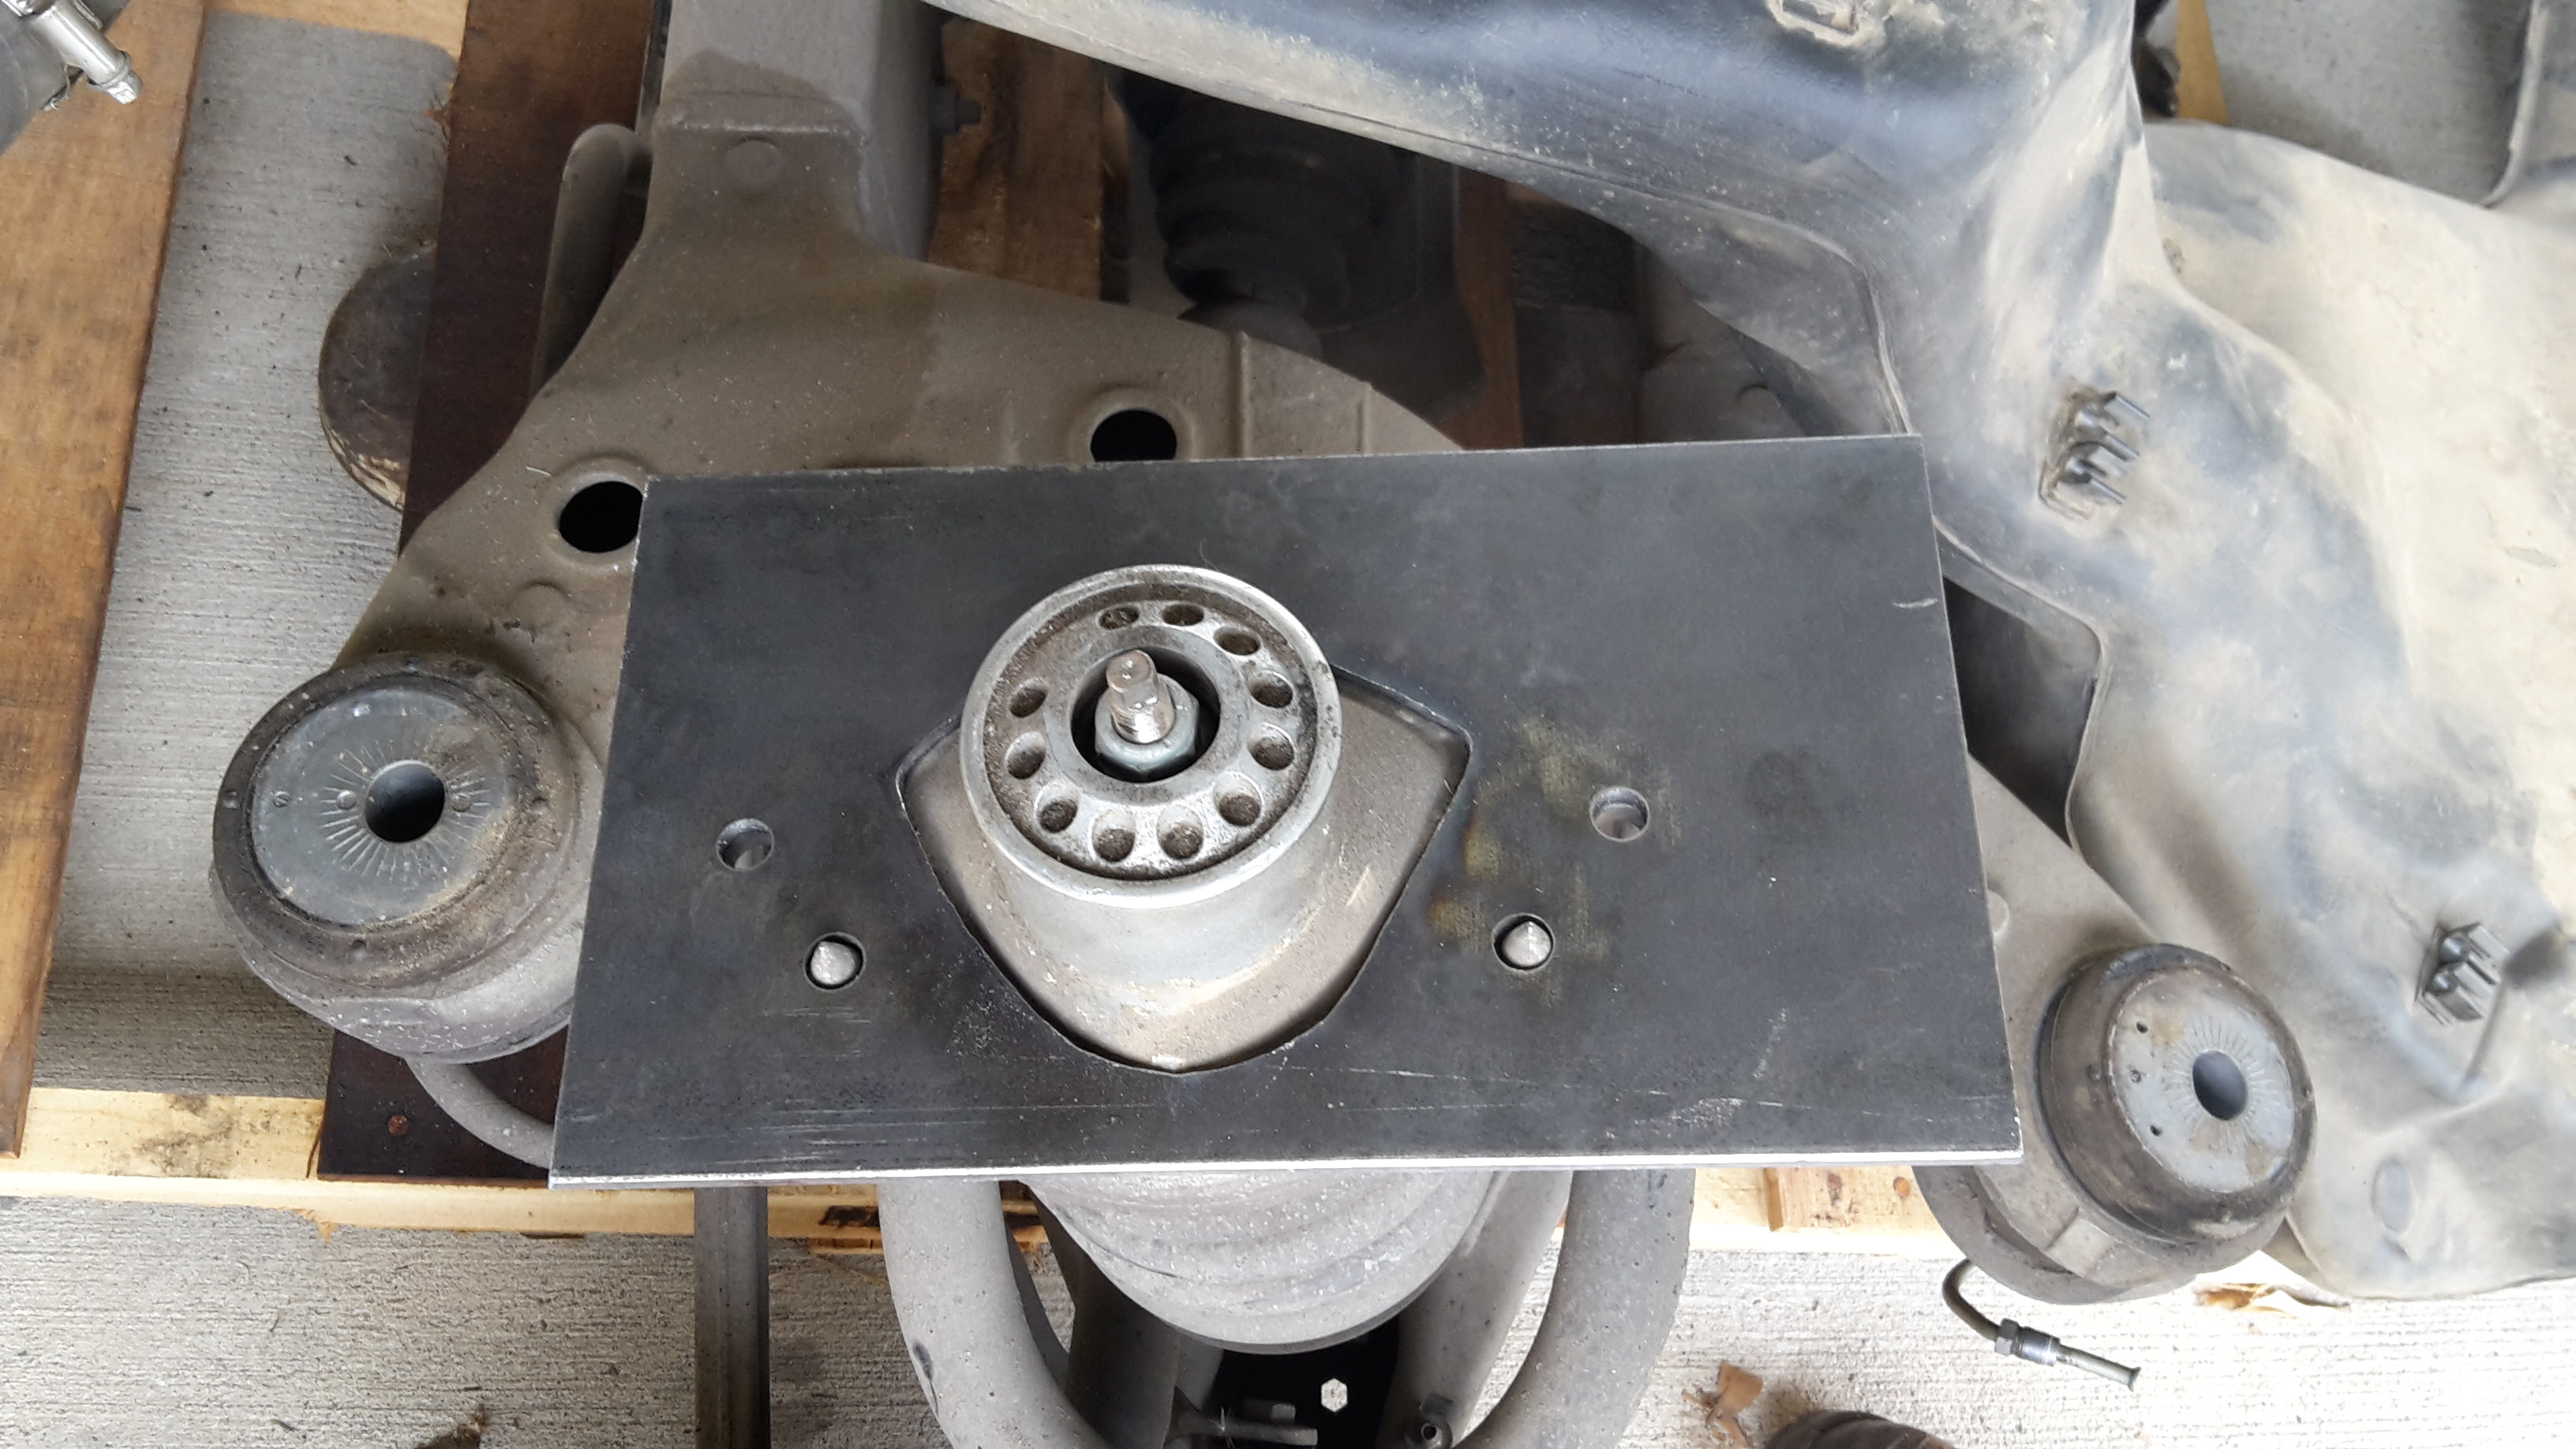
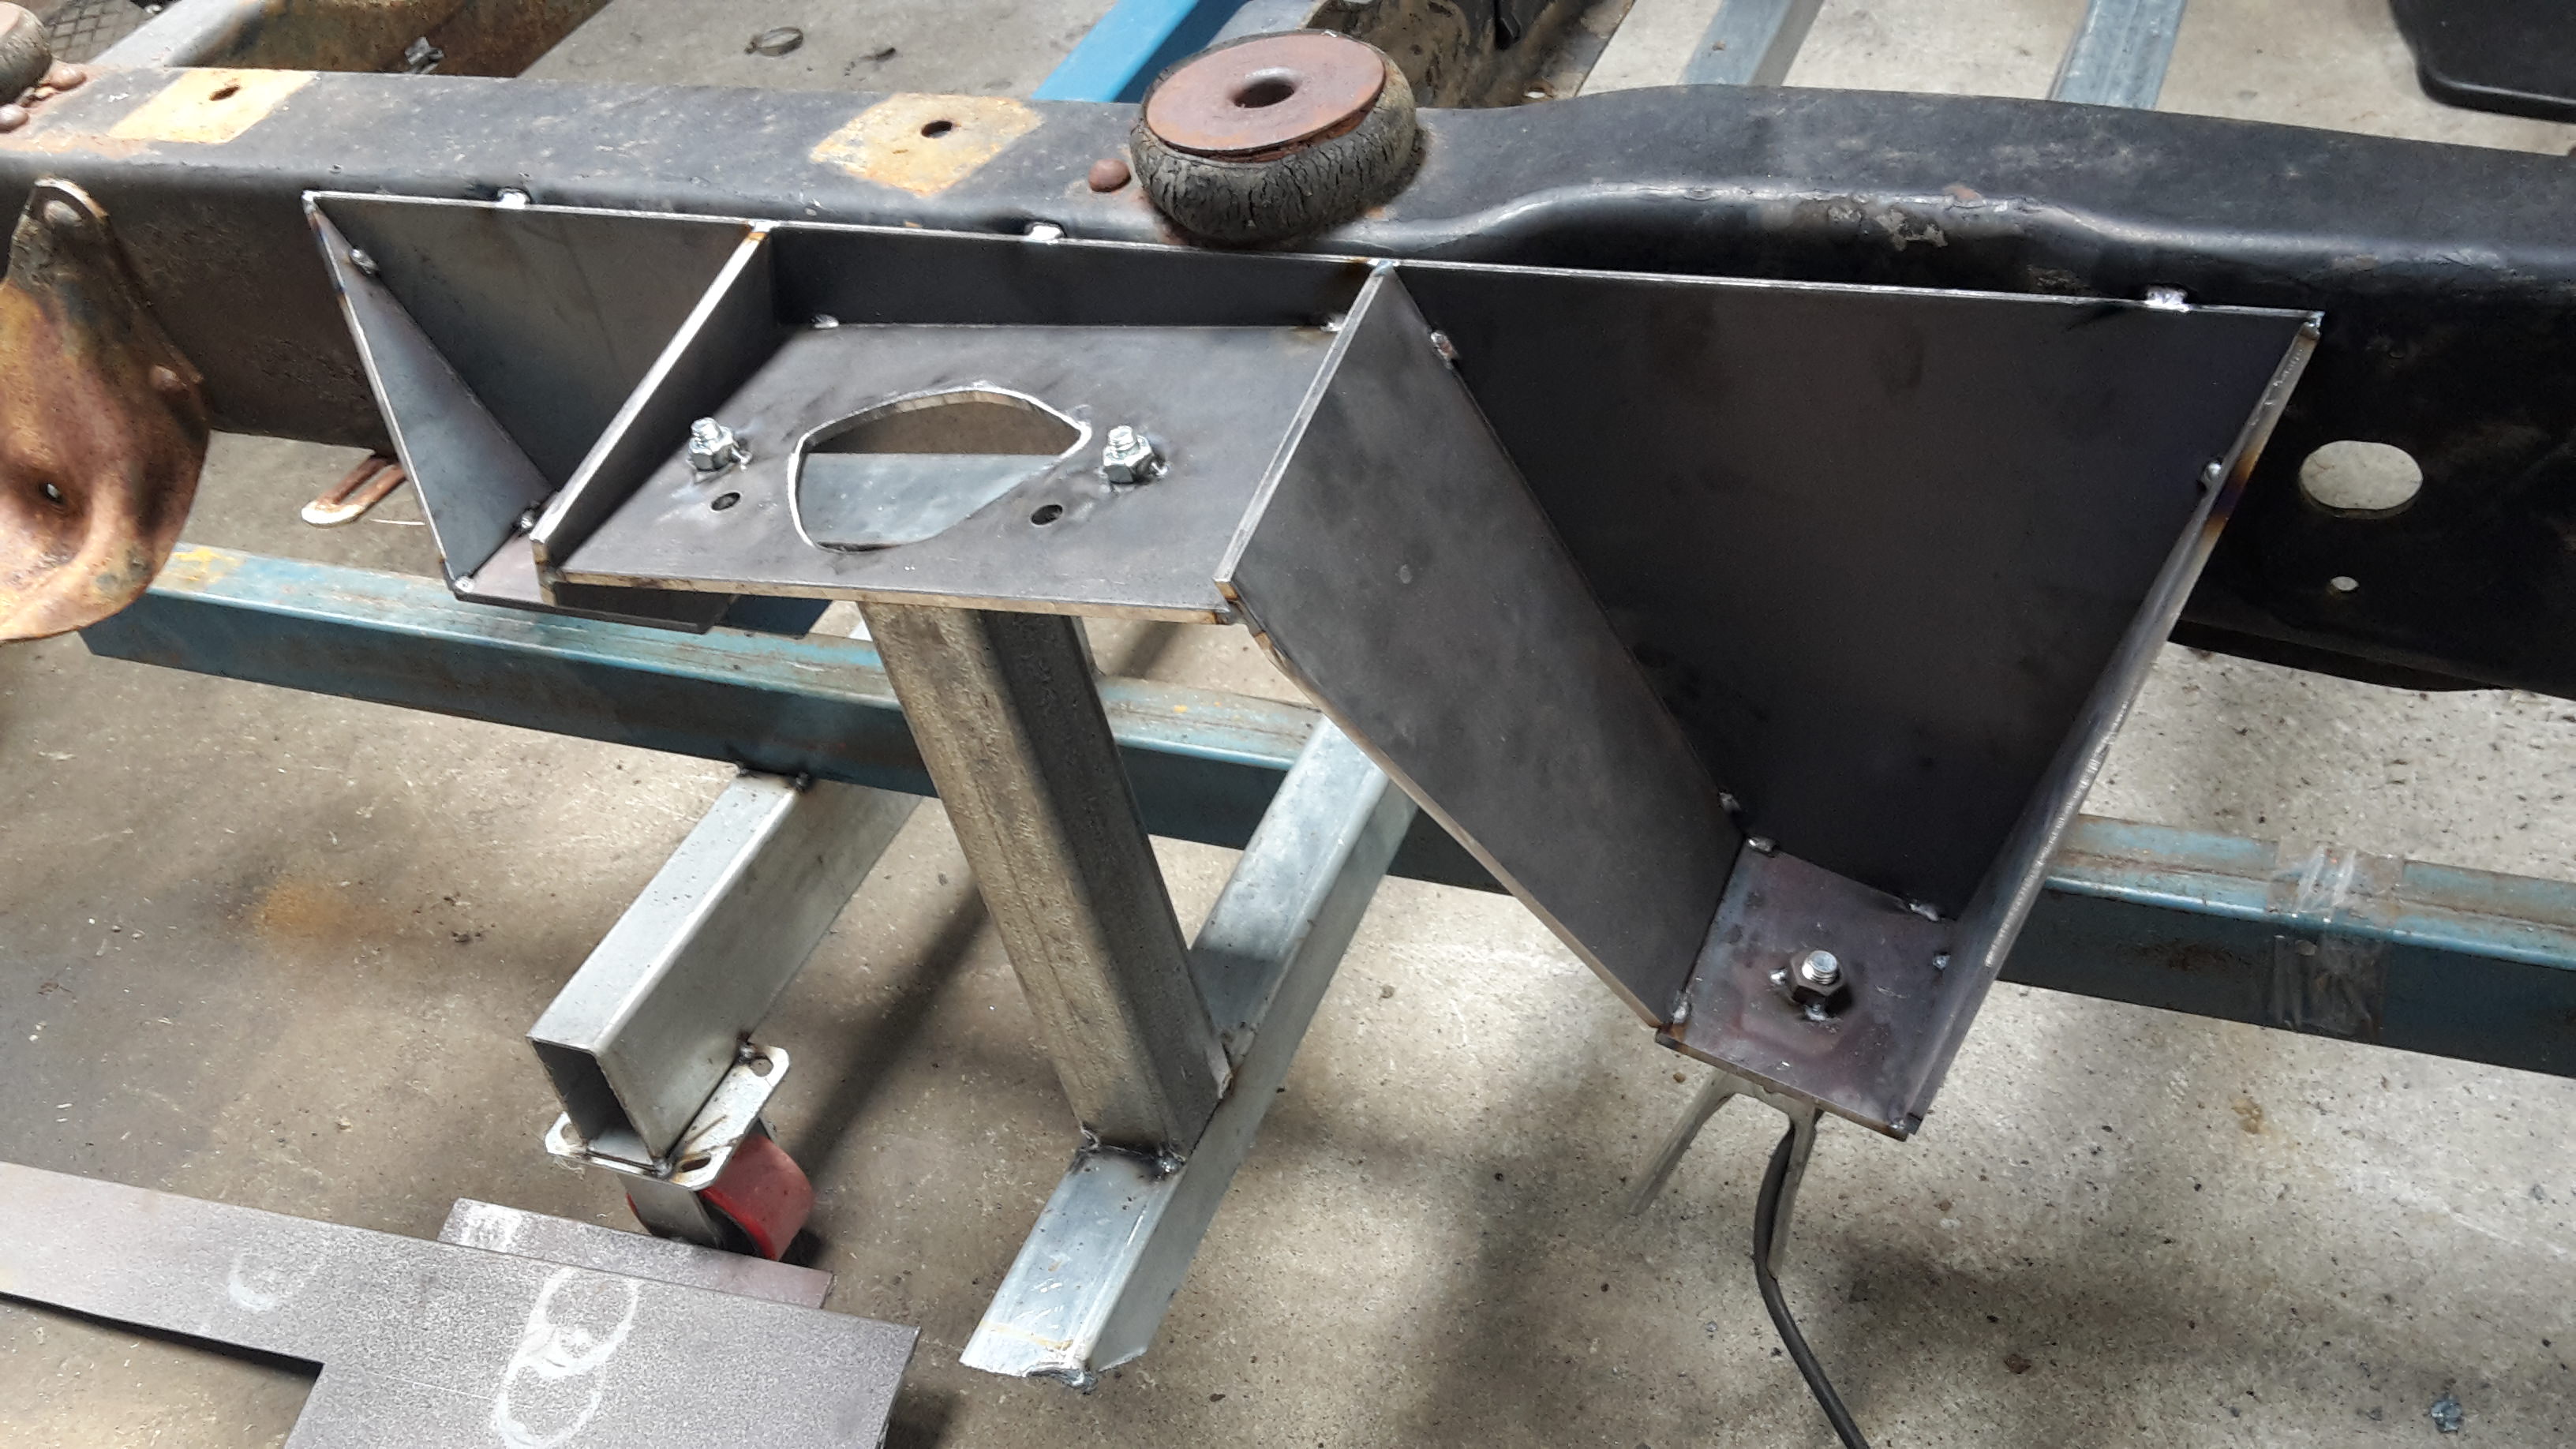
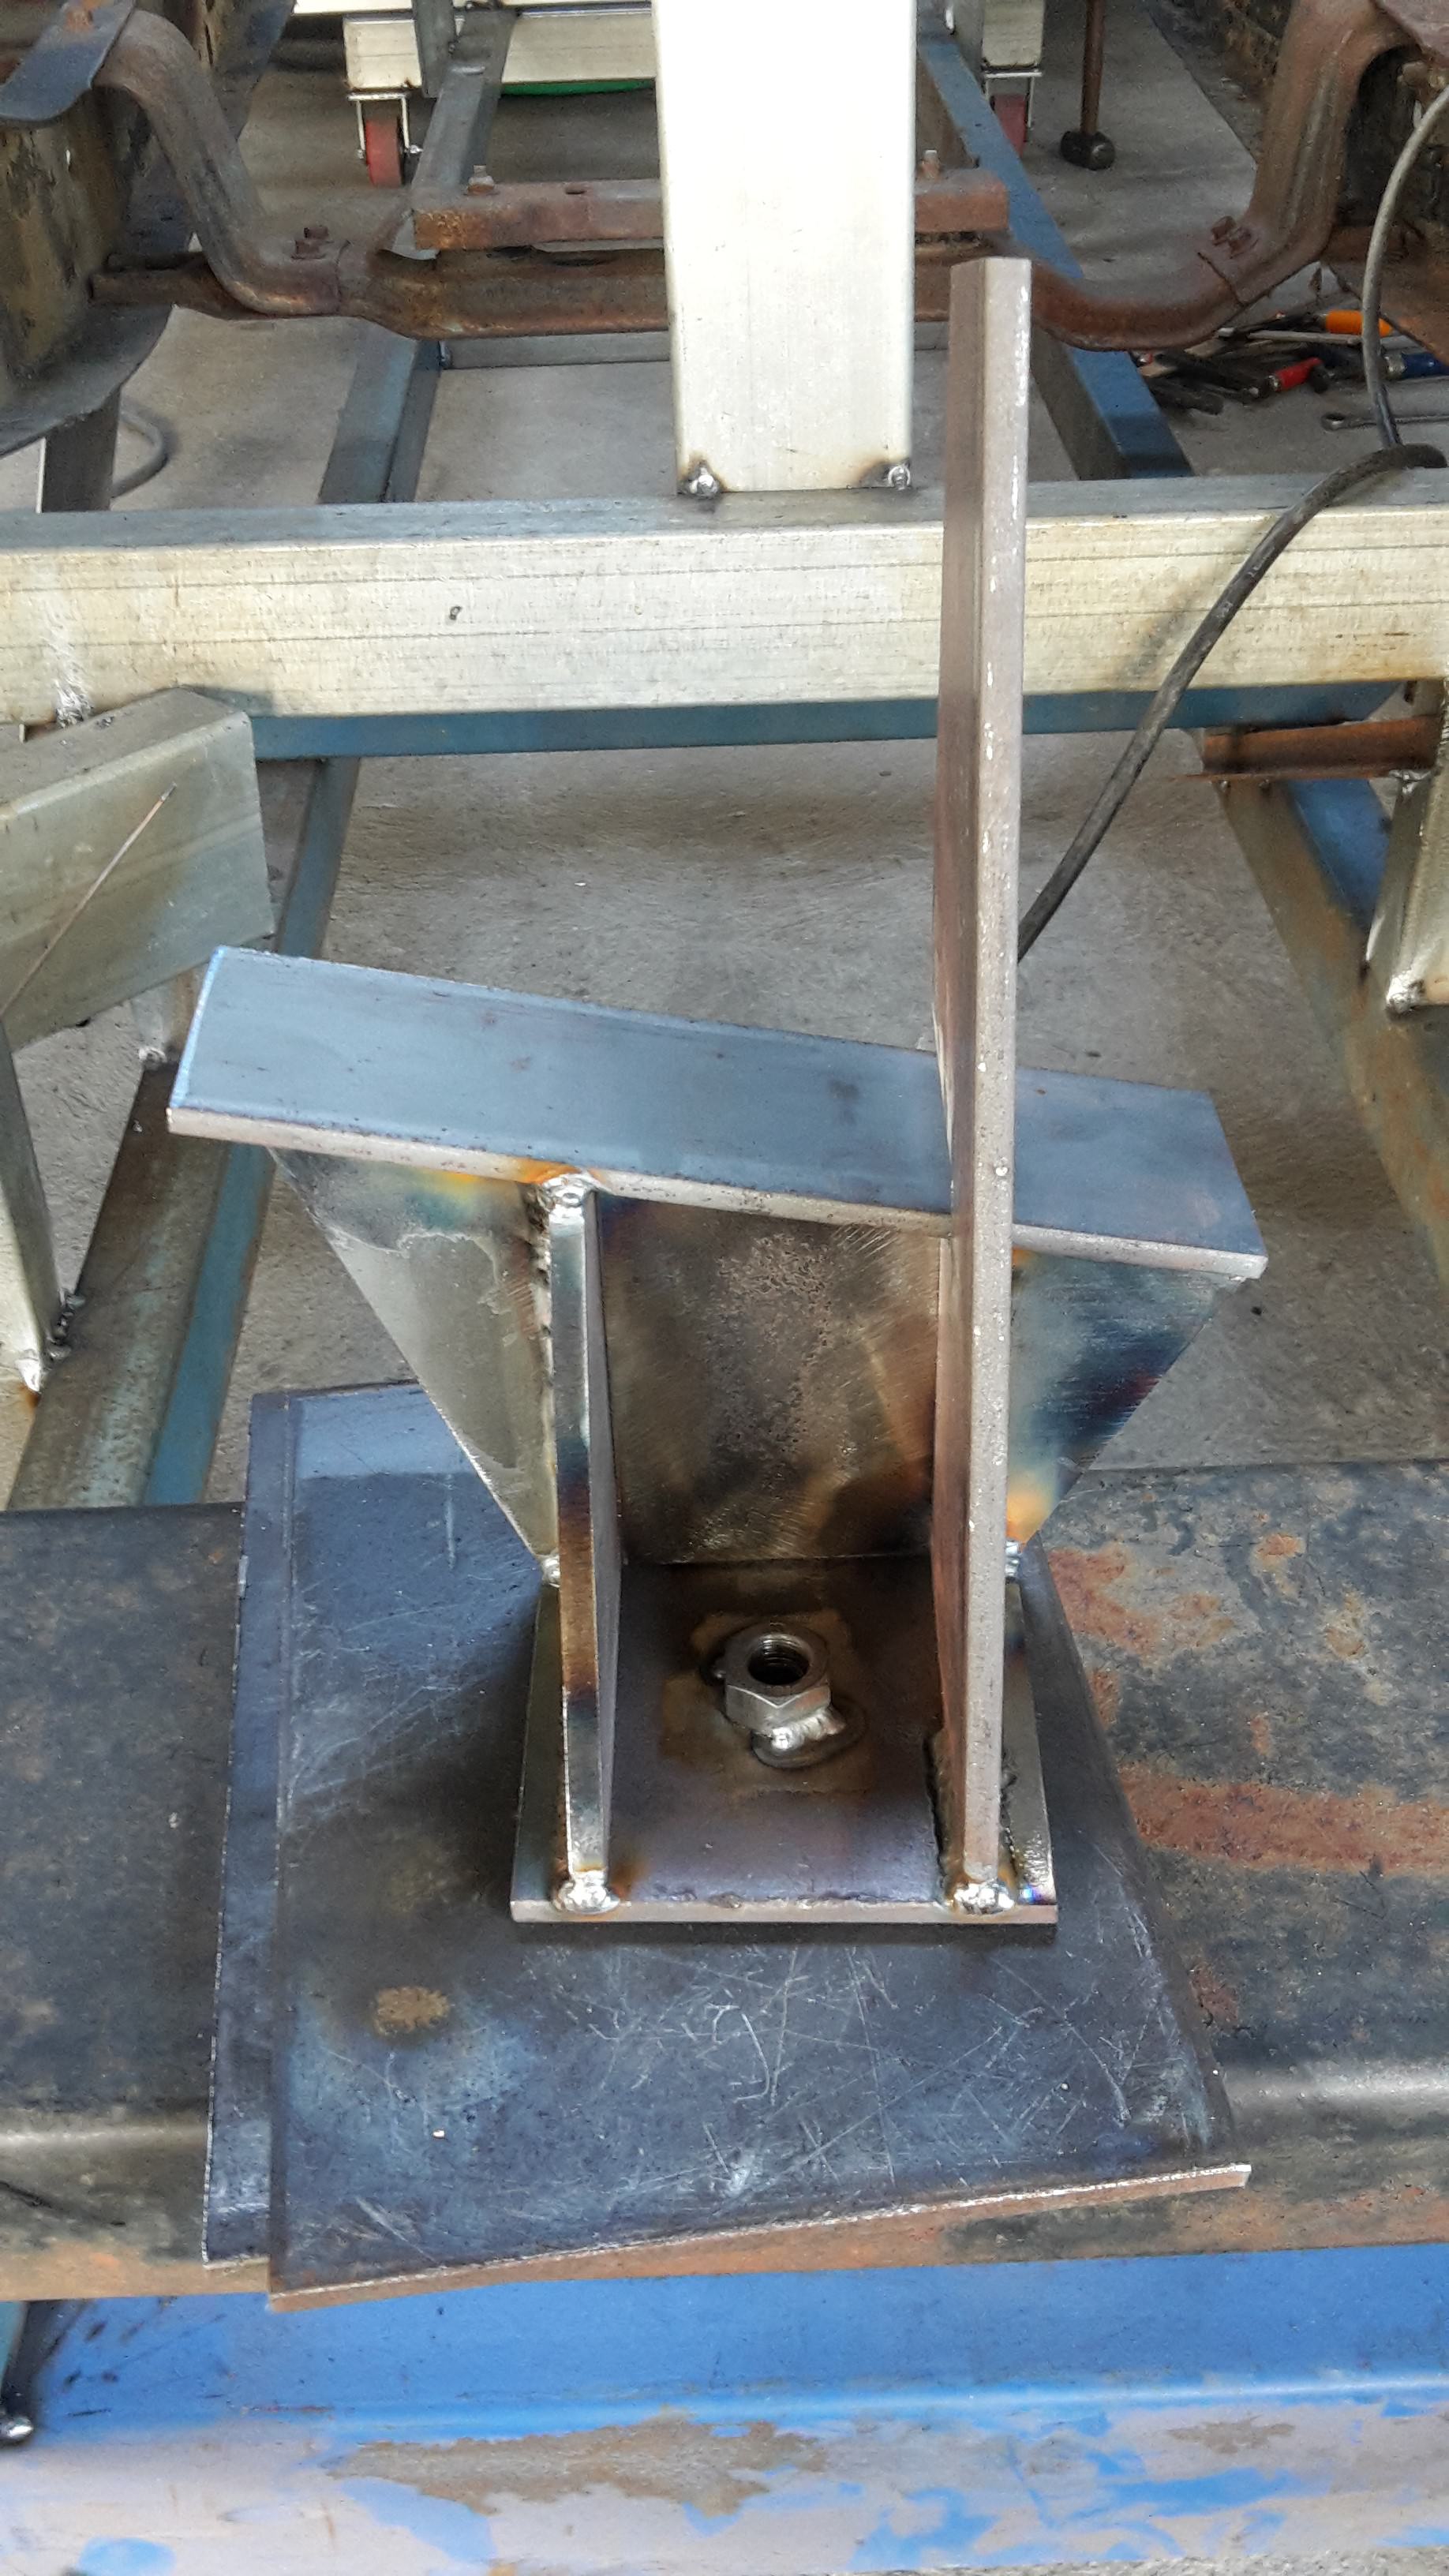
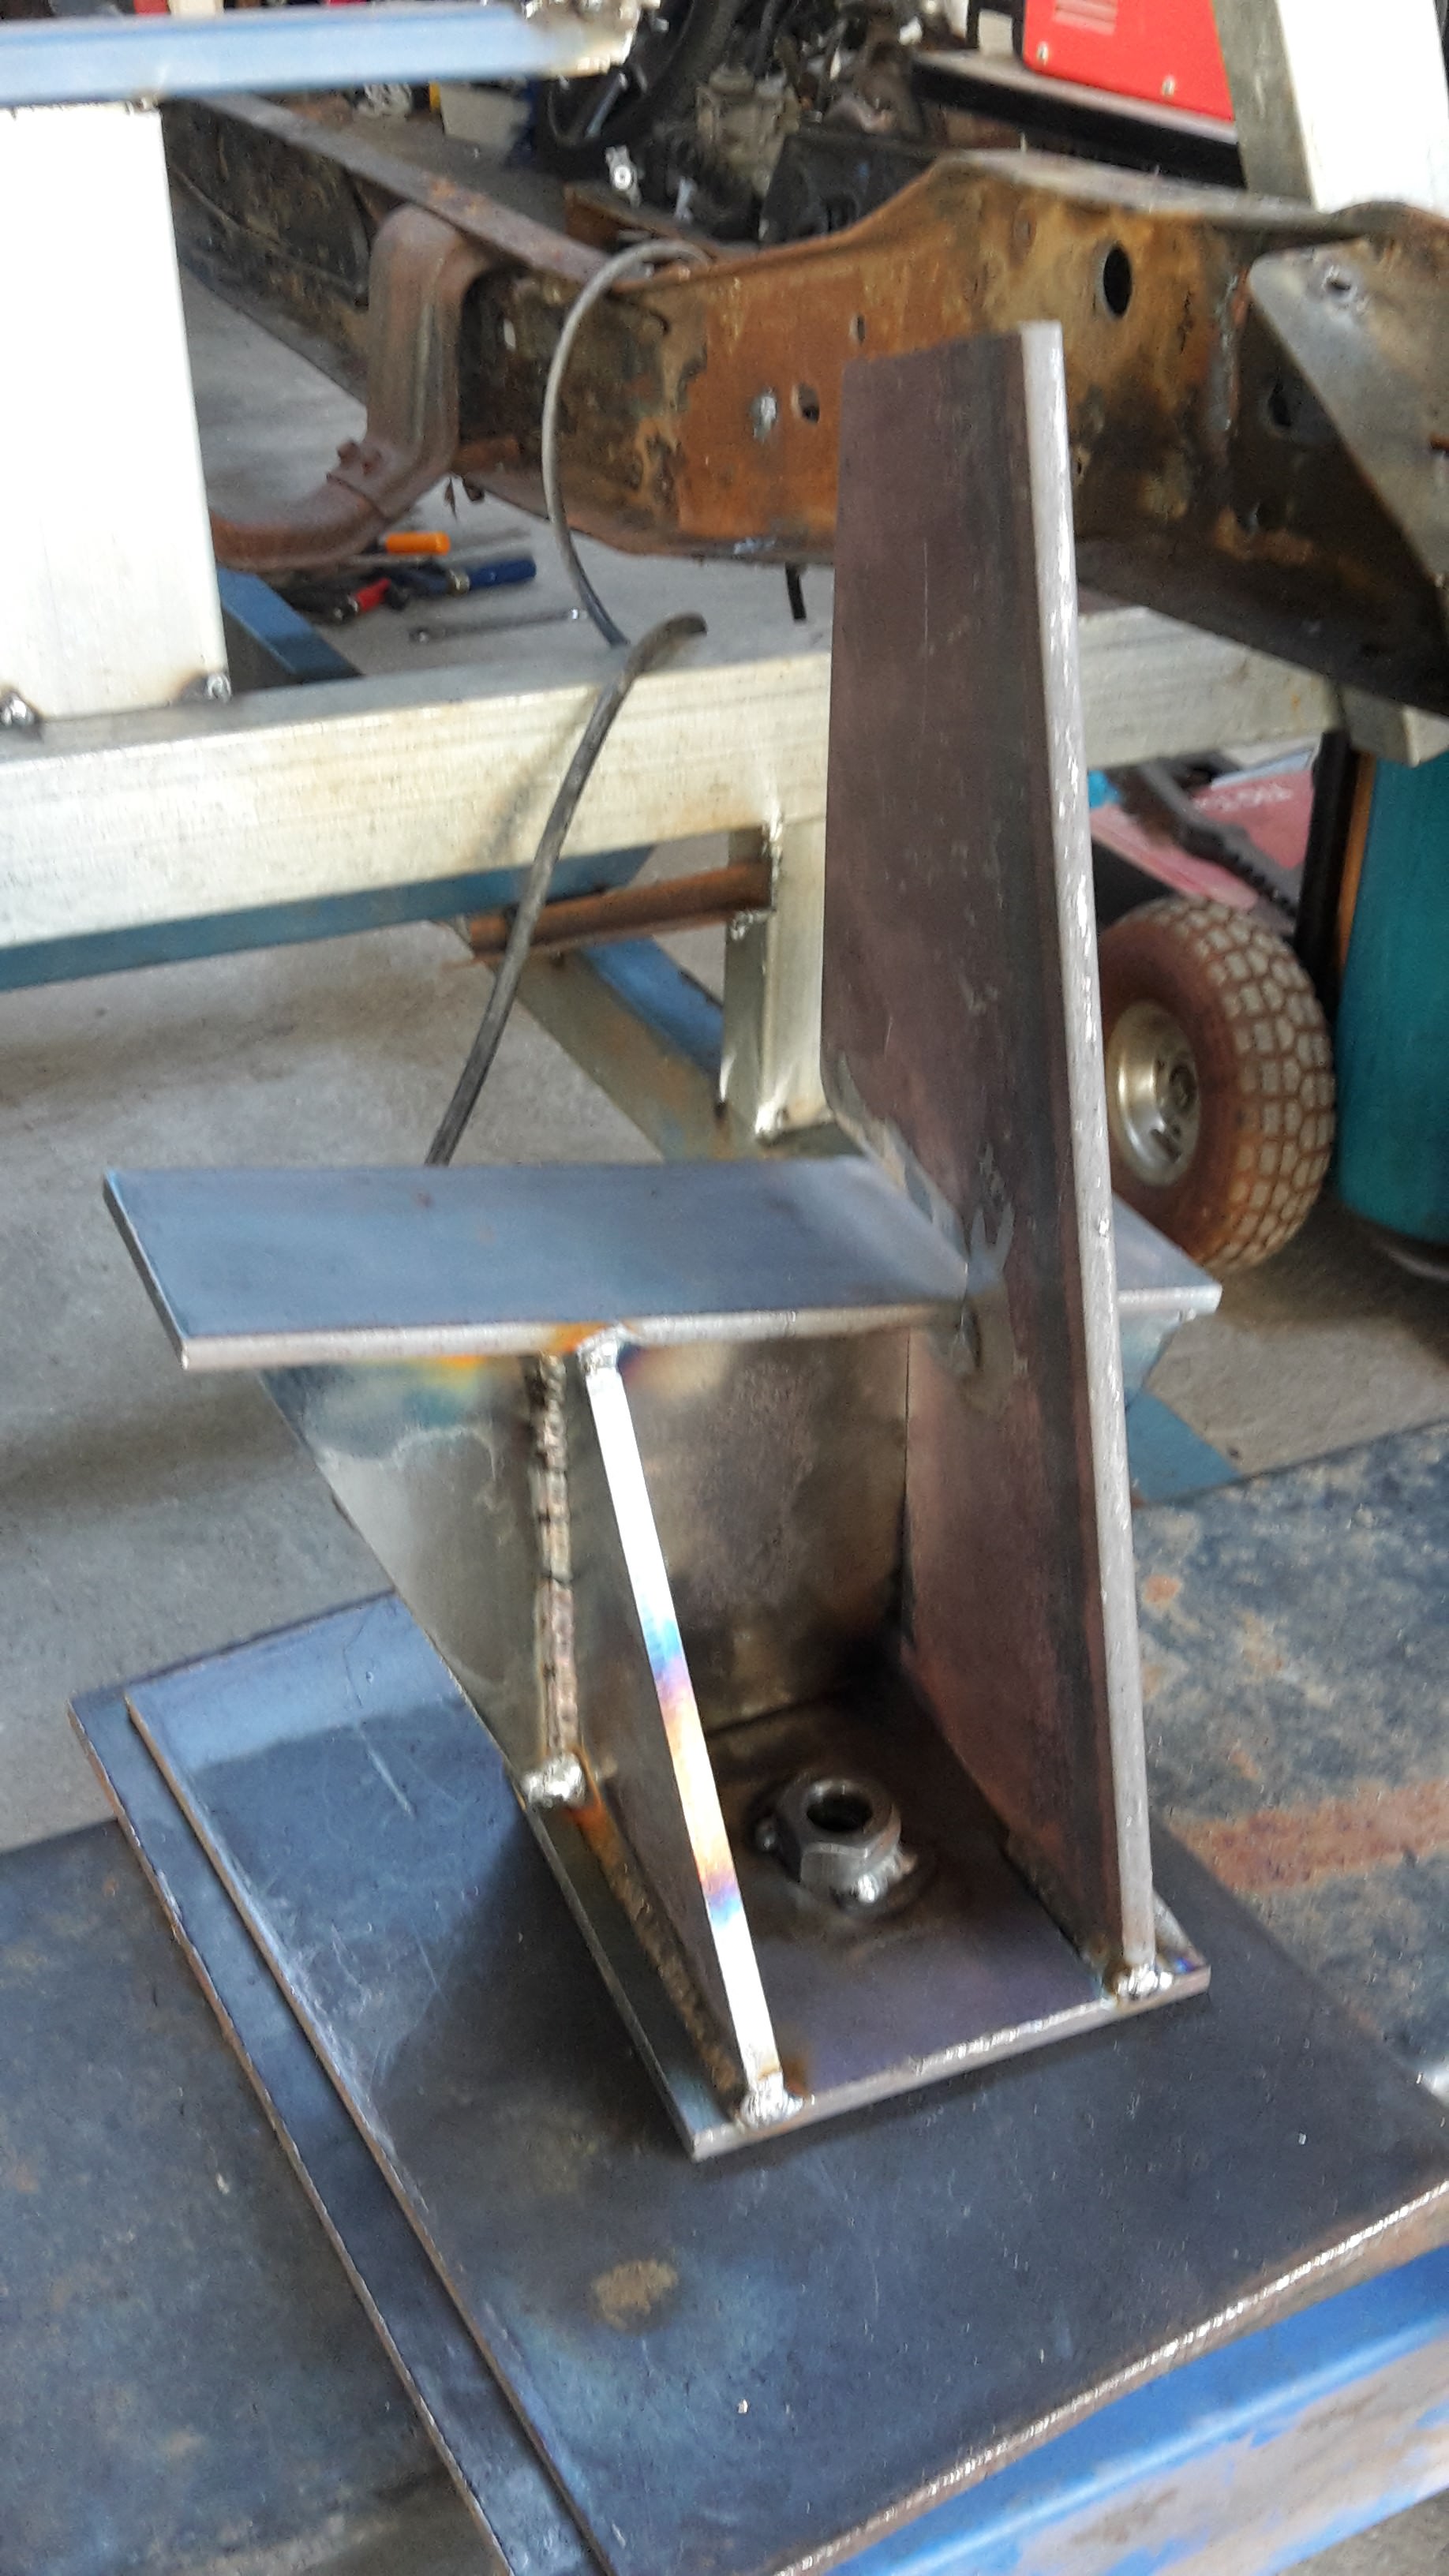
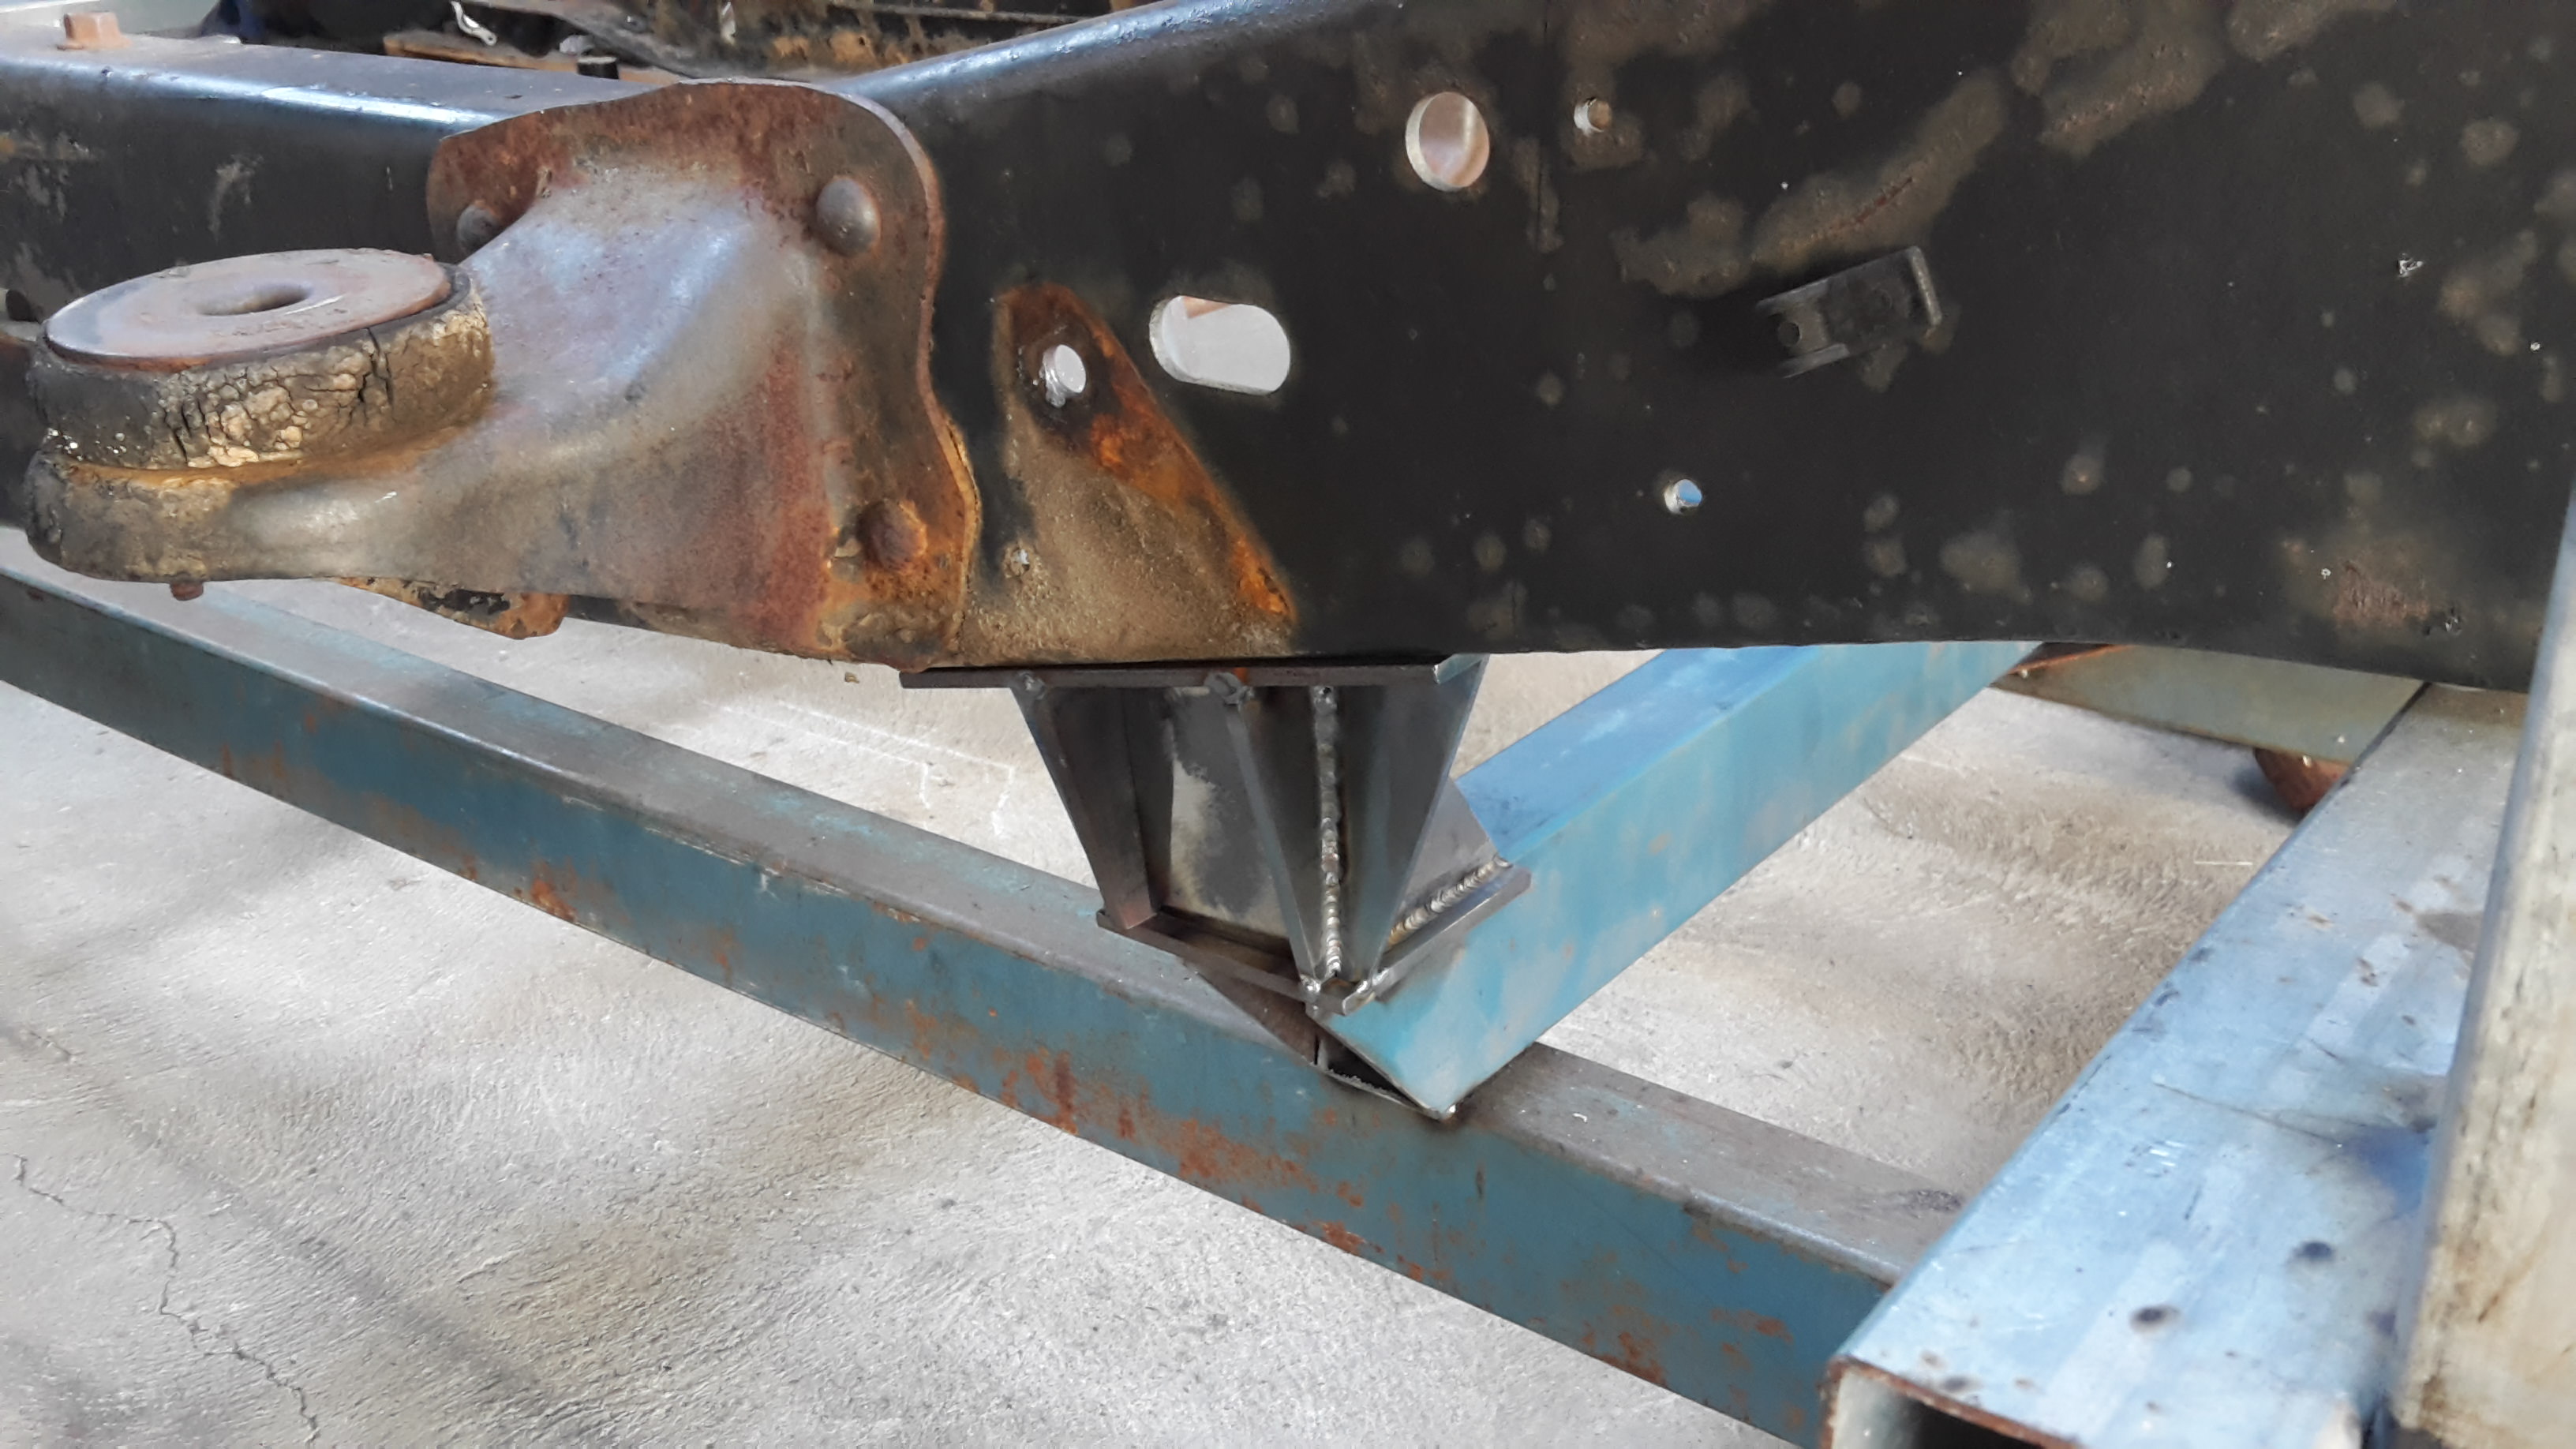
This is where I am up to as of now. I cut most of the pieces out for this side of the diff mount yesterday. I cut out the clearance for the shock top this morning and have tacked it all together. There will be more gussets on the other/under side but I need to mount the fuel tank first as I think it will be close for clearance.
11-29-2017 #53
Registered User
- Join Date
- Dec 2013
- Location
- Down Under
- Posts
- 18
I havent done a build thread, I should I suppose....
Got pleany of pics,...
Was thinking about a Gen1 Camaro footbrake for E Brake,,..mounts up under dash
This ones really only gonna be a parts hauler n cruiser,,,mY 69 Camaro is the muscle
11-29-2017 #54
Registered User
- Join Date
- Dec 2014
- Posts
- 188
I'm not too familiar with Camaro's. I'm thinking it might be similar to the set-up in my 69 Mustang?
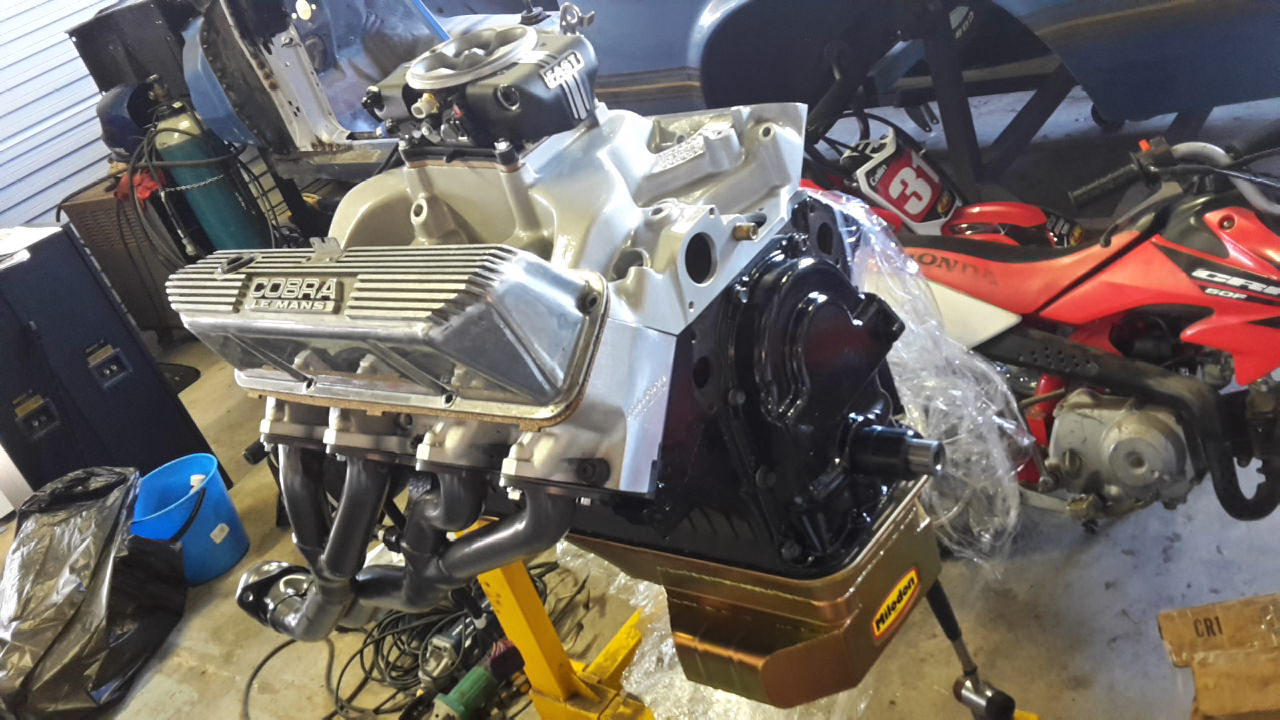
I like that, keep your 69 as the tough one to drive. This is the muscle I've built/building for my 69. Stroked 462ci Cobra Jet.
11-29-2017 #55
Registered User
- Join Date
- Dec 2014
- Posts
- 188
I've touched base with the engineer and the 6th of Feb at 10am is the earliest I can see him for him to do an inspection before welding everything up tight. Which gives me plenty of time to turn up to see him with a mocked up assembly on my car trailer.
12-03-2017 #56
Registered User
- Join Date
- Dec 2014
- Posts
- 188
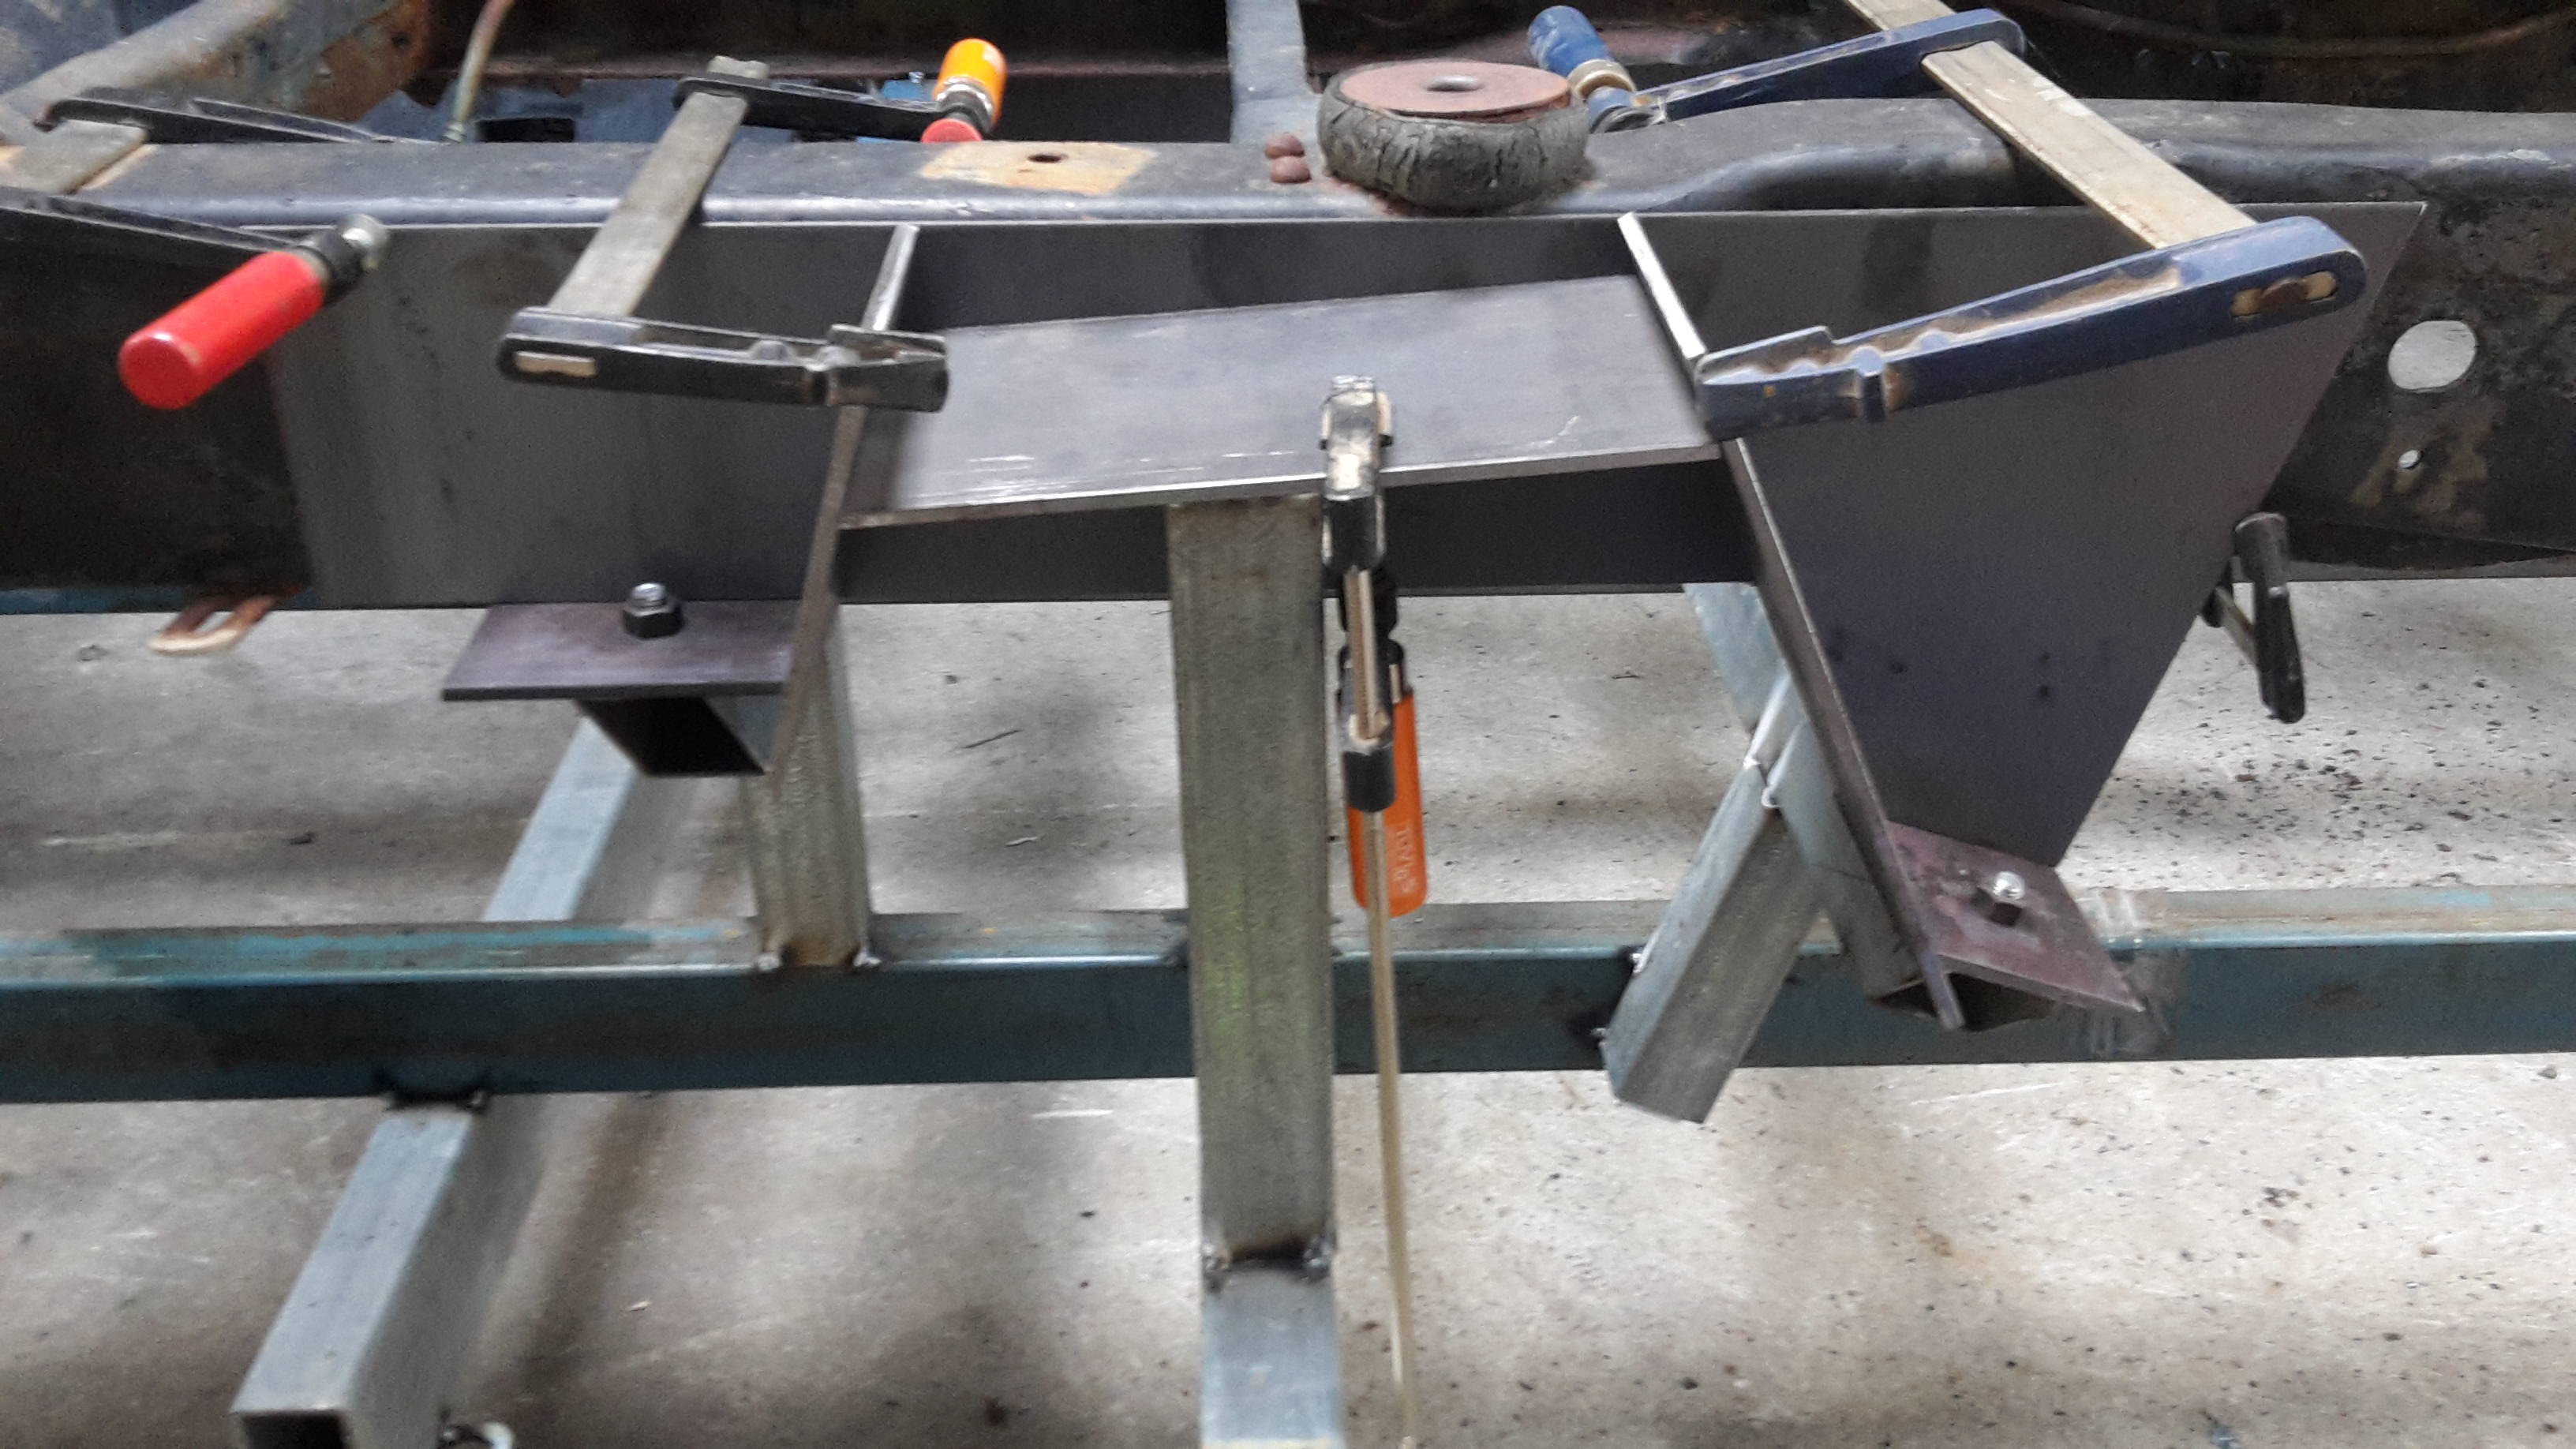
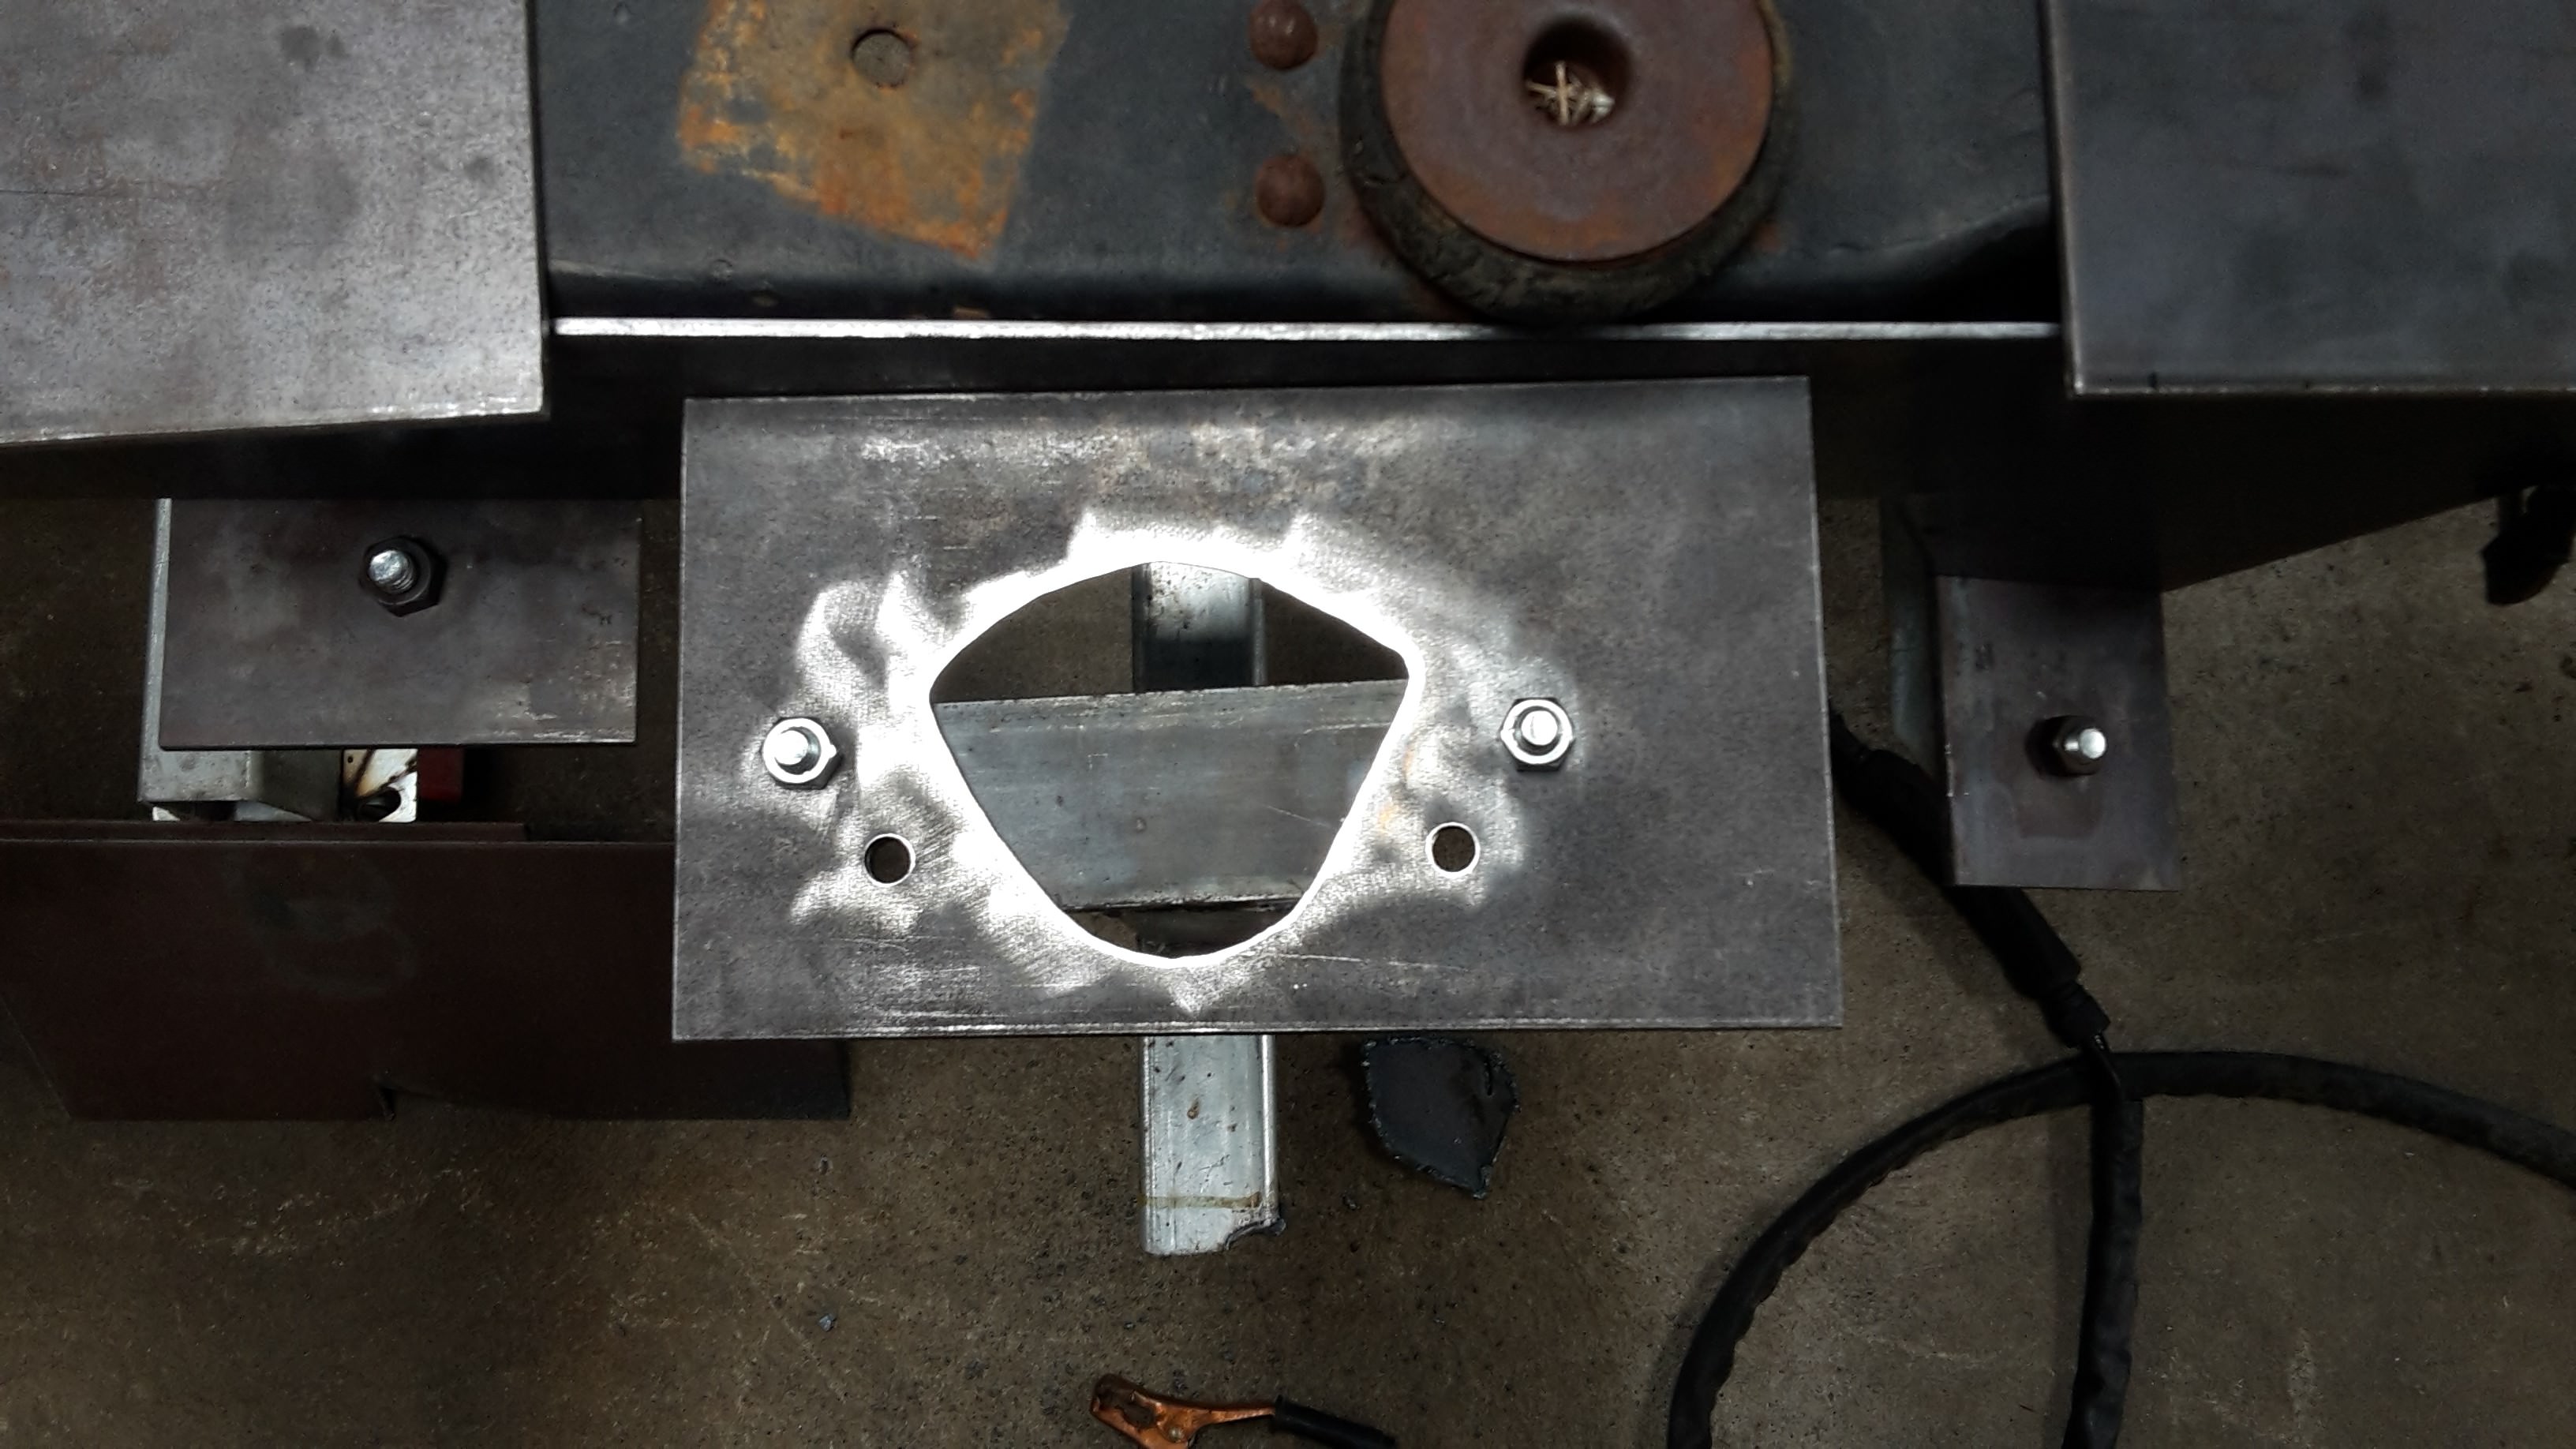
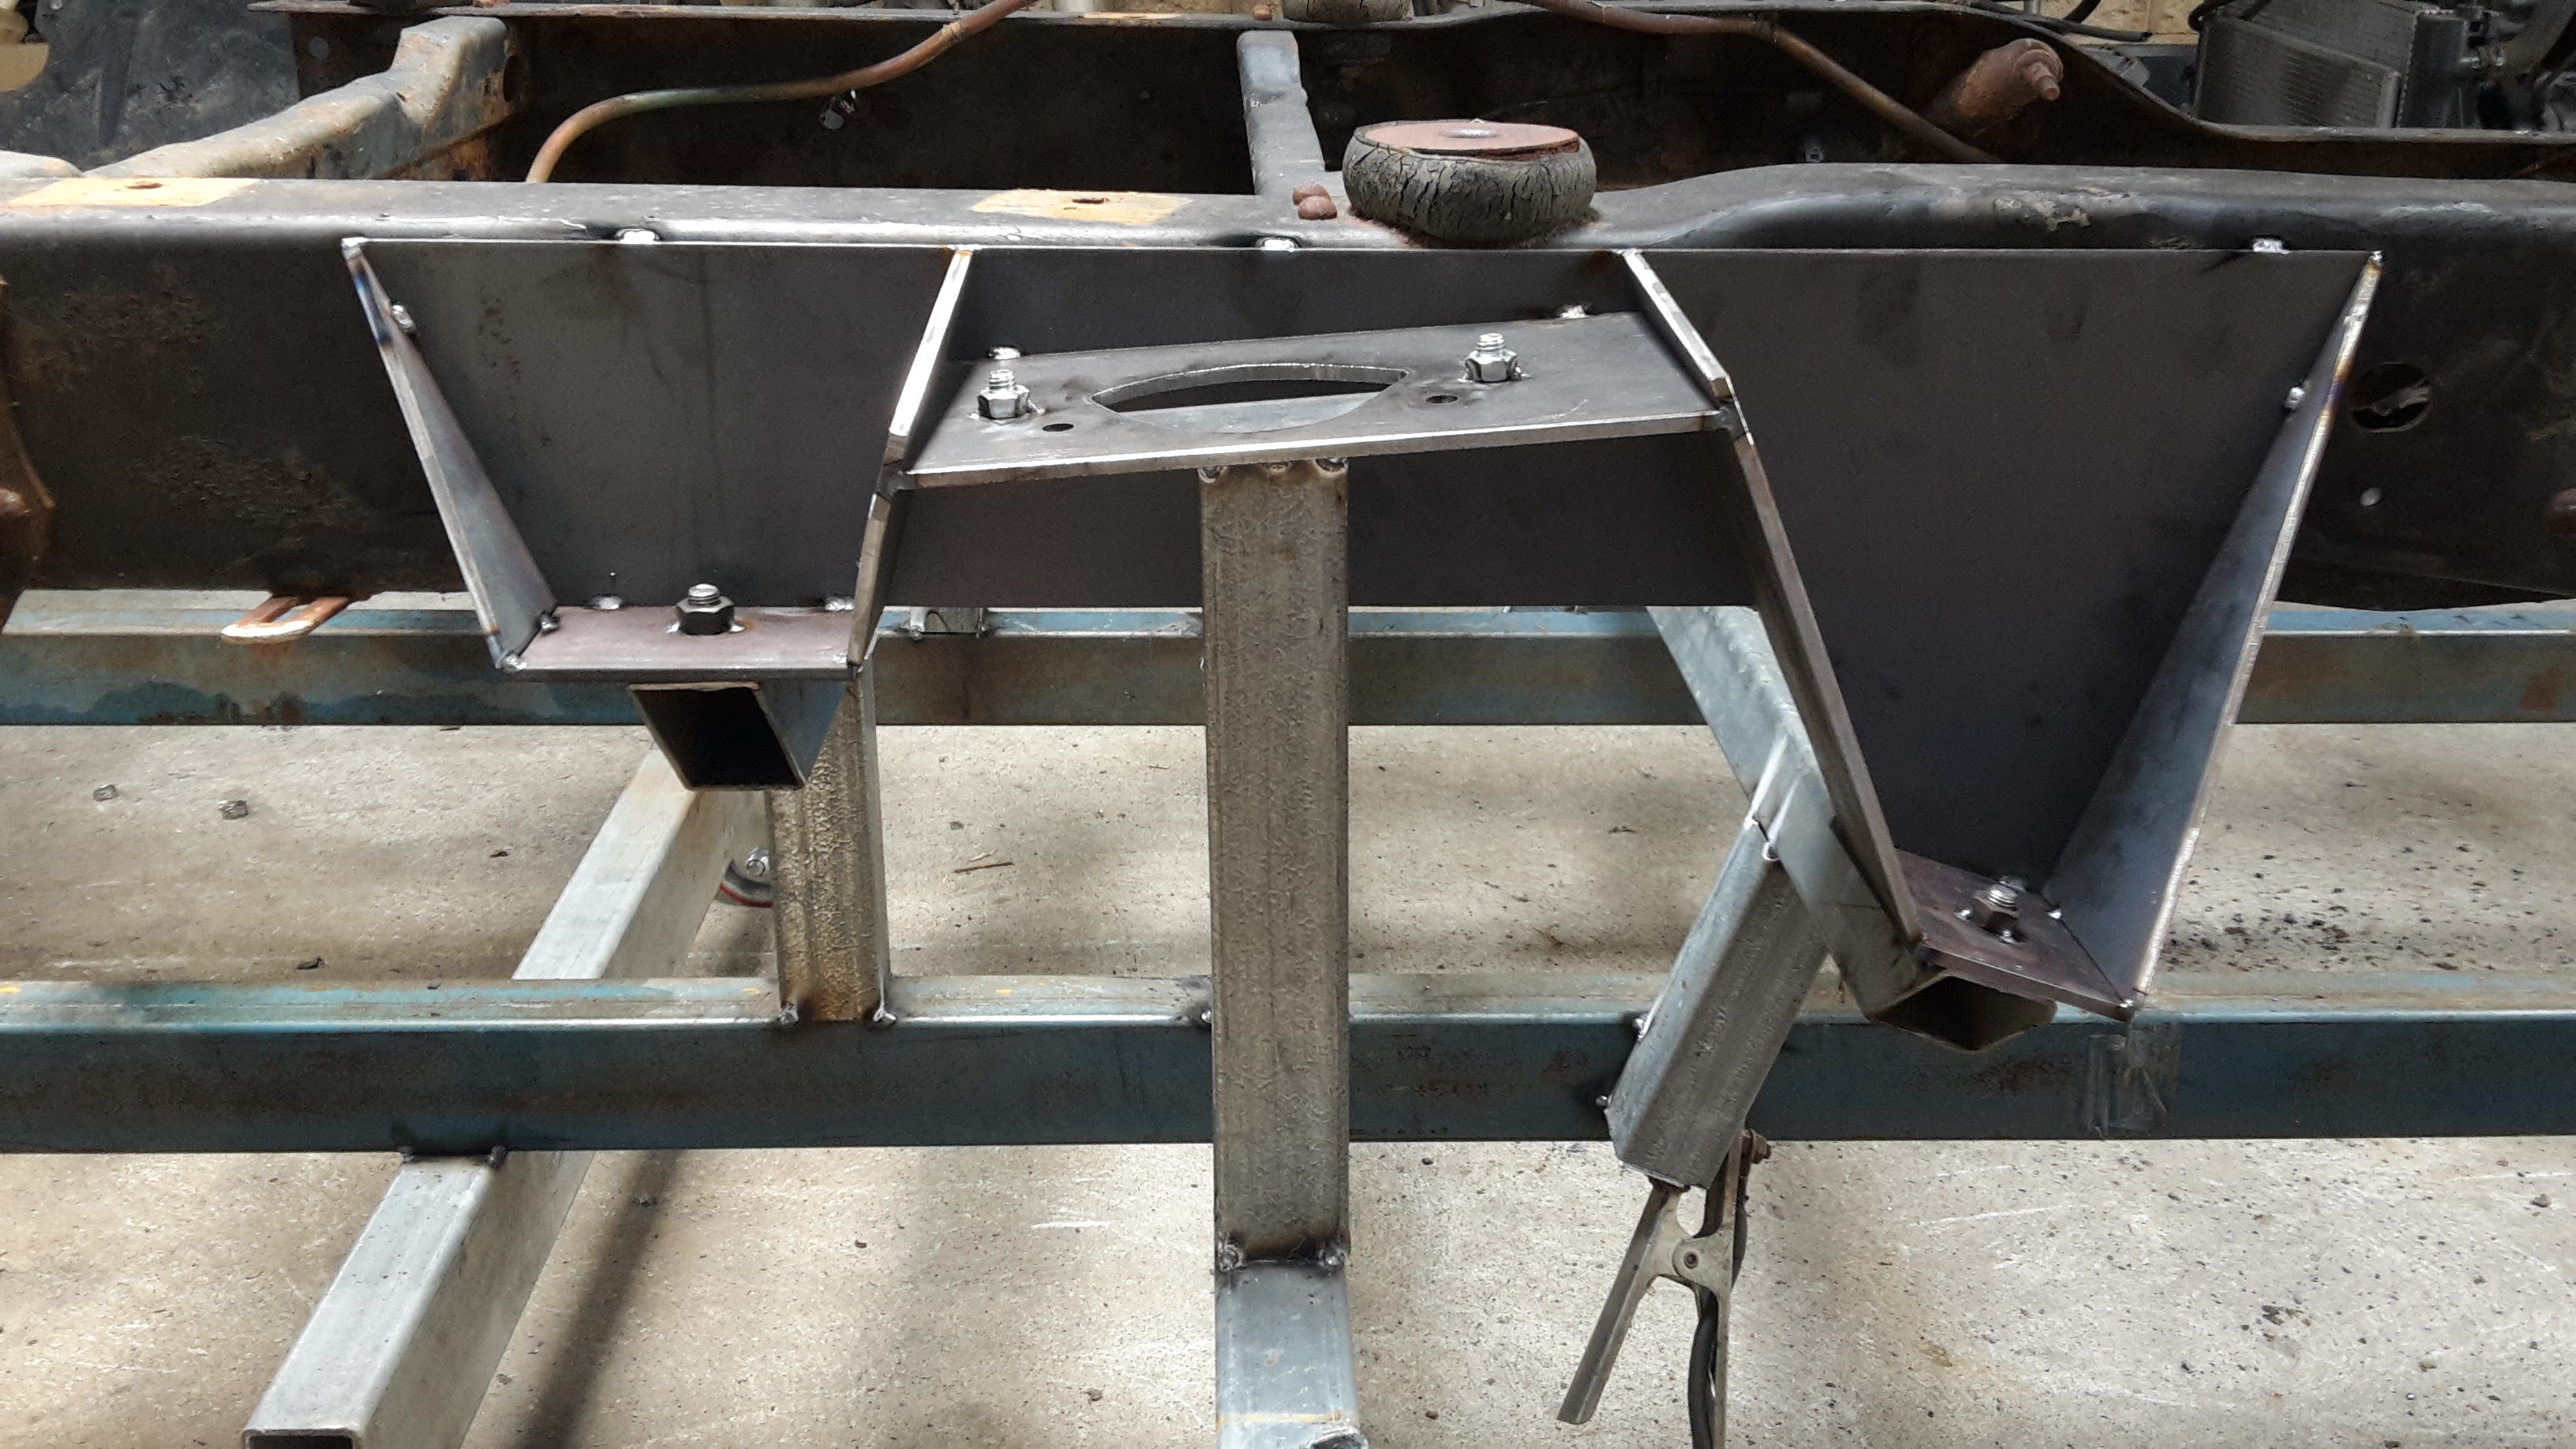
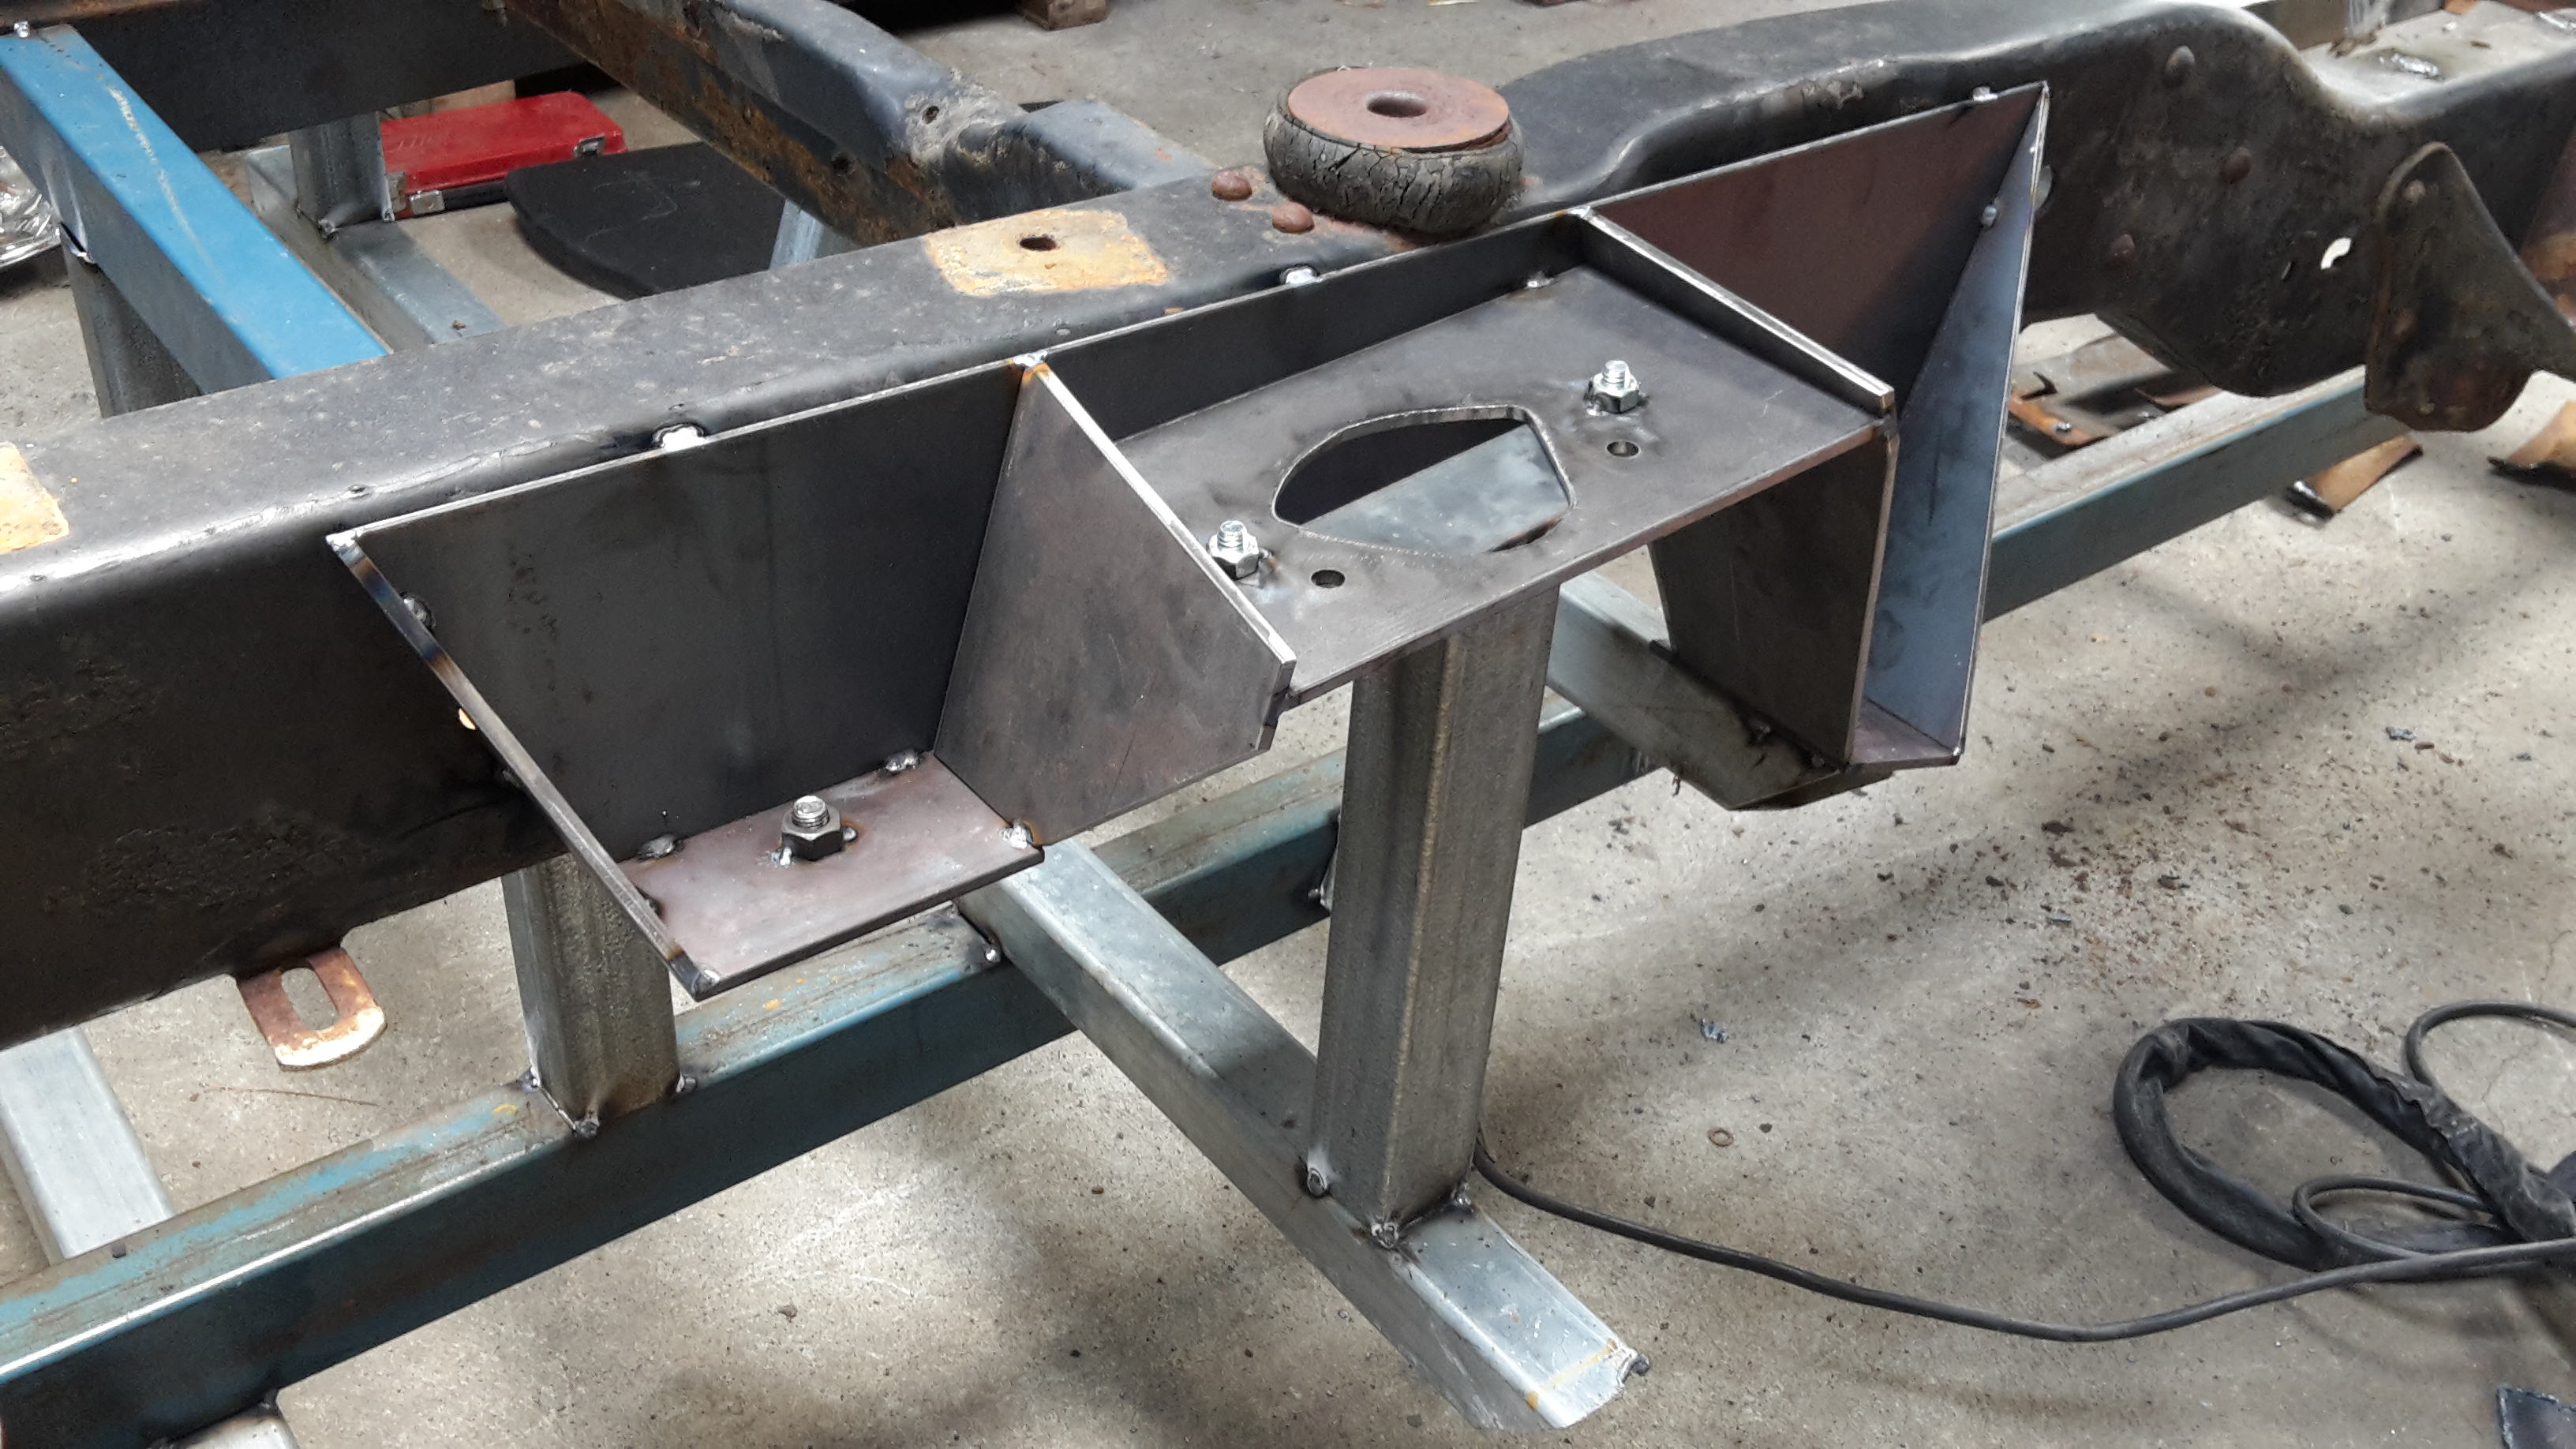
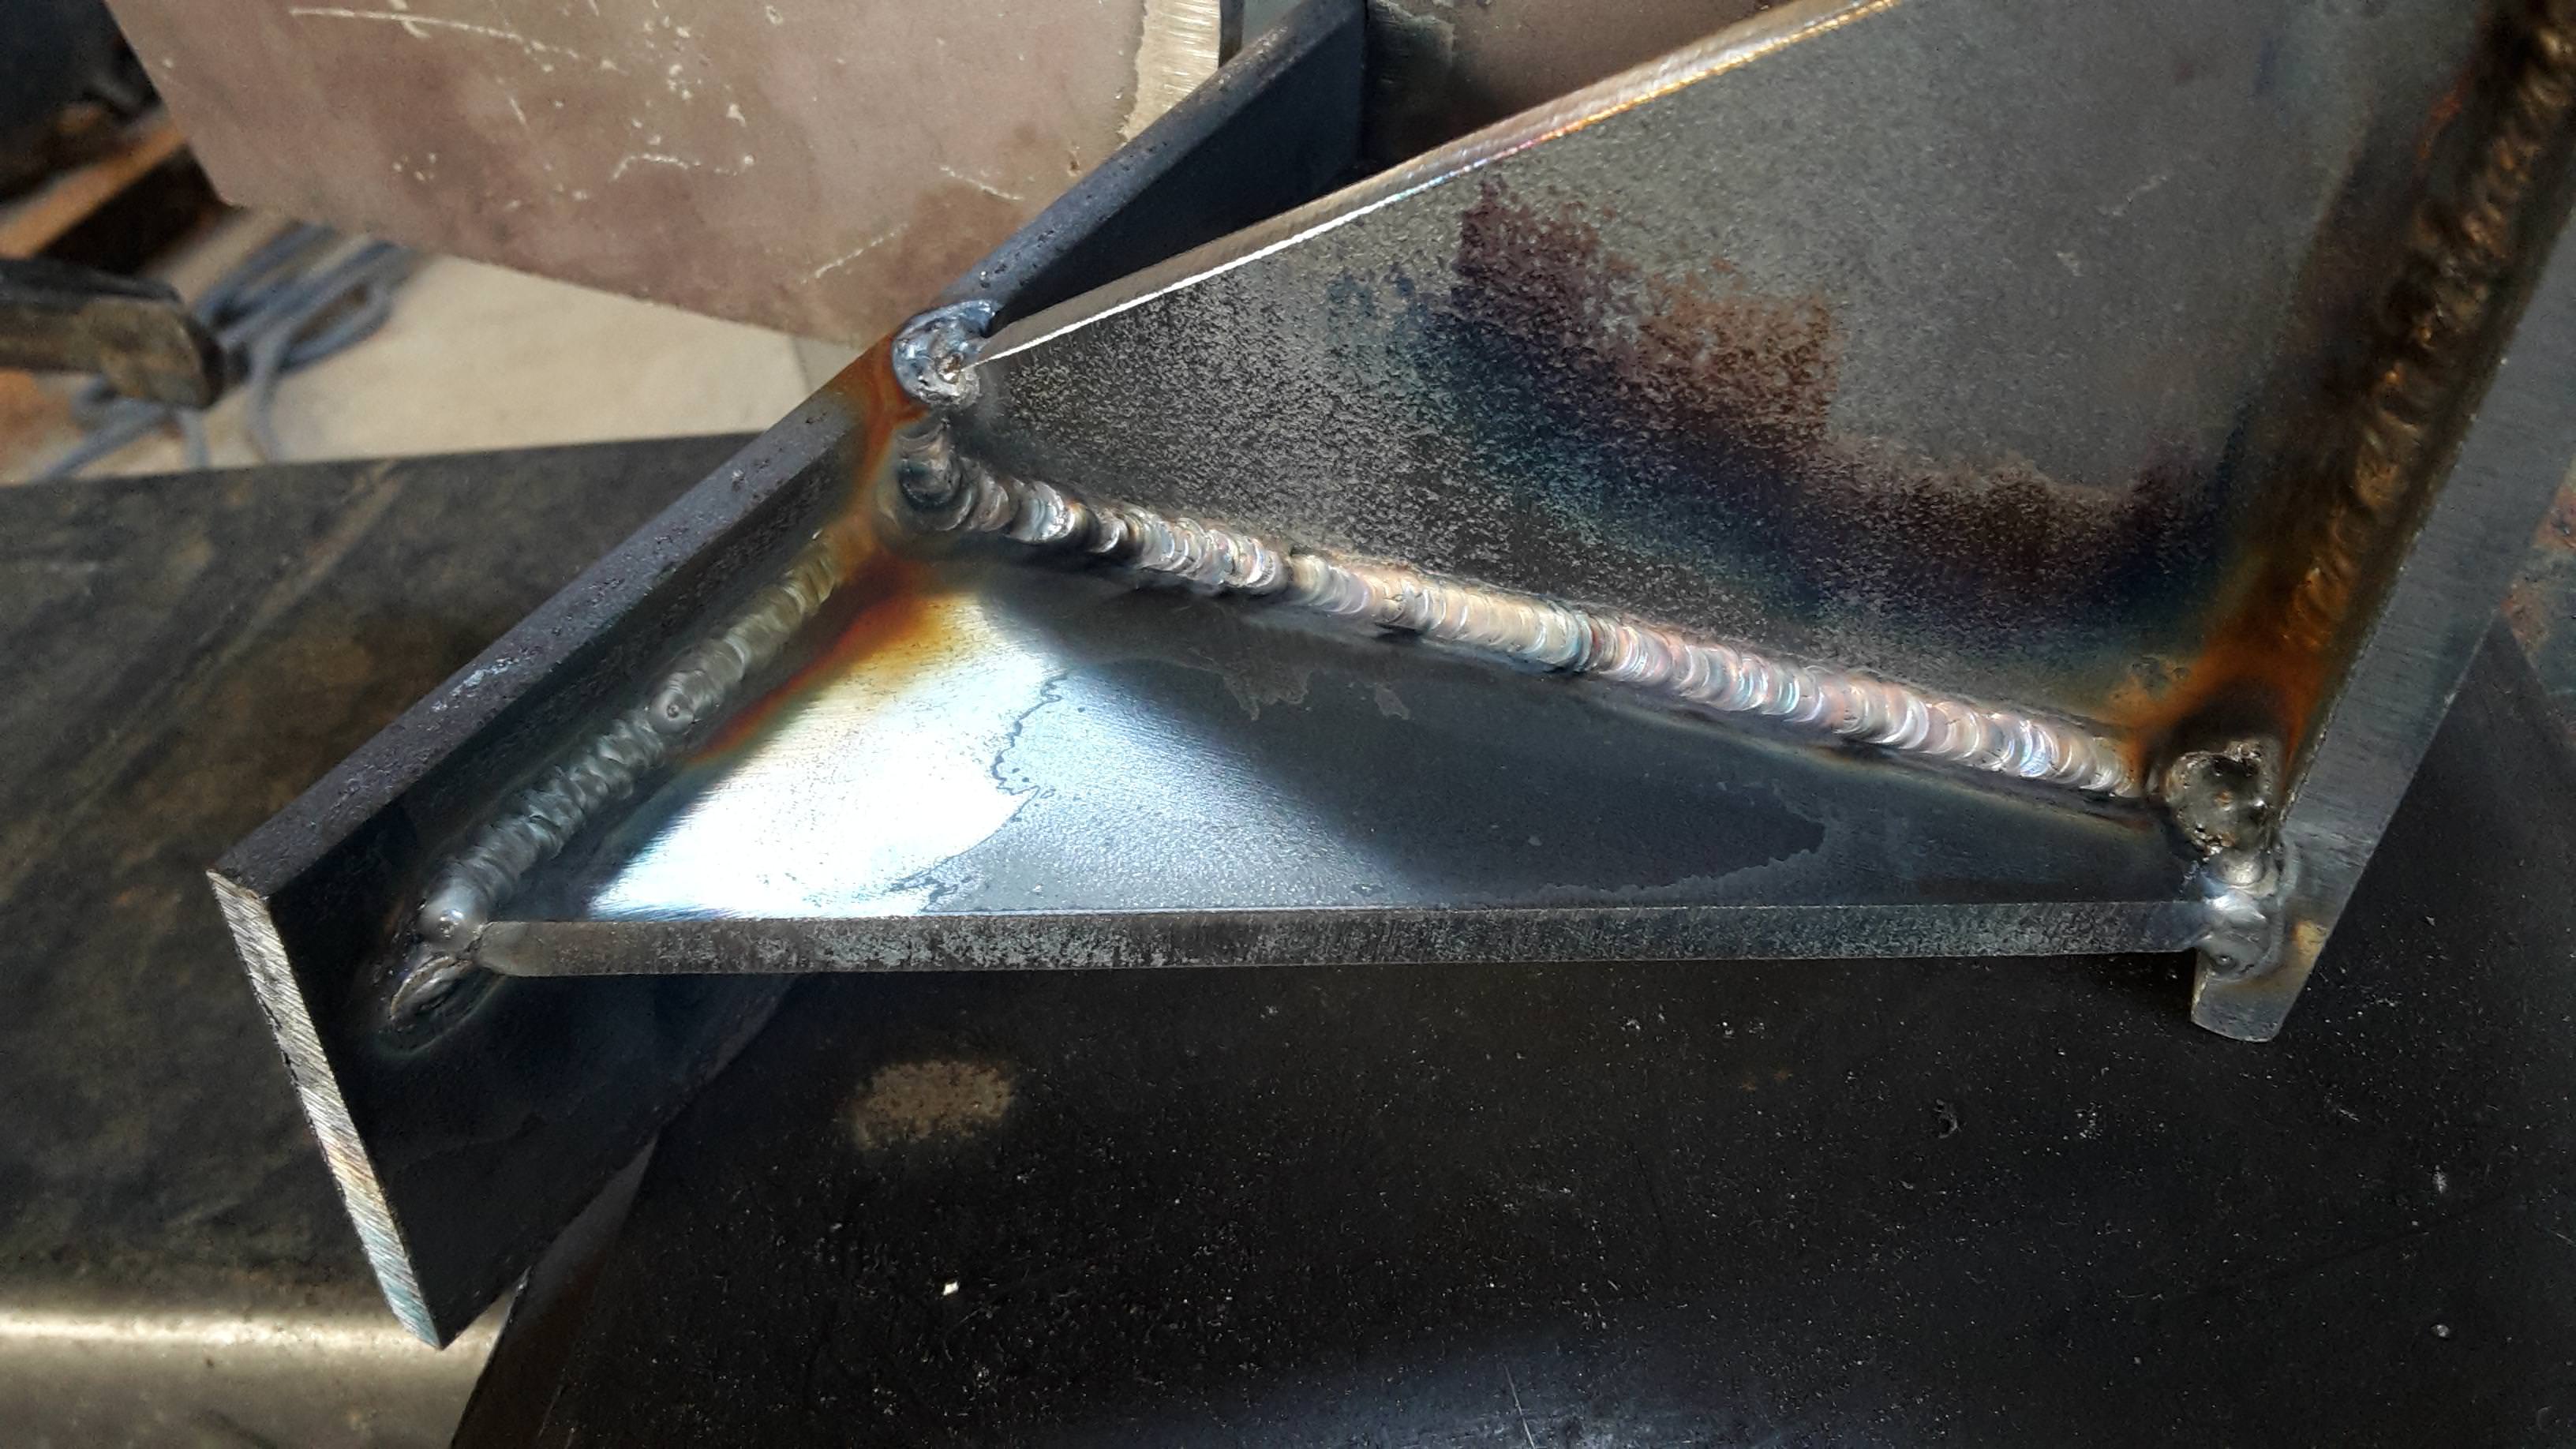
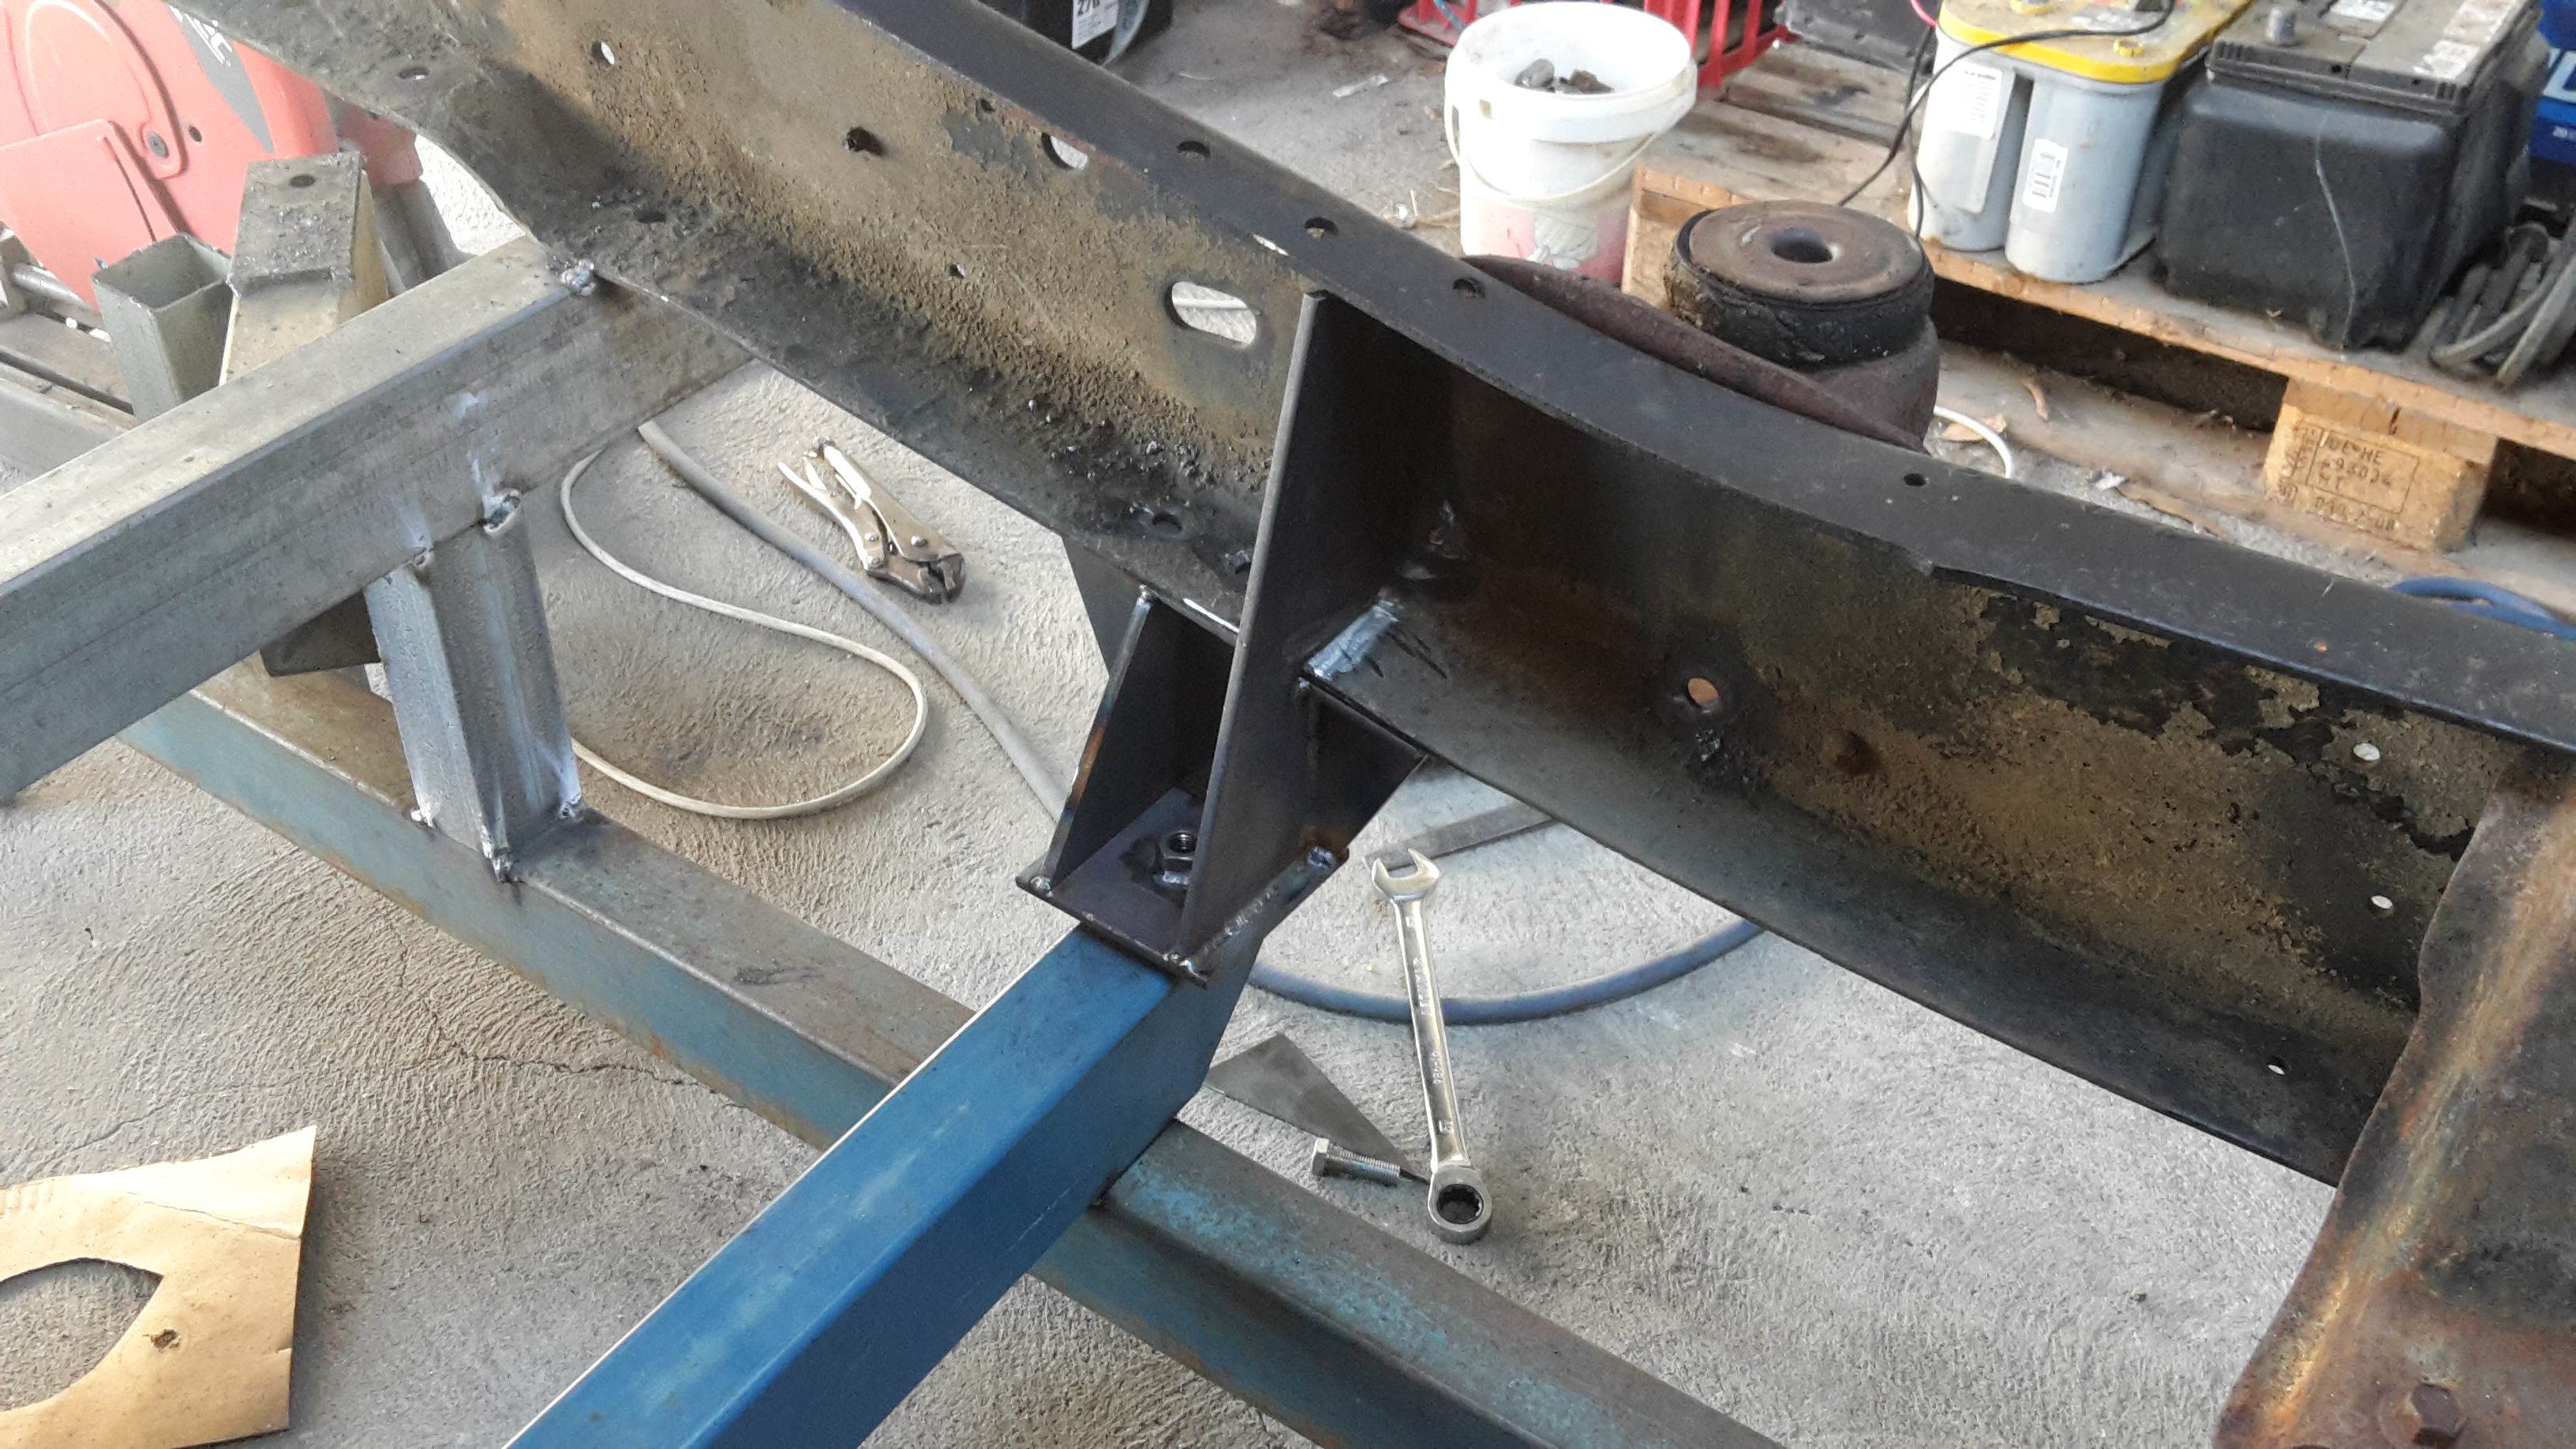
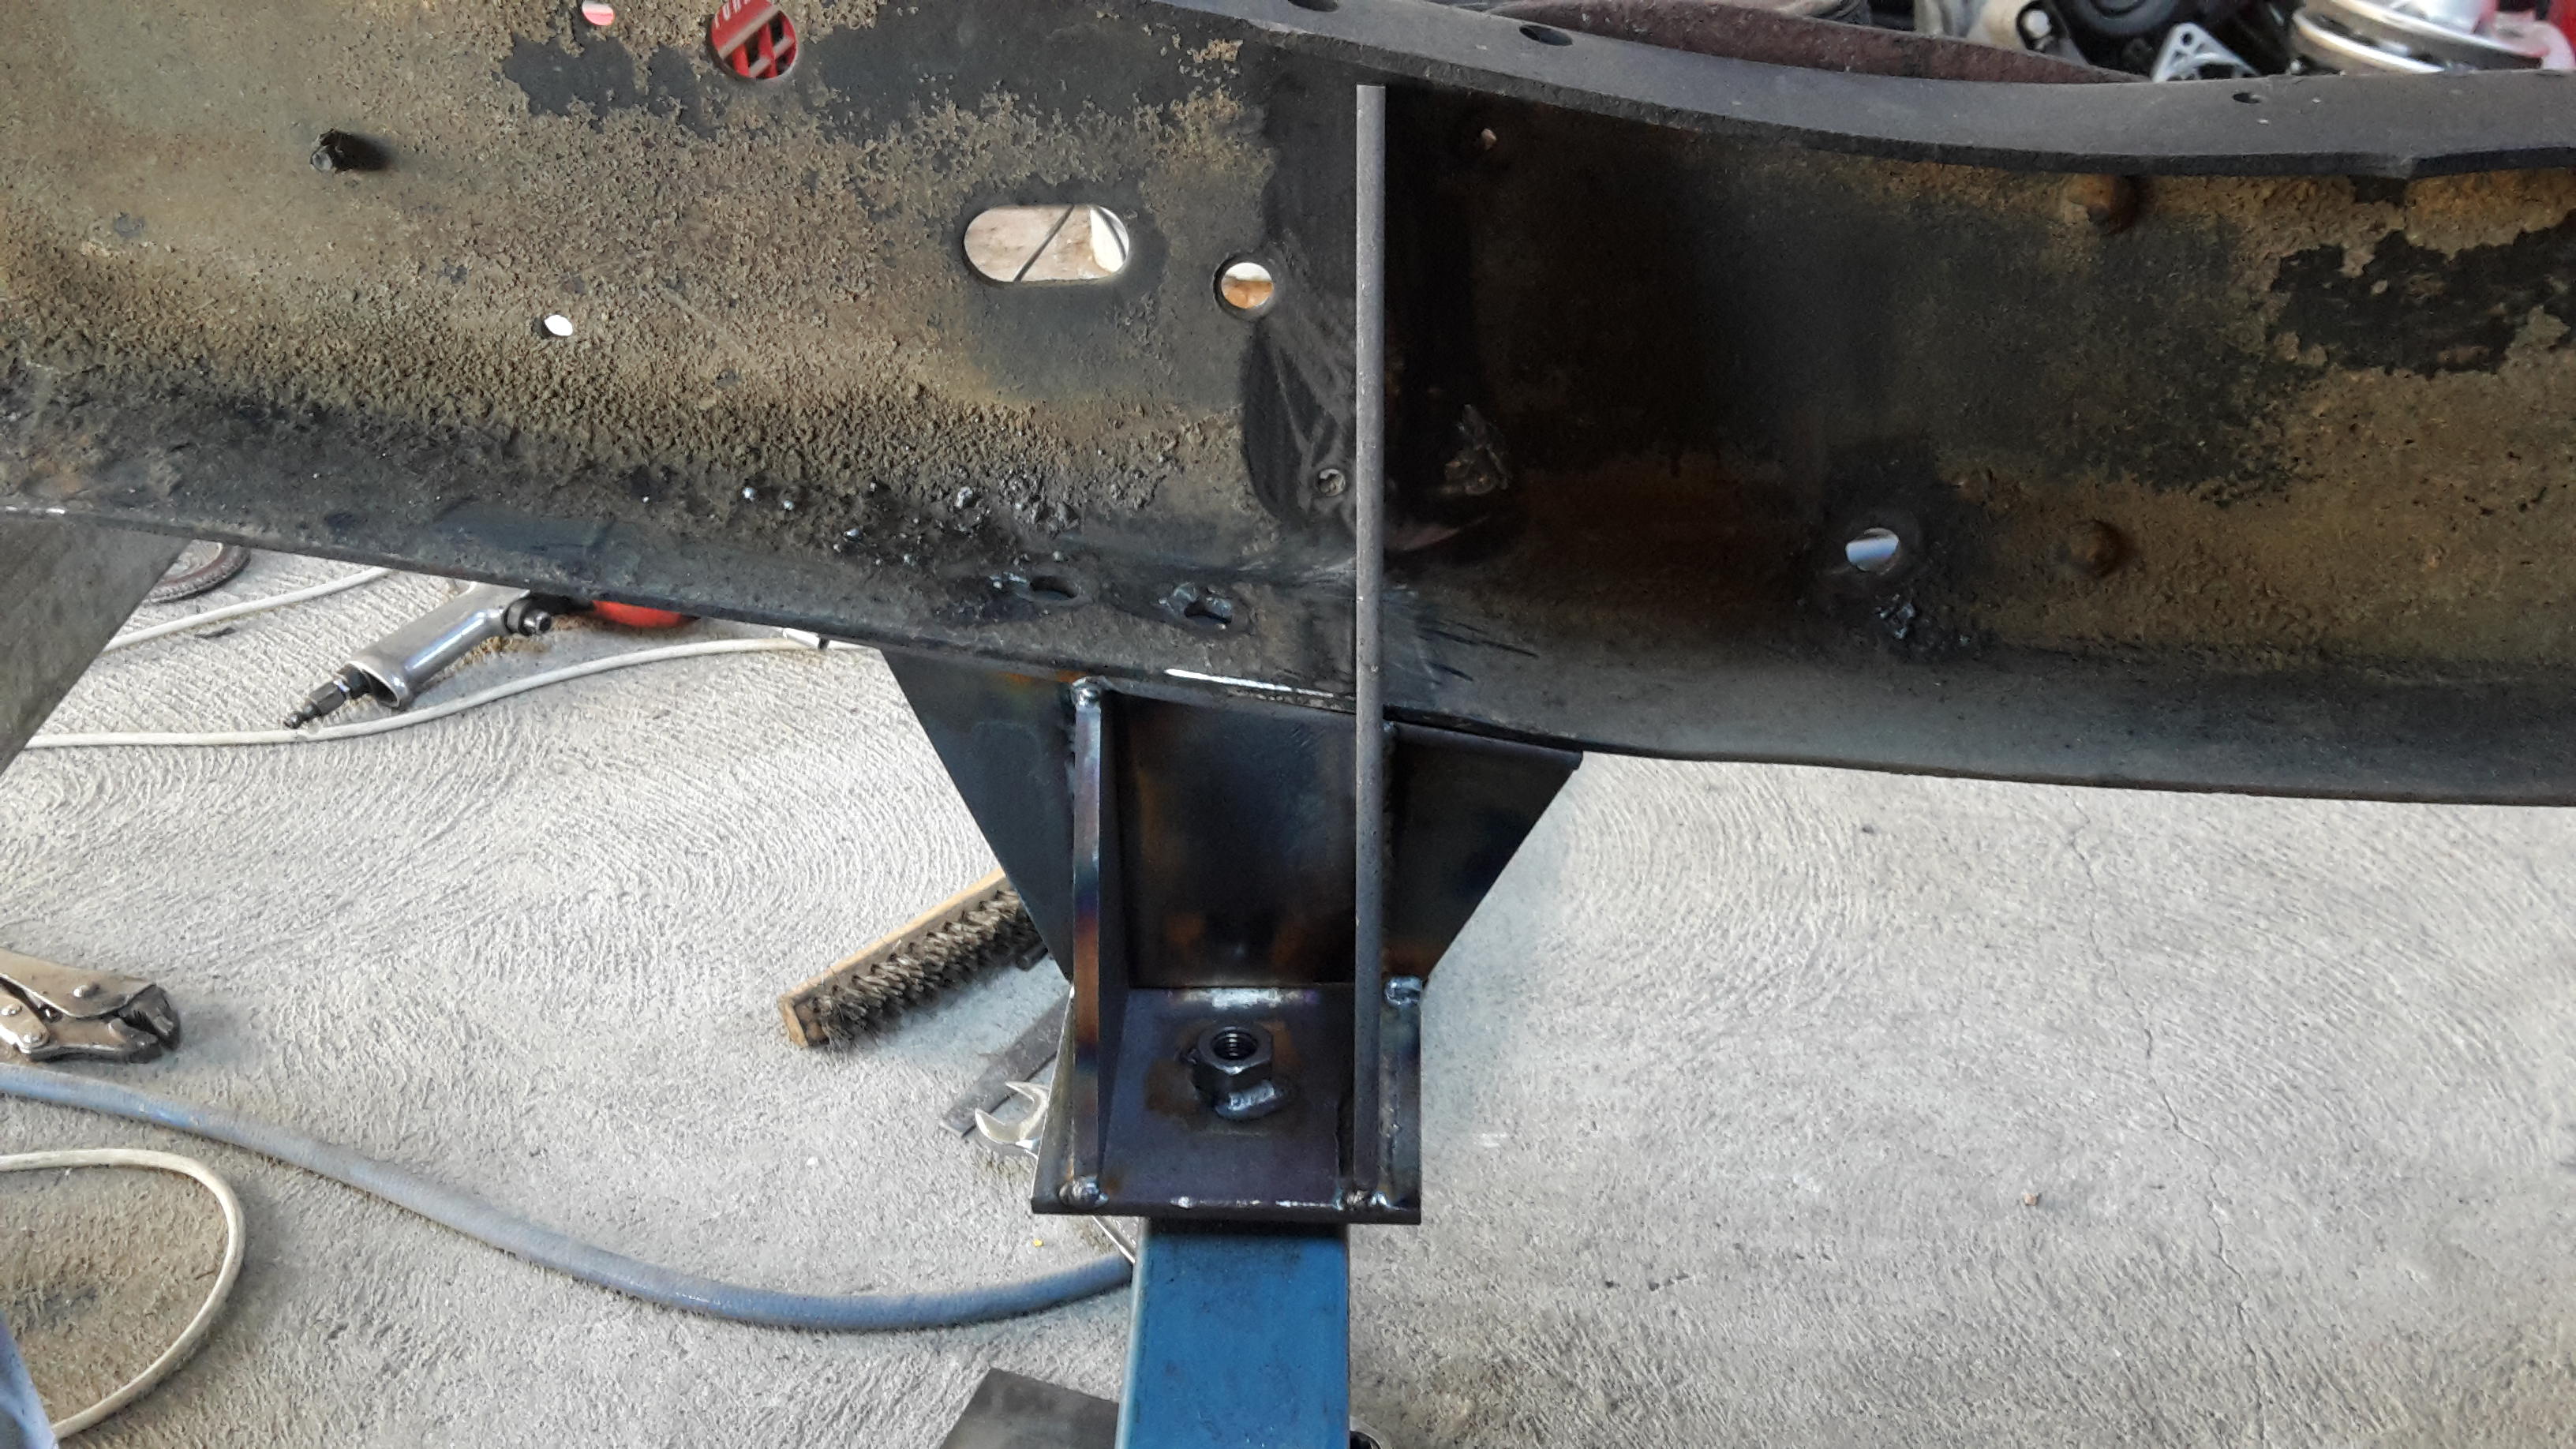
Both sides for the diff mounts are now done.
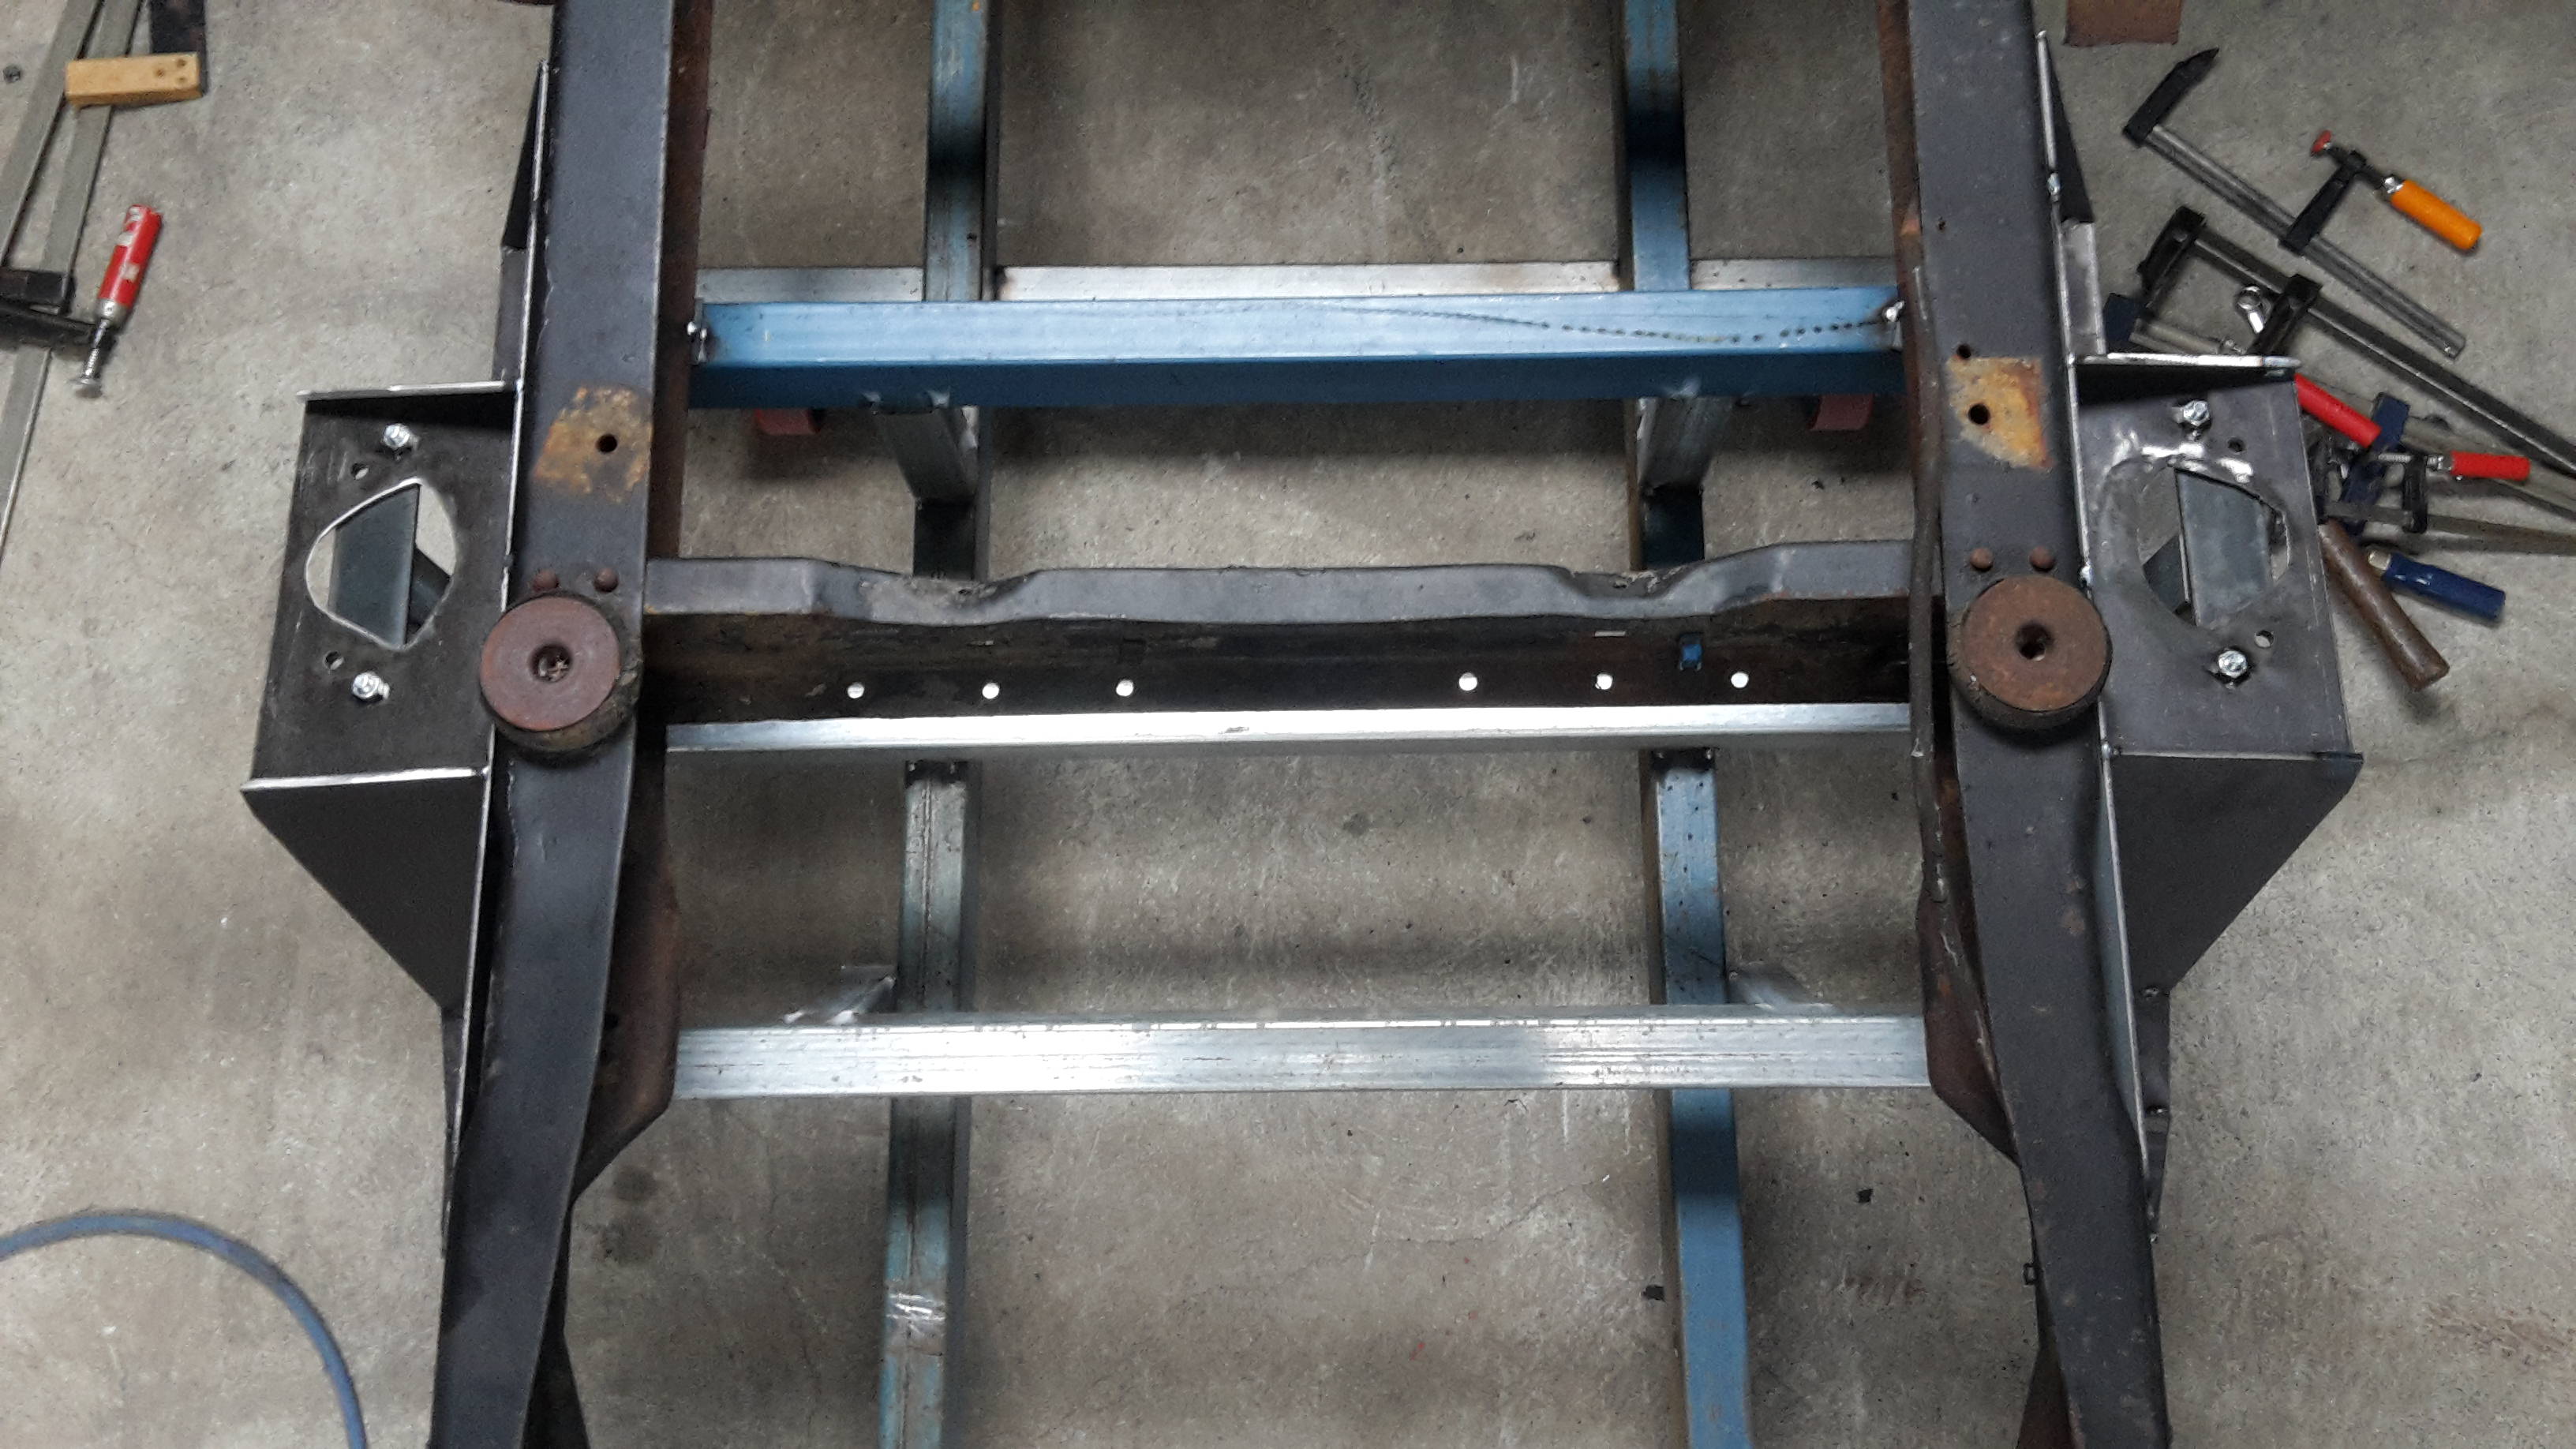
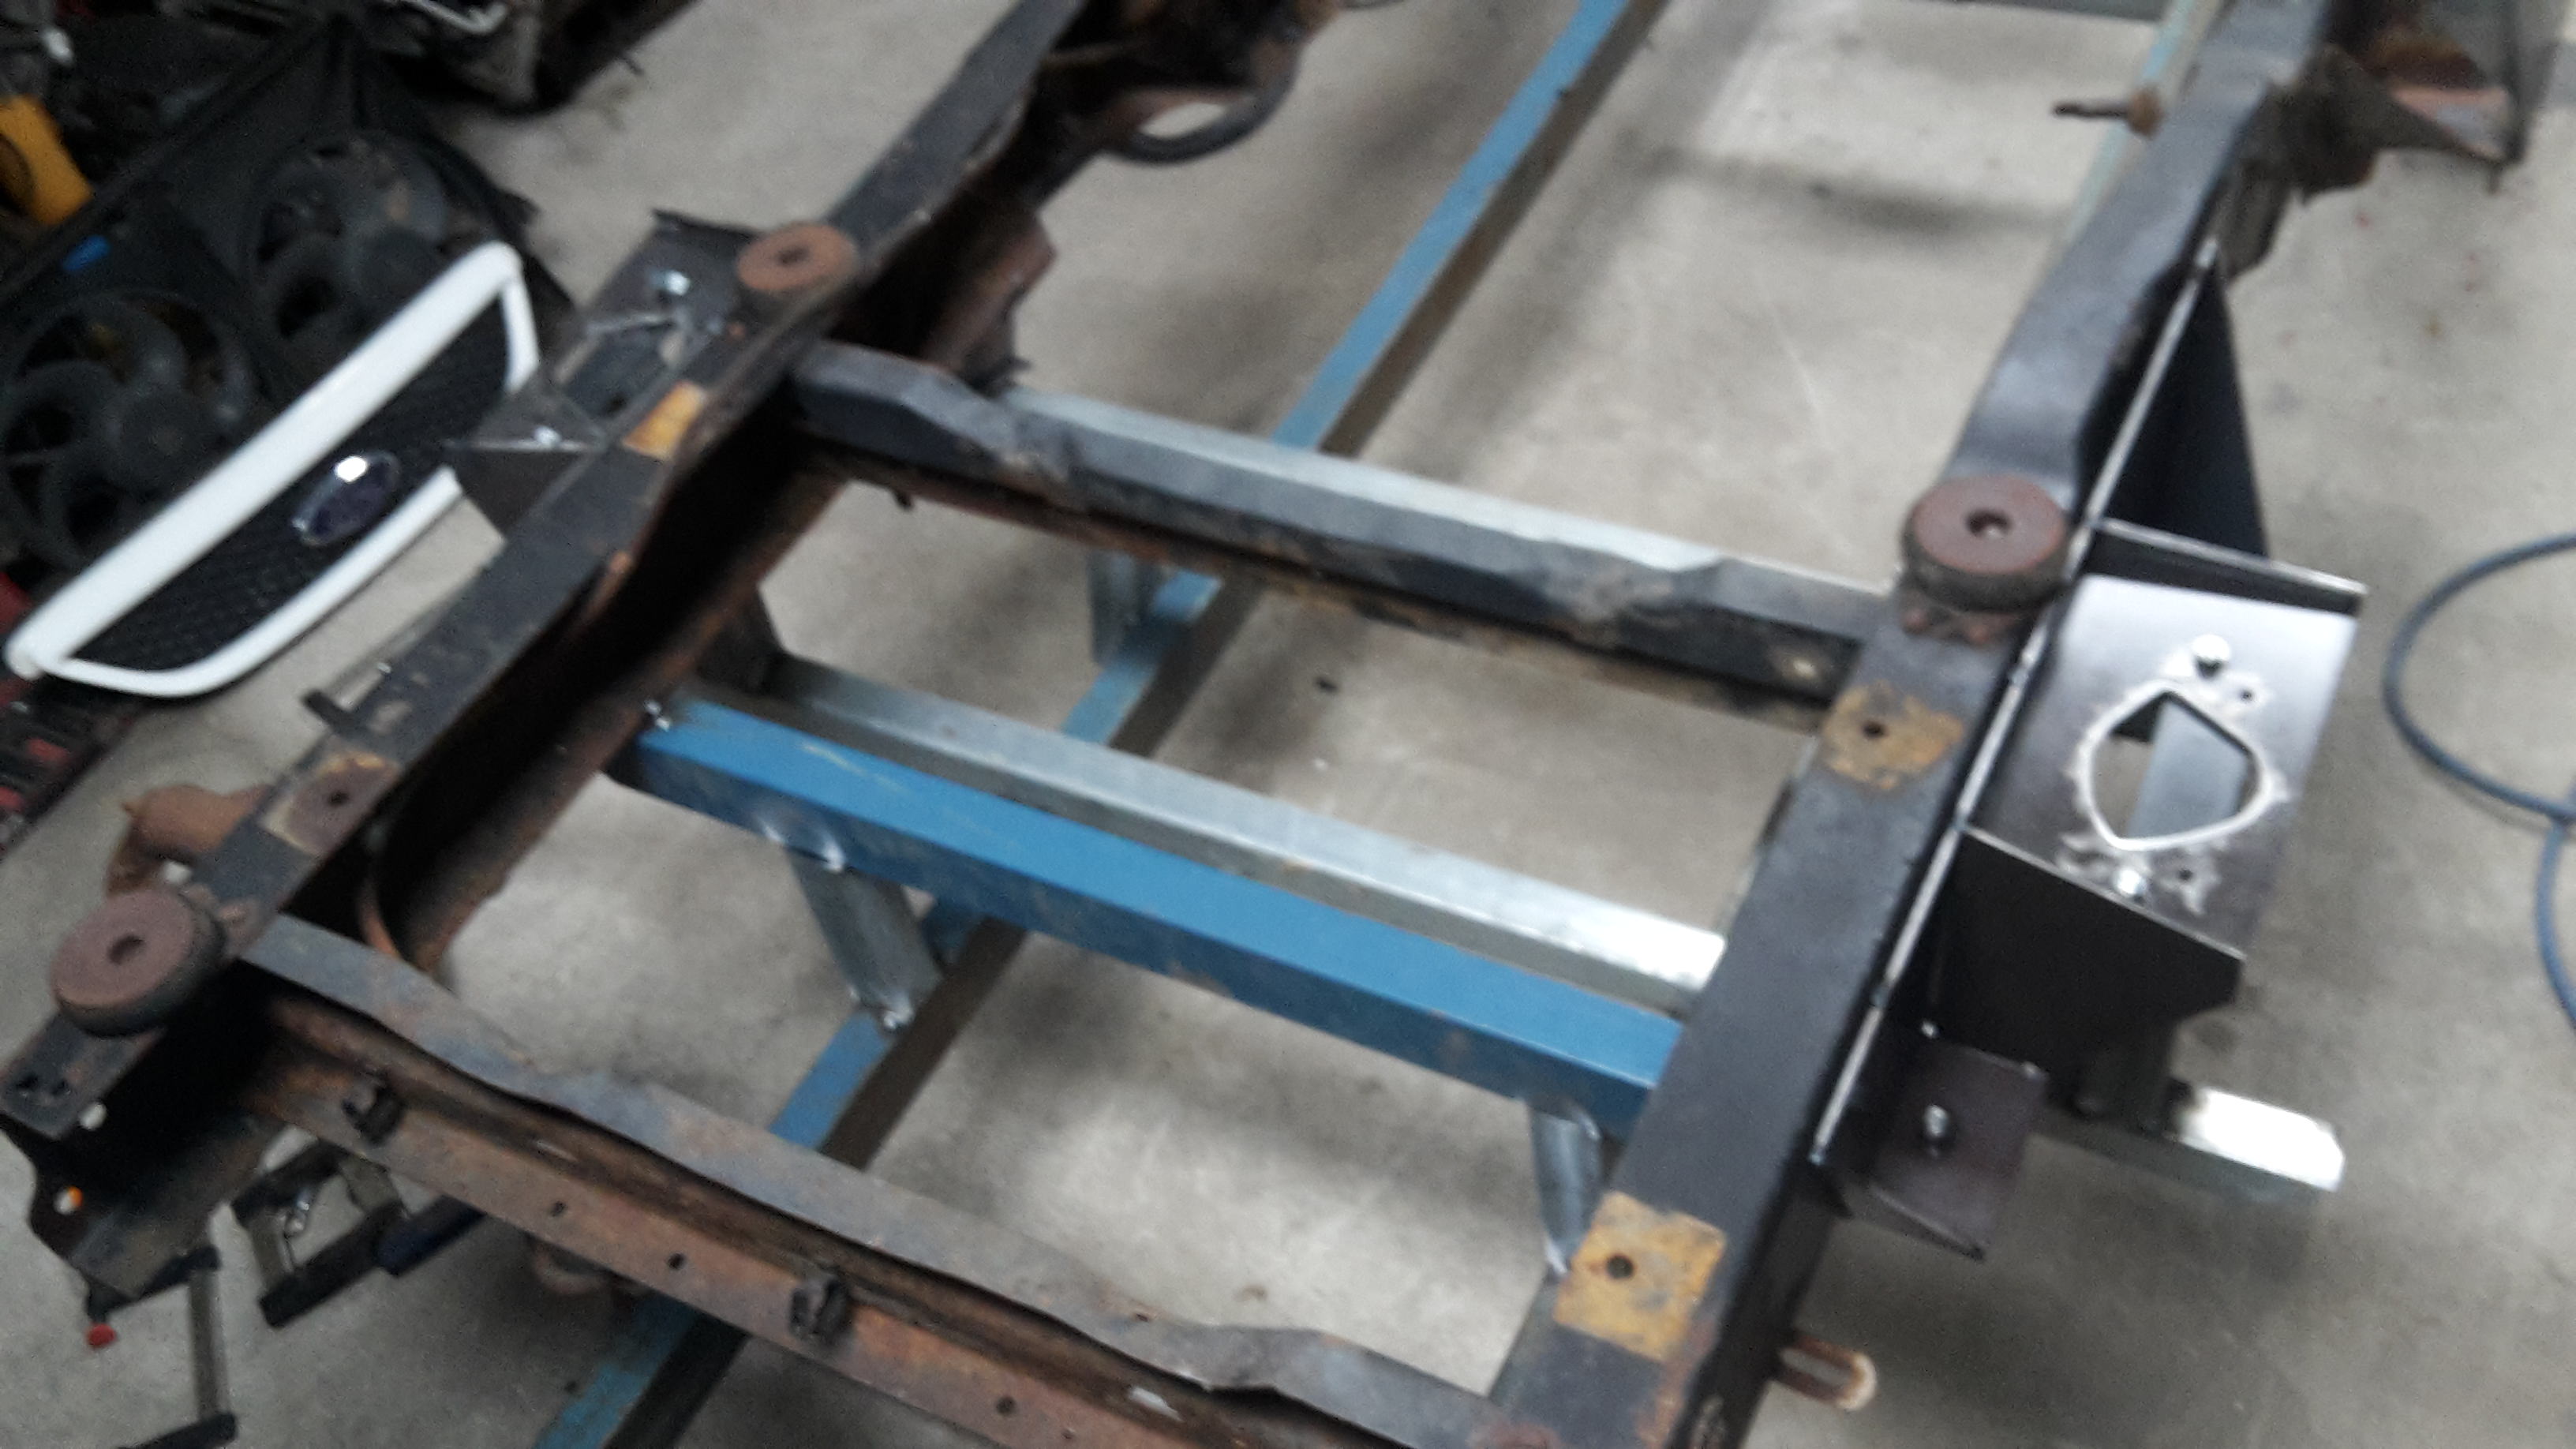
Then I started on the rear engine cradle mounts
I haven't finished welding it but it is getting there. I welded up more than I had initially anticipated but as it was quite fiddly, I just kept going. I'll still only tack it to the chassis.
I'm still a novice at TIG but like always, the more you do it the more you learn.
12-04-2017 #57
Registered User
- Join Date
- Nov 2017
- Posts
- 129
Wow this looks like its going to be an awesome build
12-04-2017 #58 Registered User
- Join Date
- Feb 2017
- Location
- South West of France
- Posts
- 26

I'd like to be as novice as you at TIG welding... looking good !
I'll follow this build thoroughly
12-04-2017 #59
Registered User
- Join Date
- Dec 2014
- Posts
- 188
Thanks guys!
12-05-2017 #60 Registered User
- Join Date
- Nov 2006
- Location
- Ma.
- Posts
- 5,567
Great work. I just picked up an E Stopp from the parts section on Lat-g. Keep the updates coming.
Wayne
Car FINALLY home !!!!!! lol
Project FNQUIK https://www.pro-touring.com/showthre...ghlight=FNQUIK

 Reply With Quote


