

Results 41 to 60 of 62
Thread: My 71 Firebird Formula/TA Blend
-
11-08-2015 #41

 Registered User
- Join Date
- Jul 2013
- Location
- Gilbert, AZ
- Posts
- 934
 Cool, thanks, would you happen to remember what your backspace was? Up to this (from my late night thread searches) I've seen a lot of people running a 9" wheel with a 6" BS. I might consider a 10" up front since I've determined that I will run a 12" out back. I realized if I step down to a 10" wheel out there it limits me to a smaller tire than I'd like, I know a square setup would handle ideally, but I do still want a steamroller look out back. I can always run a narrower tire out back, which would be a better arrangement for handling, versus trying a wide tire on a 10" wheel (applying some of my Thursday Ron Sutton Seminar knowledge right there, haha).
 Originally Posted by cpd004

Josh Campbell- Pushing the limits of my HOA since 2011
71 Firebird- 455, Ridetech front suspension. https://www.pro-touring.com/threads/...04#post1124504
67 Camaro RS/SS clone, Speedtech front suspension, coilovers, soon to get LT1/T56.
82 Z28- cheapie beater, soon to get a 406.
66 Mustang coupe- 393, T-5, sold. https://www.pro-touring.com/threads/...-Coupe-GT393-C
-
11-08-2015 #42 Registered User
- Join Date
- Sep 2005
- Location
- Chit-ca-go
- Posts
- 459
I'll try and find the specs...Dale at Schwartz set me up. I thought it was 5.5" but that might not be correct.
1971 Firebird
2017 Slipstream SS
12-28-2015 #43
Registered User
- Join Date
- Jul 2013
- Location
- Gilbert, AZ
- Posts
- 934
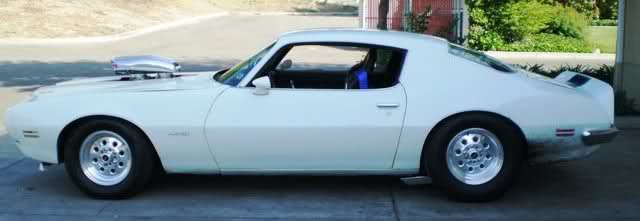
So progress has been a little slow the last couple of months. Basically after I got the quarter panel welded on, I noticed a few things that had me slightly concerned after trying to install the rear spoiler, basically a few things with the trunk lid not lining up, and making me question the squareness of the body. It was never hit hard, but the RH quarter was tapped, maybe it was just hit right enough to tweak things. Basically with the RH side of the trunklid fitting flush with the top of the quarter, the LH side was 0.25" low, so 0.125" off per side. Some people would have tweaked the trunk lid and be fine with it, but I didn't want to go through all the effort and be done with the car, and have it look "off" from 20 feet away.
The car is out and moving again. If you look close enough, you can see the trunk lid fitment to the LH quarter panel.

Here it is at the frame shop after they were finally able to get me in. This was a shop my dad always used when he used to flip wrecked cars for a hobby. The original owner of the shop has retired, so now interestingly enough I'm working with the guy's son, so it's a new generation working on these cars! Anyways, here's where it spend most of December.
It required a light tug on the LH quarter, but the trunklid fits well now. The car and subframe checks out as square, so I have confidence in it again.
Now the spoiler fits! Before I would have had to do major work to get it to fit, then it would have made things out of parallel and screw myself if I ever wanted to run a carbon fiber center later down the road. It fits well minus the typical GM fitment ailments (need to shave the RH end some in the trunk jamb area), nothing some tweaking can't fix. You can also see where he had to hack the LH taillight hole large to get the pulling equipment in. Not a huge deal, it was already hit in that area, and I was on the fence about ordering a new tailpanel as the lower valance is full of bondo... guess now I will get the tail panel!!
Shimming the center spoiler up with a paint stick brought the alignment where it needed to be. Easy to fix, I'll epoxy spacers underneath the back edge to make it all line up.
Started work on the front sheetmetal in the meantime. The wrong way to fill an antenna hole.
The right way.
Some damage to the lower edge of the RH fender. I didn't like how it was pulling out (it didn't)...
So I cut the worst of the damage, hammer and dollied it to my satisfaction, and welded in a new flat patch. Much better now, and it will only require very minimal filler.
That's about it. I have the next week off so I'll be hard at it. I have to prime my 63 Thunderbird today, so I can rearrange my garage to fit the Firebird in the center so I can tear the back end down to nothing to get the DSE minitubs installed. I'm doing this so I can mock up my Billet Specialties wheels when the come in around mid-January, and get my Ron Sutton/Speedway floater ordered!Josh Campbell- Pushing the limits of my HOA since 2011
71 Firebird- 455, Ridetech front suspension. https://www.pro-touring.com/threads/...04#post1124504
67 Camaro RS/SS clone, Speedtech front suspension, coilovers, soon to get LT1/T56.
82 Z28- cheapie beater, soon to get a 406.
66 Mustang coupe- 393, T-5, sold. https://www.pro-touring.com/threads/...-Coupe-GT393-C
03-10-2016 #44
Registered User
- Join Date
- Jul 2013
- Location
- Gilbert, AZ
- Posts
- 934
Progress hasn't been the quickest, as there were a few chilly mornings to work in the garage, I mean it was down to the 50's! For Arizonans, or at least myself, that keeps me out of the garage until the later parts of the day when it warms up! Anyways, since December, I've been slowly moving along installing minitubs, which I completed a couple weeks ago.
Rather than go into super detail on minitubs, which has been covered in depth on the internet, here are a few pics... mainly because I feel the need to keep some appearance of progress on this thread.
Kind of an ugly back area, not sure why the package tray was so hammered. I'll worry about that later.
Driver's side all cut out.
Finally, a reason to get Clecos! A lifesaver!
This was the only thing that really didn't go according to the instructions. This little leg on the driver's side was nowhere near where it needed to be, so I cut it off, and just welded it on separately. Passenger's side was just fine.
All drilled, and ready to weld.
All welded up, and looking good!
And now for the eye candy! 18x9/12 Billet Specialties Pro-Touring Line, Hydros with a gunmetal center. 1st set of forged wheels, feels like a milestone!
And next up, as I try and find time, is the rear tail panel. I've got it mostly cut out, and will install the new Goodmark panel next. The lower valance was weak, so I was on the fence about changing it anyways, but once my frame guy had to hack away at the taillight to pull it, that sealed the deal. The new piece is very nice, and I look forward to getting it in! Also working on wrapping up the details of my Speedway Engineering Grand National floater with RSRT, and will also soon be ordering the Wilwood brakes. Anvil hood has made it to California from what I heard when I last called, so I'll be driving there soon to pick it up. Going to start moving faster here soon, as the goal is my sister's wedding in October! Going to have to work a small miracle, and hope my credit cards survive as well! But I'm getting excited!Josh Campbell- Pushing the limits of my HOA since 2011
71 Firebird- 455, Ridetech front suspension. https://www.pro-touring.com/threads/...04#post1124504
67 Camaro RS/SS clone, Speedtech front suspension, coilovers, soon to get LT1/T56.
82 Z28- cheapie beater, soon to get a 406.
66 Mustang coupe- 393, T-5, sold. https://www.pro-touring.com/threads/...-Coupe-GT393-C
03-11-2016 #45 Registered User
- Join Date
- Mar 2007
- Location
- Florida
- Posts
- 2,391
Looks like you're moving along Josh, Oct. is gonna come quick.
03-11-2016 #46
Registered User
- Join Date
- Sep 2005
- Location
- Chit-ca-go
- Posts
- 459
Nice wheels!
1971 Firebird
2017 Slipstream SS
04-22-2016 #47 Registered User
- Join Date
- Nov 2015
- Location
- Indianapolis
- Posts
- 12
Can't wait to see those wheels on there! This has come a long way, Josh. Amazing work!
04-22-2016 #48
Registered User
- Join Date
- Jul 2013
- Location
- Gilbert, AZ
- Posts
- 934
Thanks guys! I'm slowly making progress. Got the tail panel installed, and can now proceed with normal bodywork again! Not going to bombard this with pics, as people don't seem that interested in seeing step by step photos of the several hours I have into the quarter panel edges hammer/dollying it back to the correct shape, after decades of abuse, haha. Might post another update next week.
Josh Campbell- Pushing the limits of my HOA since 2011
71 Firebird- 455, Ridetech front suspension. https://www.pro-touring.com/threads/...04#post1124504
67 Camaro RS/SS clone, Speedtech front suspension, coilovers, soon to get LT1/T56.
82 Z28- cheapie beater, soon to get a 406.
66 Mustang coupe- 393, T-5, sold. https://www.pro-touring.com/threads/...-Coupe-GT393-C
06-02-2016 #49
Registered User
- Join Date
- Jul 2013
- Location
- Gilbert, AZ
- Posts
- 934
Progress has been slow, but it's been coming along. I know people don't get as excited about replacing this piece of rust, or blocking this, or much of the bodywork process, so I'll do these once in awhile as I'm making visual progress.
Next step after the minitubs was to work on replacing the tail panel, that was hammered pretty well below, though well hidden by a thick layer of bondo. The LH taillight pocket had to be open more for my frame guy to get the machine in to tug it. Plus the new Goodmark panel was actually pretty nice, and I felt better about having solid, clean metal back there.
Old panel is cut out! Drilled out about 30 spot welds, always the worst part of any sheetmetal repair.
The quarter panel was still pretty hammered, which again, was well hidden by body filler. Here is the before fitment of the spoiler, this was after a lot of cleanup, and some straightening.
In progress. It's a lot better. You can see where I completely cut away the inner flange because it was just too hammered, and stretched, and held the rest of the panel back from fitting properly. It was just easier to build a new flange later.
The rear of the quarter after much hammer and dolly work, pie cutting, and welding the new flange on.
The end result was immensely better, and only required a light skim coat of filler. Spoiler fitment was now excellent.
The Goodmark rear valance was a very nice piece, but not perfect. The sides were different where they attached to the quarter flanges, lengthwise. Rather than rework the flange on the quarter, I determined adding material to the valance would be the easier approach.
Not perfect, but I didn't spend a lot of time on this since it will be completely hidden after it's done.
The only other area I had to address on the valance is the fitment to the quarter panels right below the bumper. They stuck out a little more than I wanted, and I couldn't massage or remove any more material to make the entire panel fit in tighter, so I did a pie cut over about 3 inches, and slightly tweaked the corners in.
Same for the RH side. Here you can see a vertical pie cut I made to add filler material to tighten the inconsistent gap. Not a big deal, but while I was in there, it was easy to make things perfect.
All good now!
Rear of the trunk floor and hidden areas ready to go! Black paint everywhere but the flanges, and weld thru primer on the flanges.
All welded on! Took me a couple weekends to do this, as I've never done a tail panel, or valance even, but I'm really happy with the result.
Looking like something again! I used a decent original panel that my dad is going to restore for his 73 Formula for all this mockup process. That way I know the rear valance is good for OEM, then I'll make the repop plastic tail panel fit the rest of the car.
Josh Campbell- Pushing the limits of my HOA since 2011
71 Firebird- 455, Ridetech front suspension. https://www.pro-touring.com/threads/...04#post1124504
67 Camaro RS/SS clone, Speedtech front suspension, coilovers, soon to get LT1/T56.
82 Z28- cheapie beater, soon to get a 406.
66 Mustang coupe- 393, T-5, sold. https://www.pro-touring.com/threads/...-Coupe-GT393-C
06-02-2016 #50
Registered User
- Join Date
- Jul 2013
- Location
- Gilbert, AZ
- Posts
- 934
This particular section of the quarter edge was hammered hard, plus they tried to drill and pull it, the old school way, so it was just easier to cut it out and make a new panel. Plus, this made accessing the inner flange easier to weld the valance, plus hammer/dolly access for the section of the quarter directly below.
Spend a little time trying out my hammer/dolly set to turn this flat piece into a compound curve patch. I could probably source a patch off another quarter I had, but I didn't want to cut that up, and I won't get better with the metalworking if I don't practice!
Welded into place. It didn't come out as stepped as it looks in this pic, I swear! Bad image, but I didn't take anymore angles, so it'll have to do. It didn't take much filler at all, and it's hidden by the spoiler anyways.
Next is the lower section of the quarter behind the wheel. First I had to make a new section with some hammer/dolly work, since I didn't have any inner structure patches to replace the rotted original. I didn't take any before shots unfortunately, but this is the end result. Didn't get too crazy since this was hidden.
Wirewheeled what I could, then coated it all in rust convertor.
New patch welded into place!
Now onto the rest of the quarter, mainly the sail panel. Being a vinyl top car, the fitment of the quarter to roof area was terrible. The below pic speaks for itself, this won't do! The radius of the corner was all wrong for the trim, the quarter panel was too high into the window, plus the quarter was too low into the window channel... not visible in this show, but imagine the quarter being further into the page, and the roof being out. Basically, nothing lined up in multiple planes.
The straight edge kind of shows the misalignment.
One dimension is corrected. Now you can really see the incorrect radius.
Fixing the other dimension.
Tacked a filler piece in the corner for me to grind to the proper radius, then I built a new inner channel bent to the same new radius. Horrible pic, sorry.
Next up is the factory lead seam. Here you can see the finished radius in all metal. Contrary to how some things might show up in my pics, I can do somewhat decent metal work, I think.
The filler is now fully welded in, after about 1.5 hours of small tacks. I learned before that you can never keep this area too cool. Warpage was non-existent, so that was good.
All ground down. Doesn't look the prettiest as these seams were anything but precise, since they just loaded them up with lead. Not quite a Foose or Trepanier when it comes to metal work, but at least it's all solid and clean.
The new corner radius after smoothing things out with a layer of All-Metal filler, then a skim coat of 3M plastic filler.
Now all the metal work is complete, woohoo! Now I can resume actual bodywork. Here it is all blocked down. I like to roughly block it all with All-Metal aluminum based filler as I think it's less prone to shrinking, and maybe more water resistant. Then after I'm satisfied with that, I gladly change to plastic filler, which sands much nicer than the All-Metal, which is sort of like blocking... well... metal. I've done it this way for years, and I've never had an issue.
So that's all for now folks! I've got a few edge details to clean up, some seams to seal, then I can prime this quarter and the tail panel. Then I'll flip the car around and start working on the front end! I'll fill and block the fenders as necessary, fit them to the doors, align the hood/bumper, and weld up/correct and door gaps as necessary. Then I can start working on getting the bumper fitting better, which should be fun as I've never done a urethane bumper before! At least I can fit it all now, as I picked up my Anvil hood about a month ago, which is absolutely stunning! I don't have any camera pics oddly enough, I'll take some and post them with my next update!Josh Campbell- Pushing the limits of my HOA since 2011
71 Firebird- 455, Ridetech front suspension. https://www.pro-touring.com/threads/...04#post1124504
67 Camaro RS/SS clone, Speedtech front suspension, coilovers, soon to get LT1/T56.
82 Z28- cheapie beater, soon to get a 406.
66 Mustang coupe- 393, T-5, sold. https://www.pro-touring.com/threads/...-Coupe-GT393-C
06-03-2016 #51
Registered User
- Join Date
- Apr 2014
- Posts
- 803
Looks awesome! Great looking metal work!
Pat
06-24-2016 #52 Registered User
- Join Date
- Mar 2013
- Location
- Oakdale, Ca.
- Posts
- 192
Josh -
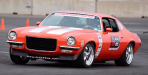
Very nice build! I am a big fan of Firebirds and have owned several with the last one being a Formula 455 Clone, Offenhauser dual quad, and nitrous. The car ran division 7 NHRA Summit Racing events for a number of years on the West Coast and I regret selling it everyday!
.
.
George Dias
1973 Camaro
2002 SVT Lightning
2003 Z06 Corvette
2015 Truckin Throwdown Champion http://www.trucktrend.com/events/tru...by-ebc-brakes/
06-26-2016 #53
Registered User
- Join Date
- May 2016
- Posts
- 33
The progress is great. Keep up the good work. Love these cars so I can't wait to see it done, as I'm sure you feel the same
 1971 Camaro genuine z/28 https://www.pro-touring.com/threads/...alia-commences
06-27-2016 #54
Registered User
- Join Date
- Jul 2013
- Location
- Gilbert, AZ
- Posts
- 934
Thanks guys! It's definitely tedious work, and progress seems slow at time, but it's rewarding being able to see the progress.
Awesome looking car! I love these cars as drag cars as well, I'm tempted to have a drag set of wheels to go along with my B-forged wheels just to mix up the look once in awhile... as long as I can figure a setup to clear the rear brakes! I've always wanted one of these cars, as I think it's one of the top 5 designs out of GM, don't plan to get rid of this one! Originally Posted by struck by Lightning
Been making more progress. Looks a lot better now in primer! Still got some tweaking to do to the decklid now that I have the upper filler in place. Also need to work the spoiler a bit more, but that's typical.
Mocked up the new taillights, and original rear bumper to check fitment, and it looks good! This original bumper was very weak, but I've got a brand new OER piece in the box ready to go, as well as a better core I picked up last weekend, so I have options. I might play with filling the better core, and eliminating the bolts and jacking slots so I can possible paint it. Not that I don't like the look of the chrome, I think it looks great actually, but the imbalance of the painted Endura nose and the chrome rear bumper has been something I wasn't 100% about. I'll paint one rear bumper, and if I don't like it, I've got a brand new chrome one I can install.
Now that the main body of the car is fully primed, I can let that cure, and flip the car around and start working the front.
Along with the car I got a very nice Trans Am Endura nose I used to generally mock up the front end. I won't be using this one though, as it's too nice to play around with... I want to fill the license plate recess, and better fit the bumper to the car. I'll keep the nice bumper in storage for a spare.
And to get up to date, at least till a couple hours ago, the new Anvil hood is set into place! Before I start working the bumper to the fenders, I need to make sure everything is 100% square. I was close by my initial measurements, the front is good, but the rear of the fenders are too close together, so I'll start there this coming weekend by moving the upper front door corners out a bit, and getting the fenders to match, till everything is spot on.
Josh Campbell- Pushing the limits of my HOA since 2011
71 Firebird- 455, Ridetech front suspension. https://www.pro-touring.com/threads/...04#post1124504
67 Camaro RS/SS clone, Speedtech front suspension, coilovers, soon to get LT1/T56.
82 Z28- cheapie beater, soon to get a 406.
66 Mustang coupe- 393, T-5, sold. https://www.pro-touring.com/threads/...-Coupe-GT393-C
07-22-2016 #55
Registered User
- Join Date
- Sep 2005
- Location
- Chit-ca-go
- Posts
- 459
From the pics, the hood looks like it lines up well with the tops of the fenders all the way down. Are the hinges on it and does it look like it will require anything to make it fit perfectly?
1971 Firebird
2017 Slipstream SS
02-15-2017 #56
Registered User
- Join Date
- Apr 2011
- Location
- Missouri
- Posts
- 35
Josh, how's progress on you Firebird coming along? I'm impressed by your work and nearing the end of my metal work on my project. Looking forward to skim coating this this spring and getting with the primer phase.
GaryB
Current Project: 1971 Oldsmobile Cutlass Supreme
Current plans include: Full RideTech Coil-Overs, Olds 455, Holley Terminator EFI, Edelbrock heads, Tremec T56 Magnum, custom dash, custom console, Dakota Digitial VXH-1017 gauge cluster, manual brakes, 3.42 gears, etc...
02-20-2017 #57
Registered User
- Join Date
- Jul 2013
- Location
- Gilbert, AZ
- Posts
- 934
Sorry for the delay, I'm not always on top of this thread unfortunately. The hood does fit very well along the length height-wise. It's very tight side to side, and I need to pull the fenders out a touch to make it fit. That was my last step while working on it, didn't do anything with that because the fenders would need to come off to re-adjust the doors. I'll try and get back to it in the upcoming months. Originally Posted by cpd004
Thanks Gary! Glad you like my thread! As far as the progress on this Firebird, it's been on the backburner for a few months now unfortunately. Kind of a long story. Going back to around my last posting, my dad and I were trying to get cars done for my sister's "hot rod" wedding. It was going to be his 70 Camaro, my 71 Firebird, and our 63 Thunderbird. Around August time I realized finances and time wouldn't allow the Firebird to be done. And around September, I realized the Thunderbird wouldn't get done. The wedding was in October. We did get my dad's 70 Camaro done. This was cool, and very significant as my dad bought it around 1983, and built it for my uncle to drive as his first car. He drove it for about a year, till my dad got it back. It was last tagged in 1987. Fast forward to 2016, and we realize the car has earned its time to shine again. My dad did most of the bodywork over the year, I painted it 2 weeks before the wedding!!!!!! It was a typical thrash, we were working on it till 2 AM the day OF the wedding. Which is why we were wrong on the front tire size, and it sat a little higher than we preferred. Both of those issues were rectified, and a front spoiler was added. I need to get current pics of it. But the wedding was awesome. My dad "gave" my sister away by driving up to the wedding. Nobody saw the car done except for my dad and I. Even my uncle who owned it before hadn't seen it, and he was at the ceremony as well. Anyways, my dad hid in the garage in front of the property, and he was signaled to fire it up (initial startup with open electric cutouts), and drove up to applause. It was pretty cool. Definitely memorable. Originally Posted by gbledsoe3
So now going back... the Thunderbird was disassembled in my primary work stall in my garage for an engine bay detail. I realized at the time I would have had to cut corners to get it to the wedding, so that's when I stopped it. Now I'm going back and welding up all the seams, smoothing them, and going through it all with the detail I truly want. I'll hopefully get it all painted in about a month, clean up and paint the engine, drop it in and swap it with my Firebird so I can get working on it for awhile! I have automotive ADD to the max. Working on my Tbird, then "oohhh, a Firebird, I'll work on that for a bit"!
Josh Campbell- Pushing the limits of my HOA since 2011
71 Firebird- 455, Ridetech front suspension. https://www.pro-touring.com/threads/...04#post1124504
67 Camaro RS/SS clone, Speedtech front suspension, coilovers, soon to get LT1/T56.
82 Z28- cheapie beater, soon to get a 406.
66 Mustang coupe- 393, T-5, sold. https://www.pro-touring.com/threads/...-Coupe-GT393-C
06-28-2017 #58 Registered User
- Join Date
- Nov 2013
- Location
- FL
- Posts
- 92
Hey, thanks for sharing your Speedhut gauges. I think they look so awesome! I love the firebird in the middle. very cool
1968 Firebird - My Way
https://www.pro-touring.com/threads/...nProEverything
06-28-2017 #59
Registered User
- Join Date
- Jul 2013
- Location
- Gilbert, AZ
- Posts
- 934
Good timing then... on seeing my post, and the bumping my post. I was going to look this up because I got an email from Photobucket saying "pay up or we'll hold your pics hostage". Looks like that was no lie. %$#%#%%$# Originally Posted by FireBeater

Anyone know a good photohosting site? Photobucket has only turned to crap lately, they certainly aren't going to see a cent out of me.Josh Campbell- Pushing the limits of my HOA since 2011
71 Firebird- 455, Ridetech front suspension. https://www.pro-touring.com/threads/...04#post1124504
67 Camaro RS/SS clone, Speedtech front suspension, coilovers, soon to get LT1/T56.
82 Z28- cheapie beater, soon to get a 406.
66 Mustang coupe- 393, T-5, sold. https://www.pro-touring.com/threads/...-Coupe-GT393-C
11-22-2017 #60
Registered User
- Join Date
- Oct 2017
- Posts
- 116
I can't believe that with everybody suing for every little thing that there has not been a lawsuit filed against photobucket....... They have ruined such an extensive amount of info for everybody across the internet! This choice they have made has totally ruined so much. They ought to be forced to continue allowing pics that were posted pre dating their infamous decision to kill themselves.
Tags for this Thread

 Reply With Quote


