Results 1 to 20 of 63
Thread: 1967 Mustang L92/T56 Swap
-
11-10-2014 #1

 Registered User
- Join Date
- Nov 2014
- Location
- Bay Area, CA
- Posts
- 30

1967 Mustang L92/T56 Swap
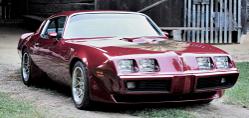
Here's a few pictures of the car prior to the swap.
It's not a real Shelby, I know it's a silly clone. I bought it that way.
This car is my DD and it occasionally sees auto-x and track use at Laguna Seca and Thunderhill.
I don't feel the need to explain the benefits of the LS platform to this crowd. The Coyote/Ford Mod Motor was ignored because they're huge engines that would require me to chop out the shock towers and get a brand new suspension setup. Besides, I like the pushrod design more for it's ease of modification. The LS beats the Windsor platform on account of it having fuel injection without having to go to a pricey aftermarket unit and coming stock from the factory with loads of displacement from an aluminum block.
The car has already had these mods:
-4-piston 11" front disc brakes
-Maier subframe connectors
-Maier control arms, springs, Koni Dampers, 1-1/8" Anti Roll Bar
-Moser 9" with Strange axles, 3.73 final drive, TrueTrac Torsen Diff
-Dual 2.25" Exhaust
The leaving engine was a stock 289 with an Edelbrock carb and intake. It felt like about 200hp.
Onto the swap.
The engine is an L9H out of a Yukon Denali. It's basically an L92 with better injectors, which is basically an L99 with a truck intake, which is basically an LS3 with Variable Valve Timing, slightly lower compression, and a heavier intake valve.
The engine was given a TSP VVT-3 cam, better pushrods, dual .650 lift springs, a stock LS3 intake, and a C5R timing chain. I anticipate it will make about 425whp.
I decided to keep the VVT because I was not planning on running a monster cam and figured that the extra power at lower RPM's would be nice. It limits my cam options, but the MAST and TSP options impressed me enough to stick with it.
I also installed a Stage 2 Monster Clutch with a lighter flywheel.
The transmission is a "Stage 2" T56 out of a 4th F-body rebuilt by Mark Corbett (aka gnx7 with an LS swapped FD RX-7). It will use an MGW shifter.
A GTO oil pan was required to make the engine fit the rear-steer design. In addition, the crossmember and steering was replaced with a TCP rack and pinion kit. This kit replaces both units with a single piece, and should help the car around the autocross course. I sure am tired of cranking and cranking and cranking the wheel to make it change direction.
Fowler Automotive took care of the fabrication to mount the engine and transmission. We used 4th Gen F-body "clamshell" mounts with a polymer transmission mount.
The Ford motor mount points are incredibly weak on these old things. You can crush them with a wrench, nut and bolt. These motor mounts distribute the forces across several points. The engine has also been dropped and set backwards a few inches to improve weight distribution.
Old mounts for comparison... The old steering gear and crossmember are visible.
Here's a picture of how the headers will have to run. The tie rods are attached to the wrong points on the rack, I'll fix this soon.
Here's how it sits now.
The last truly difficult thing to do is headers. The engine is set back and dropped a few inches, so this will be a challenge to do without going to a full custom set.
351W headers were an option, but since the engine sits so much lower than stock I don't think it will work. Knowing that the deck height of the LS3 sits somewhere between the 351W and 302/289W, I'm considering trying some 302W longtubes to see if they fit.
If anyone has any leads, suggestions, or ideas on headers, I'd be more than happy to hear about them.
-
11-10-2014 #2 Registered User
- Join Date
- Mar 2013
- Location
- Beaufort,SC
- Posts
- 329
Nice swap, and mods to keep the stock front end.
11-10-2014 #3 Registered User
- Join Date
- Feb 2013
- Posts
- 1,417
Very cool, love the car!
11-12-2014 #4 Registered User
- Join Date
- Jan 2009
- Location
- Chattanooga, TN
- Posts
- 282
Oh man this is awesome!
Please keep us updated, pics and details, I'm very interested in this one.
I've been DD a 67 coupe for a couple years now and the steering is done and my little warmed over 289 is getting quite cool.
What are you planning on doing for wiring?
Less important, but how did the T56 line up with the stock shifter hole? How would trans tunnel clearance be if you didn't lower it that much?
Keep up the good work man!Stephen S.
1967 Ford Mustang 4.7L, T5
11-12-2014 #5
Registered User
- Join Date
- Sep 2013
- Location
- sw Kansas
- Posts
- 1,645
I'm watching.
11-12-2014 #6
Registered User
- Join Date
- Oct 2013
- Posts
- 70
great looking car man
11-13-2014 #7 Registered User
- Join Date
- Dec 2011
- Posts
- 135
Damn
11-13-2014 #8
Registered User
- Join Date
- Jun 2010
- Location
- Painted post NY
- Posts
- 115
Wow! I realllllly like this!
Any chance the oem exhaust manifolds work? If you are set on headers..I have seen companies that mod headers. I bet it's pricey... Best of luck! Subscribed!Leon Reed
1978 Trans Am
LS1/4L60E
my build..updated 11-21-13 https://www.pro-touring.com/showthre...8-TA-LS1-build
11-13-2014 #9
Registered User
- Join Date
- Nov 2014
- Location
- Bay Area, CA
- Posts
- 30
Wiring is partially from the truck that the engine came from, just with all the emissions and automatic transmission stuff taken out and partially PSI Conversions stuff. Originally Posted by MSTSFabbed

I know that T56's mated to Ford motors can fit in the transmission tunnel if you use Ron Morris mounts that lower the engine like 1/2 to 1". At a stock height some people have to trim the supporting rib (bad idea). T56's supposedly fit easily in 69-70 Mustangs and not at all in stock 65-66 tunnels.
Here's a sideways photo of the shifter compared to the hole. It fits well, maybe a little trimming near the bottom is in order.
This is an F body T56. If I used a GTO, CTS-V, of Magnum T56 the shifter hole wouldn't line up.
There's another guy doing a '67 Cougar with Hooker manifolds. That's my backup plan. The stock ones were too big. Originally Posted by reedld
Do you have a link to the companies that mod headers? Thanks.
11-14-2014 #10
Registered User
- Join Date
- Jun 2010
- Location
- Painted post NY
- Posts
- 115
http://www.stainlessheaders.com/customheaders
Here is one...the other one I believe was an exhaust shop that marked some headers that hung low, cut, re welded, and re coated them.Leon Reed
1978 Trans Am
LS1/4L60E
my build..updated 11-21-13 https://www.pro-touring.com/showthre...8-TA-LS1-build
11-14-2014 #11
Registered User
- Join Date
- Sep 2010
- Location
- Mt. Washington, KY
- Posts
- 96
I like that idea. Price is kinda rough but though. Originally Posted by reedld
11-14-2014 #12
Registered User
- Join Date
- Jan 2009
- Location
- Chattanooga, TN
- Posts
- 282
Oh ok. Thats about right on.
What are you planning on doing for a clutch? Hyd TOB?
How about fuel system? New tank or a return to the old?
Thanks for letting me pick your brain. I'm pumped to see this come together!Stephen S.
1967 Ford Mustang 4.7L, T5
11-14-2014 #13
Registered User
- Join Date
- Nov 2014
- Location
- Bay Area, CA
- Posts
- 30
That's a clever way of getting custom exhaust. Shame it costs so much. Originally Posted by reedld
Right now I'm toying with Windsor headers. Hopefully I don't have to go full custom. If a header company would actually get around to making off-the-shelf pieces for these cars, I think there would be a good market for them.
The clutch is the standard Hydraulic TOB setup from a 4th F body T56. Originally Posted by MSTSFabbed
The old fuel tank is pretty small and tired so I think I'm going to upgrade to a properly baffled 16 gallon EFI tank with a Walbro or Aeromotive pump.
11-14-2014 #14 Registered User
- Join Date
- Mar 2010
- Location
- Jacksonville FL.
- Posts
- 92
This is the modeling kit I got in 2" for mine... I may rent it if your interested when it comes time....
http://www.icengineworks.com/icewmain.htm'66 Mustang Fasback build in progress
'01 F250 Platinum Edition - 1 of 2482
'12 Mustang Boss 302 #806

11-15-2014 #15 -Moderator/Sponsor-
- Join Date
- Apr 2001
- Location
- The City of Fountains
- Posts
- 15,975
Nice build. Looking forward to your progress. So did you lower the engine to get the T56 to fit?
Andrew1970 GTO Version 3.0
1967 Cougar build
GM High-Tech Performance feature
My YouTube Channel Please Subscribe!
Instagram @projectgattago
Dr. EFI
I deliver what EFI promises.
Remote Holley EFI tuning.
Please get in touch if I can be of service.
"You were the gun, your voice was the trigger, your bravery was the barrel, your eyes were the bullets." ~ Her
11-15-2014 #16
New to Pro-Touring
- Join Date
- Sep 2014
- Posts
- 1
Nice Swap, I'm building a 1965 mustang now and I definitley like the idea of the LS!!
11-15-2014 #17 Registered User
- Join Date
- Nov 2008
- Location
- NC
- Posts
- 583
Wow, Holy Shmoly, beautiful car and a DDer to boot.
Hell yeah man.
Great choice in your drivetrain to. Cant beat an LS power plant backed by a T-56.
Looking forward to your updates, oh great shots to. You're quite the photographer
11-16-2014 #18
Registered User
- Join Date
- Nov 2014
- Posts
- 9
subscribing...
11-16-2014 #19
Registered User
- Join Date
- Nov 2014
- Location
- Bay Area, CA
- Posts
- 30
Cool, I'll let you know. I doubt anything more than a 1-3/4 will fit between the shock towers and the engine. Maybe 1-7/8 if you're good. Originally Posted by manOwar
Yes, the T56 fits pretty snug, but there's about a hand's worth of clearance around the transmission to the tunnel. There's a stiffening brace in the transmission tunnel that can be chopped out, but I was going for low center of mass anyways so I put the engine as low as I felt was reasonable on a daily driver car. Originally Posted by andrewb70
Thanks! Originally Posted by Tig
04-22-2015 #20
Registered User
- Join Date
- Nov 2014
- Location
- Bay Area, CA
- Posts
- 30
It is time for a long overdue update. I've been getting work done, just not updating my thread because I'm lazy.
I've been following a similar path as andrewb70 in his Cougar build. It's been good to share experiences with the steering rack, headers, and hydraulic clutch.
Since my last update I've finished the pedal box. The brake and clutch pedal shafts were updated to heavy duty bearings and their supports were reinforced. Here's an example, not my photo. Anyone who's driven an old Mustang knows that the pedals are loose and can be kicked around easily. It didn't feel like a quality product but now the pedals move along a smooth arc. It feels much more like a modern car.
Here's the final product.
I used the Modern Driveline Hydraulic Clutch conversion to convert the old Z-bar linkage to the T56's hydraulic setup. This would aid in exhaust routing. The kit was nice, but not perfect. A couple of bolts could have been selected to better suit their task and there was a bad fitting pair in the Wilwood master cylinder.
Here's the pedal setup before I actually hooked it up. Notice how close it is to the parking brake.
Immediately there was an issue with clearance with the brake master cylinder. As you can see from this picture, the clutch master is located right next to the booster. My 8" diameter master would not fit.
Luckily a friend had a 7" diameter one that he was planning on using for a Jeep. After a bit of grinding on the outer body of the clutch master, the parts fit together.
Basically every control that the driver interacts with on this car exists in a 1.5ft cube on the firewall. Brake booster, master, distribution block, lines, clutch pedal linkage, master, more lines, steering column. Everything is in this tiny corner and it is a packaging miracle that it was able to fit.
In this photo you can see the braided line from the clutch master. I took the liberty of reinforcing the firewall around the steering column lower mount. There's a lower mount for the steering column, then the firewall, then a layer of neoprene, then a layer of rubber (included with the rack kit), and finally another plate to hold it all together. We also have great clearance for headers, but more on that later.
The final step in the pedal box was the throttle pedal. Although my L9H came with a pedal, it was too bulky to fit well and too plastic for my taste. I picked up a Corvette style DBW throttle pedal. Once again, I was low on real estate. The fuse box was moved over a couple inches and a mounting plate was fabricated and welded in on the firewall. The firewall was curved where I wanted to mount the throttle so this was a stomp-proof solution. You can see in this repeat image how the throttle pedal mounting plate fits snugly between the fuse box and the bottom of the brake/clutch pedal bracket.
The throttle pedal was placed so that I could rest my foot against the carpet and keep good throttle control. There are plenty of pedal options if I want to move the throttle closer to the brake in order to heel-toe more easily. Luckily this setup is very well placed for my sized foot.
The next part of the driver controls section was the shifter. I got a nice deal on a MGW short shifter from LS1Tech, so it was time to install it. Given the engine's setback, the original shifter hole was slightly too far forward. A bit of the floor was chopped out and rearranged to extend the shifter hole.
Removing undercoating to weld.
Nice. I quickly threw a seat back in and quickly discovered that the shift was too far forward. The MGW shifter can be clocked in 90 degree increments, so in order to bring it closer to me I clocked it to 6 o'clock position. Word of advice: bring a torch. MGW found it necessary to Red Loctite that bolt you see up top. It will not budge unless you heat it up. If anyone has experience with MGW shifters coming loose without Red Loctite, I'd love to hear the justification for it. After this minor annoyance, clocking the shifter back simply wasn't enough. With my back to the seat, I would be uncomfortable making 1st, 3rd, and 5th shifts. I put the stick in a hydraulic press and bent it. The final result should be close enough for me to shift easily once a knob is on there. If this fails then I'll have to think of something else. For now I'm happy with it. It feels extremely notchy, but the throws are short and the centering springs are strong. I bet it'll get better once the synchros are worn in and the trans has fluid in it.
I also installed the slave cylinder in the T56 but didn't take any pictures. It's been done a million times.
Finally the car has a starter, steering, and clutch. It was ready for headers. Three distinct options arose.
Andrew took the easy packaging approach. Hooker makes cast iron manifolds that fit very well between the cramped shock towers of the Mustang.
Another popular option is to take 302 or 352 Windsor headers are swap the flanges. This was recommended by much of the internet and Griggs Racing. Unfortunately I've seen a few of these endeavors turn into massive wastes of time, money, and metal. Bruce warned me that this would probably not work with the engine set where it was in my car, so I went with option C.
Custom headers!
The specs were as follows:
Stainless Steel - California gas is extremely corrosive now with all that Ethanol. Many classic car guys are losing their mild steel headers to corrosion.
1-3/4 primary tubes - According to my research, the gains of 1-7/8 simply aren't significant enough to deal with the added packaging constraint between the Mustang's shock towers.
4 O2 bungs total - 2 for O2 bungs, 2 for AFR.
V-band clamps and flex pipes - The flex pipes are to allow the exhaust to grow and shrink with heat and not stress hangers or header bolts too much.
These were built by Sanderson Headers in San Francisco. They did very impressive work.
The rack placement and the general layout of the car made fitment a breeze once the tubes got past the shock towers. I highly recommend anyone with a first gen Mustang or Cougar use the TCP rack in order to get a good engine placement. The tubes fit right through the sections of the transmission crossmember.
I figured that I was always eventually going to go to some proper headers, so I might as well get it done right now. Here are some shots of the fitment.
Right now the car is waiting on a driveshaft (ordered), fuel (ordered), intake plumbing, and wiring.
Also I bought a Maier strut tower brace on black friday because I felt a properly designed export brace would help with the added power. Also the chrome on my current export brace was starting to look a bit cheesy. This will look good caging in the LS.
Tags for this Thread

 Reply With Quote