
Results 141 to 160 of 217
Thread: 70 Formula 535
-
01-26-2019 #141

 Registered User
- Join Date
- Jul 2013
- Location
- N. Scottsdale
- Posts
- 379

Got the car ready to haul to the chassis shop next week. I'll have him tack in the tunnel hump so that I can remove the engine and transmission before the car goes to the body/paint shop. What size hole should I have him cut for the shifter?
I'll also have the cross bar and a couple triangulating pieces installed. One area I'm fairly certain about will be short pieces that connect the vertical section of the roll bar to the subframe connector behind the front seat. I'm less certain about whether to have some low door bars installed. They'll help keep things stiff and I'd have them done low enough so that they won't interfere with me getting into or out of the car, but not great aesthetically and I'm sure will create headaches when it comes time to do the interior. Thoughts?
Also wondering if we missed something when we installed the Quadralink spring pocket brackets, since the nut for the lower link is not accessible through hole the frame rail. Easy enough to make the hole bigger, but it seems odd it's so far off, which made me wonder if we goofed somehow. Has anyone else run into this?
-
02-05-2019 #142
Registered User
- Join Date
- Jul 2013
- Location
- N. Scottsdale
- Posts
- 379
It’s been raining here on and off so we haven’t made it to the chassis shop yet. Had lunch with my body and paint buddy. We mapped out a plan to move forward so he could be finished by the summer. I think the timeline is very ambitious. I’ll be ordering brakes tomorrow, 14” Baer 6p fronts, 13” SS4+ rears. This way I can install them along with the wheels and tires so that any issues can be taken care of before the car is in paint. It’s going to be an expensive 6 months.
-
02-27-2019 #143
Registered User
- Join Date
- Jul 2013
- Location
- N. Scottsdale
- Posts
- 379
It's been a busy couple weeks at work and with family, so not much progress on the car. Our son is really into soccer and he's had tournaments the last several weekends, two of which require out of town stays. This weekend's tournament is in town, but we are hosting three players from a team visiting from Japan. The things we do for out kids! Anyways, next week life should get back to normal. I received the brakes so I'll install them to make sure they'll work with the wheels. Hopefully we make it to the chassis shop too. Randy told me he'll be ready to take the car back on May 1 to finish the body and paint.
-
02-28-2019 #144

 Registered User
- Join Date
- Nov 2016
- Location
- Sulphur, La
- Posts
- 599
Man do I understand, it's baseball and UTV racing for mine. If i'm not at a tournament or a race then I'm probably fixing what he broke at the last race, then work on my car. Originally Posted by Alponcho

-
04-07-2019 #145
Registered User
- Join Date
- Jul 2013
- Location
- N. Scottsdale
- Posts
- 379
Just got the car back from the chassis shop. We decided against the door bars I had in mind. The chassis guy felt that the benefit of the bars we designed (down from the main hoop then angled sharply low to the floor, below the entire seat bolster) wouldn't be worth it. He felt the triangulating pieces from the hoop to the subframe connectors behind the seats would add enough stiffness given how I plan to use the car. I'm kind of relieved...was worried about them being in the way and the interior will look a lot cleaner now. I kept the harness bar removable.
I threw on the brakes quickly to check for clearance with the wheels. No issues. Next step is to mount tires on the wheels and install on the car. Body and paint guy said he'll be ready for her in May. At that point, we'll hang the front clip and deal with any tire clearance issues before she's painted.
-
04-13-2019 #146
Registered User
- Join Date
- Jul 2013
- Location
- N. Scottsdale
- Posts
- 379
Had the tires mounted today. Mobile installer 2Utire, did a great job. Car is back at home. Just waiting for a spot to open up at Randy's for paint.
I feel like I should be doing something to move things forward, but not sure what to make progress on next...
-
05-15-2019 #147
Registered User
- Join Date
- Jul 2013
- Location
- N. Scottsdale
- Posts
- 379
Still waiting for a spot to open up in shop for paint. In the meantime I messed around with a few things.
First, I removed the rear springs to see where the suspension would bottom out and found that I still have about .5" between the tire and lips. I think this should give me enough clearance even if I flatten the bump stop, so I should not have to trim or roll the lips any. Relative to a Camaro, the wheel opening is more rounded and so there's a bit more space available. I have plenty of clearance on the inside as well.
Second, I figured out that the motor mounts work without spacers after all. The problem was that the transmission was hung up on small section of the floor in an area that was difficult to see. I'm happy about this, but now I see that the transmission is not quite centered in the tunnel. Don't know if this is a normal or will create a problem?
-
05-19-2019 #148
Registered User
- Join Date
- Mar 2010
- Location
- Valencia, CA
- Posts
- 99
Mind blowing build- make me want to pour a few gallons on gas on my 72 and set it on fire (j.k. I love my Bird, as humble and simple as it is).
Geno
-
05-21-2019 #149
Registered User
- Join Date
- Jul 2013
- Location
- N. Scottsdale
- Posts
- 379
I started thinking more about how much space there would need to be, given the current set-up, between the tires and lips at ride height to give me sufficient downward travel in the suspension. I would end up with slightly more of a gap at the tops of the wheel openings as compared to the sides. I played around a bit, and found that the car looks much better with less of a gap at the tops of the wheel openings as compared to the sides. So I ended up ordering the shorter shocks that now come with the Firebird specific Quadralink kit. I bought my kit from DSE years ago when there was just a generic 2nd gen kit developed with the Camaro in mind, so there was no accounting for the higher/rounded wheel opening of the Firebird. The shocks are pretty expensive and the lips will need work now, but a slightly lower ride height should look better.
-
05-24-2019 #150
Registered User
- Join Date
- Jul 2013
- Location
- N. Scottsdale
- Posts
- 379
Received the Firebird shocks. The body is .5" shorter than the Camaro ones. I installed them without the springs, and with the suspension fully bottomed out, I still have a sliver of space between the tires and lips. That was an expensive half-inch! If anyone needs coilovers for a Camaro, I know where you can get a good deal

-
06-21-2019 #151 Registered User
- Join Date
- Apr 2005
- Location
- Chicago
- Posts
- 2,787
Car looks fantastic and I am happy to see that you are still working on it.
Now that you lowered you may want to consider doing the outer wheel house mod when you roll the quarters. If you ever decide to run a taller tire this is the next spot that rubs.
marty-mj
GarageScene.net High Speed Welding KDHotrods RecoveryRoomInteriors WegnerAutomotive Autometer Ride-Tech
07-21-2019 #152
Registered User
- Join Date
- Jul 2013
- Location
- N. Scottsdale
- Posts
- 379
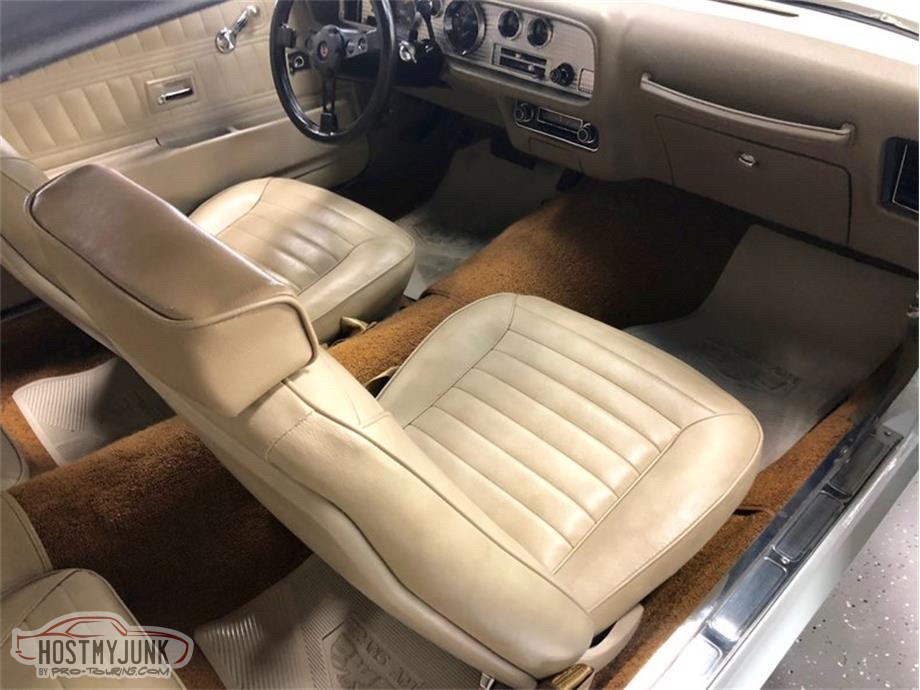
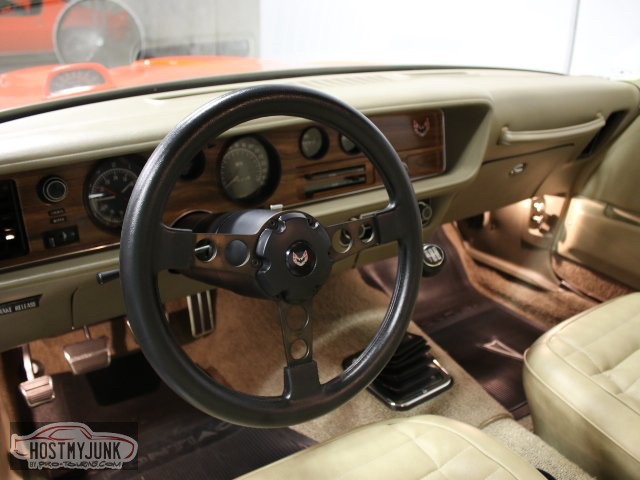
I'm starting to think about interior. I'm torn between going with factory Sandalwood color (as in the photo) or black. The plan is to buy Recaro Specialist seats in cloth and have them recovered in leather in a factory appearing pattern. I think this would look good with the factory door panels, dash, etc. I know I mentioned this previously, but the exterior will be Carousel Red (Hugger Orange), the car’s original color. Thoughts about an interior color like this in a pro-touring car?
07-22-2019 #153
Registered User
- Join Date
- Oct 2017
- Posts
- 116
I say hell yea!! That color would be awesome!
07-22-2019 #154
Registered User
- Join Date
- Jul 2013
- Location
- N. Scottsdale
- Posts
- 379
Here's a photo of a Carousel Red over Sandalwood Formula I found on the web.

Part of me also thinks it would be cool to forego the TA engine turned dash bezel I had planned in favor of the original woodgrain one.
07-22-2019 #155
Registered User
- Join Date
- Apr 2005
- Location
- Chicago
- Posts
- 2,787
I like it.
Originally Posted by Alponcho
marty-mj
GarageScene.net High Speed Welding KDHotrods RecoveryRoomInteriors WegnerAutomotive Autometer Ride-Tech
07-24-2019 #156
Registered User
- Join Date
- Oct 2018
- Location
- San Jose, CA
- Posts
- 523
meh. I would go black personally - as much as black is sometimes overdone. I think it's a better contrast to hugger orange.
1971 Camaro - 406 / T56
2016 Camaro SS convertible
2018 Colorado 4x4
07-24-2019 #157
Registered User
- Join Date
- Sep 2011
- Location
- Southern Ontario
- Posts
- 640

I would say I like the tan interior and the wood grain.
07-24-2019 #158 Registered User
- Join Date
- Mar 2007
- Location
- Florida
- Posts
- 2,391
There's several different colors in a Sandalwood interior. If you go with wood grain dash I think the early light color wood grain looks best with Sandalwood.

10-17-2019 #159
Registered User
- Join Date
- Jul 2013
- Location
- N. Scottsdale
- Posts
- 379
Randy, my paint and body guy, can't take the Formula until he finishes the car he's doing for MCACN, which is at the end of November. To move things along a little quicker, next week the car will be moving to another shop for a bunch of things needed before paint...transmission tunnel, fuel tank access hatch, firewall filler, Brake/Clutch MC bracket, AC mock up, fuel and brake lines. This way Randy can hit the ground running when he gets the car in early Dec.
Quick question: I'm wondering if anyone has a good photo of an early 2nd gen firewall that's finished? I know there are a lot of variables, but it would be helpful to identify which holes to fill/what to smooth out, and let me see if I'm forgetting anything.
10-28-2019 #160
Registered User
- Join Date
- Jul 2013
- Location
- N. Scottsdale
- Posts
- 379
Hauled the car to the shop for remaining fab work. Looking for input on a couple things.
First, although the original plan was to keep the rear seat for aesthetics, I'm thinking about doing away with it so I can lift the floor in that area so that the mufflers can be tucked in a bit higher. Any reason I may regret doing this?
Second, wondering if anyone has used the mini-tup trunk close outs that DSE sells, and if so, did they create significantly more clearance for the exhaust?
Tags for this Thread

 Reply With Quote


