

Results 201 to 220 of 228
Thread: 1969 Chevelle "Cone Smasher"
-
04-26-2016 #201

 Registered User
- Join Date
- Jul 2013
- Location
- Gilbert, AZ
- Posts
- 934

Excellent work! Very sharp, so I'm guessing it won't be long before I see it cruising around here. But then again, summer is nearly here, so maybe next fall? Lol.
Josh Campbell- Pushing the limits of my HOA since 2011
71 Firebird- 455, Ridetech front suspension. https://www.pro-touring.com/threads/...04#post1124504
67 Camaro RS/SS clone, Speedtech front suspension, coilovers, soon to get LT1/T56.
82 Z28- cheapie beater, soon to get a 406.
66 Mustang coupe- 393, T-5, sold. https://www.pro-touring.com/threads/...-Coupe-GT393-C
-
04-26-2016 #202 Registered User
- Join Date
- Mar 2014
- Location
- Yuma, AZ
- Posts
- 635
Haha yeah we've still got a good amount of work to be finished, but hopefully sometime later this summer I'll get it up to the pavillions! We will for sure have it ready for the Fall GoodGuys show Originally Posted by CampbellshotrodsAZ
 Nelson
1969 Chevelle "Cone Smasher" Family Project
https://www.pro-touring.com/threads/...uot?highlight=
1984 "Rustang" GT, 5.0, 5 Speed Project
https://www.pro-touring.com/threads/...T-(Slow-Build)
04-27-2016 #203
Registered User
- Join Date
- Oct 2005
- Location
- Montana
- Posts
- 15
You didn't even get it painted and you have another project? Money must be burning holes in your pocket! Paint looks great! Bet you can't wait to drive it. We've had 4 days of a rain and snow mix so mine is still in storage. Keep up the fine work!
P.s. Thanks for the reply to the PM a long time ago. Good advice and I suck at replying in a timely matter
04-27-2016 #204 Registered User
- Join Date
- Jun 2015
- Location
- San Diego
- Posts
- 165
awesome build, i love all the little details. you all nailed it!
05-01-2016 #205
Registered User
- Join Date
- Mar 2014
- Location
- Yuma, AZ
- Posts
- 635
Haha well when a Fastback Mustang shows up for less than a couple grand, you never say no! Originally Posted by HeadInTheClouds
And thanks! I'm definitely ready to have it on the road again. No worries about the reply, I'm bad about that sometimes too haha.
Thanks! Originally Posted by KB Camaro
Nelson
1969 Chevelle "Cone Smasher" Family Project
https://www.pro-touring.com/threads/...uot?highlight=
1984 "Rustang" GT, 5.0, 5 Speed Project
https://www.pro-touring.com/threads/...T-(Slow-Build)
11-09-2016 #206
Registered User
- Join Date
- Mar 2014
- Location
- Yuma, AZ
- Posts
- 635
Long Awaited Update
Hello all,
This thread is long due for an update! It has been a very busy year for me, I graduated in May with my Mechanical Engineering degree and immediately went to work for General Motors as a Test Engineer at the Desert Proving Ground in Yuma. Also over the summer I became a first time homeowner and moved for the first time in my life, so I've had a lot of changes occur over the past few months. Due to my life changing drastically and other life events we have progressed slower than we hoped on the Chevelle. However, I am here with an update!
After painting the car we allowed plenty of time for the paint to fully cure before we began to cut and buff the car. We had our friend who sprayed the paint give us a refresher on the process and commenced to more sanding.
Here's a few pictures of the car after buffing:
After buffing the exterior we got started on the interior. First up was the headliner. We decided to fabricate a headliner rather than try to fit an old hoop headliner into the car. It is held in place with very strong magnets from a company called MagDaddy, we found them at SEMA last year.
We built the dome lights into the headliner as well. They are from SuperBrightLED.com, they have a very wide field of view and light the interior well. Here is the back of the panel.
Hers is the front of the panel, you can see the LEDs near the center.
And here is a picture of the headliner installed.
After completing the headliner, we started on the carpet. We clearly chose black.
Here is the carpet installed in the car.
We knew we were going to do a full center console, so before the carpet was in we mocked one with foam board.
The foam board was then transformed into aluminum. We also formed some grab handles into the console so that passengers have something to hold during an autocross. At this point it still needs to be covered with material.
At this point in time the Fall GoodGuys show was approaching, and we decided that the car needed to go, finished or not. So I proceeded to complete the wiring, put the old seats in, and finish other things.
Here is a picture of the front grill assembled for the first time in 26 years.
Here is the front bumper installed. We welded the bolt holes so the bumpers need to be finished, we have not chosen what finish we want them in.
Here's the most recent pictures I have, she's ready for her first show!
We're glad to have her on the road again, and we're excited that the end is in sight!Last edited by WallaceMFG; 03-08-2018 at 12:45 PM. Reason: Fix Pics
Nelson
1969 Chevelle "Cone Smasher" Family Project
https://www.pro-touring.com/threads/...uot?highlight=
1984 "Rustang" GT, 5.0, 5 Speed Project
https://www.pro-touring.com/threads/...T-(Slow-Build)
11-10-2016 #207 Registered User
- Join Date
- Aug 2012
- Location
- Peoria, AZ
- Posts
- 1,758
The car looks great! Congrats on getting it out of the garage and on the road. Good luck at GoodGuys!!
Lance
1985 Monte Carlo SS Street Car
11-10-2016 #208
Registered User
- Join Date
- Mar 2014
- Location
- Yuma, AZ
- Posts
- 635
Thanks! Not going to be racing at this event, but will be happy to be there! Originally Posted by SSLance
Nelson
1969 Chevelle "Cone Smasher" Family Project
https://www.pro-touring.com/threads/...uot?highlight=
1984 "Rustang" GT, 5.0, 5 Speed Project
https://www.pro-touring.com/threads/...T-(Slow-Build)
11-10-2016 #209 Registered User
- Join Date
- Jul 2007
- Location
- Phx AZ
- Posts
- 25
The car is lookin awesome, really like the headliner and all the custom touches! Where you gonna park at Good Guys ? Would love to check it out in person.
Rick
11-11-2016 #210 New to Pro-Touring
- Join Date
- Jun 2014
- Posts
- 62
that car is amazing. Kind of project makes me motivated to get my 69 chevelle on the road to completion. Ive got a loooong way to go but were hoping to fire up the car next weekend.
11-11-2016 #211
Registered User
- Join Date
- Mar 2014
- Location
- Yuma, AZ
- Posts
- 635
Thanks! I'm not sure where we're going to park it yet, I'm having memory that there is a "work in progress" section to park in. If there is that's where we'll put it. If not I'd like to put it in the homebuilt section, but I'm not sure if they will let an unfinished car in there. If that doesn't work, it will probably be down the hill in the grass area. Originally Posted by Rebob
Nelson
1969 Chevelle "Cone Smasher" Family Project
https://www.pro-touring.com/threads/...uot?highlight=
1984 "Rustang" GT, 5.0, 5 Speed Project
https://www.pro-touring.com/threads/...T-(Slow-Build)
11-11-2016 #212 Registered User
- Join Date
- Jul 2011
- Location
- Prescott, AZ
- Posts
- 206
The handle idea on the tunnel is actually pretty neat. It seems most cars are lacking 'oh s***' handles to grab as you're flying around turns.
Everything's looking nice! Keep up the good work.
11-11-2016 #213
Registered User
- Join Date
- Jul 2007
- Location
- Phx AZ
- Posts
- 25
I didn't see a work in progress area but I can't see why you wouldn't be able to park in the home built. I'll be up there hope to see ya. Originally Posted by WallaceMFG
Rick
11-11-2016 #214 Registered User
- Join Date
- Oct 2013
- Location
- H-Town, TX
- Posts
- 356
The car looks great- very nicely done
11-20-2016 #215
Registered User
- Join Date
- Oct 2006
- Location
- Stillwater Oklahoma
- Posts
- 183
That console is a really cool idea. Love the handles. Paint just looks killer still can't get over it. Hope all went well at the Goodguys show.
04-28-2017 #216
Registered User
- Join Date
- Mar 2014
- Location
- Yuma, AZ
- Posts
- 635
Long Overdue
Hello,
Again this thread is long overdue for an update! Funny how life gets in the way of things haha.
At this point the car has effectively been completed except for some odd and ends like getting bumpers re-chromed. So, I will be posting the pictures I have up until now.
In the last update I had pictures of the center console. Here are some pictures of it being finished, my brother covered it.
Here it is installed:
We decided to make the console full length and split the back seat. It was mocked in foam board before bending the aluminium.
Once the console was built we began fabricating the rear seats.
Here's the frames:
Then we began shaping foam. Our shop looked like it had snowed inside from all the foam dust.
And here they are covered with material.
The front seats were the model for the rear seats, so we simply recovered them with our material. Here is the before and after:
Next item was to build the door panels. We started on the fronts with an idea for the door handles.
We made a new panel for the base.
Then we attached the arm rests I made on my friends mill. They took quite a bit of time to complete.
The material went on next:
Here was the finished product. The Chevelle emblem on the door panel is actually the emblem that originally belongs on the header panel of the car. We bought some repop ones and attached them to the panel.
Once we had the panel complete we weren't happy with the door handles and window cranks. So we talked to our friends at All American Billet and he made us a blank set of handles that we modified to match my arm rests.
The rear door panels were complete similarly to the fronts. The rear arm rests are the same as the fronts except for the lack of grab handle area
And here's dad, happy he did not sew his fingers to anything haha.
I have more pictures, I will post another update since this one is getting long.Last edited by WallaceMFG; 03-08-2018 at 01:18 PM. Reason: Fix Pics
Nelson
1969 Chevelle "Cone Smasher" Family Project
https://www.pro-touring.com/threads/...uot?highlight=
1984 "Rustang" GT, 5.0, 5 Speed Project
https://www.pro-touring.com/threads/...T-(Slow-Build)
04-28-2017 #217
Registered User
- Join Date
- Mar 2014
- Location
- Yuma, AZ
- Posts
- 635
Long Overdue Pt. 2
In continuation of the last post, here are more pictures I have.
I spent quite a bit of time reworking all the wiring. We had thrown it together before to drive the can and it looked like hell. Now I can sleep better knowing it looks better and is right. Also got the double din stereo mounted in the dash.
We also fabricated a radiator cover panel. I'm happy with how it came out.
We took loaded up the car and took it to the Del Mar Goodguys show for a family trip and had a great time over there. While we were there we stopped and talked to the ridetech guys about a few small issues we had noticed with our car since we had gotten it driving. They took measurements and lots of photos and told us to send an email and they would take care of us. I'm here to say, ridetech has some of the best customer service I have ever seen. The guys there went above and beyond to correct the issues we had with our kit and sent us the pile of parts in the picture to fix everything. I'm happy to say Ridetech has earned some lifelong customers thanks to this!
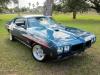
While we were in California we took some time to get good pictures of our car, here is one of them. I have more, just need to get them off my camera.
The car is basically complete, but it will continue to evolve as we drive and race the car. I'll do my best to keep the updated, and thanks for stopping by!Last edited by WallaceMFG; 03-08-2018 at 01:22 PM. Reason: Fix Pics
Nelson
1969 Chevelle "Cone Smasher" Family Project
https://www.pro-touring.com/threads/...uot?highlight=
1984 "Rustang" GT, 5.0, 5 Speed Project
https://www.pro-touring.com/threads/...T-(Slow-Build)
05-01-2017 #218
Registered User
- Join Date
- Oct 2006
- Location
- Stillwater Oklahoma
- Posts
- 183
I interior turned out awesome! Love the door hardware especially. Congrats on building one bad to the bone Chevelle.
06-13-2017 #219 Registered User
- Join Date
- Nov 2010
- Location
- Ventura County CA
- Posts
- 556
Looks great Nelsen! I like the looks of those wheels on there. Who modified the bolt pattern for you?
Clint - '70 Nova "restomod" cruiser & autocross family car
07-12-2017 #220
Registered User
- Join Date
- Jul 2017
- Location
- SeTX
- Posts
- 3
I started reading your build thread and got to page 4 and the pictures are not showing anymore. Thanks photobucket for screwing that up, lol

 Reply With Quote


