

Results 181 to 200 of 207
Thread: 1970 Mustang Grabber Special
-
05-04-2017 #181

 Registered User
- Join Date
- Apr 2012
- Location
- NC
- Posts
- 165

Still slowly getting things accomplished, snails have a quicker pace than I do lately. Didn't want to re-hash the usual grinding and fitting portion, so a little fast forward. The welds are all ground down, and the majority of the areas are semi trimmed to final size.

Fitting pipes, welding V band clamp flanges, tacking stuff together... (with a gratuitous weld porn pic)
With things coming together, a quick check to see if this fits, which thankfully it does.
I have removed the muffler to cut the exit hole in the side and get these pipes attached. The extra long, drawn out exhaust build is getting ever so close to completion, yea!!
-
05-04-2017 #182
 Registered User
- Join Date
- Sep 2016
- Posts
- 147
Amazing work as always Mike.
-
05-14-2017 #183
Registered User
- Join Date
- Apr 2012
- Location
- NC
- Posts
- 165
As I continue to get interrupted with other issues (like putting a clutch in a AWD Outback, yea...) I have gotten the attachment brackets fabricated and positioned. They were already laid out so all I had to do was to cut them out, drill, bend and weld them up. A few holes drilled in the car (actually a bunch of other steps were needed, blah, blah blah...) and the passenger side piping is fairly well done.
I removed the system and welded the muffler to the X pipe assembly. I do not like how the rear rocker area doesn't look like the other side. A straight edge confirmed that this side is about 3/16" flatter than the driver's side. So while the exhaust is off the car, this area will be chopped back apart and brought out to the same contour. My OCD will not let me ignore this.*
Barring any more surprise "friend" projects, I'll get that fixed and move on to getting the holes in the floor covered up.
-
05-14-2017 #184
Registered User
- Join Date
- Sep 2016
- Posts
- 147
Are you going to have some heat sheilding between the exhaust and the floor? It looks tight.
-
05-15-2017 #185
Registered User
- Join Date
- Apr 2012
- Location
- NC
- Posts
- 165
It is beyond tight as it protrudes through the floor lol. Originally Posted by Dalpilot

I have a plan to give the frame rail a little beef-up and make a cover that will enclose the area. It shouldn't need any heat shielding, but will put some mat or lizard skin over the area. This is coming up.
-
05-19-2017 #186
Registered User
- Join Date
- Apr 2012
- Location
- NC
- Posts
- 165
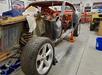
I fixed the rocker shape on the rear portion, it looks much better. The exhaust was removed, the band was welded in the frame rail notch and a few other touchups were knocked out. I decided to go ahead and remove the car from the rotisserie for a while, so over to the lift it went.
The frame table was positioned under the car and lowered into position. I was glad it all lined up with just a little persuasion. I think it looks funny on this as I have only seen the '70 convertible sitting on it.*
The junk castors I used for the table do not like the weight of this car. With the block, heads and transmission in the chassis, along with a roof and cage it added some weight (compared to the convertible)**and the castors protested. I'll get it all in position and leveled, then get these holes in the floor filled back up.*
-
05-22-2017 #187
Registered User
- Join Date
- Sep 2016
- Posts
- 147
Originally Posted by latoracing
It doesn't get any tighter then that. Lol
-
05-23-2017 #188
Registered User
- Join Date
- Apr 2012
- Location
- NC
- Posts
- 165
Since everything else I have done on this car is "overkill", might as well continue with that theme lol. I wanted to give the frame rails a little more support, since I all but cut them in half. I also need a way to plug those huge holes I cut in my new floor. So I started with a template, then enlarged it a little. I then transferred the pattern to some 2" x 4" x 1/8" wall tube. A little bit of Sharpie guided plasma cutting and we have some roughed out frame beef-ups.
A little trimming, some grinding, more trimming and the beef-up is starting to fit.
When I torched out the rough shape, I left a long strip of the top of the tube, which was cut at the tangent line of the radius on the corners of the tube. The front is bent down to the radius I cut into the tube, which takes the contour of the part.
Tack welded in place as the strip makes contact
Fully welded and ground. The radius on the sides mimic the original shape of the tube, (your how to for the day lol) and will look like it was formed, not welded.
I have a couple of plasma holes I didn't get filled, but I'll take care of them shortly. I am going to cut some of the height out of these as they look huge, and probably do not need to be that big. I'll get it trimmed, then notched for the side pipe routing.
-
05-24-2017 #189
 Registered User
- Join Date
- Dec 2011
- Posts
- 135
Mike, it's one thing to be talented at working,welding and shaping metal, but to have the vision to merge your ideas and skills together is pretty impressive. I've enjoyed watching your work on this car from the beginning, and I can't help but wonder what you have up your sleeve next.

-
05-25-2017 #190
Registered User
- Join Date
- Apr 2012
- Location
- NC
- Posts
- 165
Thank you so much for the compliments. Originally Posted by Bossed
This side pipe experiment kinda took on a life of it's own. I was not 100% sure it was going to work, but seems to have been pulled off. It will be interesting to see how it works once the car is running. I just hope nothing rattles and it is not obnoxiously loud lol.
I have a couple more areas I want to mess with before the bodywork starts. I've been working on a project that I wanted to build for a long time and it is starting to come together. (it is going to help with future parts...)
-
05-25-2017 #191
Registered User
- Join Date
- Apr 2012
- Location
- NC
- Posts
- 165
Finished trimming in the beef-up part and down sizing it by over 1/2", it looks much better. I marked the area that it will be attached to and removed the floor leaving the frame rail flange exposed.*I did not want to weld this to the floor pan, that would have been fairly useless.*
With all that removed, I went ahead and marked the area for the pipe to go through and cut it out. I also cut a strip out of the leftover tube to enclose the 1/2 hole. A little bending in the vice, tacked and welded in place. I will trim the excess off and get the welds ground down on the beef-up and the frame rail. Should be welding this one in place on the next posting.
-
06-10-2017 #192
Registered User
- Join Date
- Apr 2012
- Location
- NC
- Posts
- 165
Haven't updated this in a little while, been busy with an E-wheel build , it is a fun distraction but hopefully going to be useful on future projects.
I did get the passenger side beef-up welded in place a week or so ago.
I have the other side all trimmed, fitted and on it's way. The floor is laid out for cutting and that's where it's been sitting... The E-wheel is getting closer to being completed, I'll get back to this frame reinforcement business soon.
Meanwhile, weld, weld, weld, weld.....
06-11-2017 #193 Registered User
- Join Date
- Mar 2008
- Location
- Brisbane Australia
- Posts
- 410

Can't wait to see how the e wheel turns out too
Hot rodder's recycle, wheres those prius' going when the tree huggers have a new fad.
06-16-2017 #194 Registered User
- Join Date
- Jul 2011
- Location
- Prescott, AZ
- Posts
- 206
What in the world is that?
06-16-2017 #195 Registered User
- Join Date
- Nov 2011
- Posts
- 163
looks to me like the start of a home built english wheel Originally Posted by Centerforce
Justin Hocking
67 Mustang Coupe to Fastback swap
TCI front and rear
Detroit Mini Tub
Future coyote
06-17-2017 #196
Registered User
- Join Date
- Apr 2012
- Location
- NC
- Posts
- 165
Justin is correct, it is an English Wheel, used for shaping sheet metal. This was some of my inspiration, along with several other designs. Mine is much smaller. Originally Posted by Centerforce
I have a specific project to build with it and should be able to find more uses for this machine. I've wanted one for years and finally went after building it.
06-18-2017 #197
Registered User
- Join Date
- Sep 2016
- Posts
- 147
I know Mikes secret now. He told me it would happen to me as well and it did, (not that I have 1/100th of his talent). After a while, the building stuff becomes more addicting than finishing the project.
Well done Mike.
06-19-2017 #198
Registered User
- Join Date
- Jul 2011
- Location
- Prescott, AZ
- Posts
- 206
Ah, got it! We thought it looked a little large to be a car part Originally Posted by latoracing

That'll be a useful addition to the garage if you plan on doing a lot of sheet metal work.
07-28-2017 #199
Registered User
- Join Date
- Apr 2012
- Location
- NC
- Posts
- 165
Been messing around building machinery, finally got it powder coated and reassembled.
Gotta get back to work on the car, and get some pics replaced at some point...
07-28-2017 #200 Registered User
- Join Date
- Nov 2006
- Location
- Ma.
- Posts
- 5,567
Beautiful job!!
Wayne
Car FINALLY home !!!!!! lol
Project FNQUIK https://www.pro-touring.com/showthre...ghlight=FNQUIK


 Reply With Quote


