
Results 21 to 40 of 44
Thread: 1971 Chevelle SS Clone LS3 swap
-
08-28-2011 #21
 Registered User
- Join Date
- Aug 2011
- Posts
- 47
I got the TSP cam and spring kit installed today. Boy changing springs with the heads on, even with a tool designed for that, is tough. I also painted the valve covers red. I was wanting some nice valve covers but they are simply too expensive. Since I have the engine out I also made some 1/4" spacers out of some aluminum and put them under the motor mounts on the cross-member. I have been reading that even the Mast Motorsport oil pan (which is what I have on order) needs a spacer to clear the inner tie rod ends on A-Body's.
-
08-29-2011 #22 Registered User
- Join Date
- Jul 2011
- Location
- Nashville/ Tampa
- Posts
- 724

The holes in the console might have been where the seat belt holders were. I hope you have better luck with your kwik bracket than I have had with mine.
https://www.instagram.com/gen_v_lt1_chevelle/
Do not buy anything from Frankie's Used Auto Parts. Ever.
Chevelle ̶a̶l̶m̶o̶s̶t̶ ̶f̶i̶n̶i̶s̶h̶e̶d̶ L92/200-4r now Gen V LT1 and T56- https://ls1tech.com/forums/conversio...nvertible.html
08-30-2011 #23
Registered User
- Join Date
- Aug 2011
- Posts
- 47
Oh? What kind of issues did you have with the Kwik brackets?
08-30-2011 #24
Registered User
- Join Date
- Aug 2011
- Posts
- 47
Got the radiator and fan fitted
After work today I got the radiator fitted and made some aluminum brackets to hold an electric cooling fan.
09-26-2011 #25
Registered User
- Join Date
- Aug 2011
- Location
- michigan
- Posts
- 22
any updates
09-26-2011 #26
Registered User
- Join Date
- May 2009
- Posts
- 33
Sweet!
09-27-2011 #27
Registered User
- Join Date
- Aug 2011
- Posts
- 47
Update finally getting some more parts
Been waiting on the transmission now. Once I get the trans I can get a lot of this done. Got lots of parts waiting to go in but transmission is the key to getting the engine in the car and get a driveshaft ordered. While I am waiting for that I ordered and got some suspension parts.
Took a picture of the front suspension progress. The front will be and SC&C/SPC ATX tall spindle setup with C6/Z06 brakes from Kore3. Also got a set of Fikse FM5's coming this week too. Everything should be here before the weekend except the transmission. Been waiting since middle August for the transmission.
I also worked some on the dash. Got rid of the clock and put a Monte Carlo fuel gauge in its place tested it and it works good. Also, got a oil pressure gauge to replace the small "SS" fuel gage on the lower right. I
used an oil pressure gauge from a late 70s model GMC Jimmy. It matches fairly well and just fits inside the confines of the 1-1/4" circle. I got it all wired up tonight and it seems to be working.
I piece-mealed the front accessory brackets for the LS3. I ordered all the parts from summit using part numbers I found on LS1tech. I got the tensioner, idler, ps brace, reservoir and alternator/ps bracket for about 250 bucks. Got a used 06 Vette PS pump and alt for 200. So $450 for the accessories brackets. Will be adding a Kwik/Sanden setup later on to complete it. Here are some pics:
10-01-2011 #28
Registered User
- Join Date
- Aug 2011
- Posts
- 47
I got some used 18"x10R 18"x9"F Fikse FM5's with Yokohama Advan 295/35 and Yokohama 255/40 yesterday for $1500 for the set.
However, they are pretty rough and absolutely filthy dirty even though they are only 4 years old. Tires are almost new though. I have
to get two new lips cause the two front had bad curb rash. The centers need refinishing too. The paint on the centers is all chipped
up around the lugs and at some point (when they were in storage) some kind of chemical spilled on the centers finish and ruined
it on two wheels pretty badly. Whomever had these before didn't take good care of them seeing they probably spent about $5000 for
these wheels and tires. At least they aren't bent though. The two lips will cost nearly $500 and will go get a quote on powder coating
the centers on Monday. I hope the media blast and powder coat doesn't cost more than $500.
In other news I just finished putting on a 1350 pinion yoke that's a job!
10-10-2011 #29
Registered User
- Join Date
- Aug 2011
- Posts
- 47
The engine and trans is in the car now. Just finished it up this weekend. Also got the exhaust done and the suspension. The Mast oil pan barely clears the
inner tie rods, the 4L65E barely clears the tunnel the Stainless Works headers barely clear the crossmember. In other words its a very tight fitting combo.
It turned out nice though. Will post some pics tomorrow. Next up is brakes then wiring.
10-12-2011 #30
Registered User
- Join Date
- Sep 2011
- Posts
- 55
Where did you get your LS3 from?
10-12-2011 #31
Registered User
- Join Date
- Oct 2011
- Posts
- 696
Please post more pics
10-13-2011 #32
Registered User
- Join Date
- Aug 2011
- Posts
- 47
I got engine from protech engines in Lubbock Texas. Its a
New gmpp crate engine.
10-13-2011 #33
Registered User
- Join Date
- Sep 2011
- Posts
- 55
Thanks.
10-13-2011 #34
Registered User
- Join Date
- Aug 2011
- Posts
- 47
10-13-2011 #35
Registered User
- Join Date
- Feb 2006
- Location
- Enumclaw, WA
- Posts
- 235
I want to see the Fikse's on! I don't care if they are rough or dirty...

1970 Chevelle Pro-Touring Project
Plans- 6.0L H/C (TT later), T56, UMI suspension, Kore3 C6 Z06 brakes, and lots more....
10-13-2011 #36
Registered User
- Join Date
- Aug 2011
- Posts
- 47
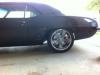
Here is pic of wheel
The front wheels are all apart for outer lip repair/replacement so here is a shot of the back wheels mocked up
on the car
10-13-2011 #37
Registered User
- Join Date
- Oct 2010
- Location
- Longwood, FL
- Posts
- 191
car is looking sweet and i'm sure will perform even more so! that engine is just plain gorgeous
10-14-2011 #38
Registered User
- Join Date
- Aug 2011
- Location
- Las vegas, nv
- Posts
- 51
Wow looks awesome!
10-14-2011 #39
Registered User
- Join Date
- Jul 2009
- Location
- Cypress, TX
- Posts
- 317
Do you have an electrical schematic for the seats? I picked up a set of C5 power seats for my son's Camaro. They're in and now we just need to hook up the electrical.
 1969 Camaro - LSA motor, 6L90 transmission, TCI front subframe, TCI torque arm rear suspension, Ford 9" rearend
10-15-2011 #40
Registered User
- Join Date
- Aug 2011
- Posts
- 47
The power seats were an easy two wire hookup too. However, I had to connect 12v(+) to both orange wires in the seats connector to get it to function. And I hooked ground to the black wire with white stripe. Originally Posted by terrydmorgan


 Reply With Quote


