

Results 1 to 20 of 514
Thread: Project 70 RS
-
06-27-2011 #1

 Registered User
- Join Date
- Feb 2009
- Location
- N.J.
- Posts
- 674

Project 70 RS
After having the car apart for alomost 4 years, things are starting to come together.
Subframe and engine are back in it actually feels like I'm getting somewhere.
There are too many members to thank for all the help I have been given, so I will just thank all the people on this forum.
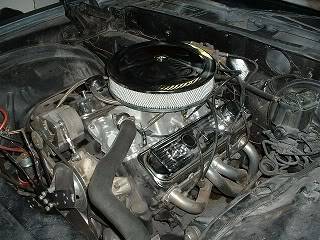
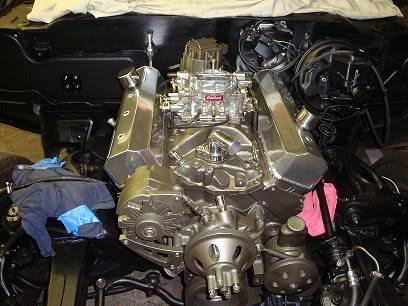
Here is a before picture of the engine compartment and an up to date picture of the progress so far.
Thanks again for all the help.
-
06-28-2011 #2
Registered User
- Join Date
- Feb 2009
- Location
- N.J.
- Posts
- 674
Project 70 RS
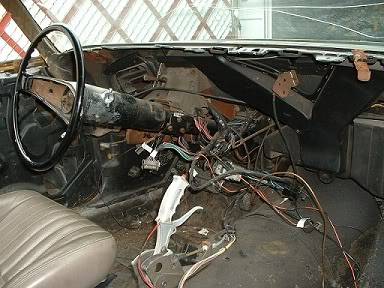
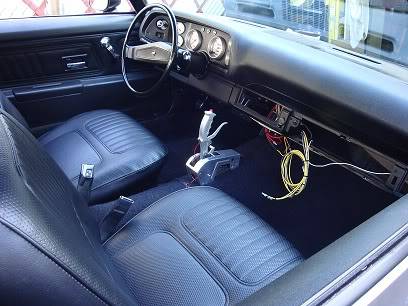
Here is an interior picture the week I got it.
Completely gutted and alot of useless wiring but rust free.
I'm in the process of installing the Vintage Air system at the moment.
Everything inside is new including a lot of Dynamat.
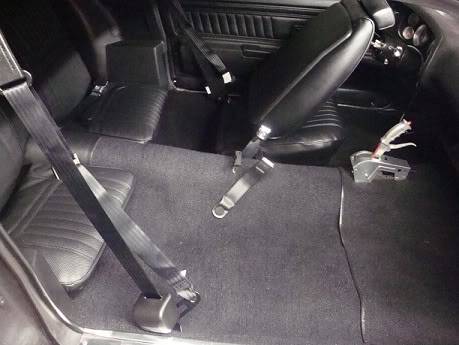
Here is a photo from last week.
06-29-2011 #3 Registered User
- Join Date
- Jul 2010
- Location
- Rancho Murieta
- Posts
- 54
wow, lots of progress, car looks great! Need more pictures though! btw, what color is that that you painted the engine with? is it cast iron? I'm lovin it!
06-29-2011 #4
Registered User
- Join Date
- Feb 2009
- Location
- N.J.
- Posts
- 674
Thanks Clutch93,
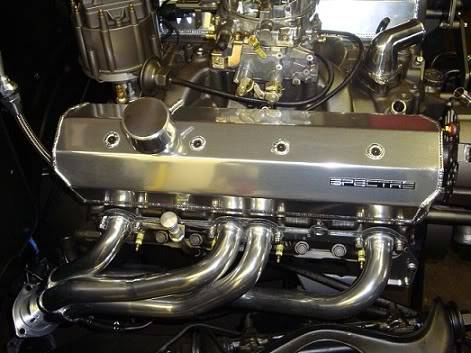
Yes, it is cast coat iron. It will look awesome with all the stainless steel arp hardware I have for it.
I'm going to try and post some more pictures this weekend.
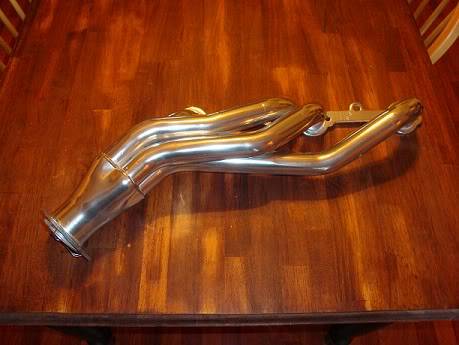
I should be getting my headers back from the ceramic coaters on friday.
I want to get the rest of the engine together this weekend so I can finish the Vintage Air install.
Thanks again
06-30-2011 #5
Registered User
- Join Date
- Feb 2009
- Location
- N.J.
- Posts
- 674
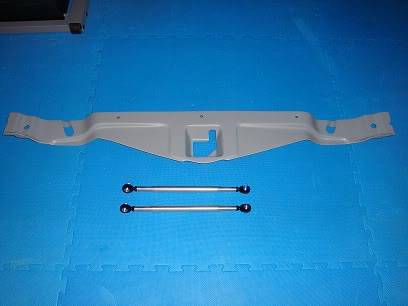
I recieved some parts from Anvil Auto today.
Radiator closeout and aluminum fender braces.
Nice stuff, can't wait to put them in.
Closeout will be painted low gloss black just like the rest of the engine compartment.
Really makes the engine pop.
07-02-2011 #6
Registered User
- Join Date
- Feb 2009
- Location
- N.J.
- Posts
- 674
Picked up my headers from the ceramic coaters today.
Hope to get them installed tomorrow so I can put the a/c compressor in too.
Also here's a better picture of the interior.
07-02-2011 #7 Registered User
- Join Date
- Jun 2011
- Location
- Ohio
- Posts
- 263
Man that interior looks really nice!!
07-02-2011 #8
Registered User
- Join Date
- Feb 2009
- Location
- N.J.
- Posts
- 674
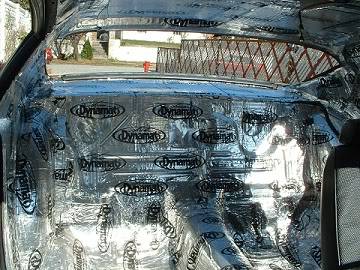
Thanks, heres a picture of my dynamat stage.
I went a little crazy with it. Got a great deal on ebay and bought more than I needed.
Ended up doing the insides of the doors too.
They close like a new car though. Love that solid sound and feel.
07-02-2011 #9
Registered User
- Join Date
- Jun 2011
- Location
- Ohio
- Posts
- 263
Looks great should keep the noise level down.
07-03-2011 #10 Registered User
- Join Date
- May 2011
- Location
- Central FL
- Posts
- 216
The interior looks great, very clean. Was there originally any wood laminate on the inside? I can't stand the stuff lately.
- David
1967 Camaro - In remembrance of my friend Scott
07-03-2011 #11
Registered User
- Join Date
- Feb 2009
- Location
- N.J.
- Posts
- 674
Not really sure. When I got the car it was pretty much gutted.
All the A pillars and anything that was gloss are painted a trim black now.
All metals are a brushed finished now also.
Trying not to have anyhing shiny.
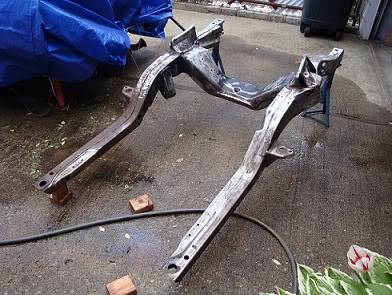
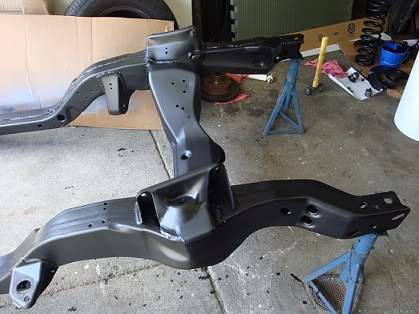
Here's a picture of the front subframe before and after coating it with KBS
3 weeks ago.
No shine.
07-03-2011 #12 Registered User
- Join Date
- Mar 2010
- Location
- Clovis NM, 88101
- Posts
- 329
Brother, it is looking good!! Keep the pics coming and don't stop working on it.
73 Camaro
Gene
07-03-2011 #13 Registered User
- Join Date
- Nov 2006
- Location
- Ma.
- Posts
- 5,567
Its looking great. Nice job on the subframe.
Wayne
Car FINALLY home !!!!!! lol
Project FNQUIK https://www.pro-touring.com/showthre...ghlight=FNQUIK
07-03-2011 #14
Registered User
- Join Date
- Feb 2009
- Location
- N.J.
- Posts
- 674
Thanks, I am really happy with the satin look of it.
It makes the engine stand out even more.
Well, I have to go put the headers on.
More pictures later.
07-03-2011 #15
Registered User
- Join Date
- Feb 2009
- Location
- N.J.
- Posts
- 674
Just got the headers in and now have to go get stainless steel hardware to bolt them to the exhaust. Have aluminum gaskets for the collectors but did not like that the bolts were not s/s.
Installed the Vintage Air compressor. Brackets are ok but definitly look better with arp hardware.
07-04-2011 #16
Registered User
- Join Date
- Feb 2009
- Location
- N.J.
- Posts
- 674
Started early today, hooked up the trans linkage, trans kickdown, throttle cable.
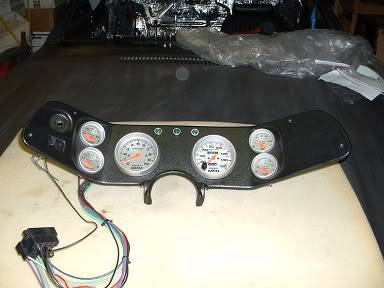
Installed the new OER dash vents and v/a control panel.
Connected the headers to the exhaust.
Mounted the radiator support and started fitting the new aluminum rad.
that's been sitting in the basement for almost 2 years(about time!).
Then had time to barbeque and enjoy the day.
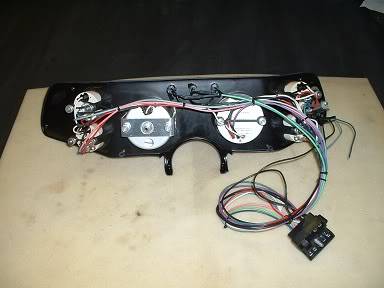
Here are some pictures of the dash wiring and covans dash insert with Autometer guages.
07-04-2011 #17
Registered User
- Join Date
- Nov 2006
- Location
- Ma.
- Posts
- 5,567
Its looking great. Nice work.
Wayne
Car FINALLY home !!!!!! lol
Project FNQUIK https://www.pro-touring.com/showthre...ghlight=FNQUIK
07-04-2011 #18
Registered User
- Join Date
- Jun 2011
- Location
- Ohio
- Posts
- 263
sounds like you had a busy 4th looks great!
07-04-2011 #19
Registered User
- Join Date
- Feb 2009
- Location
- N.J.
- Posts
- 674
Thanks guy's, it was a great day.
Worked on the car AND had family time.
I have been mocking up the radiator and have run into a snag.
I was going to keep the original fan shroud but once I put in the aluminum rad, the
shroud really looks crummy.
So, I have been looking at some nicer alternatives.
What do you think of this?
http://www.jegs.com/i/Flex-a-lite/400/536288/10002/-1
I have never used electric fans before on my projects and I'm not sure.
07-05-2011 #20
Registered User
- Join Date
- Feb 2009
- Location
- N.J.
- Posts
- 674
Decided against this particular setup. Just found out the fans are only 700cfm each.
Seems kind of weak.
Will have to keep looking.
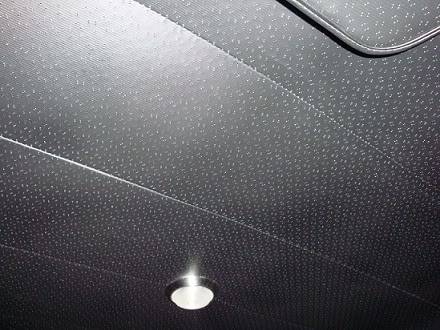
Here is picture after I installed the headliner.
I think it came out pretty good for my first time. Followed the advice of several other members.
The info on this forum is invaluable to doing things correctly.

 Reply With Quote


