

Results 1 to 20 of 36
Thread: Project Black Widow
-
01-25-2018 #1
 Registered User
- Join Date
- Mar 2016
- Location
- California, Desert
- Posts
- 122

Project Black Widow
Hi Everybody!
Time to get started... sort of. I will be returning home from overseas toward the end of March and will be able to start actually assembling parts. For now, I have a sub-frame sitting in PTFB's shop getting worked on. I purchased it from F-Body International already set up for the new PTFB coil-over setup. This is a great tuning advantage, and will also save me a lot of time that I would have had to spend repairing my old sub-frame, which was damaged in an accident. The new sub-frame is for a later model, and will need to have holes drilled in the back of the frame to adapt it to my 74 Camaro, so Dave at PTFB is going to do that for me as well.
By the way, in case anyone is considering PTFB for suspension parts, I can say so far the customer service has been great! Dave even picked up the sub-frame in Illinois from the seller, since he was in town to pick up things from his old shop. He then brought it back to his shop in Tennessee to do the final touches for me, crate it and additional parts, and ship it to CA. He is quick to respond to questions in emails, and gives good, detailed information. I'm also a big fan of his approach to performance- making competitive packages affordable for people on a budget so that we get to have fun too!
For now, I'm trying to make sure I have as many of the needed parts on hand as possible for when I get home so I can get started right away!
I'm getting all my suspension, steering, braking, and chassis bracing components from PTFB. I have purchased tires- 275/35ZR18 BF Goodrich Rival S, on all four corners. My next thing to buy will be wheels. I'm considering Team III LT3's in 18x9.5. They aren't cheap, but they are the only wheel I like that isn't upwards of $750 per wheel. I think they are the best looking wheels out there.
I will also need to buy and install a dash, mostly to comply with CAM rules, which require a somewhat finished interior. I'm thinking about going with this fiberglass dash, to save weight and money:
Not only is this dash cheaper than a stock replacement, it may allow me to forgo a gauge panel. If I can, I would like to use a generic 6 gauge instrument kit installed directly into the fiberglass. Just cut holes for each gauge. This seems like it would be cheaper than buying kits specific for Camaros which include their own panel. The difference seems to be about $400 for a generic set vs $750+ for a Camaro specific one.
I already have a complete wiring harness from Painless which I will need to install.
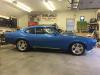
The car as it sits now:
For a little background on the car, see my intro thread:
https://www.pro-touring.com/threads/...ild?highlight=
The thread that led me to my choice of suspension parts:
https://www.pro-touring.com/threads/...ion?highlight=
The thread that helped me decide to keep my current transmission until I can afford to get a 5 or 6 speed:
https://www.pro-touring.com/threads/...ual?highlight=Last edited by 74 Camaro; 06-24-2018 at 11:47 AM. Reason: resize images
-
01-26-2018 #2
Registered User
- Join Date
- Mar 2012
- Posts
- 288
In for the ride.
01-26-2018 #3 Registered User
- Join Date
- Sep 2004
- Location
- Orlando, FL
- Posts
- 1,077
If you haven't seen it already, Popular HotRodding did a pro-touring build like yours called "G/28"... maybe you can still find it.
SMSgt Ty Ingle, USAF
"CF71" - Freedom BirdHoodpins.com, Inland Empire Driveline, Billet Accessories Direct, Modo Innovations, AutoRad Radiators, Morris Classic Concepts, Marquez Design, Anvil Auto, Fesler Billet, US Collision (DOOM), AGR Performance, Pro-touringF-body.com, Phoenix Transmission Products, Shiftworks, ACC Carpet, Hedman Hedders, BMR Fabrication, American Autowire, MityMounts, TIN INDIAN Performance, Kauffman Racing Equipment, Pypes, RobbMc Performance, WMC, Holley, NOS, PST
01-26-2018 #4
Registered User
- Join Date
- Mar 2016
- Location
- California, Desert
- Posts
- 122
I just checked it out. Very cool build. I like what they were able to accomplish with handling performance on a budget. It's very encouraging! My budget is similar, but with a slightly different focus. With true coilovers in front and adjustable shocks front and rear, adjustable sway bars front and rear, extensive chassis bracing (all on order from PTFB), and stickier tires than what the G/28 started with, I'm definitely biased more towards handling than power. That doesn't mean I will be faster- just that I have the potential to be faster, at least, in the corners. When I do upgrade my engine, that too, will be focused on handling, as my goal is to get an aluminum block ls for reduced weight and increased cornering performance. Originally Posted by OLDFLM

They did have a better car to start with in the looks department. I have run across the car before, actually, when I was researching options on what to do with the bumpers. What they did with the bumpers was cool. Not sure if it will be my approach, though. In any case, that will be a future project...
By the way, this build is heavily influenced by what my sister (Hannah) likes. I suggested once that we build the car for straight-line performance and she said she'd rather have a car that can handle. So for now, the focus is not on engine stuff. Her preferences also influence my plans for the engine. There is plenty of potential in the small block that I have now, but I intend to put any engine budget into getting that aluminum swapped in, rather than beefing up the sbc. Money for money, I could probably get more power out of the sbc, but again, I'm focusing on what will make the car handle better, which will be reduced weight. For a few grand, I could either have a mediocre LS1 or beast up the sbc. At a certain price/power point, I think it does make more sense to swap to an LS3, due to the inherent flow of the heads. I will just have to see what my budget for that is in the future. For now, it's all speculation.
Hannah's take on the bumpers is that the car needs the chrome. She is one of the most sensible people I know, and I usually come around to agreeing with her taste. While others see the G/28 bumper mods as an improvement, I actually see them as a compromise. They say their approach reduces visible bulk, but I think that taking out the rubber strip creates a tall, flat area that looks blocky. Also, the shortened sides make the side of the bumper look almost square. The longer side extensions of the stock shape go better with the low-and-long flow of the overall car design. Somewhere I read an opinion that tucking the bumper too much detracts from the shape of the grill, which is leading to a point. If you snub it off too much, it looks abbreviated. I think people want the 70-73 look, but don't realize that those cars had a much more vertically square front end, whereas the 74-on are more angular. You can see the stock/modded bumper comparison pictures here:
http://www.hotrod.com/articles/0802p...disco-bumpers/
In my opinion, for all the effort, I would stay with the stock look. Again, this is all just blah, blah, as I am far away from seriously attacking that kind of project anyway. For the record, my interest in modifying the bumpers comes from more of a desire to reduce weight, which increased by about 300 lbs from 73 to 74, the bumpers being a large part of that equation.
I hope I'm not droning on too long about irrelevant topics. I find it all to be interesting, and enjoy speculating. Thanks for reading, and I would love to hear your comments!
01-26-2018 #5
Registered User
- Join Date
- Mar 2016
- Location
- California, Desert
- Posts
- 122
Quick update:
I decided to go with the wheels that were suggested to me by Dave, the Vision 143's in 18x9.5, 0 offset. I paid $546.64 on Amazon with free shipping. I'm not crazy about the style, but they are unbeatable at that price. Also, I'm planning on going wider eventually, when I have time to carefully mock up what back spacing I will need and clearance fenders. When I do that, I will get 8 spoke wheels more to my liking, either the LT3's or a forged option- depending on budget. If I were to get those beautiful LT3's now, it would be hard to replace them after a 2K investment. The 143's are disposable in comparison, costing less than half of what my BFG Rivals cost me!
The Vision 143:
01-27-2018 #6 Registered User
- Join Date
- Oct 2009
- Location
- CT.
- Posts
- 738
I'm digging this build so far. Pretty good plans for it. I also like the car, you don't see that many of this year range of the Camaro. Mainly a lot of the 70-73 and then the 78 and up.
On the bumper topic. I'm not so sure about the bumpers being tucked throwing off the grill comment that you read somewhere. I know we all have opinions, but to me the tucked bumper helps the aesthetics of most any car, especially these. It gets rid of that Park Bench look of them. While I agree i would prefer the chrome look instead of painting them, there are options. After being tucked/modified, there is options. They could be chromed, costly. They could be painted in a chrome look paint, or even powder coated in a nice high luster silver or even an HPC type coating that will resemble a chrome look. Options are out there. But in the end it is your car and you are the one building it. Do it to your taste and not what others think you should.
Glenn
1955 Chevy BelAir
1951 Chevy 3100
1987 Chevy Silverado
My last project....
https://www.pro-touring.com/threads/...my-72-Maverick!!
01-28-2018 #7
Registered User
- Join Date
- Mar 2016
- Location
- California, Desert
- Posts
- 122
I think I should clarify. The guy I referred to owned a big bumper Camaro himself, and tried a more extreme tuck before he settled on something a little more moderate, like 1 inch, I think. Originally Posted by HotRod47
One approach would be to shorten the straight sections on the front to bring the sides in a bit. I would leave the sides long, and trim as necessary to fit. Chrome would be the preferred finish, but that would depend on budget. I would try to replace the triple-flat-spring structure with a tubular structure, in order to retain some of the crash protection, but drop some weight. Pic of the heavy structure (not my car):
Alternatively, I could get a full fiberglass front end, such as the one below, which incorporates the bumper. It would all be body color, but the weight savings would have the performance advantage. Besides that, the shape is quite well executed. To be fair, it does have the rubber strip area flattened out, but I'm okay with it. The Glasstek front end:
Last edited by 74 Camaro; 06-24-2018 at 11:55 AM. Reason: resize images
01-29-2018 #8
Registered User
- Join Date
- Sep 2004
- Location
- Orlando, FL
- Posts
- 1,077
Another affordable rim option would be the CL205 which is the grey centered Torque Thrust II. A great looking rim for these early F-bodies imho!
These can be had in an 18x8 wih 4.5"bs for the front and 18x10 with 5.5" bs for the rear. Allowing you to run a 255/40/18 up front with a 295/35/18 out back.
But you may be limited to a 275 or 285 in the rear with the Camaro wheel arch being flat at the top vs a Firebird/TransAm.SMSgt Ty Ingle, USAF
"CF71" - Freedom BirdHoodpins.com, Inland Empire Driveline, Billet Accessories Direct, Modo Innovations, AutoRad Radiators, Morris Classic Concepts, Marquez Design, Anvil Auto, Fesler Billet, US Collision (DOOM), AGR Performance, Pro-touringF-body.com, Phoenix Transmission Products, Shiftworks, ACC Carpet, Hedman Hedders, BMR Fabrication, American Autowire, MityMounts, TIN INDIAN Performance, Kauffman Racing Equipment, Pypes, RobbMc Performance, WMC, Holley, NOS, PST
01-29-2018 #9 Registered User
- Join Date
- Aug 2007
- Location
- Denton Texas
- Posts
- 1,236
Im gonna watch this pretty close, Im thinking of doing a 1974-77 Tribute Z28.. bumper are just so ugly

05-17-2018 #10
Registered User
- Join Date
- Mar 2016
- Location
- California, Desert
- Posts
- 122
Update
Alright! The front brakes and mc have arrived. I pick up the rest of the parts tomorrow on crate. I'm stoked! I may try to get that mc installed today.
These parts are arriving just in time for me to be done moving and helping my friend renovate her apartment. Also had to work on 3 different vehicles other than the Camaro. Seems like life just wants to get in the way of what I really want to do. But now I should be able to actually get going on this. Is it too good to be true?
Something else that I'm pretty stoked about, these wide, sticky tires! Pic shows new tires next to the old, which were already wider than stock, being from an 80's Camaro.
Last edited by 74 Camaro; 06-24-2018 at 11:44 AM. Reason: resize images
05-21-2018 #11
Registered User
- Join Date
- Mar 2016
- Location
- California, Desert
- Posts
- 122
Over the weekend
Friday I picked up the parts. PTFB everything, which look to be high quality.
I wanted to test fit the cage, so I started stripping the interior. The old wiring harness is a complete rats nest, so that had to come out. The carpets looked dingy, so those had to come out. The headliner was warped, so that had to come out. Everything was dirty, so everything came out, even the foot pedals.
Saturday, in order to further facilitate cleaning, the fenders had to come off. My dad helped me scrape old cracked caulking off and scrub off the dirt with a dish brush and windex.
The plan is to follow up with a much smaller, neater bead of caulk. The car needs all new weather seals, but I would like to paint the interior and door jambs before installing the weather stripping. I don't like the idea of having to remove the stripping later to do paint. This is not exactly a frame-off restoration. More like a frame off cleaning. I like a clean interior. Even if the body needs work, I at least like my car to be clean. I am not fond of carpets in cars, or in life, and I also really like the contours of body stampings. Something beautiful to me about seeing what is actually there. So I'm thinking about using some kind of rubberized paint on the floor boards, like an underbody or bed liner. Preferably something that is easy to clean. This way I will not need floor mats, which would slide around during autocross or canyon carving and present a possible safety concern. There is some pitting in the floor boards, but they are still holding together. I will probably use a rust stopping primer first.
Sunday, went up to Ridgecrest to get my brake hard lines and front bumper from storage, as well as some other parts. Ordered some more parts from Classic Industries. Unfortunately they are out of stock on weather stripping. I have till Sunday to do what I can before I head out to Michigan for a family event. Will be gone two weeks. When I get back, I will have one month to finish the current build stage. Hopefully, this week I can have the interior done. That way when I get back I can get right to installing parts.
Parts inventory revealed a few things missing. PTFB accidentally held onto my spindles which are modified for the big brakes. I also meant to order their cowl brace, but somehow wasn't clear about that in my emails. I discovered that I needed upper mounts for the rear sway bar, so I ordered a used stock set from Ebay. My car was a base 6 cylinder car, so it didn't have a rear sway bar.
In other news, well, this isn't new, just funny. So, when I got back from deployment I took a look at my engine to get casting numbers to see which Edelbrock crate engine this was exactly and get an idea what kind of horsepower I'm making. Well, apparently I've learned a lot about cars since the original purchase of the Camaro some 5 years ago. I don't know when I picked up the knowledge, but I hadn't actually stopped to look at the engine in, well, years, apparently. So I get home from deployment, glance at the engine, and right away I know this is not an Edelbrock crate engine. Edelbrock heads are aluminum. These are obviously iron. I've been telling people that the engine I have is worth what I paid for the car. Joke's on me and I'm not even mad about it. I don't even think the guy who sold me the car knew either, because I don't think he did the swap. I remember he told me the engine makes 350 horsepower. Even then, I knew enough to be skeptical of that, especially with a stock looking exhaust manifold. 1 hp per ci is pretty good, and I doubt you can get that with those restrictive manifolds. Those also were a clue that whoever put the engine together was going cheap, so it never made sense that it would have been an Edelbrock crate engine. It just had Edelbrock intake, valve covers, and air cleaner. Even the carb is a Carter. Knowing that the engine isn't Edelbrock, everthing makes a little more sense. The bondo over giant rust holes in the fenders. The original 3 speed manual trans that came with the 6. The electrical tape wiring job for the aftermarket sound system. The roughly circular hole drill pattern in the rear plastics over the speakers. The blue masking tape over jagged holes cut into the rear deck metal for other speakers. The inch-thick stack of shims on the right front suspension to try to correct for a past accident. A hundred little details that say someone either didn't know what they were doing, or didn't give a crap.
The engine is more revvy than the 350 in my 75 pickup, so now I'm curious what it actually is. This is where my knowledge ends. How do I go about figuring out what kind of parts are in the engine? Should I get headers?
Last edited by 74 Camaro; 06-24-2018 at 11:14 AM. Reason: images too large
06-24-2018 #12
Registered User
- Join Date
- Mar 2016
- Location
- California, Desert
- Posts
- 122
Lots of Updates
I've been so busy actually working on the Camaro that I have not had time to post. I have a lot to cover, so I will try to be brief and just show pics.
06-24-2018 #13
Registered User
- Join Date
- Mar 2016
- Location
- California, Desert
- Posts
- 122
5/18/2018
Removed most everything, including front body panels. Drive train and rear end still in place.
Wiring harness out:
06-24-2018 #14
Registered User
- Join Date
- Mar 2016
- Location
- California, Desert
- Posts
- 122
5/19/2018
Removed heater box
06-24-2018 #15
Registered User
- Join Date
- Mar 2016
- Location
- California, Desert
- Posts
- 122
5/21/2018
Test fitting the roll cage:
Help from my nephew:
06-24-2018 #16
Registered User
- Join Date
- Mar 2016
- Location
- California, Desert
- Posts
- 122
5/24/2018
Rear Bumper off. Ordered parts from Glasstek
06-24-2018 #17
Registered User
- Join Date
- Mar 2016
- Location
- California, Desert
- Posts
- 122
5/25/2018
Rear end out
Leafs, old vs new
Gas tank out
Oops
06-24-2018 #18
Registered User
- Join Date
- Mar 2016
- Location
- California, Desert
- Posts
- 122
5/26/2018
Brought home some proper equipment
Much better!
Damage from engine drop
Tires mounted and road-force balanced
06-24-2018 #19
Registered User
- Join Date
- Mar 2016
- Location
- California, Desert
- Posts
- 122
5/27/2018- 6/10/2018
Two-week vacation to Michigan to see my other sister, and to Indiana for my grandfather's 90th birthday.
Of course, while I was in Indianapolis I had to see the speedway museum.
There, I saw this IROC Camaro:
Got to see the Gilmore museum too. Lots of cool stuff. Mostly I was just anxious to get back and start working on the Camaro again.
06-24-2018 #20
Registered User
- Join Date
- Mar 2016
- Location
- California, Desert
- Posts
- 122
6/12/2018
Outlet for a welder installed $$
Test fitting the frame
Not gonna happen
Having to wait a couple days to get the welder I wanted so I can fix this.
Tags for this Thread

 Reply With Quote


