

Results 41 to 60 of 204
-
09-24-2017 #41

 Registered User
- Join Date
- Apr 2016
- Location
- England
- Posts
- 55

Really nice car! Great work and some ideas I'll be stealing for my '69 project. ;)
-
01-15-2018 #42
 Registered User
- Join Date
- Aug 2017
- Location
- South Dakota
- Posts
- 153
 Thanks!
 Originally Posted by Badhand

-
01-15-2018 #43
Registered User
- Join Date
- Aug 2017
- Location
- South Dakota
- Posts
- 153
I'm still working on my project but I have lots of things going on right now so I haven't gotten in near as much time as I would like. I tore the car down and have started final prep before I start spraying primer and paint. I also added some additional shock tower braces just for some more strength along with some extra welding to beef things up a bit. I will be applying some heavier bed liner product to the underside for protection and some sound deadening. The current plan is to use some lizard skin sound control and ceramic products on the inside of the car along with Dynamat. I originally had the engine bay gloss black with a textured finish but have sanded that down smooth and will do some body work over the holes I have welded up and I will paint the engine bay body color this time around.
-
01-15-2018 #44
Registered User
- Join Date
- Dec 2014
- Posts
- 188

Am loving the tower mods. Nice work on everything you've done.
I wanted to the same mods to mt 69. Someone has already hacked up the inner big block bracing on mine so they need attention anyway. How much more access to you believe you will have now to the plugs and header bolts?
01-16-2018 #45
Registered User
- Join Date
- Aug 2017
- Location
- South Dakota
- Posts
- 153
Thank you! I should have gained around 2" per side of clearance since that is the max I went in on the notch but it's a little hard to tell exactly where the plugs and headers will rest once the engine is in place but I'm guessing it is very close to that. I'm sure it is in the 1-2" range on each side though for sure and it should make a big difference! Originally Posted by Max Power
07-29-2018 #46
Registered User
- Join Date
- Aug 2017
- Location
- South Dakota
- Posts
- 153
It's been a while since the last post but a busy home life has made it hard to keep things moving very fast. I'm still working on the car trying to accomplish at least a little something each day. I now have the car prepped and will start getting the priming and blocking done along with painting the interior, underside, and engine bay. Here are a few progress photos of the car sealed in a PPG Epoxy and then a PPG primer surfacer.
07-31-2018 #47 Registered User
- Join Date
- Dec 2011
- Posts
- 135
Glad to see your progress. Can't wait to see updates.
08-04-2018 #48
Registered User
- Join Date
- Aug 2017
- Location
- South Dakota
- Posts
- 153
Thanks! It's nice to see some more visual progress that's for sure. Originally Posted by Bossed
08-04-2018 #49
Registered User
- Join Date
- Aug 2017
- Location
- South Dakota
- Posts
- 153
I had a little vacation time built up so I decided to do something fun...like work on my own car
 It was time to get some material on the car and keep the bare metal surfaces from wanting to flash rust. I started on the inside and I would like the car to be as cool and quiet as possible. I sprayed an epoxy down and seem sealed everything followed up with Lizard skin sound control, Lizard skin ceramic coating, a little bed liner here and there and also some low gloss black paint.
I may be going overkill here but we are big fans of the Dynamat at our shop and I decided to lay some of that down as well.
08-04-2018 #50
Registered User
- Join Date
- Aug 2017
- Location
- South Dakota
- Posts
- 153
Next on the list was the bottom. The bottom was mostly in need of a freshen up from the last restoration I did. When I originally restored the car in school there were only partial patch panels available and being a rookie my installation of them isn't how I would perform them today. I decided the repairs were done well just not as cosmetically pleasing as I would do them today and doctored the underside up rather than replacing everything with new complete panels. It's going to be a driver and it will function just fine. I wasn't worried about making the bottom real pretty since it wasn't perfect anyway and it's going to see plenty of abuse.
I sealed everything up again with a coat of epoxy primer, followed up with more seam sealing, and gave it a full coat of a kevlar bed liner. (pictures may not be in exact order)
08-04-2018 #51
Registered User
- Join Date
- Aug 2017
- Location
- South Dakota
- Posts
- 153
Next up was the engine bay. I like a clean engine bay but still wanted a little flash so I smoothed it out a bit and decided to go body color. I like to pretty the engine up rather than cover it up with fancy sheet metal panels. I started by welding and patching all the unwanted holes. A little body work to smooth things out after that. I proceeded with a coat of epoxy, more seam sealing, a coat of sealer, and base coat followed by clear.
08-12-2018 #52
Registered User
- Join Date
- Aug 2017
- Location
- South Dakota
- Posts
- 153
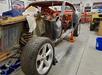
I let the paint sit for a couple days and then gave the clear a good wet sand and buffing. I also started adding a few components that are easier to install now before I get the engine in place. After that I started with the suspension and steering. I went with the Ride tech level 2 coil over system both front and rear. The front is pretty straight forward. The rear has a little more involved and they have updated the rear cradle since earlier system and it uses some different mounting. One thing not mentioned in the instructions is the rear hard brake line bracket will need to be removed for the cradle to go into place properly.
08-12-2018 #53
Registered User
- Join Date
- Aug 2018
- Posts
- 5
What steering setup are you using? Power or manual?
Nice build love it!!!
08-12-2018 #54
Registered User
- Join Date
- Aug 2017
- Location
- South Dakota
- Posts
- 153
Thank you! Originally Posted by 50dan
I am currently running a Randall's power steering rack.
08-18-2018 #55 New to Pro-Touring
- Join Date
- Jan 2005
- Location
- Mosjøen, Norway
- Posts
- 45

Hi, nice build! Sorry about the crash, it's a situation that sucks. I know firsthand. Anyways, what front hub is that? What brake package are you running ? Is it the '70 spindle?
08-18-2018 #56
Registered User
- Join Date
- Aug 2017
- Location
- South Dakota
- Posts
- 153
Thank You! The front hub is a Bear hub for the T4 13" front brake package and I am running the SS4 13" I believe from Bear in the rear. I have the 70 Disc Brake spindles on there with this package. I also had a set of the Drum spindles that are noted to be stronger than the disc but sold them to a friend. Originally Posted by fvike
08-19-2018 #57
Registered User
- Join Date
- Aug 2018
- Posts
- 3
Which shock tower brace is that?
08-19-2018 #58
Registered User
- Join Date
- Aug 2017
- Location
- South Dakota
- Posts
- 153
The outer shock tower brace is one from Global West that I have modified slightly and added an additional brace tied to the torque boxes. Originally Posted by Wikdstang
08-19-2018 #59
Registered User
- Join Date
- Aug 2018
- Posts
- 3
What about the export brace? I'm running ridetech setup in the front also and wanted to put some kind of export brace back on.
08-19-2018 #60 Registered User
- Join Date
- Sep 2016
- Posts
- 147
Very nice. I sure miss mine.

 Reply With Quote


