

Results 1 to 20 of 21
Thread: SpeedHut Gauge Users - In Here
-
05-26-2017 #1

 Registered User
- Join Date
- Oct 2015
- Location
- Western Mass
- Posts
- 227

SpeedHut Gauge Users - In Here
I'm about to pull the trigger on a 6-pack of SpeedHut gauges (4.500" Speedo/Tach, 2-1/16" Oil, Water, Volts, and Fuel). Probably going with the warning lights in the small gauges and domed faces on all gauges, so the calibration/programming buttons will be on the back of the gauge or maybe on a pigtail? Using a classic dash carbon fiber insert to put all six (6) gauges right up front. Here's the general look.
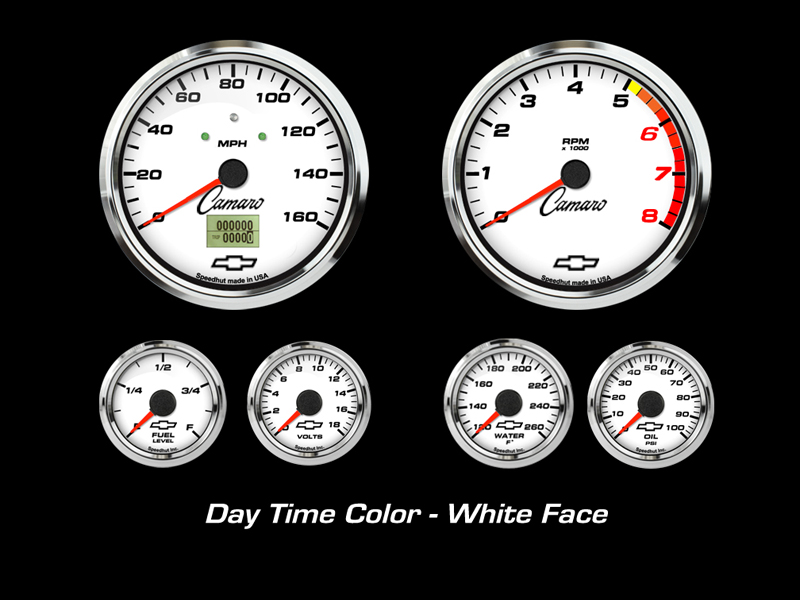
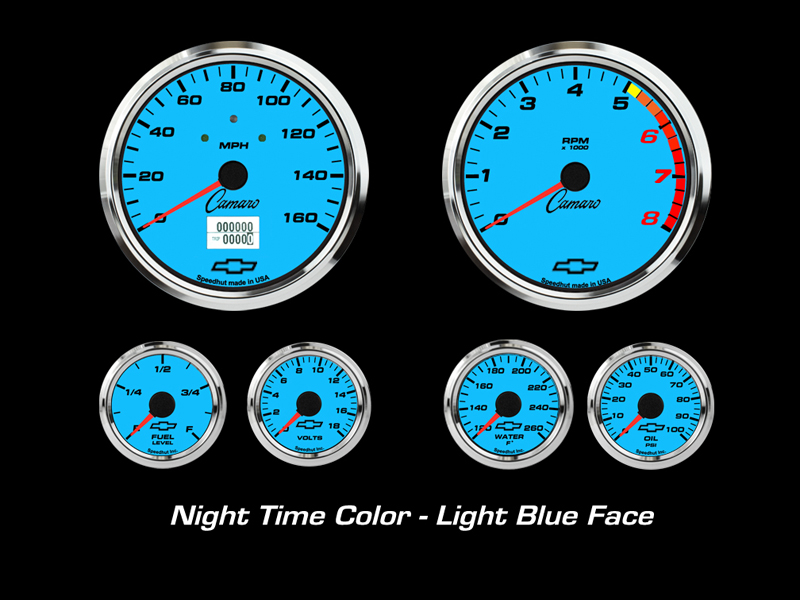
So white faces, Camaro and Bowtie graphics during the day... and at night the gauge face glows light blue (dimmer controlled) with the same graphics look.
My big question is the difficulty in wiring up the SpeedHut setup. Unlike Dakota Digital, SpeedHut doesn't appear to have a semi-plug'n play module to which everything connects. It looks like everything is wired independently. So I just wanted to get a feel from those who have installed SpeedHut gauges... what the degree of difficulty in getting it all set up and calibrated? Trying to figure out why I should go with an electronic speedo as opposed to the GPS one. Also wondering about little things like calibrating the fuel level using a stock tank/sender. How happy are you with your SpeedHut gauges?
I like the fact that SpeedHut has a lifetime warranty, and also that they allow you to customize the gauges and add graphic elements. In my case I'm adding the logos and the redline effect. For those who have used domed or flat glass... how do you like your choice?'69 LeMans Blue Coupe, White Interior, Massaged .030" over 454, Super T10 4-Speed,
Holley 4150, Pertronix Ignition, CompCams Xtreme Energy XS274S, 781 Oval Port Heads
-
05-27-2017 #2
Registered User
- Join Date
- Apr 2010
- Location
- Portland, OR
- Posts
- 357
Its pretty easy install. I have the GPS speedo and it works great!
1973 Firebird 466 Pontiac, T56, C5 Brakes, PTFB and Hotchkis suspension
2011 Camaro SS Supercharged, ZL1 body and brakes, Z28 suspension.
05-27-2017 #3
Registered User
- Join Date
- Jan 2013
- Location
- Cypress, California
- Posts
- 381
I had no problem with the installation and wiring.
05-27-2017 #4 Registered User
- Join Date
- Sep 2005
- Location
- Chit-ca-go
- Posts
- 459
The wiring is very straightforward. I bought a 12 position (IIRC) molex connector kit. I used this to make a single plug in connection between the gauges and cars harness. The antennae for the GPS unit and the dimmer are of course seperate. I did have issues with the sending units Speedhut shipped with my gauges. The oil pressure sending unit they shipped wasn't compatible with the particular series gauge I ordered. Took a bit of back and forth to figure that out. I have a buddy that did logos on all of his gauges (Oldsmobile) similar to yours and regretted it after getting it all together. It looks too busy. You are also able to delete the Speedhut script if you choose to. Just mentioning it before you make your final decision if you choose to go with them. I went with a new fuel tank the same time that Iinstalled my gauges. I set the empty reading, threw some gas in and went for a fill up. I then set the full reading.
1971 Firebird
2017 Slipstream SS
05-27-2017 #5
Registered User
- Join Date
- Oct 2010
- Location
- Sacramento, CA
- Posts
- 246
A friend had the dash and be careful, the smaller gauges are aimed at your lap, not your face.
Rick - 1969 Camaro - LS1 driven daily
05-28-2017 #6
Registered User
- Join Date
- Oct 2015
- Location
- Western Mass
- Posts
- 227
Heres the Photoshop mock-up I started with. This is the actual Classic Dash insert I'm using. I don't think the smaller gauges are too low. Heck, the factory gauges in the console can't even be read without looking around the steering wheel and craning your neck. Originally Posted by ccmc

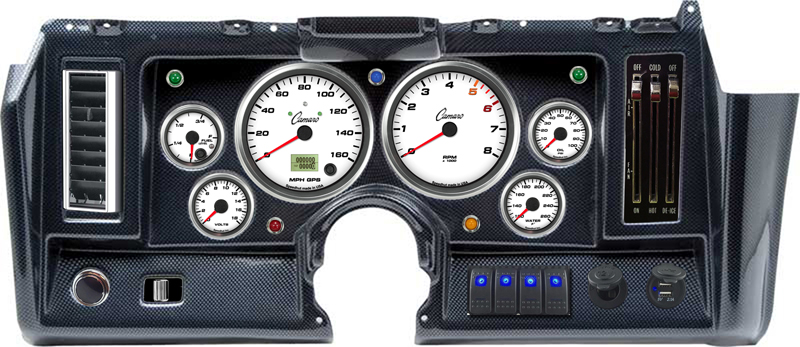
I was thinking the bow ties were a bit much too. I do like the Camaro script though, and the redline effect. The LED lights I slugged in before I settled on having the directionals and high beam in the speedo face. I may still incorporate some LEDs for the emergency brake, ignition, and whatever. I don't have a radio now, so I just slugged in some switches an a couple 12v outlets. Got to put a switch someplace for the electric cutouts LOL. Would be neat if I could find a radio that was white faced and glowed blue at night!
Any pictures of that molex connector you can post up? I'd like to see the wiring mess I'm headed for lol.
I already installed the MOMO D36 wheel which has angled spokes so I'm pretty sure the gauge view will be decent. I restored an original console this past winter and rather than wood, I'm going to use carbon fiber on the two panels to kinda tie it all together.'69 LeMans Blue Coupe, White Interior, Massaged .030" over 454, Super T10 4-Speed,
Holley 4150, Pertronix Ignition, CompCams Xtreme Energy XS274S, 781 Oval Port Heads
05-29-2017 #7
Registered User
- Join Date
- Sep 2005
- Location
- Chit-ca-go
- Posts
- 459
I should have a pic. I'll post it later today.
1971 Firebird
2017 Slipstream SS
05-29-2017 #8
Registered User
- Join Date
- Oct 2010
- Location
- Sacramento, CA
- Posts
- 246
Yes,
That dash. If you compare the angle of the face of the gauges to stock you will see that all of the gauges are aimed at your stomach instead of your face. If you drive a lot it's a pain in the ass.
It's not that they are too low. Its just that the dash is angled wrong for viewing correctly. I almost bought this dash until we installed it in his car. As soon as we did, I knew I would not buy it.
It works for him as his car is not driven too often, 1 or 2 times a month. I drive mine almost every day.Rick - 1969 Camaro - LS1 driven daily
05-30-2017 #9
Registered User
- Join Date
- Sep 2005
- Location
- Chit-ca-go
- Posts
- 459
I didn't take a very good pic, but I'll post what I have:
The gauges use a Metripack connector (forgot which series) to mate with the cars existing harness wherever possible. I tried not cutting anything. The goal was to make it all plug together:
Here's a similar connector that I used for the radio that is an actual Molex brand:
The longer wire ties are the releasable ones I used to mock it up before final install.1971 Firebird
2017 Slipstream SS
07-01-2017 #10
Registered User
- Join Date
- Oct 2015
- Location
- Western Mass
- Posts
- 227
One of the nicest factory dashes I ever had was the one in my mid-'70's Firebird Formula 400. Basically had the Trans-Am wheel and machine turned dash, all gauges spread out nicely. Just my opinion, I'm sure there's folks that didn't care for it. So much nicer than the '69 Camaro layout.
Rick... My car is not a DD, basically a cruiser, local shows and cruise-in's. The '69 stock dash is so bad that almost anything is an improvement.'69 LeMans Blue Coupe, White Interior, Massaged .030" over 454, Super T10 4-Speed,
Holley 4150, Pertronix Ignition, CompCams Xtreme Energy XS274S, 781 Oval Port Heads
07-02-2017 #11
Registered User
- Join Date
- Mar 2014
- Location
- Nebraska
- Posts
- 65
I have a Speedhut gps has the bottom on the face. I have programmable fuel guage too and it's a remote mounted switch. They now make OBD2 guages. If I was doing mine over again I'd buy a combo guage that has fuel oil water on one larger guage to match the speedo. I also like the speedo/tach combo but I wanted to run the factory style hood tach. Wiring is pretty easy. Normal wires for guage installs. Just an additional memory wire
1968 Pontiac GTO pro touring LS1 T56 9"
07-16-2017 #12
Registered User
- Join Date
- Oct 2015
- Location
- Western Mass
- Posts
- 227
I'm getting close to the install time. I knew the SpeedHut speedo & tach were just a tiny bit undersize, so I had to make four "washers" out of black 1/8" ABS. The SpeedHut gauges lock in place with a full width threaded rear ring, so once I fabbed up the washers, they sandwiched the dash and then it all gets locked in place.
Waiting for new headlight and wiper switches to arrive, then I can start messing with the fitment. SpeedHut supplies a lot of wire and connections, so I might install it now and think about whether it makes sense to cut a bunch of snap together clips to make a harness with a multi-pin connector. I also have to add at least a bezeled light for the emergency brake and ignition, not sure about the rest of the idiot lights. Directional and high beam are built into the speedo.'69 LeMans Blue Coupe, White Interior, Massaged .030" over 454, Super T10 4-Speed,
Holley 4150, Pertronix Ignition, CompCams Xtreme Energy XS274S, 781 Oval Port Heads
09-07-2017 #13
Registered User
- Join Date
- Oct 2015
- Location
- Western Mass
- Posts
- 227
Going to start removing the old gauges today. Had some unrelated personal setbacks (we lost our Golden Retriever) but doing some work on the car is a good diversion.
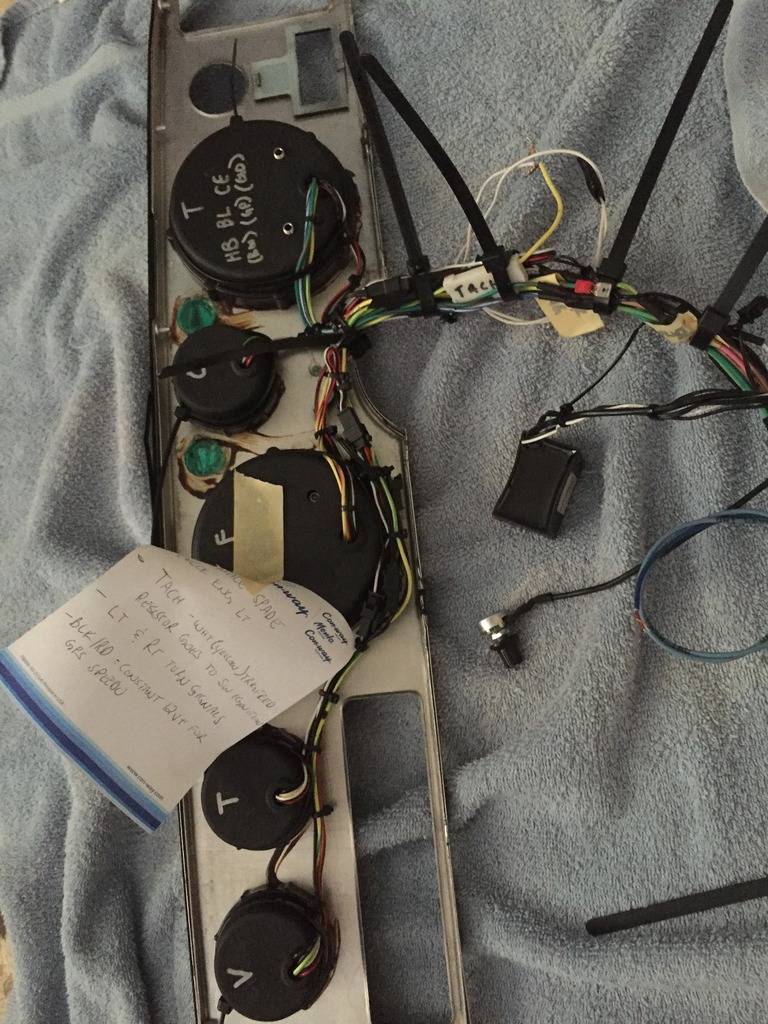
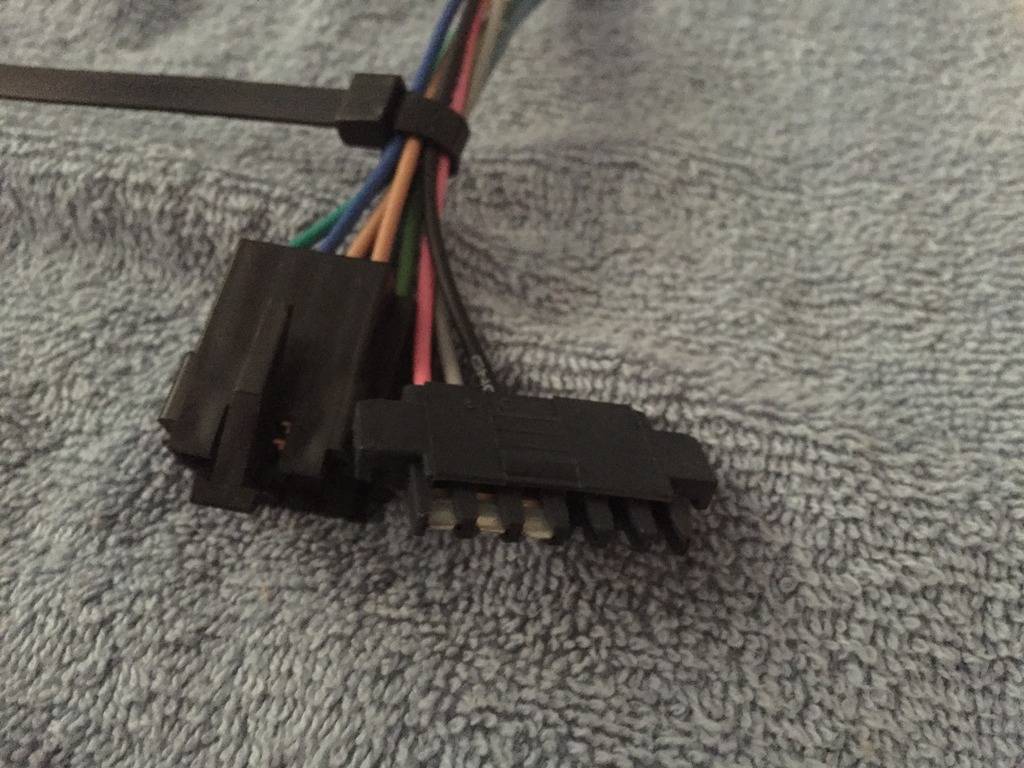
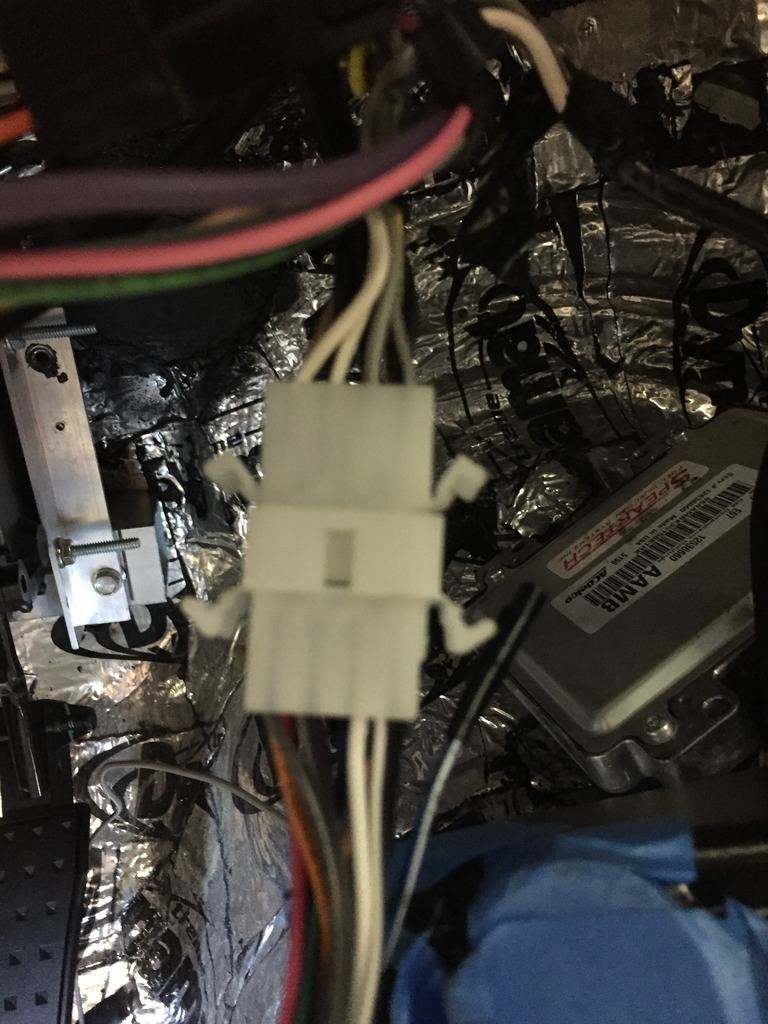
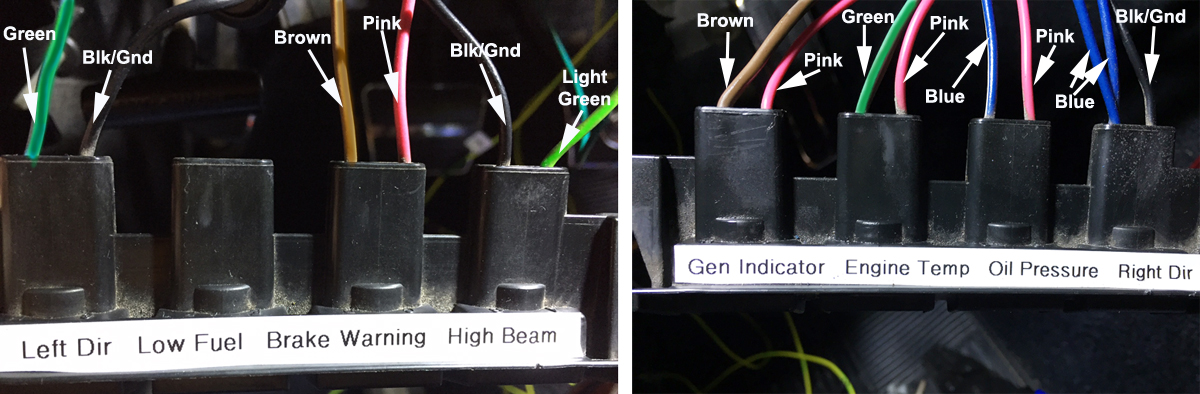
In the process of prepping the dash "module" I labeled all the gauges on the back panel, then also labeled all the individual wires. Missing from the picture are the plug-in switches that allow you to calibrate things like the "Empty" and "Full" settings on the gas gauge. The Speedometer is a GPS model and that is also a plug-in component that will need to be calibrated once everything is connected.
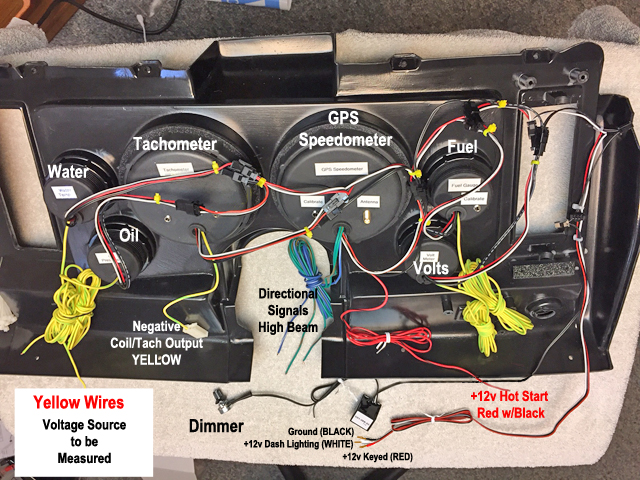
Ultimately, I decided that this dash may have to be removed when I do the Vintage Air install or perhaps for some other reason. So I decided that I'd incorporate plug-in connectors. I probably overkilled it with the Deutsch waterproof connectors but whatever. The 4-Pin smaller connector serves the positive voltage signals coming from the senders (Fuel, Water, Oil, Volts) while the larger 12-Pin connector serves all the power, ground, directionals, high-beam, and general lighting. Also pictured is the rheostat module that allows you to brighten or dim the dash lights.
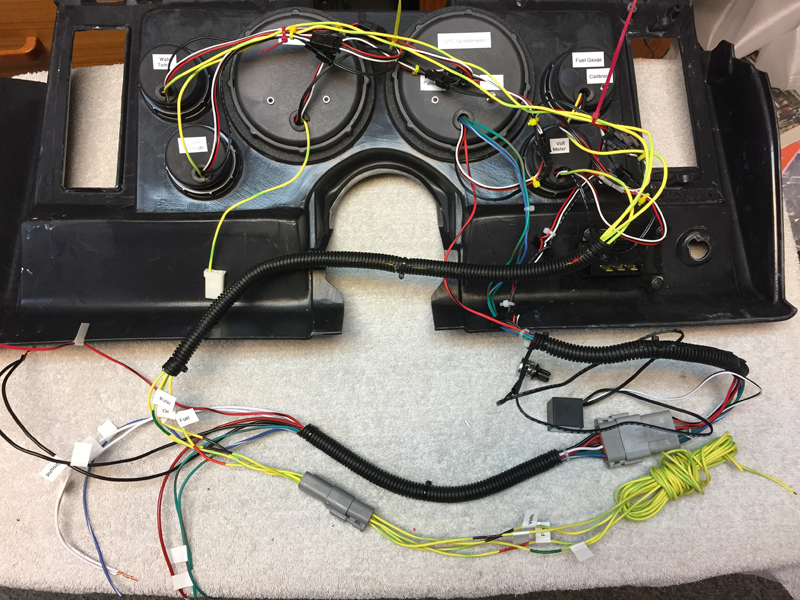
One thing I haven'y yet figured out is what to do with the existing seeedometer cable, I'm hoping there's a cover/cap I can install on the transmission to prevent gear oil from leaking. Maybe somebody could jump in with an idea or link.'69 LeMans Blue Coupe, White Interior, Massaged .030" over 454, Super T10 4-Speed,
Holley 4150, Pertronix Ignition, CompCams Xtreme Energy XS274S, 781 Oval Port Heads
09-07-2017 #14
Registered User
- Join Date
- Oct 2010
- Location
- Sacramento, CA
- Posts
- 246
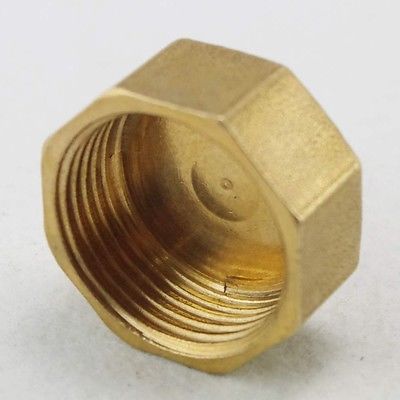
I just cut a plastic circle out of a peanut can lid and stuck it inside the screw down portion where the Speedo cable exits the transmission. It is soft and sealed up with no leaks.
Rick - 1969 Camaro - LS1 driven daily
09-08-2017 #15
Registered User
- Join Date
- Oct 2015
- Location
- Western Mass
- Posts
- 227
LOL... Now THAT'S creative! I'd love to see a picture of that. What is actually holding it in? I was thinking some kind of brass plumbing cap or plug. When you pull the speedo cable out, its a male thread isn't it? Something like 5/8-18 or 7/8-18? Slip an O-ring in there and snug it down? Originally Posted by ccmc
 '69 LeMans Blue Coupe, White Interior, Massaged .030" over 454, Super T10 4-Speed,
Holley 4150, Pertronix Ignition, CompCams Xtreme Energy XS274S, 781 Oval Port Heads
09-08-2017 #16
Registered User
- Join Date
- Oct 2010
- Location
- Sacramento, CA
- Posts
- 246
The cable retention nut is holding it on. But a brass cap would be better. Though I've been running it for 5 years and over 50k miles without a leak.
Rick - 1969 Camaro - LS1 driven daily
09-09-2017 #17
Registered User
- Join Date
- Jan 2014
- Posts
- 1
OldTimer, can you provide more info on how you made the "washers"? I was looking at the same gauges until I saw they were slightly too small for the dash, and had a similar thought of making some kind of rings to fill the gap. So i'd be interested to see how you solved this problem. Thanks! Originally Posted by OldTimer
09-09-2017 #18
Registered User
- Join Date
- Oct 2015
- Location
- Western Mass
- Posts
- 227
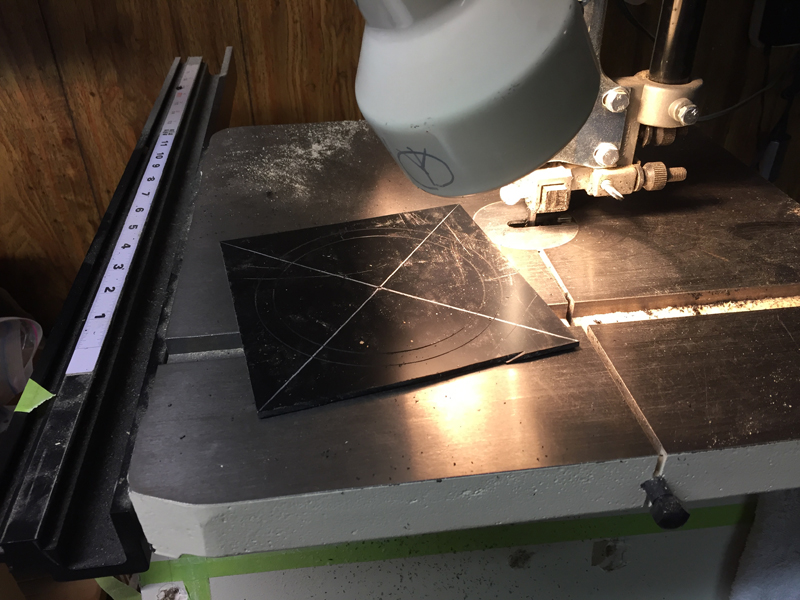
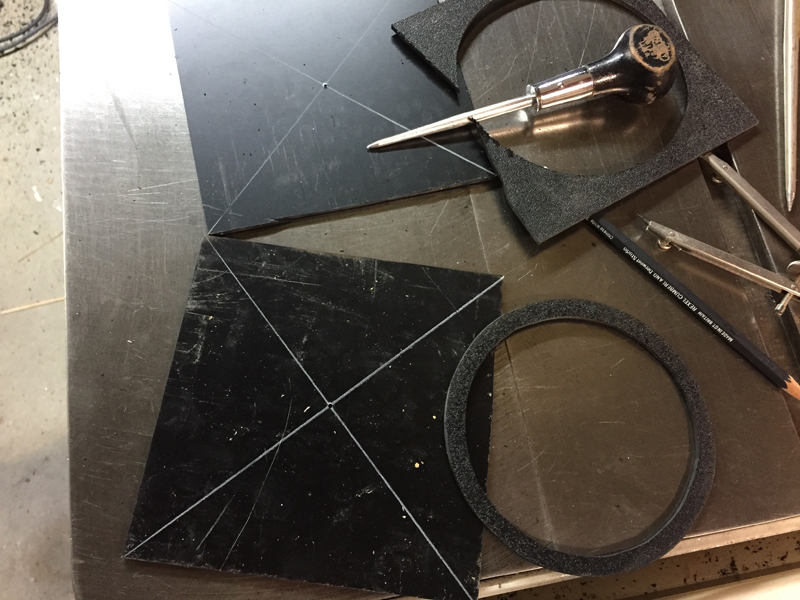
Pretty easy actually. I bought some textured black ABS, I think it was 1/8" or maybe 3/32"? After making a cardboard dummy to see what worked, I used a scoring compass to draw/score a 4-5/8" circle for the outside diameter, then a second inner circle of 4-1/4" for the gauge bore. Cut the outer circle first on my bandsaw, then used my porting tool on the Foredom flex shaft to hog out the inner circle. Cleaned up the edges, made four (4) disks so I'd sandwich the Classic Dash insert, then trap it all with the gauge bezel and the rear clamp ring. If you look at the pictures above, you can see the ABS textured "washer" on the back side. On the front side you can't barely see it because the bezels just around a sixteenth smaller and its actually recessed. Here's a couple pix in progress. Originally Posted by Negativecreep00
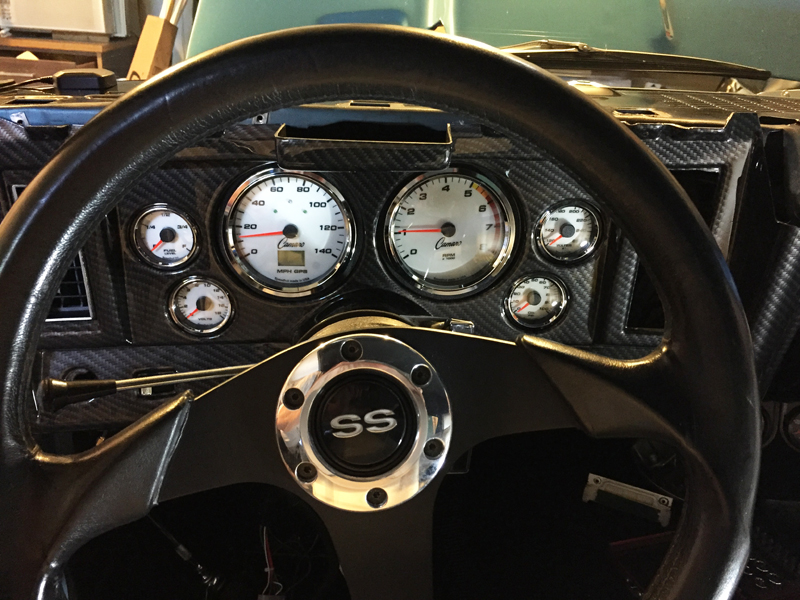
Finally started the old dash tear-down today. Got the old (actually new) dash pad off, trial fitting the insert, lotsa wiring to mess with. I'm going to leave all the existing bulb sockets for the idiot lights and the speedo/fuel gauge zip tied with no bulbs as I'm not a fan of destroying a perfectly good wiring harness. My biggest "worry" is tapping into the existing harness to get sender pulse from the fuel tank, don't really know which one of the three wires on the plug is actually providing the voltage or resistance or whatever I need to get the SpeedHut fuel gauge working. Oil, water and voltage should be pretty straightforward (I hope)... the tach should be simple as well as it just draws pulses from the coil, same as my Sun Tach did. Lighting and power is on the loom. Got the GPS antenna placed, snaked the tach wire out to the engine bay so just have to crimp an end on it. Gotta drain some coolant so I can swap in the new sender on the manifold, then the tough one... setting up the oil sender. I bought a SS shielded line so I can remote mount the sender on the firewall and keep the wire away from any header heat. Also have to figure out how to remove the knobs from the heater slider bc while I have the dash apart I was going to do the Vintage Air conversion on the control panel. I'll do the VA install later this Fall or Winter. Anyway... this is pretty much my view through the steering wheel. Its not locked down, just sitting in place.
 '69 LeMans Blue Coupe, White Interior, Massaged .030" over 454, Super T10 4-Speed,
Holley 4150, Pertronix Ignition, CompCams Xtreme Energy XS274S, 781 Oval Port Heads
09-22-2017 #19
Registered User
- Join Date
- Oct 2015
- Location
- Western Mass
- Posts
- 227
Operational... but not yet finished LOL. Got the dash back in and also did a temp install on my restored original console. Got all the gauges working, still have to get the dimmer sorted out, plus calibrate the gas tank, and the gps speedo. The speedo is the least of my problems as it powered up immediately and cross-checks perfectly with my iPhone god speed app.
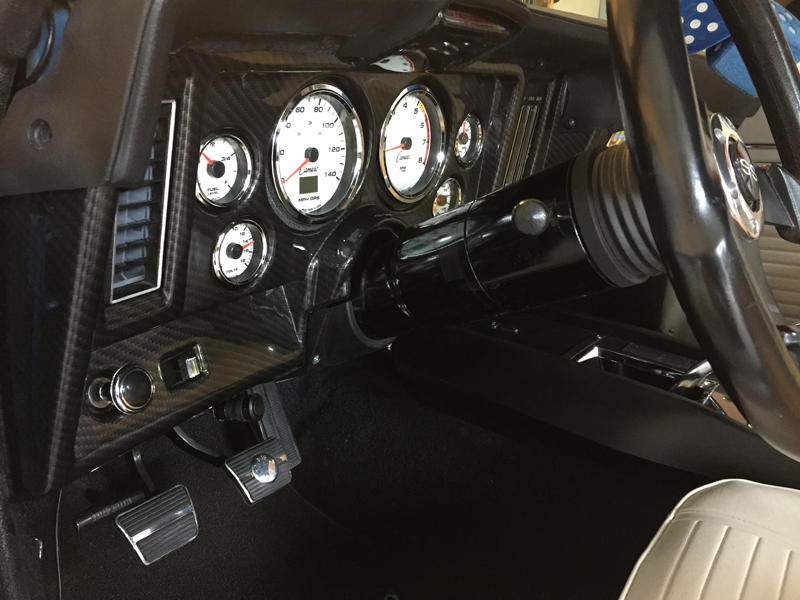
Side View... I re-installed the non-AC dash pad just to get it together. The only issue I had with the insert was that the "nose" where the dash extends towards the wheel seemed to be a little lower than I would have liked. Got out my heat gun and carefully moved the nose up and it looks fine now. I did remove the heater control and replaced it with the Vintage Air unit to get a head start on my VA install LOL.
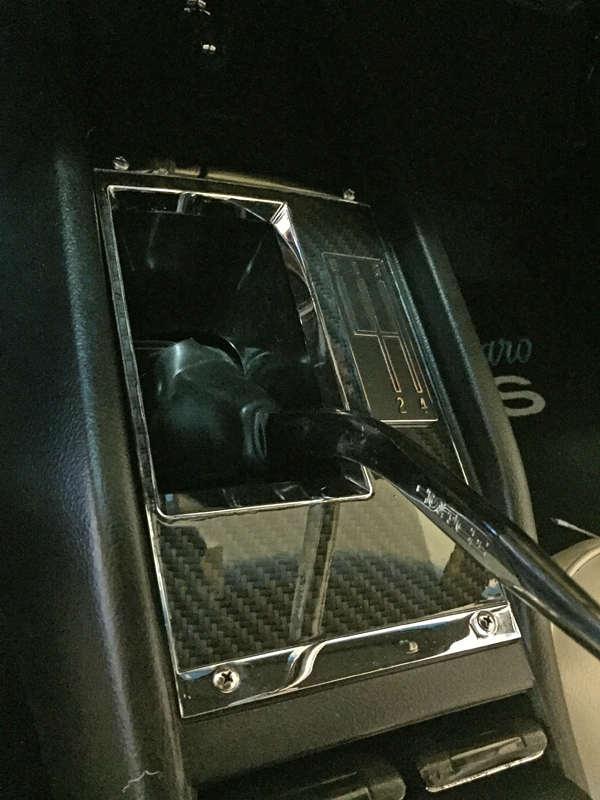
I decided a while back that everyone has wood grain on their OEM consoles so I wouldn't. I restored an original 68-69 console this past winter, had the dash insert, console inserts, and the grab bar panel all hydro-dipped in a more realistic carbon fiber pattern. My local guys at TKTMZ Hydrographics did a beautiful job. I have to get a new boot with a rectangular opening for the Hurst flat base shifter. Might even have to try a different handle as I'd like the pattern slightly forward (maybe 1/2"?) and a little more centered.
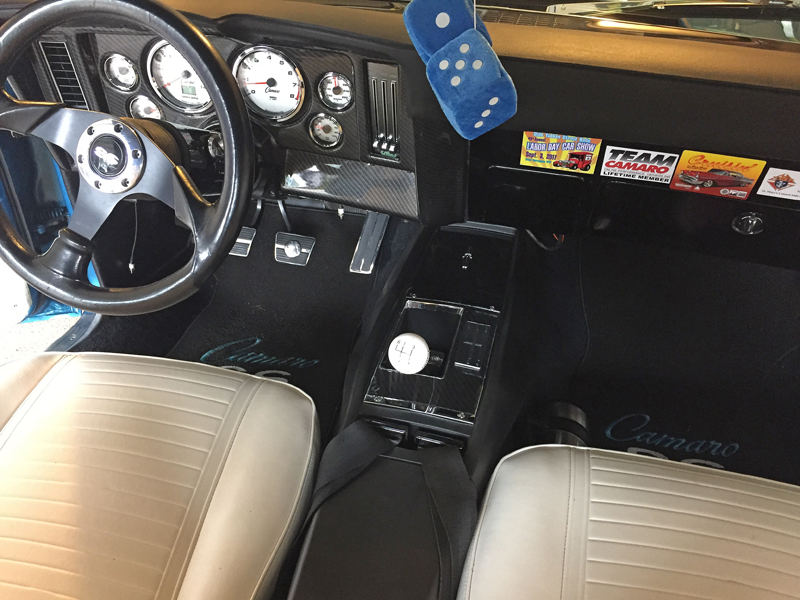
Overall view... the show/cruise magnets are going LOL... to be replaced by the carbon fiber grab handle panel. I ordered the rear clamps for the panel, they don't come with it! Something to remember when you buy individual parts. Should've bought the entire kit in one shot.
Calibrating the gas tank is not as straightforward as the SpeedHut instructions would have you believe. They say that a 1969 Camaro should have a sender that works in the 90-0 ohm range... which was standard for all GM cars from 1965-197X. I tried that setting and got a false reading... and I know my gas tank sender was working just fine before switching to the new gauge. They have a manual calibration mode, but you have to empty the tank to get an "Empty" reading, lock it in, then fill the tank to capacity to lock in a "Full" reading (PITA). I may try the auto calibration one more time before I drain the fuel LOL. Somebody mentioned that you can use a stick to play with the float in the tank on a '69 as you can supposedly see it with a flashlight through the fill opening. Might look at that.
I haven't calibrated the Speedo yet because it was 100% accurate on startup when I checked it against my iPhone GPS App. But I will calibrate it, it seems very simple. So nice having an accurate speedo again.
Gauge Lighting is another gremlin I have to address. I must've hooked up the lighting wires incorrectly because I have the pointers all glowing red at night, but the lights themselves are stuck on the dimmest possible setting and can barely be read. IIRC the dimmer control on the Camaro light switch is an Orange wire, I might've screwed something up. When I had called SpeedHut for some pre-wiring advice, the tech there told me to cut the wires to the inverter/rheostat and solder them together. Might have cut it in the wrong spot. Its a bit confusing because they have two different wires providing "dash lighting" in their instructions.
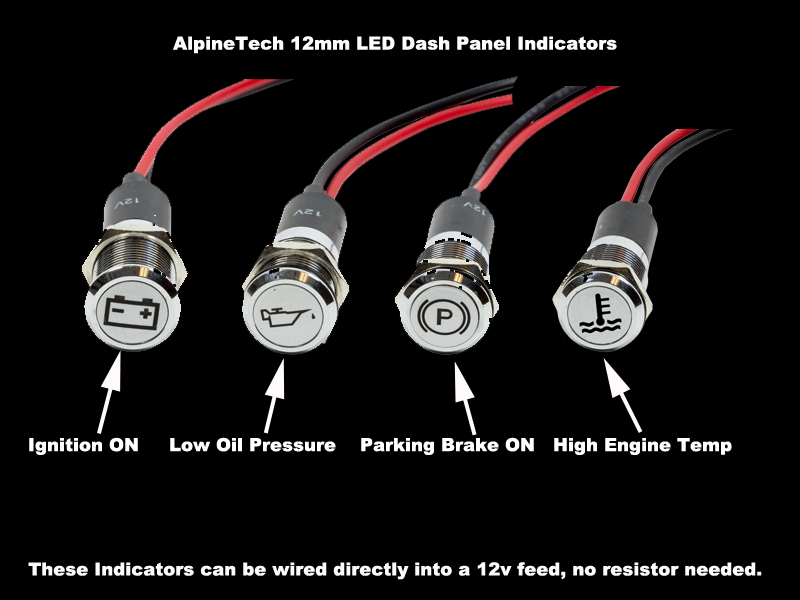
I have the following dash indicators on order... already received the battery and Parking Brake ones... waiting on the others. They'll be installed as soon as I get them, theoretically can be tapped right into all the existing "idiot" light lines.
I'll keep updating as I make progress, and hope to fix the photo bucket mess in the beginning of the thread.Last edited by OldTimer; 09-22-2017 at 07:25 AM. Reason: Adding comments and pix.
'69 LeMans Blue Coupe, White Interior, Massaged .030" over 454, Super T10 4-Speed,
Holley 4150, Pertronix Ignition, CompCams Xtreme Energy XS274S, 781 Oval Port Heads
09-23-2017 #20 Registered User
- Join Date
- Sep 2014
- Location
- Sun City West, AZ
- Posts
- 672
I love my Speedhut gauges and the GPS Speedo. I'm still trying to get the Fuel Gauge level in sync but, I think the most of my problem may be the sender. I replaced the sender and it read totally different than the last sender. I think it is the lousy cheap Chinese part that is causing all my problems so I was able to find a new GM Fuel level sender. I'll have it in next week.
Here is a picture of my custom dash that JCG Restorations and Custom did for me.

 Reply With Quote


