

Results 21 to 40 of 95
Thread: 1970 Cutlass convertible updates
-
05-05-2017 #21

 Registered User
- Join Date
- Mar 2013
- Location
- Beaufort,SC
- Posts
- 329

Is there a way to bypass the safety device on the motors and just go direct to the motors?
-
05-07-2017 #22 Registered User
- Join Date
- Sep 2016
- Posts
- 10

Looks like we are out of luck.. The seat needs a wake up signal from the k-canbus system every 0.7 second to stay alive. I will wire the ground and have a switched 12vdc to wake them up when ever i need to adjust them.
With other wire needs to be connected other than the 2 Brown and the big red?
EDIT:
The above statement were before I actually tested them... Just read a lot of different posts saying you needed a CANBUS K-Can.. Well... How wrong can I be... and Im happy I was wrong!!
My seats are from a 2008 E92 M3
Test 1:
GND to the 2 brown wires
12VDC to big red and red/white wire
Result: working, but timed out after a few seconds when not operating the buttons.
Test 2:
Same as above, but this time with a power supply set at 5VDC
positive to pin 2 (CAN_H)
negative to pin 3 (CAN_L)
12VDC to pin 7 (Lumbar support)
Success!!!
Have left them like this for 1 hr now and they work!!
Turned off the PS and they went stb after 10 sec. Turnd on the PS and everything is functional again.
I plan to use a regular car phone charger (Android) and modify it a bit so I get 5 VDC on ign on.
Hope this works for you Dan!Last edited by CutLS442; 05-07-2017 at 05:32 AM. Reason: More info
05-07-2017 #23 Registered User
- Join Date
- Sep 2013
- Location
- Houston, TX
- Posts
- 247
555 Timer to wake up BMW seat
BadOlds:
Where did you get the info about the K-bus "wake-up" pulse? If that info is good, you can wire up a basic 555 timer circuit that will pulse the seat every 0.7sec whenever the ignition is on. Using the circuit below; use the following component values and you will have a 0.7sec oscillator to wake up your seats.
R1=1kΩ, R2=2kΩ, C1=220µF
Vcc=12v switched, Pin3 goes to the k-bus pin on the seat
Here's a web link for more info:
http://www.electronics-tutorials.ws/...scillator.htmlLast edited by cdrod; 05-07-2017 at 04:50 AM. Reason: bad pic
Rodney Meyers
72 Olds 442 Rest-mod clone
05-07-2017 #24
Registered User
- Join Date
- Apr 2017
- Location
- TX
- Posts
- 138
That is great info, I ran a power wire to the console today so I will be wiring them very soon.
05-07-2017 #25
Registered User
- Join Date
- Apr 2017
- Location
- TX
- Posts
- 138
I wrapped my woodgrain console trim in black vinyl and finished up the shifter today. I have a few odds and ends left to do but the interior portion of the build is coming to an end. I measured my rear tires and feel like a 285 35 20 will fit pretty good on a 20x10 rim with 6.25" backspace. Has any other A body owners ran that combo with good results? I have 19x8.5 rim in front with 5.5" backspace, I would like to have a slightly shorter tire on the front. What is a good size tire to run in the front to compliment the 285 35 20 on the rear?
Dan
05-07-2017 #26
Registered User
- Join Date
- Apr 2017
- Posts
- 40
Thanks so much for posting all of this great info!!!
I have been looking at these seats for my Dad's 67 Cutlass 2dr hardtop.... I really want a shoulder belt built in to a seat for this car, and these are nice, clean looking seats.
My big question is what about the seat belt tightener wiring (+/-) and the function of that.... how does this work?
05-07-2017 #27
Registered User
- Join Date
- Sep 2016
- Posts
- 10
You dont connect the safety features of the seats since the car has no sensor that gives input to these.
The first thing I did was to snipp off and isolate the airbags and the belt tensioner wires. They both have explosive charges that you dont want to go of while testing your seats.
Thanks
Morten
05-07-2017 #28
Registered User
- Join Date
- Sep 2016
- Posts
- 10
As for wheels, Im running 245/40-19 on 8.5 in the front and 275/40-19 on 9.5 in the rear.
05-10-2017 #29
Registered User
- Join Date
- Apr 2017
- Location
- TX
- Posts
- 138
Rim and tire help needed
I need to order some rear rims and tires for all four corners. I bought the rims and tires you see on the car for $450 including the spacer/adaptors that convert them from 5x120mm to 5x4.75" Chevy bolt pattern. They are 19 x 8.5 with some Nitto suv tires on them. When I changed my brakes the 15 inch rims would not fit anymore. I bought these as a way to get my car rolling while I did the upgrades but they have grown on me to the point I am going to order some wider rims in the back to match the front. I like the way they show the brakes and I don't care for an all black rim. My choices are a 19 x 9.5 that would require me to use a spacer/adaptor to make the backspace work or go with a 20 x 10 that can be ordered with a 6.25 inch backspace that will work without an adaptor. I carefully measured and I think that 6.25 backspace will fit my car perfectly but I could add a thin spacer if they are too close to the frame rail. I think a 285 35 20 tire will fit nicely on that 20 x10 rim but maybe bulge out too much in which case I could run a 275 35 20 instead. If the 285 does bulge over the wheel lip will a 275 handle better because the sidewall is stiffer? I need to order these rims and tires asap so any help or opinions are greatly appreciated. I have done a lot of research but someone who really knows about this stuff would be a big help.
Thanks
Dan
05-11-2017 #30 Registered User
- Join Date
- Apr 2008
- Location
- Virginia Beach VA
- Posts
- 381
Hi Dan,
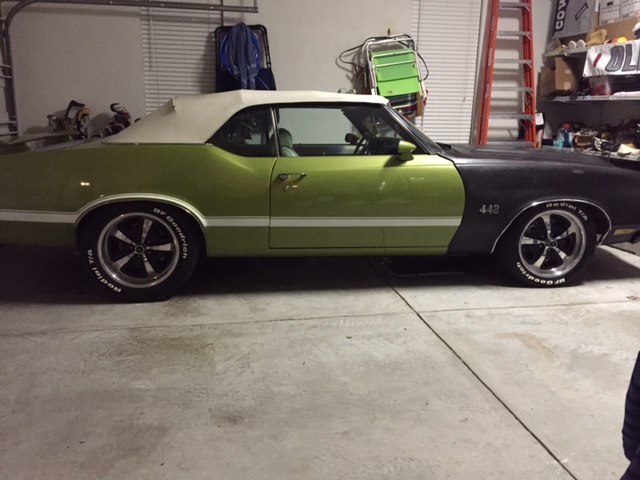
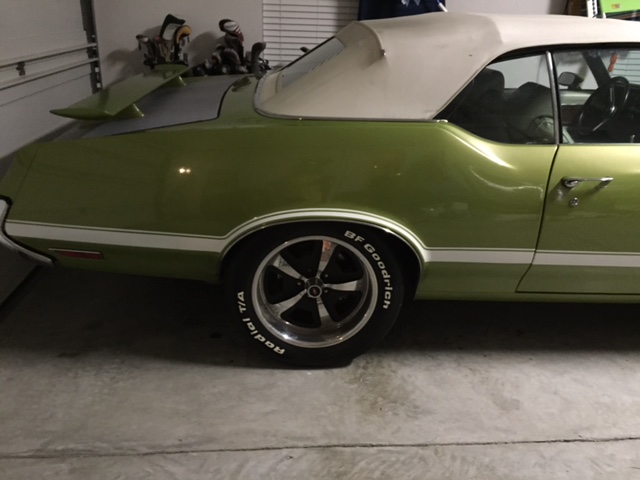
I will jump in here to offer my findings on my 71 442 convertible. I'm running 18" rims and tires but you can still use the total diameter and width as a point of reference since the wheel wells and backspacing should be pretty close. Here' my set up with all the details:
Front Tires/rims- NewGen500 18x8 rims (5.25” BS- {was 4.5 for stock rotors/spindles}) w/Nitto*** 555 255/45/18s
10”sw – 26.97”d
Rear Tires/rims- NewGen500 18x10 rims (6.0” BS – {was 5.5 for stock rear drums}) w/Nitto*** 555r 305/45/18s
drag radials 12.02”sw – 28.78”d
***Nitto words sanded off and BFG Raised white letters glued on for show***
A few important things that came up for me: I don't think you can go taller on either tire w/o running into issues or having to do mods. On a positive note with the tires this tall I can lower the car down so the tire tucks and still have lots of ground clearance with my headers for street driving, going over speed bumps etc. As far as backspace goes I'm maxed all the way around for both front and back. Had to "massage" the rear to get about 1/2" both inner and outer so I can drive the car really hard and get sideways as much as I want w/o any tire rub. I also rolled the quarter lips and wrapped the stock chrome pieces around that cut lip to make a smooth surface. I honestly don't think you can go any wider on our cars w/o heavy mods. Also make sure you don't have plans to update brake rotors or spindles before you pick the final #s on your backspace. The bigger rotors push the wheel out and will have to be accounted for and the spindle type can change what's needed in the front too. For example a stock spindle vs B-body spindle vs AFX spindle would require 3 different BS measurements for your front rims assuming you are trying to max out the width. For lock to lock clearance you can only be off about 1/4" to not run into problems so make sure you know exactly what your spindle and rotor setup is going to be and then measure measure measure until you are 100% sure you have the # as close as possible to put the rim/tire combo as perfectly "centered" as possible to give you about 1/2" clearance on both sides.
-Joe
some pics:
 Joe Lincoln
Lime Green 71 Olds 442 Convertible
Upgrades thread: https://www.pro-touring.com/showthre...ible&highlight=
05-11-2017 #31
Registered User
- Join Date
- May 2017
- Posts
- 6
This thread rocks! I've been trying to decide what to do with both wheels and the interior for a while. Thanks for the updates and subscribed.
I recently finished replacing the top on my 72 Cutlass vert and will be doing a writeup with instructions/pics soon if that helps (you mentioned you're planning to do yours). I'm just about to finish up my fuel injection conversion, convert the rear end to limited slip, and then on to the interior and wheels.
Here's mine so far:
http://www.leftlanebrain.com/categor...s-convertible/
Thanks,
LEFTLANEBRAIN
05-11-2017 #32
Registered User
- Join Date
- Apr 2017
- Location
- TX
- Posts
- 138
Thanks for those measurements Joe, Killer car you got there. Brain I did that top about 20 years ago and swore I would not do another. It might seem easy now that I have done all of this Interior work.
Dan
05-14-2017 #33
Registered User
- Join Date
- Apr 2017
- Location
- TX
- Posts
- 138
I have the seats bolted in and working good. I decided to wire them with a switch located in the console under the armrest. If they time out you can just flip the switch off then back on and they work fine. The seat back covers which got damaged when the airbags deployed are on back order from BMW until mid June. I also finished the console, I tried to make an extension out of sheet metal to extend the console further forward under the dash. No matter which way I tried it looked out of place. I decided to just hack it off in front of the trim, DONE!!
I am happy to be near the end of this interior swap. While it is gratifying to see the end product I do not enjoy this type of work at all. I am now getting back to things I like better. I have an Edelbrock quiet flo fuel pump on order to replace the LOUD pos that I have now. I am also replacing the twenty year old braided fuel line from the fuel cell in the trunk to the carburetor. I am going to freshen up the 750 hp series carburetor and rebuild the Magnafuel regulator. The rear wheels should be here next week so it will be time for new rubber after that. Getting close to paint jail haha.
Dan
05-14-2017 #34
Registered User
- Join Date
- Sep 2016
- Posts
- 10
Looking good Dan!
How did you mount the center console and the back seats? I have testede fitted the front seats and console, but I havent figured out how to mount the seats in the back..
You got some pics?
Thanks!
Morten
05-14-2017 #35
Registered User
- Join Date
- Apr 2017
- Location
- TX
- Posts
- 138
Oh no, you are going to expose me for the caveman I am haha. I used 2 x 4's bolted through the floor and screwed/ziptied the seats and console to them. I will post some pics for you later today or Monday when I get back over to the car.
Caveman Dan
05-14-2017 #36
Registered User
- Join Date
- Apr 2017
- Location
- TX
- Posts
- 138
Here you go, my dirty little secret is out on the interwebz now. When I first got the interior I just stacked some old boards in the rear seat area to see if it was going to work at all. After trying some different ideas I just screwed them down and they work good. I am going to attach the lower rear seats to the boards with extra long and thick zip ties. The console screws to the boards running down the center with some zip ties to make it sturdy. High tech stuff for sure.
Dan
05-15-2017 #37
Registered User
- Join Date
- Sep 2016
- Posts
- 10
Thank you Dan,
I will probably go for a simular solution. It is not the first time wood is used in the interiors of cars, so I do not agree that this is "caveman style " lol, but I see your point.
Thanks,
Morten
05-15-2017 #38
Registered User
- Join Date
- May 2017
- Posts
- 6
You could have at least used green treated lumber! Just making a joke, interior looks great Dan. And I agree, I'd rather do just about anything more than interiors.
05-16-2017 #39
Registered User
- Join Date
- Apr 2017
- Posts
- 40
Thanks for the answer above, so do they have inertia tensioners for the belt as well as the explosive charge ones? And you rely on the inertia tensioners like the cars without active seats (explosive charges)?
Thanks again!
05-17-2017 #40
Registered User
- Join Date
- Apr 2017
- Location
- TX
- Posts
- 138
Yes they have inertia tensioners as well. After the air bags and seat belt tensioners deploy the inertia tensioners still work like any other car.
Dan

 Reply With Quote


