

Results 21 to 40 of 61
-
07-02-2016 #21

 Registered User
- Join Date
- Sep 2012
- Location
- London, Ontario
- Posts
- 293
Wow...Sorry for your loss.
73 Maverick Grabber Project
My never ending project:
https://www.pro-touring.com/threads/...hlight=grabber
-
07-02-2016 #22
 Registered User
- Join Date
- Nov 2006
- Location
- Ma.
- Posts
- 5,567

jeffery, sorry to hear about your friend Nathan, It's so tought to loose someone you've been so close to and with all the time.
Wayne
Car FINALLY home !!!!!! lol
Project FNQUIK https://www.pro-touring.com/showthre...ghlight=FNQUIK
-
07-02-2016 #23
 Registered User
- Join Date
- Sep 2013
- Location
- sw Kansas
- Posts
- 1,644
My sympathies to all involved.
-
07-02-2016 #24
 Registered User
- Join Date
- Mar 2007
- Location
- Florida
- Posts
- 2,391
Jeffery, sorry you lost your bud Nathan.
-
07-03-2016 #25
 Registered User
- Join Date
- Oct 2009
- Location
- CT.
- Posts
- 738
so sorry to hear of your loss
Glenn
1955 Chevy BelAir
1951 Chevy 3100
1987 Chevy Silverado
My last project....
https://www.pro-touring.com/threads/...my-72-Maverick!!
-
07-03-2016 #26
 -Moderator/Sponsor-
- Join Date
- Apr 2001
- Location
- The City of Fountains
- Posts
- 15,975
Sorry for your loss. Hopefully you will continue the project in his memory...
Andrew1970 GTO Version 3.0
1967 Cougar build
GM High-Tech Performance feature
My YouTube Channel Please Subscribe!
Instagram @projectgattago
Dr. EFI
I deliver what EFI promises.
Remote Holley EFI tuning.
Please get in touch if I can be of service.
"You were the gun, your voice was the trigger, your bravery was the barrel, your eyes were the bullets." ~ Her
-
09-12-2017 #27
Registered User
- Join Date
- Dec 2015
- Posts
- 22
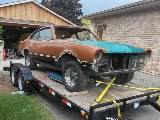
Its been over a year since Nathan passed and so it's on. The car is now in the hands of expert Cup chassis and suspension builders - helps to live in NASCAR country. They tell me the car will be on the flat plate in 2 weeks or so. We will check out the chassis alignment and decide the ride height.
The rear-end is assembled - thank you Mike! Below is the build if ur interested:
- Yukon Zip Locker YDGF9-31-SM, clutch pack, street posi
- Nodular Iron Case, HD, Center Section YPDOF9-2-306
- Daytona support bearing kit YK F9HDC-SP-C
- Yukon 3.70 Ring Pinion YG F9-370
- Forged Pinion Yoke 3150, 28 Spline YY F900662
- Moser Axles, 31 Spline, 27/24 lengths, 47 in end-to-end
- Big Ford Bearings and Torino Housing ends
- Willwood 12" Rotors and 4 Piston Brakes 140-2114-BD
Looking at transmissions - favoring the Tremec TKO.
-
09-12-2017 #28
Registered User
- Join Date
- May 2013
- Location
- Colton Ca.
- Posts
- 623
Glad to see you back at it. This is such a cool build.
Ahmad B.
-
01-26-2018 #29
Registered User
- Join Date
- Dec 2015
- Posts
- 22
The ride height is settled for now (6" front and 7" rear), there is plenty of adjustment with 11" rear coil-overs and the front cantilever should provide a about 2" height range without a manual link adjustment.
----------------------------------------------------------------------------------------------------
Discovered the front clip frame rails were just to high for the ride height and the width between the frame rails was to wide to fit the tire / control arms. Front clip needs rework & I need to get an engine block to make sure there is room for the headers.
---------------------------------------------------------------------------------------------------
Really struggling deciding on tire size. These are F: 245/40/17 and R: 295/35/18. I am looking for the right balance with the tires and rims.
---------------------------------------------------------------------------------------------------
-
01-27-2018 #30
Registered User
- Join Date
- Oct 2009
- Location
- CT.
- Posts
- 738
Glad to see an update on this build, its gonna be really nice when done!!! I love the stance!
Glenn
1955 Chevy BelAir
1951 Chevy 3100
1987 Chevy Silverado
My last project....
https://www.pro-touring.com/threads/...my-72-Maverick!!
-
02-03-2018 #31
Registered User
- Join Date
- Dec 2015
- Posts
- 22
-----------------------------------------------------------------------------------------------------------------
Still setting up the reared and making ajustments to the links.
-----------------------------------------------------------------------------------------------------------------
Picked up a 351c today. DOAE-J Feb 10, 1970, 2 bolt, 2V heads, and a CS Shelby manifold.
-
07-05-2018 #32
Registered User
- Join Date
- Dec 2015
- Posts
- 22
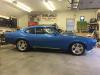
Sail vents and body work ..
Decided to keep the sail vents but could not help myself; changed out the aluminum vent screens with a darker screen. hope this is ok -- gives so much more contrast. Used a metal gutter guard found at the local hardware store.
The body panels & doors are tight. Really look good beyond my expectations.
BTW: I will have some great pics of the front suspension development to share on my next post. Not sure if anyone has done this before; but we are looking to build out a cantilever front suspension.
-
07-08-2018 #33
 Registered User
- Join Date
- May 2010
- Location
- British Columbia
- Posts
- 508
looking awesome !
-
07-09-2018 #34
Registered User
- Join Date
- Sep 2013
- Location
- sw Kansas
- Posts
- 1,644
What's the plan for the 351? I'm curious about your front end .

-
07-11-2018 #35
Registered User
- Join Date
- Dec 2015
- Posts
- 22
Thanks for the replies!! Originally Posted by wfo guy

I wanted a vintage motor so a 351c seems appropriate. Still researching but thinking a mild stroker kit, proper oiling system updates, Milodon rear sump, modern heads, and using the Shelby intake with a carb.
Will get some front end pics my next shop visit...
-
07-22-2018 #36
Registered User
- Join Date
- Dec 2015
- Posts
- 22
Starting the Front End
The control arm supports are tacked in place just incase some adjustments are needed for the steering rack and sway bar. We will be using a rear sump oil pan.
Working engine mounts now to set the motor block and transition then resolve any issues. At some point finish the welds and fabricate new control arms.
Below is kind of the initial coil over placement idea for the cantilever suspension.
There are more pics on the project web site if ur interested.
-
07-22-2018 #37
Registered User
- Join Date
- Dec 2015
- Posts
- 22
Parts have arrived!
Finally made a decision on the front nose section, lower valance, and purchased the transmission.
Just had to have the Eleanor style and the product line from Maier Racing is an outstanding addition to the build. Will need to save up and buy the other parts later.
Now have a sweet Tremec TKO600 5 Spd from Silver Sport Transmissions - SST with the Stage II Performance Enhancement Upgrade and picked up a Quick Time SFI Bell housing.
-
07-23-2018 #38
Registered User
- Join Date
- Jul 2018
- Location
- Buckinghamshire UK
- Posts
- 4

This is going to be brilliant, loving the suspension ideas. Rear end looks seriously heavy duty. Love it.
-
12-31-2018 #39
Registered User
- Join Date
- Dec 2015
- Posts
- 22
Going Coyote ...
We had a set back and trying to recover. Sadly discovered multiple cracks in the 351 Cleveland block I bought - water jacket areas mostly.
So we are going Coyote. Picked up a 2013 5.0L Coyote w/ 52K miles pulled from a Mustang GT. William at (Wade MotorSports) helped us out.
The Coyote engine is enormous compared to the Cleveland. This has caused rework - bascally had to remove the entire front clip, firewall, and the floor pan to fit this engine. Now we can determine the right position and height to place the motor and build around it. First time dealing with a Coyote, so we'll see how this goes.
Happy New Year!
01-01-2019 #40 Registered User
- Join Date
- Aug 2015
- Location
- charlotte
- Posts
- 924
wow, it really does look bigger, I never realized the size difference. By 'nascar country' I assume you mean Mooresville?
Tags for this Thread

 Reply With Quote


