
Results 21 to 40 of 122
-
02-06-2016 #21
 Registered User
- Join Date
- Oct 2009
- Posts
- 36
WOW ! That looks great ! Moving right along. I dont know what youre using to paint the frame but you might want to try SEM Hot Rod black. I used it on my wagon and a ton of suspension parts. It dries to about an 80% gloss. Lays out nice too. Comes with paint, activator and reducer in the box.
And thats pretty funny that you wound up with Gary's frame. That poor guy is his own worst enemy. He took a lot of crap on YB.
-
02-07-2016 #22 Registered User
- Join Date
- Feb 2012
- Location
- Central NY
- Posts
- 240

The frame was the last thing he had at all. Even got a chance to look around his shop and there were no other parts :( Well I got the floor swept and the frame back on stands. Gotta take my son for some driving lessons today then try to finish cleaning the bottom of it. Hopefully start painting tomorrow night. I've been waiting on some parts, but they have been "delayed"... I hate waiting on slow, unresponsive, vendors. I'll update again with pics as soon as I accomplish something Hahaha
02-08-2016 #23 Registered User
- Join Date
- Mar 2009
- Location
- overseas
- Posts
- 3,434
love them g-body projects
 Kevin S. (overseas in Germany)
1963 Chevrolet Impala 2d ht Coupe
www.CruznArt.com
CRUZN - Automotive Artworks
02-09-2016 #24
Registered User
- Join Date
- Feb 2012
- Location
- Central NY
- Posts
- 240
Well my back has been bothering me so I haven't been working on it as much as I want or planned. I did go out tonight for a few hours and found that some area's I already cleaned were starting to get minor surface rust. Made the call to clean the whole front section of frame and put the first coat of paint on. Letting that dry now. I'll snag some pics and post them up tomorrow.
02-10-2016 #25
Registered User
- Join Date
- Feb 2012
- Location
- Central NY
- Posts
- 240
Snapped some pics finally. Going to try to clean more of the frame tonight and possibly finish painting the bottom.


02-12-2016 #26
Registered User
- Join Date
- Feb 2012
- Location
- Central NY
- Posts
- 240
I finally received some reinforcement braces I ordered. These are welded to the frame and wrap around to support the rear lower control arm mount. I also have them for the upper mounts and will show detail of those when I install them. I need to find an old control arm. I noticed when I flipped them frame upside down, the right side mount had been hit at some point and was bent out of place. I had to cut one of the tabs off the frame and finessed the mount back into place. It's close now, but I'm sure it's still off a little. I dont want to weld the new braces into place then find out the mount is still out place.


Left side mount for comparison

02-12-2016 #27 Registered User
- Join Date
- Mar 2009
- Location
- San Antonio, TX
- Posts
- 1,632
Congrats man! I can appreciate the amount of work that goes into 'just' cleaning up and painting the frame. I also dig garage builds the most.
 Dave
Dave
84 Monte SS - just a few bolt-ons
02-12-2016 #28 Registered User
- Join Date
- Jul 2006
- Location
- Northwestern NJ
- Posts
- 342
Looks great, Streetbu!
Tommy
Tommy Souren
"The older I get, the faster I was."
Grandma's 20k mile '80 Malibu Classic, in-progress factory style LS6 454, Legend LGT 700 5 speed, 9" 3.70 posi, Global West suspension, 12"/11" discs.
02-12-2016 #29
Registered User
- Join Date
- Feb 2012
- Location
- Central NY
- Posts
- 240
Thank you! I'm not just cleaning the frame either. The factory welds left a little to be desired, so I'm smoothing the extra weld and splatter off, welding some places they missed, and generally deburring and smoothing the frame. It's not only for looks but makes it much nicer to work on when I have to. No more gouging your hand on weld spatter or sharp corners. It's a PITA that I hope is worth it!
02-13-2016 #30
Registered User
- Join Date
- Feb 2012
- Location
- Central NY
- Posts
- 240
I got the upper control arm support braces welded in this morning. Still need to figure out the lower mount that is bent before I weld those braces in.

02-19-2016 #31
Registered User
- Join Date
- Feb 2012
- Location
- Central NY
- Posts
- 240
Finally some updates. So I quit smoking on February 10th, it's been hard to be in the garage and not have one so I decided to remove myself from the temptation for a little bit. In addition I've been looking for a rear lower control arm so I could weld in the lower control arm reinforcements and repair the one damaged mount. Hopefully have one coming but decided to paint the rest of the bottom and sides of the frame so they don't keep getting surface rust on them in the mean time.


02-20-2016 #32
Registered User
- Join Date
- Feb 2012
- Location
- Central NY
- Posts
- 240
Flipped the frame and welded in the body mount repair washers. Now to wipe the dust off and paint the topside. Then the real fun starts with the body swap.


02-25-2016 #33
Registered User
- Join Date
- Feb 2012
- Location
- Central NY
- Posts
- 240
I received the lower control arm today & just finished welding in the the lower support braces.

02-29-2016 #34
Registered User
- Join Date
- Feb 2012
- Location
- Central NY
- Posts
- 240
I've been on a spending spree. Stainless brake lines, braided stainless brake hoses, Blazer spindles, and just today I ordered the ridetech front a-arms and HQ coilovers. A few pics just keep everyone interested lol


03-02-2016 #35 Registered User
- Join Date
- Feb 2013
- Location
- cleveland,oh
- Posts
- 13
i'm interested to know if you have a part # for the ss braided brake lines on the front. i'm running blazer brakes and would like to upgrade to the braided lines.if no part# than maybe could give me the specs so i have an idea of what to look for. thanks. keep the build pix coming. looks great so far.
"there's no substitute for cubic inches"
03-02-2016 #36
Registered User
- Join Date
- Feb 2012
- Location
- Central NY
- Posts
- 240
I'm using hoses for a g body. They are actually slightly longer than Blazer hoses. You have to use the Blazer hose bolts though. Russell part #692100


03-06-2016 #37
Registered User
- Join Date
- Feb 2012
- Location
- Central NY
- Posts
- 240
Well I think everyone had the same idea. Use their tax return to buy car parts. ridetech is behind on shipping because of the volume of orders. I guess that's a good problem to have if you're a business. LOL my fault for not ordering sooner so I'm stuck waiting for parts. Hopefully by the end of this week. I did get a few other parts in though.
My Brembo front brake rotors

New backing plates for the Blazer spindles.

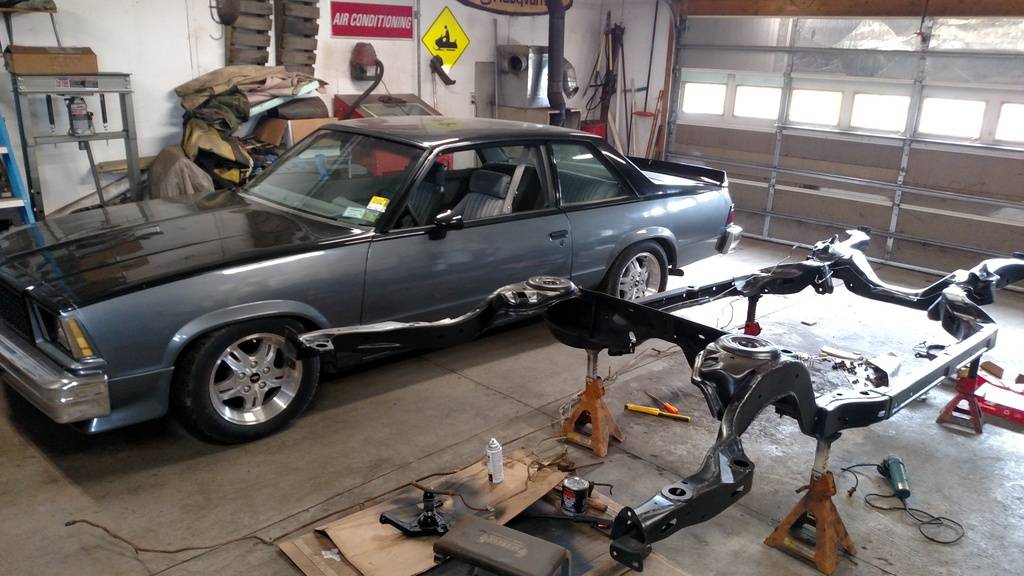
And I was able clean out the garage and get my car out of storage before the lawn turns to mush.
03-06-2016 #38 Registered User
- Join Date
- Jul 2005
- Location
- Bay Area
- Posts
- 1,085
Who makes the LCA plates you welded up?
Jose (Joe)
1963 Nova SS Convertible
1978 Malibu LT1/4L60E
1978 Malibu Stock
1983 Malibu Estate Woodie Wagon
2007 Harley Dyna SB
03-06-2016 #39
Registered User
- Join Date
- Feb 2012
- Location
- Central NY
- Posts
- 240
JT Racecraft. Quality product but took a little while for him to ship...
03-09-2016 #40
Registered User
- Join Date
- Feb 2012
- Location
- Central NY
- Posts
- 240
Well I just received my ridetech Tru-Turn setup, but was disappointed to see they back ordered the HQ coil overs and no one happened to mention that to me. Without the coil overs I can't put the a arms in as it will leave me stuck on jackstands. They say the middle of next week but lord knows if I tear into it and they don't show, then I'm really up a creek. As it is now, I can merely stand the chassis up on it's side and still use the garage. I don't want to risk damaging the a arms or the chassis with them all on but without the coil overs though. So I'm in a holding pattern waiting on parts. I can assemble the spindles and the a arms, get everything ready to go, but that shouldn't take very long at all. I'll post some pics of the arms tonight. They are VERY nice pieces!

 Reply With Quote


