

Results 121 to 138 of 138
Thread: 3rd gen Z28 track day build
-
05-01-2017 #121
 Registered User
- Join Date
- Jun 2015
- Location
- kent,ohio
- Posts
- 128

Wow, the concern about my health has me overwhelmed. I really appreciate all the good wishes. The doctors have been able to tweet my meds so I am not as sick after chemo so I should have a few days between chemo sessions to work on the car.
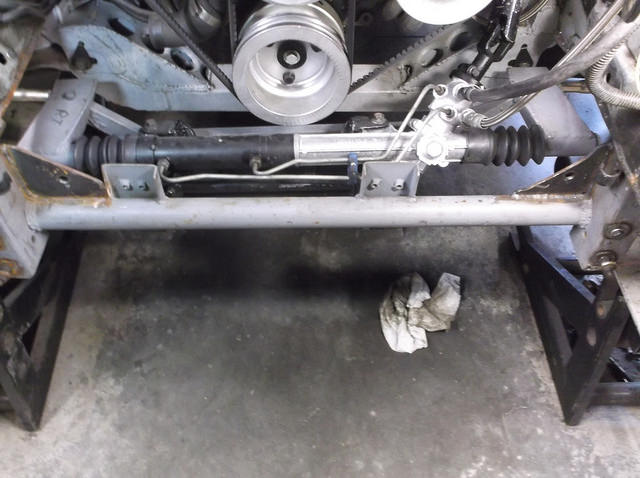
I am working on adding some extra plating to the rack mount to eliminate any positivity of flex when trying to turn 315 30 18 Hoosiers at turn 7 at Mid Ohio.
-
05-01-2017 #122
 Registered User
- Join Date
- Apr 2005
- Location
- Chicago
- Posts
- 2,787
Hi Dave,
Yep, Chemo sucks and Fulfox (5FU) is just wonderful. My favorite part is most likely won't lose your hair it will just thin as do your finger nails, and your patients. However don't worry you will get through it. It's just a small hick up and you are going to have good days, bad days and really bad days. If it gets real bad you can dumb down to the Xeloda as it's side effects aren't as bad.
Side note: When the remove your pump get out and walk, do it every day no matter how ****ty you feel. I promise you it will make you feel better. If it was wasn't for an unknown women from Chemo I would have just gone home and laid on the couch. Exercise and moving is the best thing you can do for yourself during chemo.
If you need someone to talk with about the chemo you are going through I will pm you my number and you call me as I am almost 5 years out (lost 1/3 of my colon) and did both Fulfox and Xeloda chemo.
Mert, Originally Posted by 83rdracer

This is the most powerful thing I have read in a long time. If you don't mind I am going to share this with the cancer charity I work with. You sir are an inspiration and I truly hope I meet you one day so I can shake your hand. Words are powerful and these are just that.
Originally Posted by mert.celet
marty-mj
GarageScene.net High Speed Welding KDHotrods RecoveryRoomInteriors WegnerAutomotive Autometer Ride-Tech
-
06-30-2017 #123
Registered User
- Join Date
- Jun 2015
- Location
- kent,ohio
- Posts
- 128
It looks like photobucket.com is holding my pictures hostage. They want me to pay $339.00 a year to allow me to post to a third party. What a rip off. Not sure what to do.
-
06-30-2017 #124
Registered User
- Join Date
- Aug 2011
- Location
- Granite City
- Posts
- 114
Fairly sure they are gonna hit everyone, and the entire forum isn't gonna have pic anymore Originally Posted by 83rdracer
-
06-30-2017 #125
Registered User
- Join Date
- Nov 2002
- Location
- Georgetown,TX
- Posts
- 2,557
Yep, looks like I'll be switching to Imgur, to host my photos.
-
06-30-2017 #126
 Registered User
- Join Date
- Jul 2011
- Location
- Istanbul / Turkey
- Posts
- 76

Looking forward to see Your upgrades My Friend. And I've always been happy with dropbox btw. It is very user friendly and up to a certain size (about 50mb), it's free.
Being handsome is only skin deep. But Badass goes to the bone.
Mert Celet
-
07-14-2017 #127
Registered User
- Join Date
- Jun 2015
- Location
- kent,ohio
- Posts
- 128
I opened an imgur account but am having trouble uploading my albums from photobucket. I can load the albums to my computer but can't get them to imagur account. I can load single photos from computer to imagur. Any suggestions.
-
07-14-2017 #128
 Registered User
- Join Date
- Mar 2015
- Location
- FL
- Posts
- 318
I just switched over to post image. Very easy and user friendly. I like it better than photobucket already--no delays and no ads. Originally Posted by 83rdracer
-Mitch
G8 GXP, White Hot, Auto, bone stock
68 Firebird, 428 Pontiac, CNC'd KRE Al d-ports, hyd roller, EFI, TKO600, TCI Eng complete chassis, Ridetech, Kore3 C6Z brakes, C5Z 18" with 315 rivals x4, C6zr1 mufflers
RRR, NASA HPDE https://youtu.be/DPp1l9-FuNE
-
08-06-2017 #129
Registered User
- Join Date
- Jun 2015
- Location
- kent,ohio
- Posts
- 128
Finally done with chemo. Doc canceled last session due to cumulative effects. July was a total bust, never worked on the car due to major fatigue. Side effects from chemo can last for months but I have been off chemo for 3 weeks and can feel some improvement. Hopefully I can get back to working on car in the next week or so.
I want to thank everyone who expressed their concern, thought of me or whispered a prayer. Your concern for my wellbeing has been unexpected but very much appreciated.
Dave
-
08-06-2017 #130
Registered User
- Join Date
- Jul 2011
- Location
- Istanbul / Turkey
- Posts
- 76
It's so good to hear back from You Dave. I am truly happy for You! We all care about You...
All You have to do is just believe in Yourself. And make Your subconscious mind believe that You had already been recovered. That's just takes repetition. The subconcious mind has no discrimination. Whatever it is pressed upon, it has no way but accept it. And The body is just an instrument of the subconscious mind and it always has to obey. That's how You will get Your Results.
And don't forget. We all believe in You!
Make the Car Gods Proud My Friend!Being handsome is only skin deep. But Badass goes to the bone.
Mert Celet
-
10-18-2017 #131
Registered User
- Join Date
- Jun 2015
- Location
- kent,ohio
- Posts
- 128
Well I am finally back at it. August and Sept were pretty much a bust due to cbronc fatigue. I got the car on the road to shake it down and motor died every outing losing fuel to carb. Would quit after 30-45 minutes of driving. At first I thought vapor lock, but carb and fuel lines were barely warm. fuel pump could usually. Be heard running as I coasted to side of road. I finally caught the car running in the driveway with only 2 psi on the gauge. The pump is self regulated at 6psi. It seems that after running for an extended length of time the pump would slow down causing pressure and volume to drop. Replaced the pump with a similar unit from different mfg (made in usa) . Drove car for 2 hours and no problems.
Besides the fuel issue I also had to get a hood on the car. I have a 6" Harwood cowl hood that I bought years ago for cheap. It's too tall to see over to drive safely in traffic so I needed to cut it down. I also needed to make the cowl scoop functional and seal the carb to the hood.
I'll post pics of hood mods soon.
Just glad it runs and drives well and I am able to work on it again.
-
10-18-2017 #132
Registered User
- Join Date
- Jul 2011
- Location
- Istanbul / Turkey
- Posts
- 76
Hi Dave! I!m So grateful to see You back on track!
I have a 4'' cowl from Harwood which i have bought but haven't used. If You want i can ship it to You.Being handsome is only skin deep. But Badass goes to the bone.
Mert Celet
12-08-2017 #133
Registered User
- Join Date
- Jun 2015
- Location
- kent,ohio
- Posts
- 128
Sorry mert but I don't think I could afford the freight!!!!
12-11-2017 #134
Registered User
- Join Date
- Jun 2015
- Location
- kent,ohio
- Posts
- 128
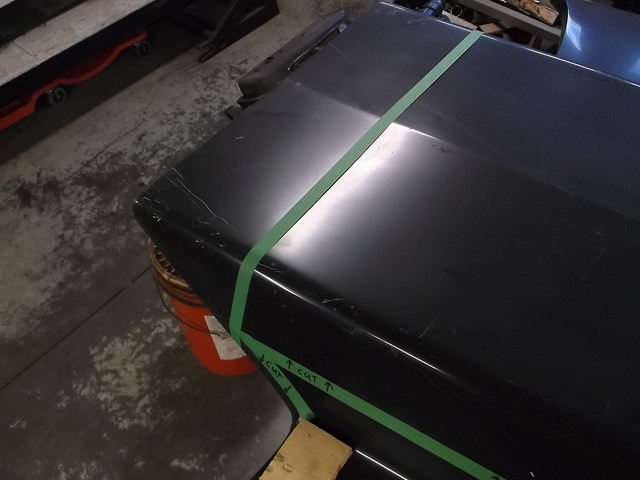
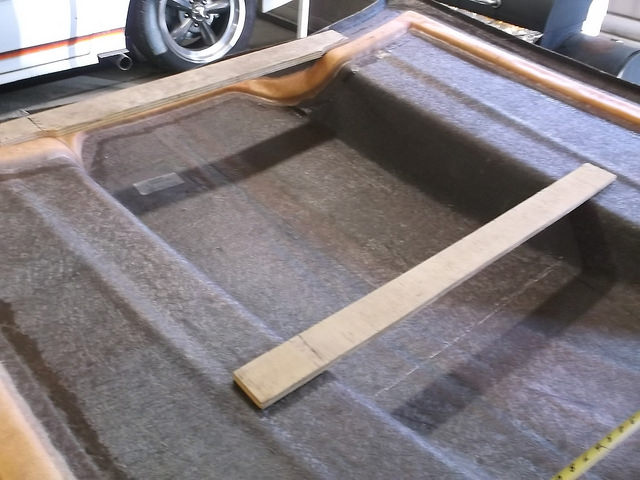
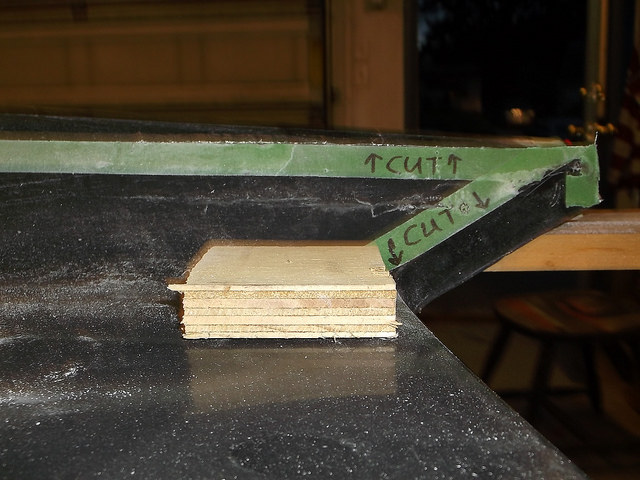
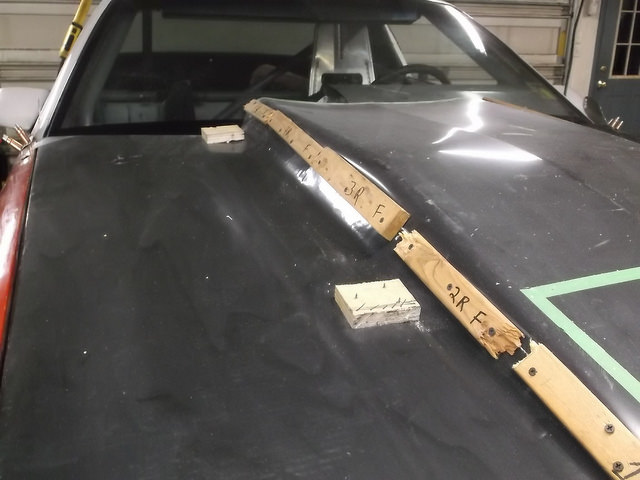
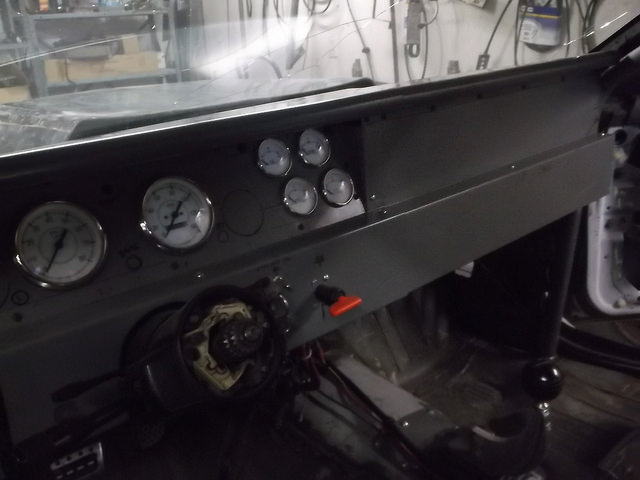
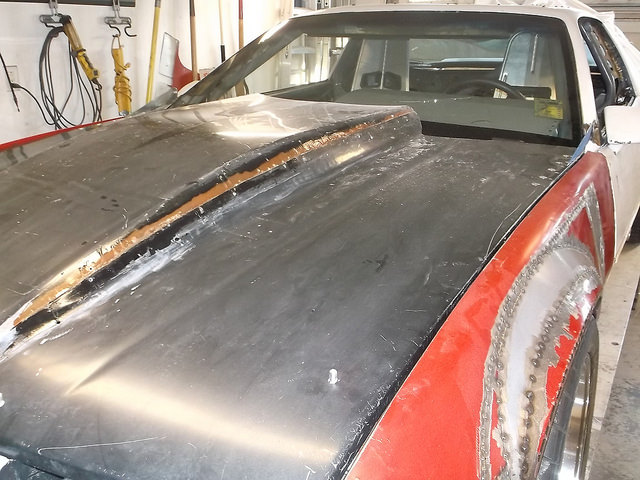
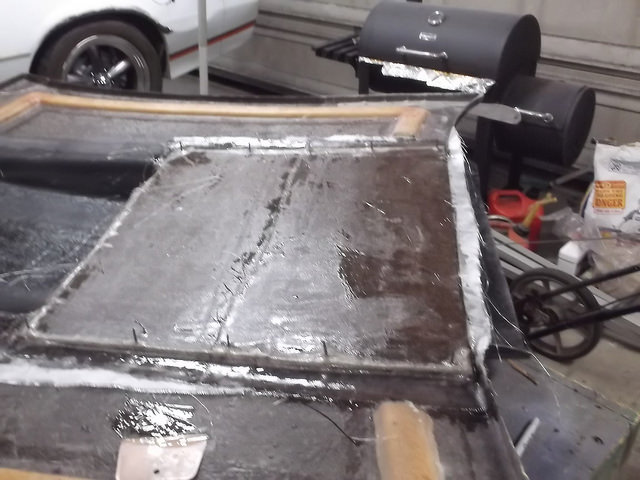
Haven't posted for a while but been working on the car none the less. The next task as mentioned earlier was to try and cut down a 6" Harwood pin-on cowl hood to about 3". I am no body man and have only worked with fiberglass a few times so once again I am attempting a significant modification and not really knowing what I am doing, lol. The plan is to cut the full length of the cowl scoop down the sides and let the top drop into the lower part and bond it all back together. I also made a cold air box in the scoop that the air filter fit up inside making the hood a functional cowl scoop sealed off from engine heat.
Here we go. First pics show how much and where I planned to cut the hood.
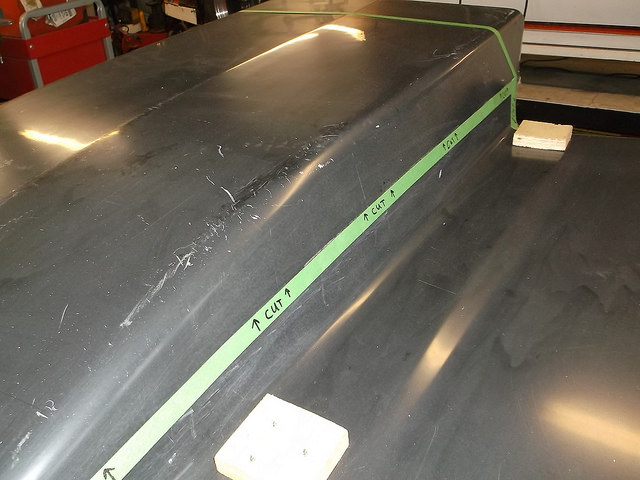
Before I did any cutting on the hood I screwed a couple of 1x4 to the bottom of the hood to keep it from cracking in half and hold it in alignment.
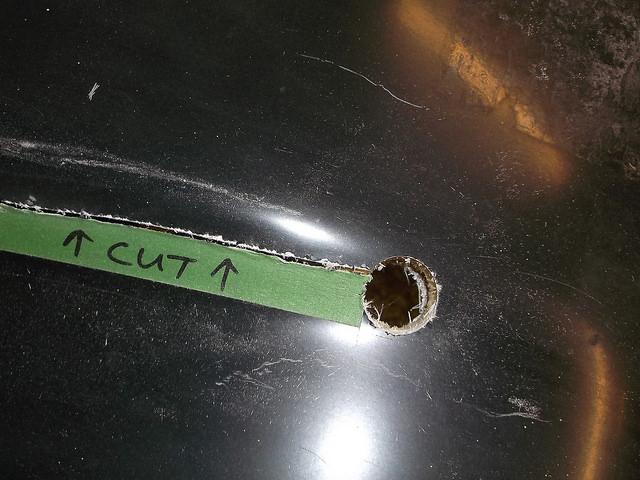
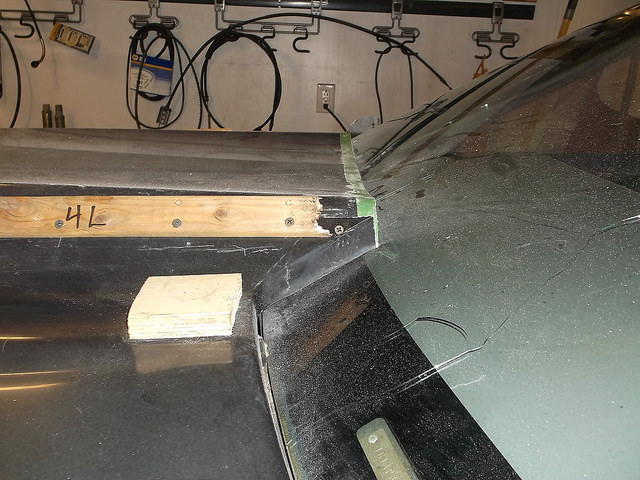
I only cut the scoop down the sides but left it attached at the front. To allow the hood to flex/bend down to the rear without cracking the front I drilled a couple of 1 1/4" holes at the front edge of the cut lines. I cut the hood with a skill saw and it dropped down inside the lower half like I had hoped.
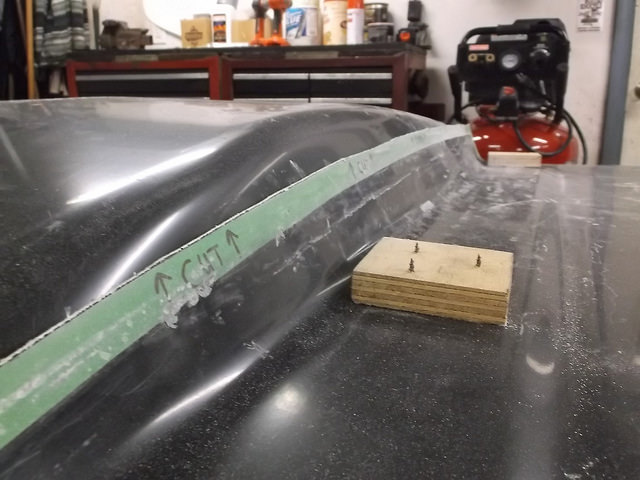
Because the sides of the scoop angle in from bottom to top, the farther to the rear of the scoop the wider the gap got between the sides of the upper and lower halves. At the front there was little to no gap but at the very rear the gap was over 1".
I spent a couple of days trying to figure out a good way to fill the gap and have it look presentable. Most of my ideas involved a lot of fiberglass and bodywork that I didn't want to do. It struck me that fiberglass is just a form of plastic and I might be able to heat the lower side panel and bend it into the upper. After successfully trying it out on the piece I cut off of the back of the hood I attacked the hood with my heat gun.
Starting at the front I heated up 6-7" at a time till the fiberglass softened and with a block of wood press the lower side against the upper half. As the gap widened I had to do this several times to get the lower side panel to deform enough to close the gap. I also had to come up with a way to draw the sides together as I was heating them and hold them in place as they cooled. I ended up using short sections of scrap wood on the inside and outside of the hood and drywall screws to draw and hold sides together. This was a slow proces and took about 4 days to do both sides.
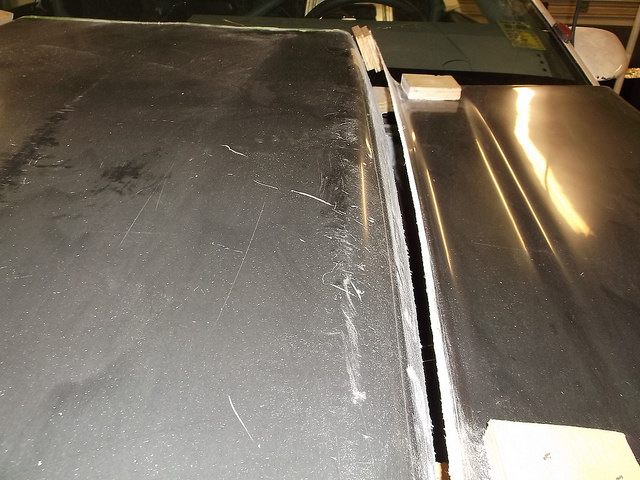
Once I had it all reformed and fitted I had to take it all back apart, scuff all the surfaces with flap disc and bond the halves back together with a heavy coat of resin. My inexperience should up big time as did not add enough hardner to the resin and after waiting 3 days for it to dry I had to pull it all back apart and redo it. Anyway once bonded together and all the wood removed the hood didn't look too bad.
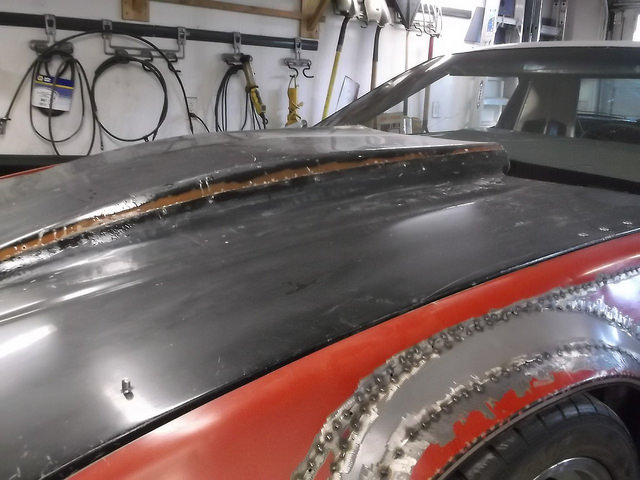
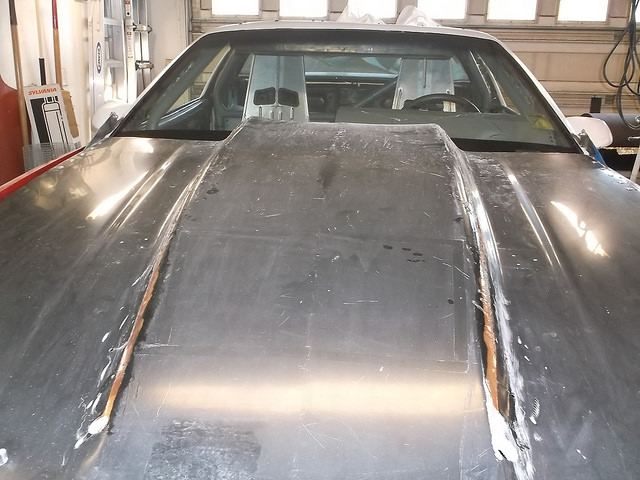
To add a little extra assurance that the sides wouldn't pull apart at some time, I added a few layers of fiberglass mat across the seems on the underside of the hood. A little body putty to smooth out the outer seams and it shouldn't look too bad. I can even see over it. Visibility is actually very good.
12-11-2017 #135
Registered User
- Join Date
- Jun 2015
- Location
- kent,ohio
- Posts
- 128
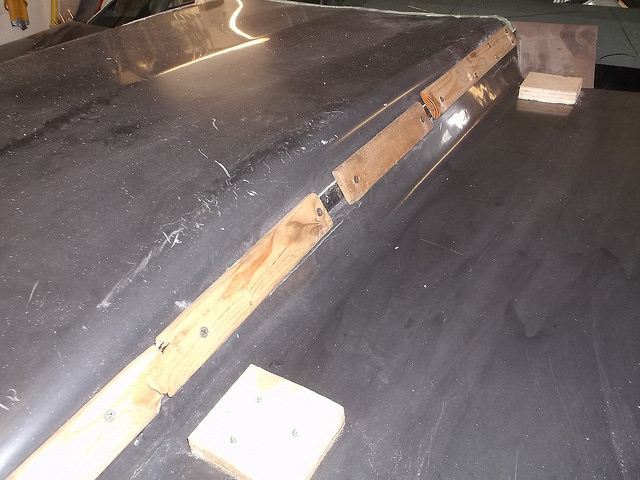
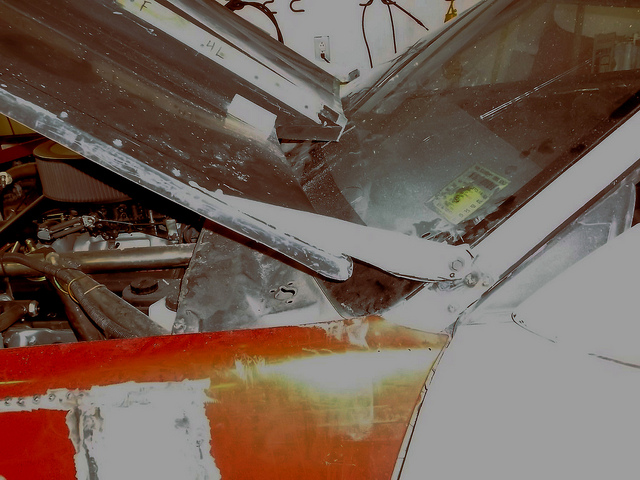
To modify the hood I had to take on and off the car probably 20 times and also flip it over nearly as many times. The 3rd gen hoods are huge, about 5' x 5' and I am thinking no way do I want to deal with this hood ever time I want to look under it. Also what do you do with it once its off the car. Lay it up against the side of the car? Lay it on the roof or rear hatch? What is the wind catches it? The only good answer was to put hinges on it but how on a light weight pin on hood and with a fairly tall cowl scoop that sits close to the windshield? On our old stock car that ran a gutted stock steel flat hood we had simple tabs welded on top of the hood at the rear that fastened/pivoted on a bolt through a bracket welded to the fender. Not real pretty but it was simple and effective and just removing the two bolts and the hood came off if needed. Maybe something like that would work.
Problem with the above is the scoop hits the glass as soon as you start to open it. The pivot for the hood has to be slightly above and behind the rear edge of the scoop, unless you design some cantilevered hinge that would lift the back of the hood before it pivots up. This put the pivot point up on the A-pillar. After a few cardboard mock ups I decided it didn't look to bad and will be less noticeable when painted same as the body. So I made some simple hinges.
14 x 2 x 1/8 aluminum under the hood for support.
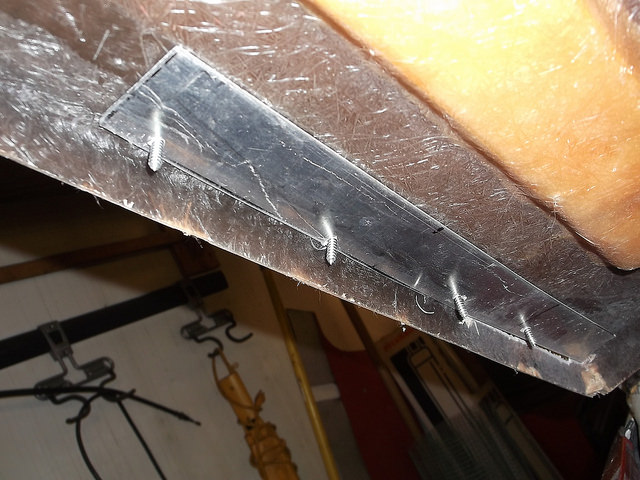
The aluminum was bent up 90* and slid through a slot cut into the outer edge of the hood. This attached to a small tab welded to the A-pillar.
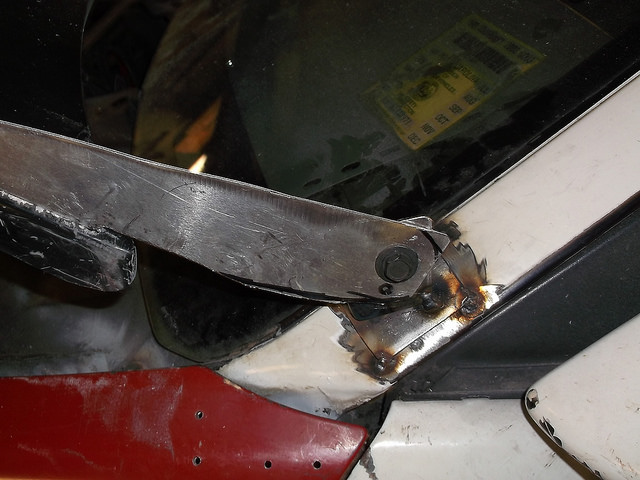
Sheet metal screws were replaced with 3/16 large head rivets and hinge arm was fiberglassed onto bottom of hood.

I don't think they will be very noticeable once painted same as body color. Because they are thin you barely notice when looking head on.
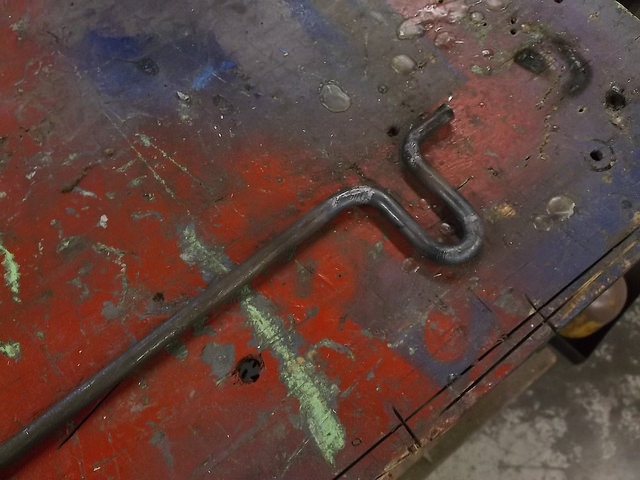
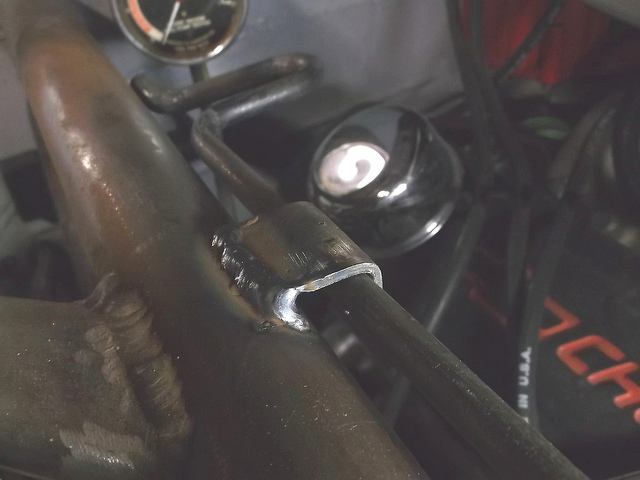
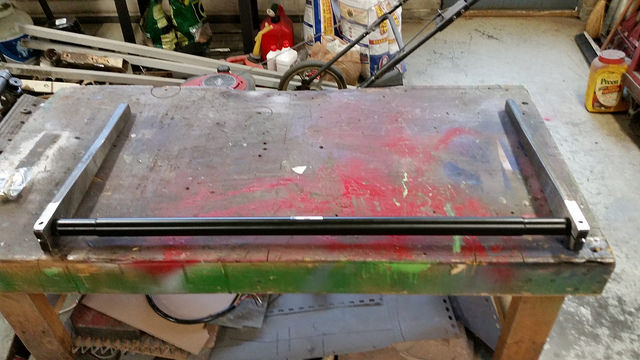
Of course if you have a hinged hood you need a way to prop it open. Since the car sits very low I made a rather long prop rod so that I wouldn't be ducking to look or work under the hood.
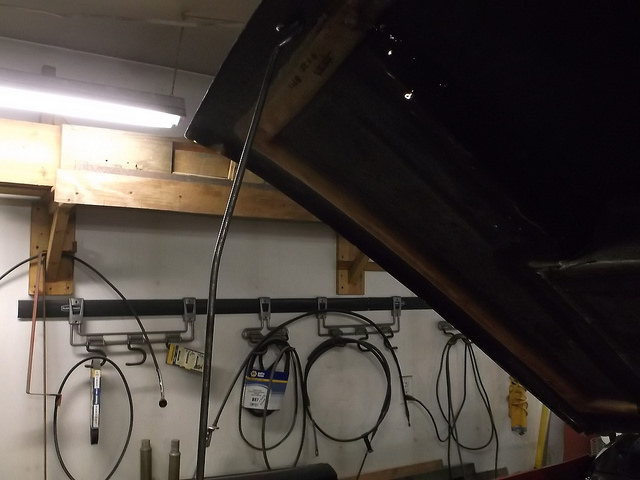
You would think a hood prop rod would be simple but you have hinge it, shape it, and retain it when not in use.

12-14-2017 #136
Registered User
- Join Date
- Jun 2015
- Location
- kent,ohio
- Posts
- 128
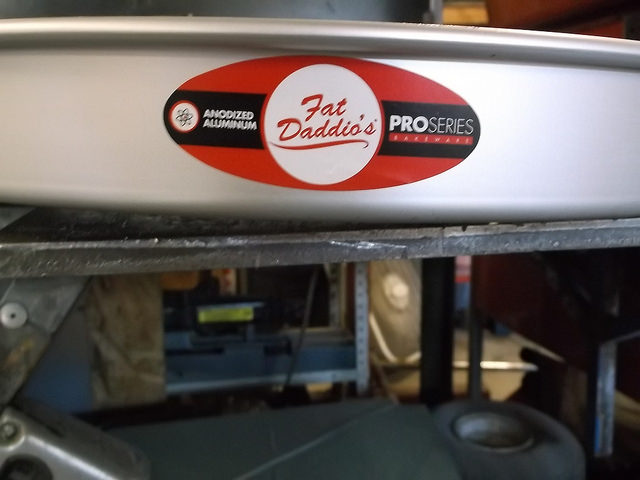
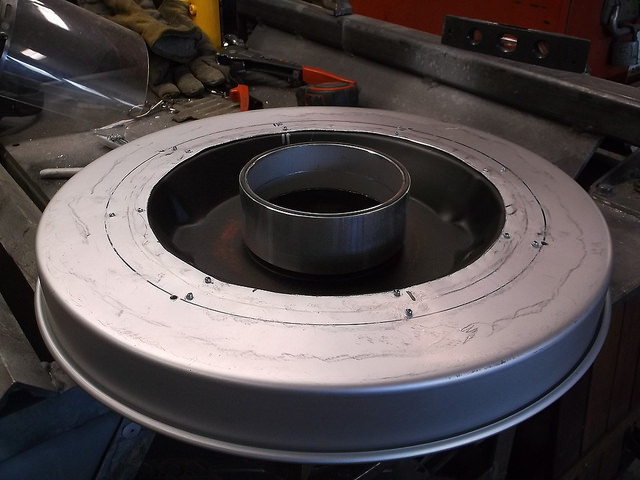
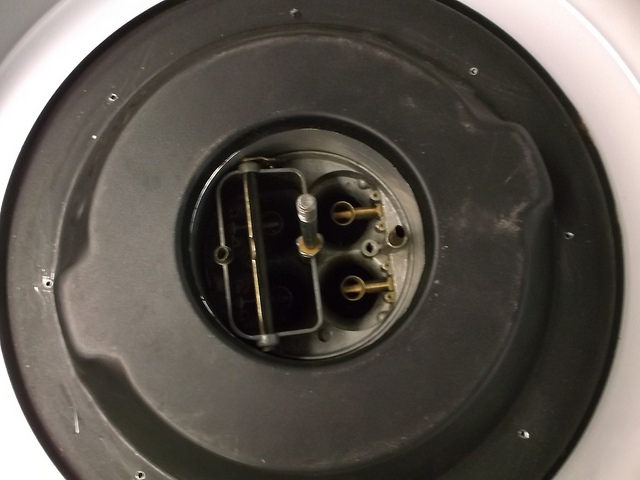
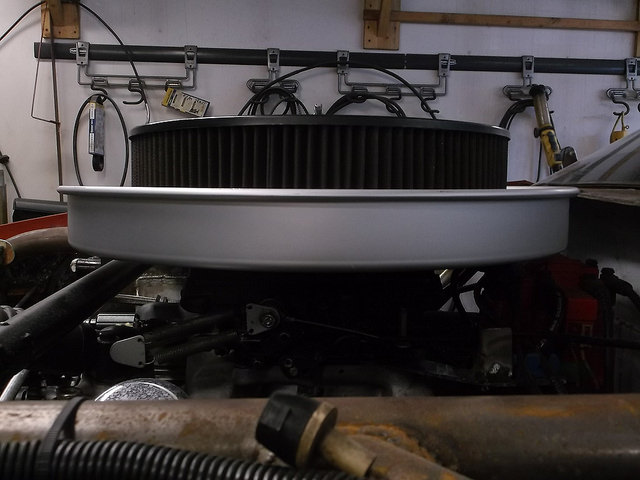
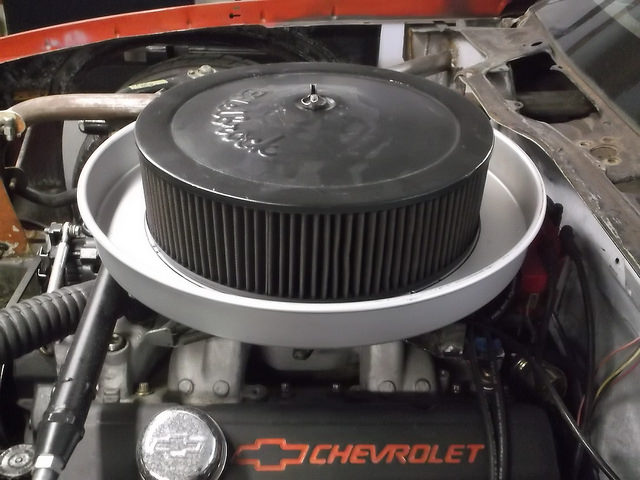
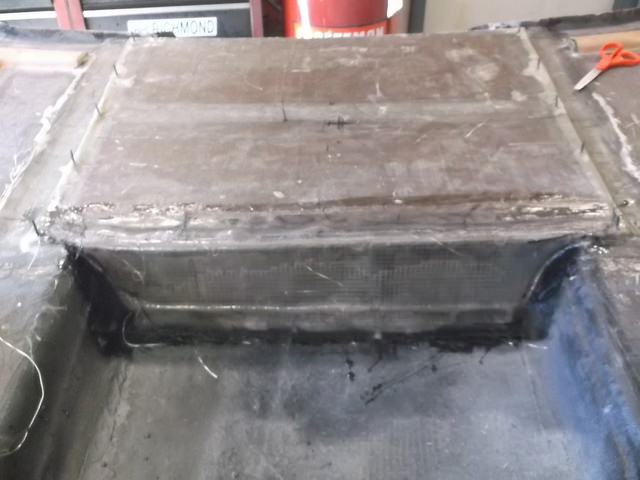
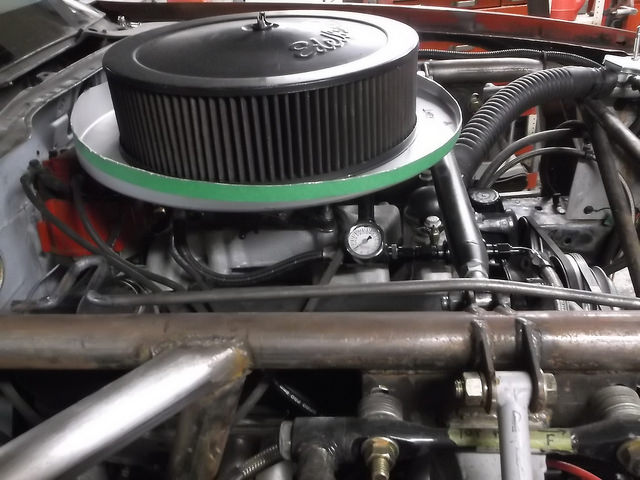
To make a functional cowl hood you have to seal off the seal off the engine heat from the scoop and then seal the air filter housing to the scoop. I followed an example from another member on thirdgen.org and used an 18" aluminum cake pan to modify the airfilter housing.
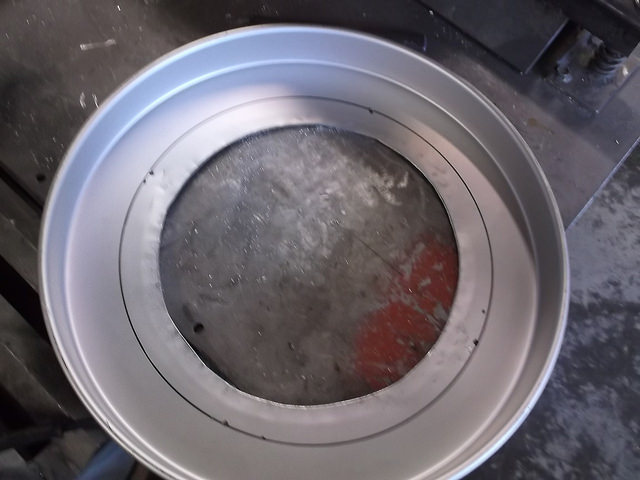
I am using a 1 1/4" drop base air cleaner assembly that set the back of the air filter right on top of the spark plug wires on the HEI distributor. To raise it up I used a 2" aluminum spacer. This not only raised the base off the plug wires but will help straighten the air flow into the carb.
and on the engine
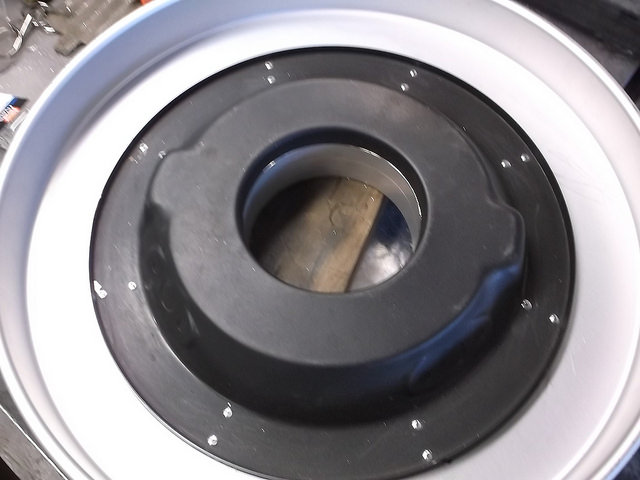
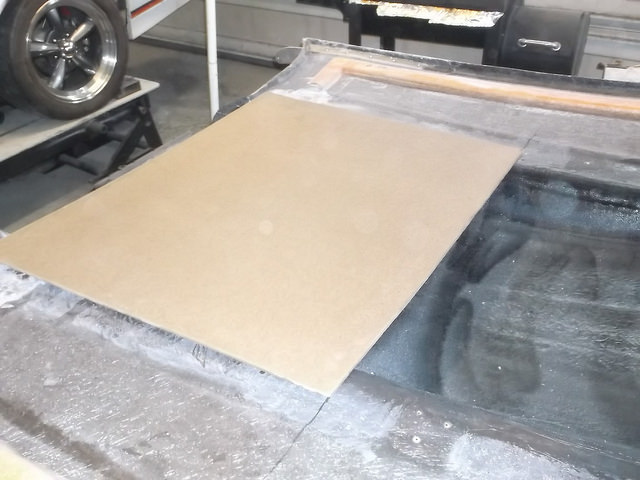
Now for the air box. Again following the example on TGO I cut a piece of 3/16 hardboard wide enough to span the gap on the under side of the hood and long enough to allow the front of the cake pan to seal against. I covered the top side of the board with a single layer of fiberglass to weather proof the board and then bonded the board to the bottom of the hood with 3 layers of glass.
To close off the front side of the air box I cut out a piece of 1/2" steel screen and formed it to the shape of the underside of the hood.
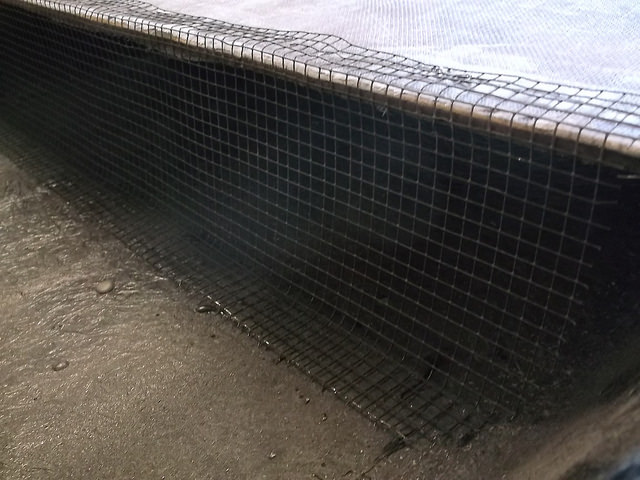
I then covered the screen with a couple layers of fiberglass.
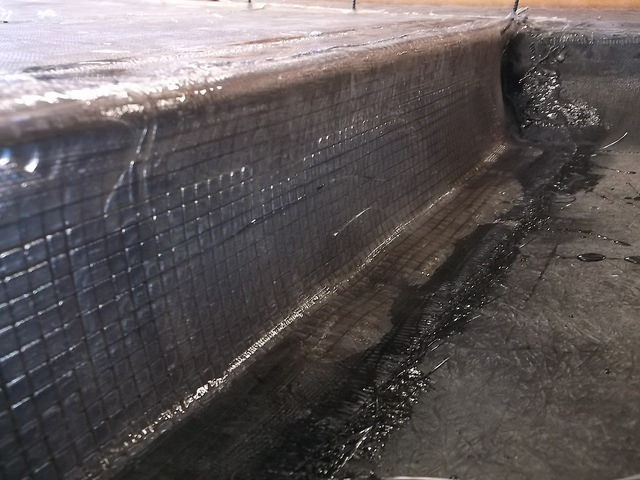
An added bennefit of the air box is that it added extra structure and stiffness to the back of the hood.
To locate the opening for the air filter housing I measured from the air filter stud out to the inner edge of both fenders and also out to the bottom of the windshield. The outer edge of the pan is 9" from the air filter stud and the edge of the filter is 7" from the stud. I marked my cut line at 8" giving me a hole size of 16". This should offer plenty of clearance for the filter to pass through and provide a wide lip for the pan to seal to.
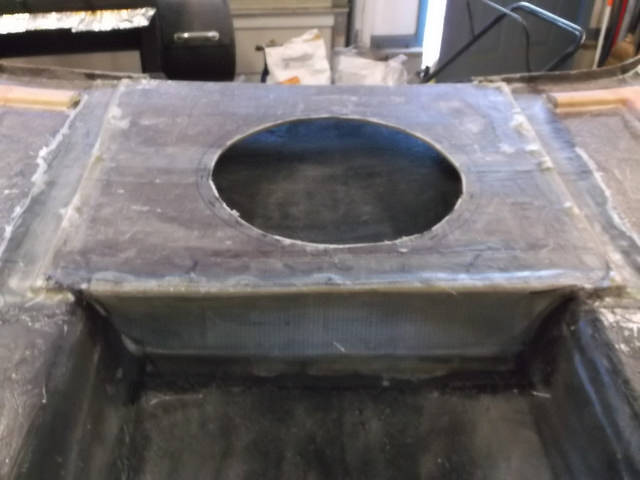
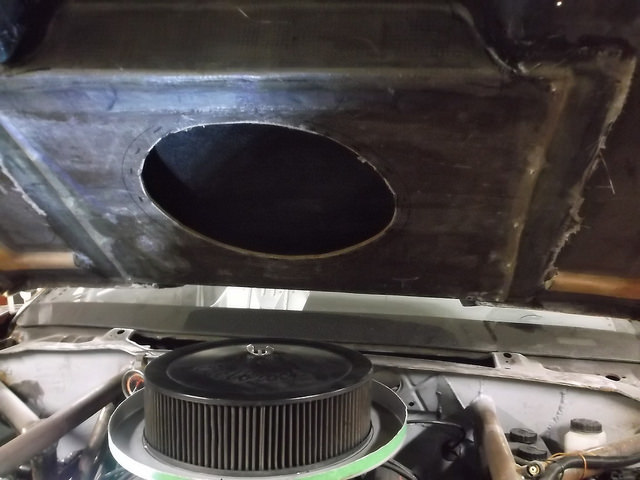
Of course the pan sits level and the air box slopes down to the front so I had to trim the pan. A little at a time till the pan just touched the bottom of the air box. The fit is so close I don't think I will bother with a rubber seal as the air box just slightly presses down on the edge of the pan.
12-14-2017 #137
Registered User
- Join Date
- Jun 2015
- Location
- kent,ohio
- Posts
- 128
The mechanicals on the car are pretty much finished and I have put about 200 miles of shakedown runs on it this last summer and fall. I have, however, held off on buying the front splined sway bar and arms primarily due to cost. Seeing how this is about the last major parts purchase I bit the bullit and ordered an 1 3/8" hollow splined sway bar and straight steel arms from 1Speedway.com in late September. The guys on the phone there were great in explaining what they had to offer and what was available. It was at the end of the racing season and some sizes/styles were out of stock. I had originally planned to go with a solid 1 1/4 sway bar but it was out of stock. Since these are made in batch production runs it wouldn't become available until the end of the year. The hollow 1 3/8 bar is pretty stiff but my functional arm length is about 13" which gives me about 525lb/in spring rate. Hopefully this bar will let me change out my front springs from 400lb/in to 350 or 325lb/in springs for a little softer ride and more suspension travel.
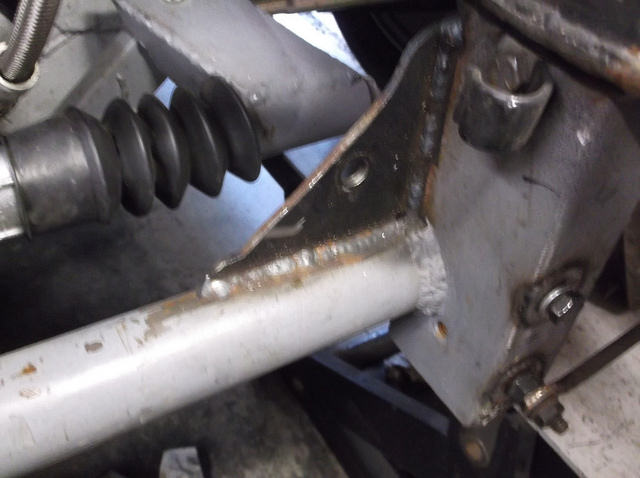
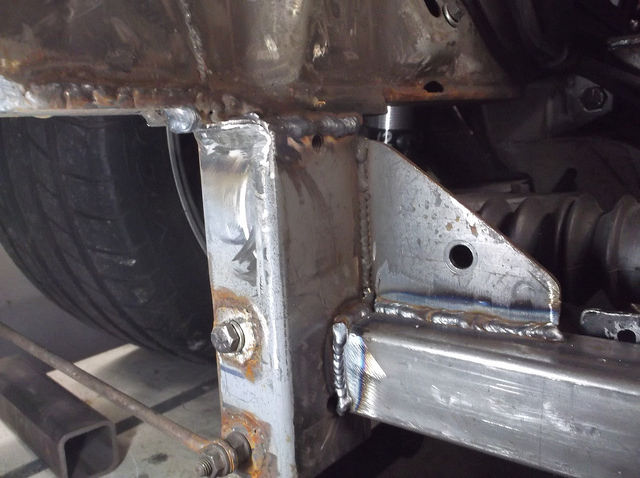
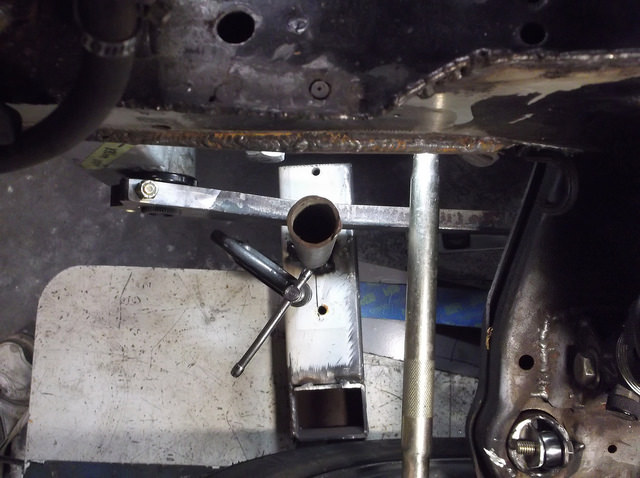
The splined sway bar was always part of the plan and the mounts were already built into the front crossmember. Because I did not have the sway bar when I built the crossmember I used a 48" length of 1 1/4 diameter steel tubing to line up the bearings when I built the mounts. This is one of only a few parts that I built significant structure around without having the exact part on hand. One of the other parts was the TKO600 trans that I built mounts and tranny tunnel around the 700R4. That bit me in the ass as I had to cut it all out and redo once I got the TKO600.
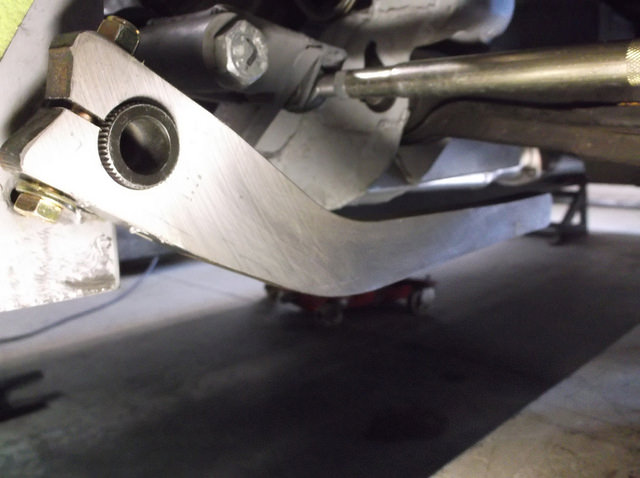
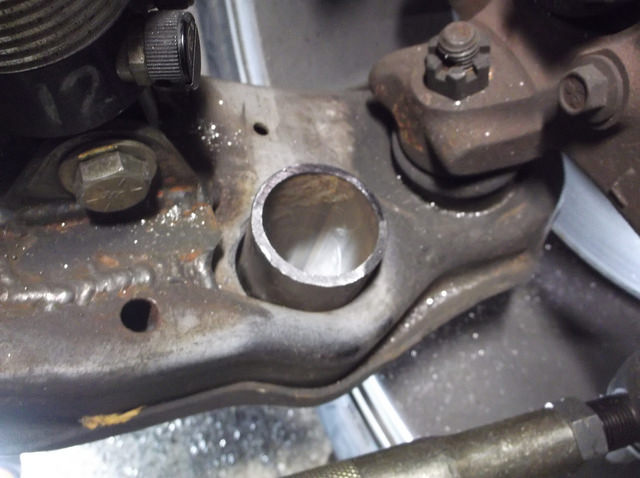
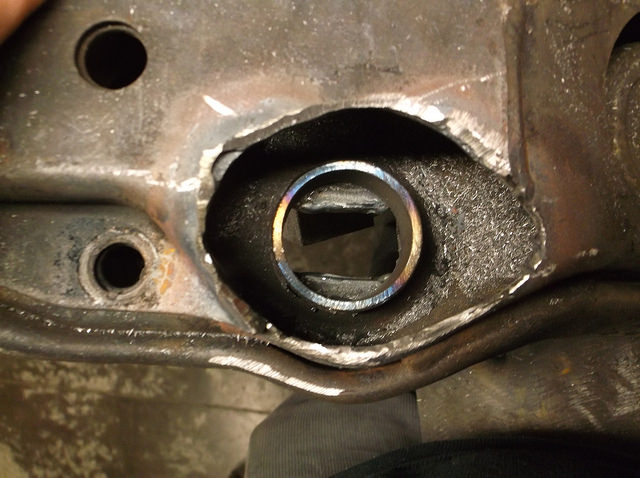
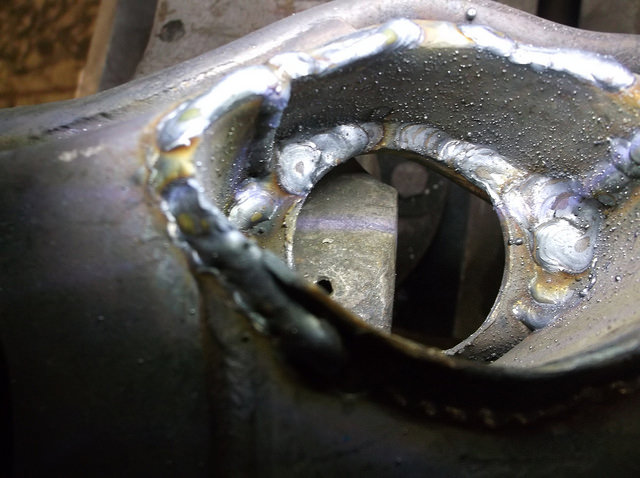
Well the sway bar bit me too. Even though the tubing was same od as the sway bar ends and spun freely in the bushings, the splined sway bar wouldn't pass through both bearings. This was a problem as the crossmember incorporated the rack and pinion mounts and brackets for the front x-brace, all heavily welded in. I ended up cutting it out and welding in a section of 2x2x.125 tubing and cutting and realigning the right side upright.
I will have to finish this later today.
12-15-2017 #138
Registered User
- Join Date
- Jun 2015
- Location
- kent,ohio
- Posts
- 128
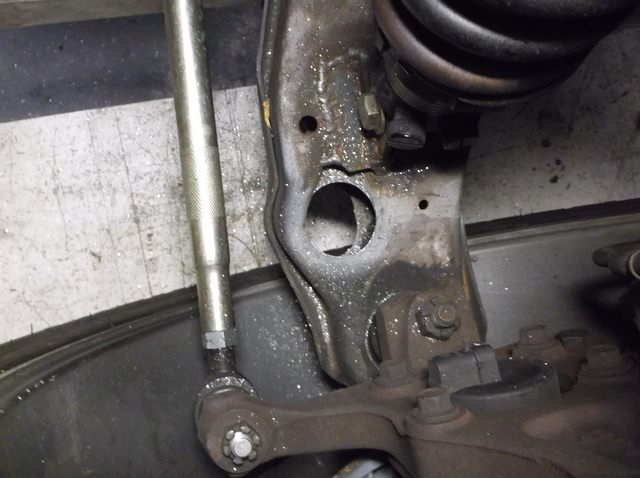
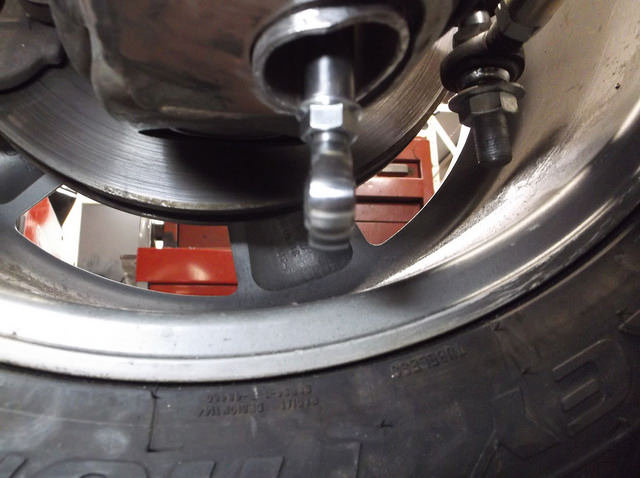
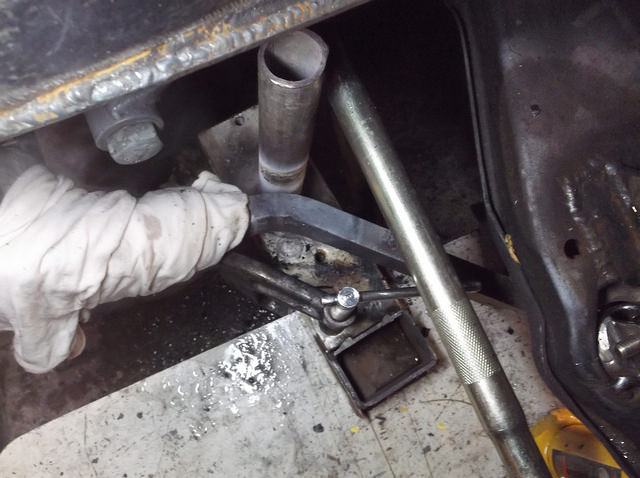
With the sway bar mount fixed I installed the sway bar and arms and immediately realized I had an interference problem between the sway bar arms and the rack and pinion.
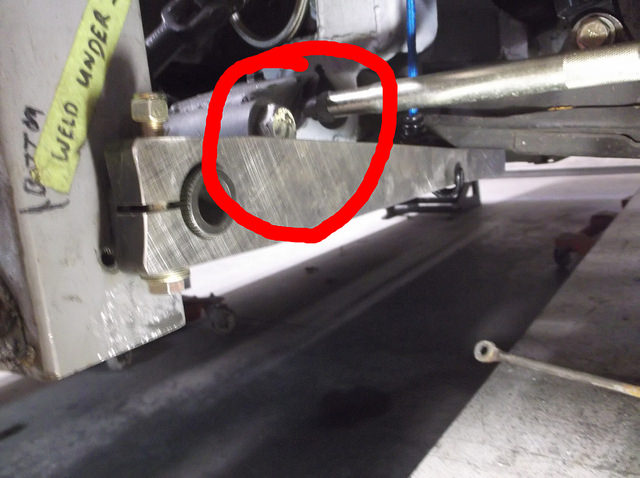
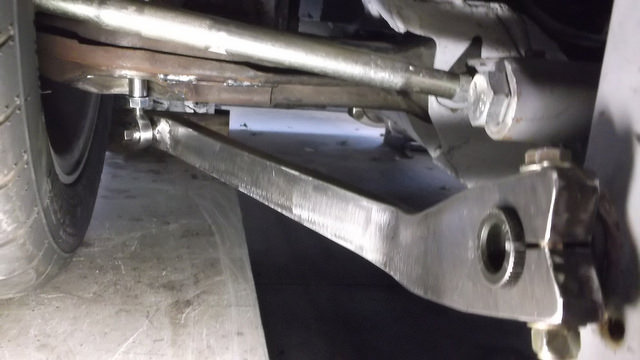
I thought this might be a problem and considered ordering the 30* offset arms instead of the straight ones but live and learn I guess. So after paying to ship 12lbs of steel back and forth across the country I put on the 30* arms and the interference problem was eliminated.
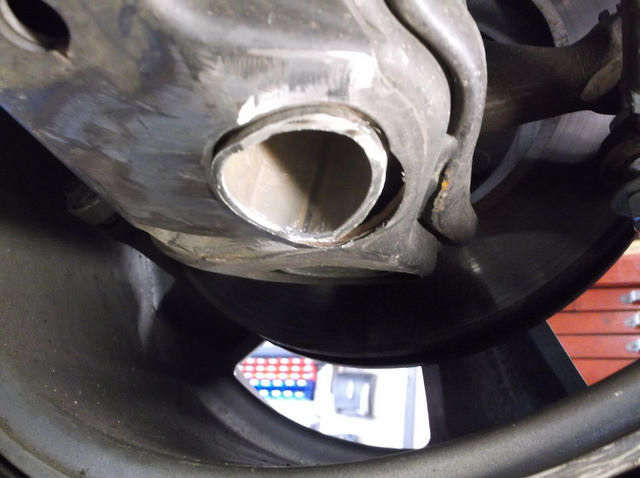
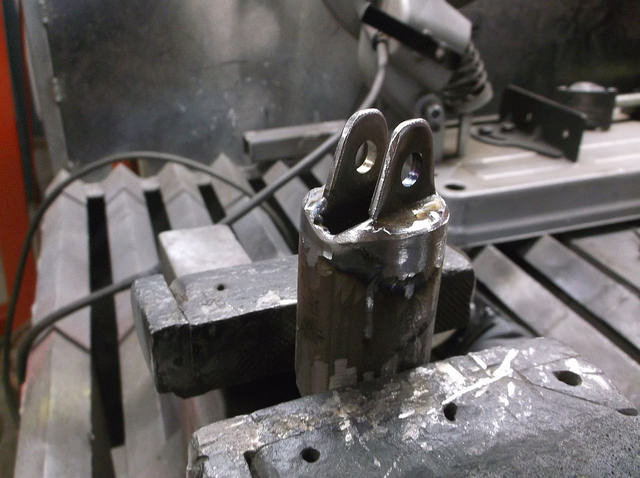
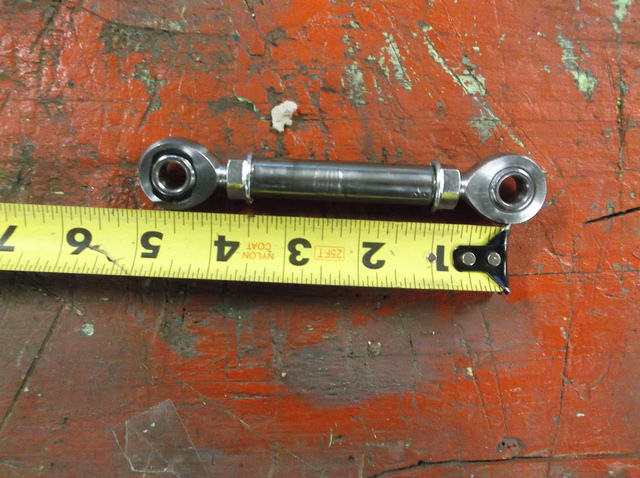
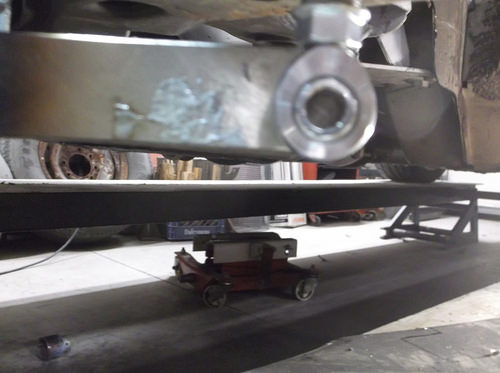
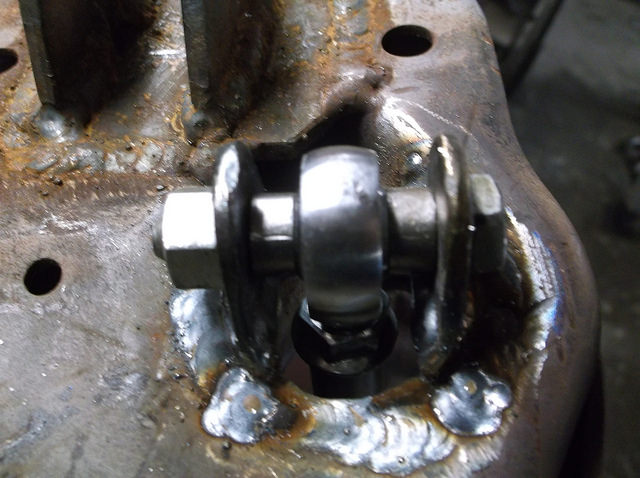
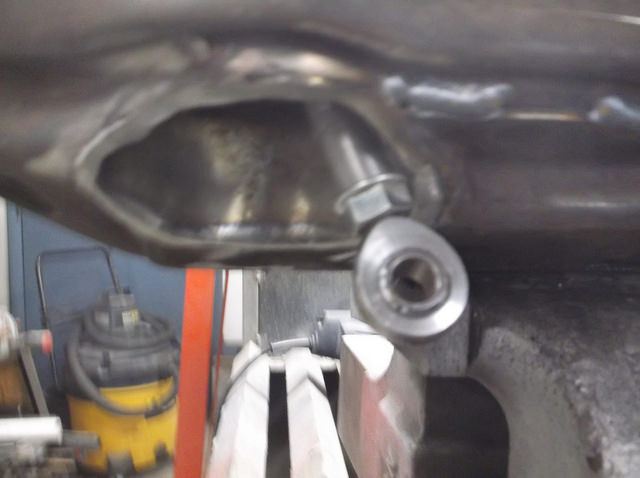
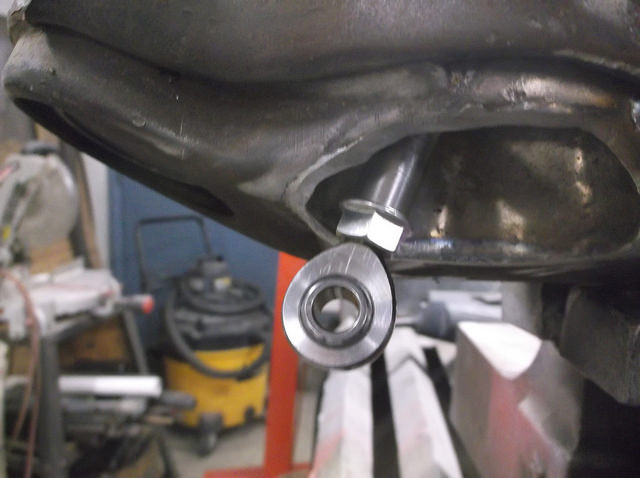
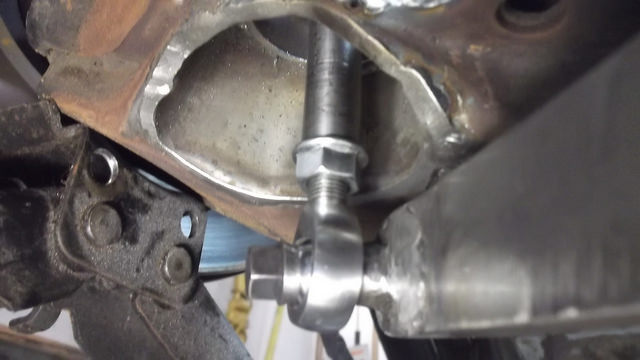
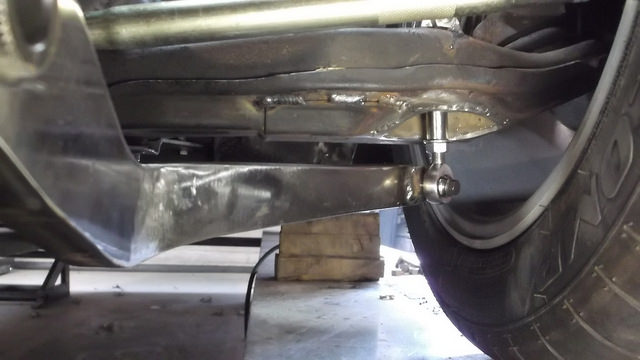
Its going to take a lot of heat and effort to bend these 3/4" thick steel arms so I needed a target location to bend them to. I modified the lower A-arm first by drilling a 1 3/4 hole through the arm and then placing a 1 5/8 tube through the hole to strengthen the arm. I added some 3/8 mounting tabs to the top of the tube and made sway bar links from .095 wall 1/2" tubing and QA1 3/8 rod ends.
Now that I had a target I had to figure out how I was going to bend the arms. At first I thought I would mount something up on my weld table to bend the arms around. But after trying unsuccessfully to get accurate measurements I decided the best way to do it was right on the car. To bend the drivers side I spaced the passenger side sway bar arm off the bottom of the A-arm about 1" with a block of wood and clamped it in place. With the driver's arm in place I measured 10" back from the end of the sway bar arm and with a small level drew a vertical line down the sway bar arm.
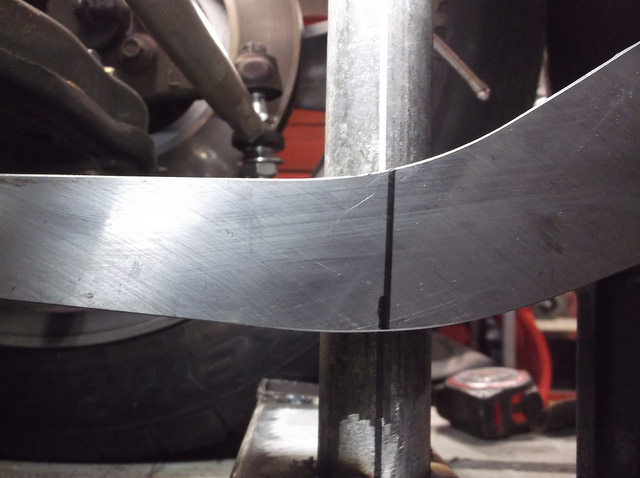
I needed something strong to bend the arm around and ended up welding a piece of 1 5/8 roll bar tubing to a section of 2x3 box tubing and clamping that to my steel ramp.
After a lot of heat and many blows with a 30oz ball peen hammer I got the end of the sway bar arm to set beside the link.
I marked and drilled the mounting hole in the end of the arm and bolted the link on. At this point it looks good.
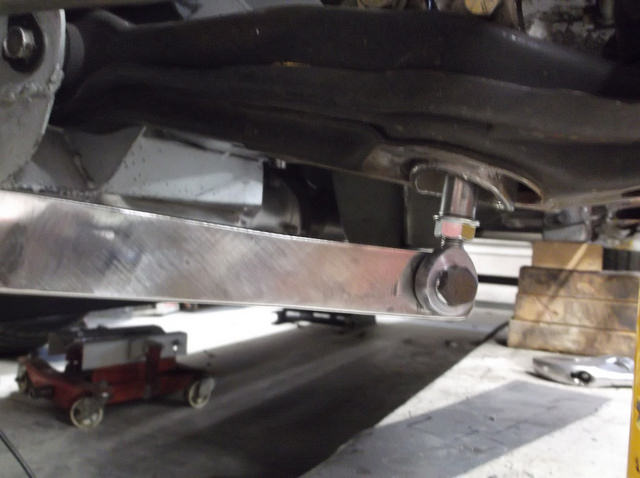
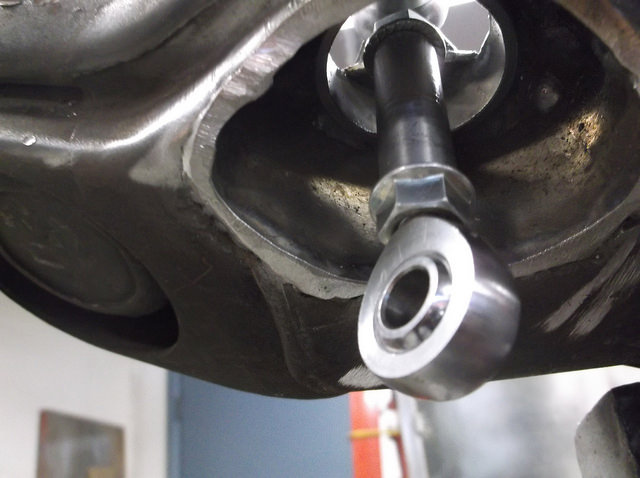
The real test would be to run the suspension through its travel and check for any binding. I removed the coilovers and the passenger side sway bar arm and using a scissors jack ran the suspension up and down 3". Before the suspension traveled an inch the shaft of the link was into the side of the 1 5/8 tube. Total failure! The hole in the bottom of the A-arm needs to be opened up considerably abd the tabs on the upper mount need to be moved outward to allow for more articulation.
I cut a football shaped hole in the bottom and reinforced it with 1/16 sheet fully welded inside and out. I also shortened the 1 5/8 tube quite a bit and moved the tabs out on the upper mount.
These mods allowed full articulation of the link
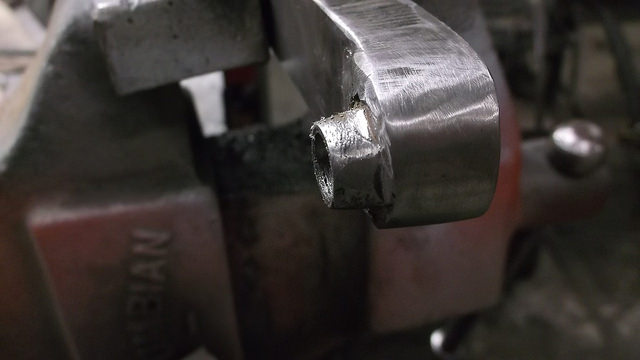
It was also apparent that the link needed to be spaced out away from the arm and that the link need to be mounted farther out towards the end of the arm. To find the "sweet" spot to mount the link I cut a slot in the arm and tried different positions. The mount location ended up at the very end of the arm. I welded the unused portion of the slot shut and made a tapered spacer to weld onto the arm.
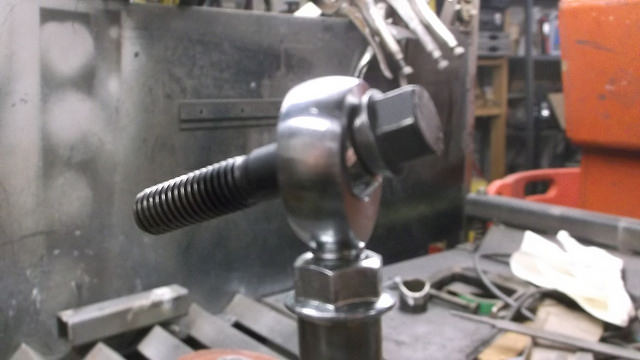
I wanted a really strong bolt to fasten the link to the arm. I found some ARP bolts the correct size. I beveled back the formed flat washer under the head of the bolt to allow more articulation.
I copied all my work to the other side and with both sides attached again ran the suspension through its range of motion. NO binding what so ever!!!! Its a shame its 20* and snowing outside. I'd kind of like to take this out for a test drive.
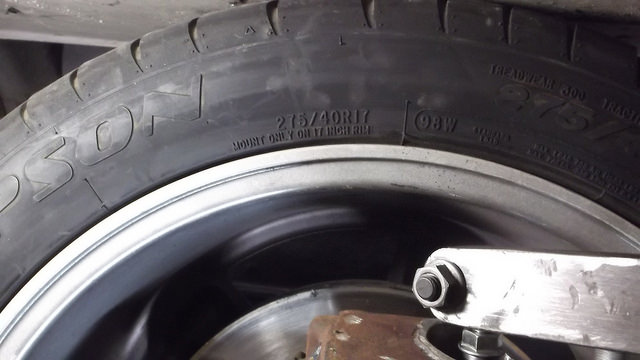
Plenty of room for wider, deeper wheels.
and finished pics...
driver side
passenger side

 Reply With Quote


