

Results 101 to 120 of 136
Thread: 67 whippled-coyote fastback
-
01-14-2018 #101

 Registered User
- Join Date
- Aug 2012
- Location
- Pennsylvania
- Posts
- 254
 Makes sense! Thanks.....
 Originally Posted by andrewb70

-
01-14-2018 #102
Registered User
- Join Date
- Aug 2012
- Location
- Pennsylvania
- Posts
- 254
I used Boom Mat by DEI Originally Posted by justin51986
-
04-18-2018 #103
Registered User
- Join Date
- Apr 2018
- Posts
- 7
Subscribed, need to see this finished.
-
04-23-2018 #104
Registered User
- Join Date
- Dec 2010
- Location
- No. CA
- Posts
- 34
Did you ever decide on a hood solution with the blower & mass air intake? We are building a similar setup in a 67 fastback and are considering the NPD 68 Shelby style hood (regular or tall). They make a slightly taller version with approx. 3.5-4" inch of increased clearance.
Have you taken any confirming measurements on the clearance needed for your setup? The photos you posted appear to be about 3-4 inches. Keep up the great work.
-
04-25-2018 #105
Registered User
- Join Date
- Oct 2016
- Posts
- 59
You're doing an awesome job!!!!!!
-
05-03-2018 #106
Registered User
- Join Date
- Aug 2012
- Location
- Pennsylvania
- Posts
- 254
I am leaning towards the Shelby Hood, but have not taken any measurements yet. I should be putting the sheet metal back on very soon, and will definitely have my mind made up by then (Hopefully!). Originally Posted by buck19
Thanks for the encouragement!
- - - Updated - - -
Thanks, much appreciated!!! Originally Posted by Michaels 69
-
05-10-2018 #107
Registered User
- Join Date
- Aug 2012
- Location
- Pennsylvania
- Posts
- 254
I've been getting quite a few things done lately, and now she's finally running!! I finished the floor out with a product called KilMat (80mil thickness) which is much like Dynamat and Xmat.
-
05-10-2018 #108
Registered User
- Join Date
- Aug 2012
- Location
- Pennsylvania
- Posts
- 254
I modified a 22 gal fuel tank with an Aeromotive Phantom setup with twin 340 pumps.
-
05-10-2018 #109
Registered User
- Join Date
- Aug 2012
- Location
- Pennsylvania
- Posts
- 254
Fuel management is through a FORE Innovations fuel pump controller.
-
05-10-2018 #110
Registered User
- Join Date
- Aug 2012
- Location
- Pennsylvania
- Posts
- 254
battery is relocated to the Trunk
-
05-10-2018 #111
Registered User
- Join Date
- Aug 2012
- Location
- Pennsylvania
- Posts
- 254
Finished up the rear brakes with Two piston Brake Calipers, and Stop Tech 14" Brake Rotors
-
05-10-2018 #112
Registered User
- Join Date
- Aug 2012
- Location
- Pennsylvania
- Posts
- 254
I was able to fab up my own 3" exhaust with turndowns. I wanted an H-Pipe as I love the sound that they produce. I've always ran an H-pipe on my previous Mustangs and figured if it sounds good and performs good on a pushrod, then it's got to sound good on a Coyote!
The Eastwood MIG135 is a handy machine!
-
05-10-2018 #113
Registered User
- Join Date
- Aug 2012
- Location
- Pennsylvania
- Posts
- 254
Finally found an Intake coupler that works!!
-
05-24-2018 #114
Registered User
- Join Date
- Dec 2010
- Location
- No. CA
- Posts
- 34
It looks like you were able to mount the engine with the stock F150 oil cooler/filter mount still in place. Also, the photos indicate that you were also able to use the stock oil pan from the F150.
Did you use a higher motor mount to make this work with the IFS & rack? Are you using the poly/prothane lower profile adjustable motor mounts that may allow you to drop the engine about an 1"?
If you are using standard motor mounts, do you have room to drop the engine with the stock F150 oil cooler and oil pan without conflicts?
This is a conflict area for most guys doing the F150-classic mustang swaps. As you know, the F150 truck coyotes have the enormous oil cooler and alternator mounting location is slightly wider.
Please elaborate with any mods or photos regarding this issue.
Also, did you have to swap out the front timing cover from your 2013 F150 Coyote engine to the newer, GenII front cover to accommodate the supercharger setup? If not, did you have to modify, drill, tap, customize the stock front cover?
Thanks again for sharing.
Looking forward to your quality build updates.
-
05-25-2018 #115
Registered User
- Join Date
- Aug 2012
- Location
- Pennsylvania
- Posts
- 254
Originally Posted by buck19
Did you use a higher motor mount to make this work with the IFS & rack? - No, the Rod & Custom IFS is a well designed and the crossmember is specific to Coyote swaps. Are you using the poly/prothane lower profile adjustable motor mounts that may allow you to drop the engine about an 1"? - I am using a set of Prothane mounts for 94-04 4.6 Mustangs. They are non-adjustable, but not sure is they are lower than the OEM rubber mounts.
If you are using standard motor mounts, do you have room to drop the engine with the stock F150 oil cooler and oil pan without conflicts? - There is a tad bit of room to go lower and clear the pan, but the will run into issues with the oil cooler rest/hitting the sway bar.
This is a conflict area for most guys doing the F150-classic mustang swaps. As you know, the F150 truck coyotes have the enormous oil cooler and alternator mounting location is slightly wider. - No issues with the Alt and the distance to frame rail ( I have just over an inch between Alt and frame rail).
Please elaborate with any mods or photos regarding this issue.
Also, did you have to swap out the front timing cover from your 2013 F150 Coyote engine to the newer, GenII front cover to accommodate the supercharger setup? If not, did you have to modify, drill, tap, customize the stock front cover? I retained the 2013 F150 Timing cover, and only modified it per the Whipple instructions. Had to cut a few tabs off the cover to accommodate the blower Idler/Tensioner pulley bracket.
Hope this helps....
-
05-25-2018 #116
Registered User
- Join Date
- Aug 2012
- Location
- Pennsylvania
- Posts
- 254
She's Alive!!
I finally have her running (smoothly) thanks to Jon Lund Sr. from LUND RACING. Still some tuning/tweaking to do, but can't be happier with Lund Racing!
12-13-2018 #117
Registered User
- Join Date
- Nov 2015
- Posts
- 120
I am well on my way to building up my f150 coyote to put in my 67 stang. If you had more build pictures of the engine that would be amazing. This is one of my favorite threads on this site.
12-13-2018 #118 -Moderator/Sponsor-
- Join Date
- Apr 2001
- Location
- The City of Fountains
- Posts
- 15,975
I can't believe I missed this thread. Very cool build!
Andrew1970 GTO Version 3.0
1967 Cougar build
GM High-Tech Performance feature
My YouTube Channel Please Subscribe!
Instagram @projectgattago
Dr. EFI
I deliver what EFI promises.
Remote Holley EFI tuning.
Please get in touch if I can be of service.
"You were the gun, your voice was the trigger, your bravery was the barrel, your eyes were the bullets." ~ Her
12-14-2018 #119
Registered User
- Join Date
- Aug 2012
- Location
- Pennsylvania
- Posts
- 254
Thatorange67 - Thanks, much appreciated, and best of luck with your build.
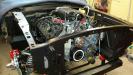
Here is a pic of the engine bay. I upgraded the throttle body to a VMP twin 67MM.
- - - Updated - - -
Thanks Andrew! Originally Posted by andrewb70
12-31-2018 #120
Registered User
- Join Date
- Aug 2012
- Location
- Pennsylvania
- Posts
- 254
Started working on my console a few weeks ago, and I think I made good progress? I started with a console out of a 2016 Mustang. Ended up cutting it down four inches from the bottom, then heating/shrinking it about another seven inches to get it to work for me. I also wanted to mimic the factory part of the dash to mate to the radio bezel to look somewhat appropriate.

 Reply With Quote


