

Results 1 to 20 of 56
-
08-25-2014 #1
 Registered User
- Join Date
- Aug 2009
- Posts
- 277
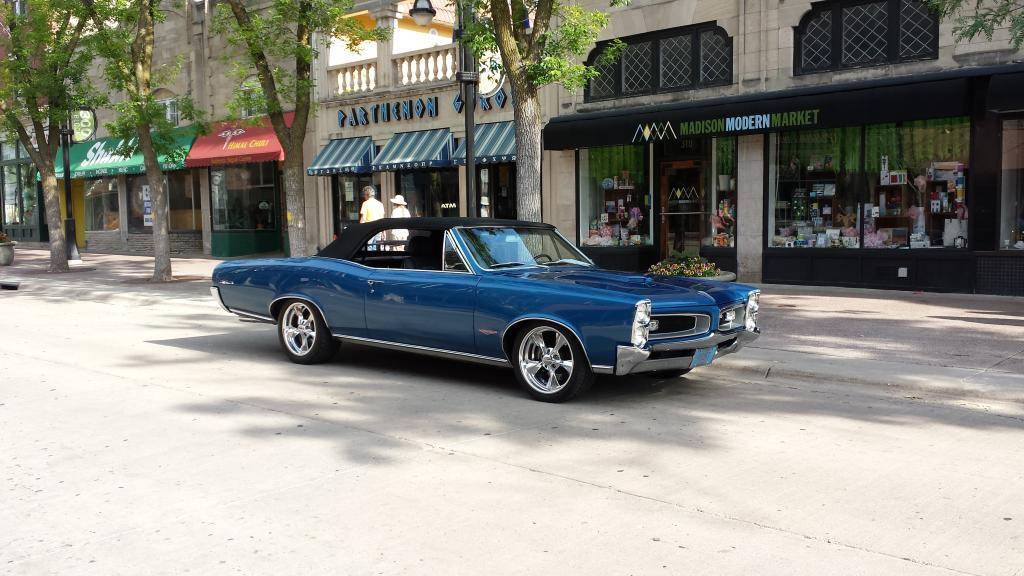
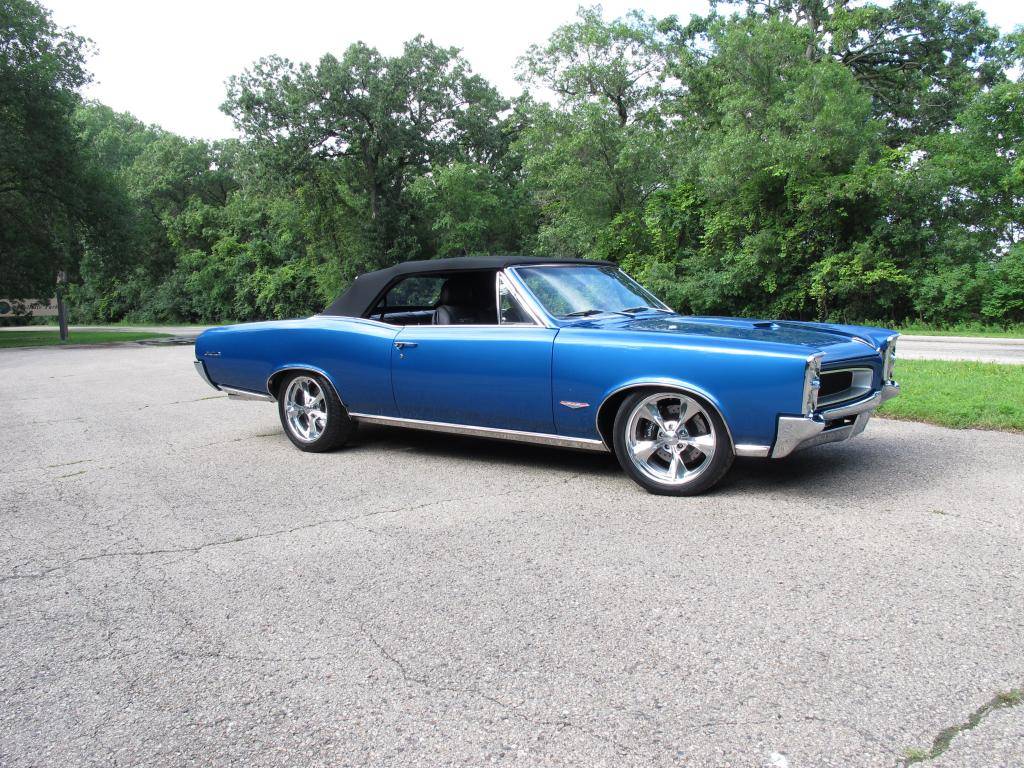
LS3 525HP / Legend LGT-700 Conversion in a 66 Pontiac GTO Convertible
I have owned my GTO for 17 years and the car has undergone several revisions over the years. The car is a real 66 GTO convertible born with a 389 tri-power, M-21 and a 3:90 posi. I bought it back in 1997 when my wife and I had started dating and we drive this thing. The only time it has been on a trailer is when the body work was getting done and we have enjoyed thousands of miles in this car.
In 2005, the 389 started chugging oil out the breather and instead of rebuilding the anemic 389 I had a 455 built by a guy in Virginia. The 455 was a turd from the get go and the build quality was less than stellar and after dealing with the short comings of this thing for 5 years, I decided to cut my losses and I sold the engine for a huge loss. I replaced the 455 with a 461 that was built by a reputable builder in Ohio. The engine made a butt load of HP and TQ, but after living with 550 HP and 14 MPG for 4 years I concluded that I needed to re-think my strategy for a car that is easier to drive and is a bit easier on fuel. My wife hated the 461 for various reasons and I would rather have something that is more civilized so she can drive it on occasion.
For several months prior to the decision to sell the 461, I struggled with the “it’s not a Pontiac in a Pontiac” crap. I decided that life it too short to worry about what others think and I decided that a LS3 525 HP conversion would be a wonderful succession. The engine has attitude and those who have this engine love it. Let’s face it, you can’t beat a LS based engine and the newer technology and factory available parts make this a great platform. After selling the 461 back in July, I have been doing my homework trying to figure out the best use of my money and time. I had initially thought about an LSA, but the extra $4K (adder of the LSA plus the heat exchanger and misc. things that are required) pretty much squashed that idea. I would have loved to do an LSA, but I am spending way too much already and the extra $4K seemed like a hard sell to the finance department. So, it is LS3 NA for me. I am going to re-use things like my Legend LGT-700 5-speed, hydraboost, EFI tank, and electric fan setup…Anything I can re-use should help with the sticker shock of an LS build.
Follow me as I navigate through the build and search out the best prices and the best vendors. I am anticipating a April 2015 completion date. I am posting identical posts in LS1 Tech and Performance Years so please excuse the duplication. I know there are people that don’t frequent this site so it seemed like a good thing to do.
I few pictures to start. I will post more as I go and I will post the final parts list and the prices for the parts.
Frame off restoration in 2012. Who would have thought I would be ripping things apart so soon?
Thanks for following along. Bob
-
08-26-2014 #2
Registered User
- Join Date
- Apr 2012
- Location
- Woodstock, IL
- Posts
- 2,410

LS3 – 525HP / Legend LGT-700 Conversion in a 66 Pontiac GTO Convertible
Nice GTO!
Were a dealer for a lot of companies including GM Performance, feel free to give us a shot in quoting some parts out for ya.
-DaleSchwartzPerformance
The leader in bolt-in muscle car chassis
SchwartzPerformance.com | GMachineChassis.com | Facebook | Twitter | Instagram
Dealer for: Forgeline, RideTech, Tremec, American Powertrain, Silver Sport Transmissions, GM Performance Parts, RECARO, Cerullo Seats, TMI Products, Vintage Air, Baer Brakes, Wilwood, BeCool, AFCO, Tanks Inc, Holley / Hooker, Ultimate Headers, Rick's Tanks, Moser Engineering, Currie, TechAFX, Stainless Works, II Much Fabrication, and many more
08-26-2014 #3 -Moderator/Sponsor-
- Join Date
- Apr 2001
- Location
- The City of Fountains
- Posts
- 15,977
Hey Bob,
Can't wait to see some progress. This swap should be pretty straight forward since you will be reusing a lot of your old parts. The trick is to make sure that that LS engine sits where the Pontiac did so that your transmission and driveshaft are in the same place. Also, getting the engine as low as possible will be key.
Andrew1970 GTO Version 3.0
1967 Cougar build
GM High-Tech Performance feature
My YouTube Channel Please Subscribe!
Instagram @projectgattago
Dr. EFI
I deliver what EFI promises.
Remote Holley EFI tuning.
Please get in touch if I can be of service.
"You were the gun, your voice was the trigger, your bravery was the barrel, your eyes were the bullets." ~ Her
08-26-2014 #4
Registered User
- Join Date
- Jan 2013
- Location
- Cypress, California
- Posts
- 381
I agree. The conversion should not be too bad as you already have a lot of the parts. Originally Posted by andrewb70

08-26-2014 #5 Registered User
- Join Date
- Feb 2005
- Location
- Las Vegas, NV
- Posts
- 1,185
Try not to get hung up on the Pontiac thing either
You have a beautiful car
just look at it as you are doing a GM A-body LS swap
There are alot of quality builds out there, a bunch on this site as well as others, that you can draw info and parts list from, that actually work correctly
Judging by your pics, you wont be going the "cheap route" by buying inferior parts, that look like they will work, just bust of saving a few bucks
Concentrate on quality engine mounts, conversion plates, oil pan and headers
using quality proven parts will ease the install process and more importantly your drive train will sit in correct position and drive line angles, with minimal to zero fitment issues
Jeff
08-26-2014 #6
Registered User
- Join Date
- Aug 2009
- Location
- Central California
- Posts
- 132
Nice car. Just bought my engine for my 64 GTO. Looked at a lot of options including the LSA crate, let me know if you have questions.
08-27-2014 #7
Registered User
- Join Date
- Aug 2009
- Posts
- 277
thanks for the words of encouragement. I have tried the cheap route before to just get burned by stuff not working. I have been doing a lot of reading and driving myself crazy with details. Time to dispose with the engineer in me and start wrenching
Chris. Look for my PMs in the future.
Andrew is a wealth of information as well. AND...he is a Wisconsinite now! Too bad you don't live near Madison. Oh well, Oshkosh isn't too far away.
08-27-2014 #8
Registered User
- Join Date
- Aug 2009
- Posts
- 277
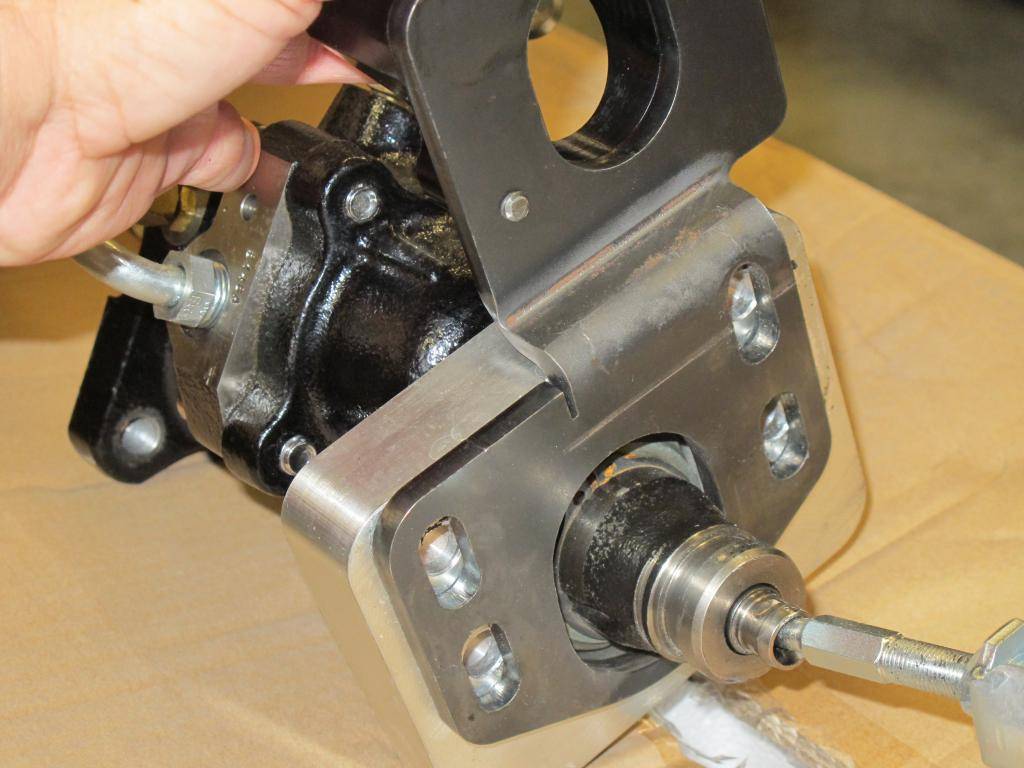
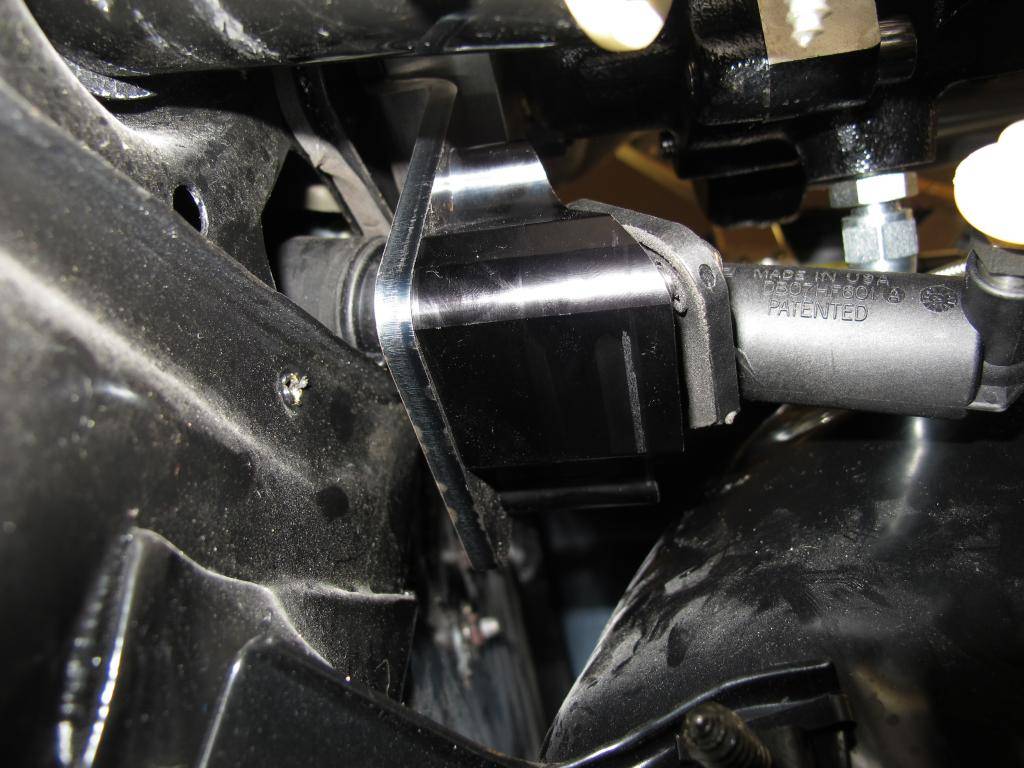
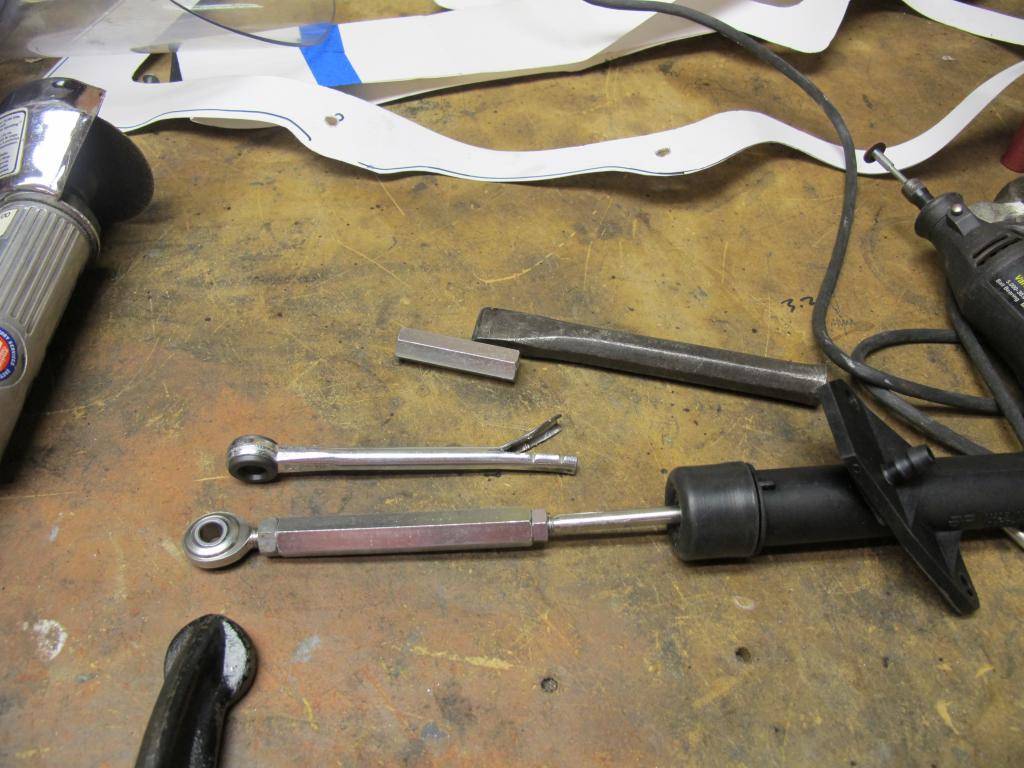
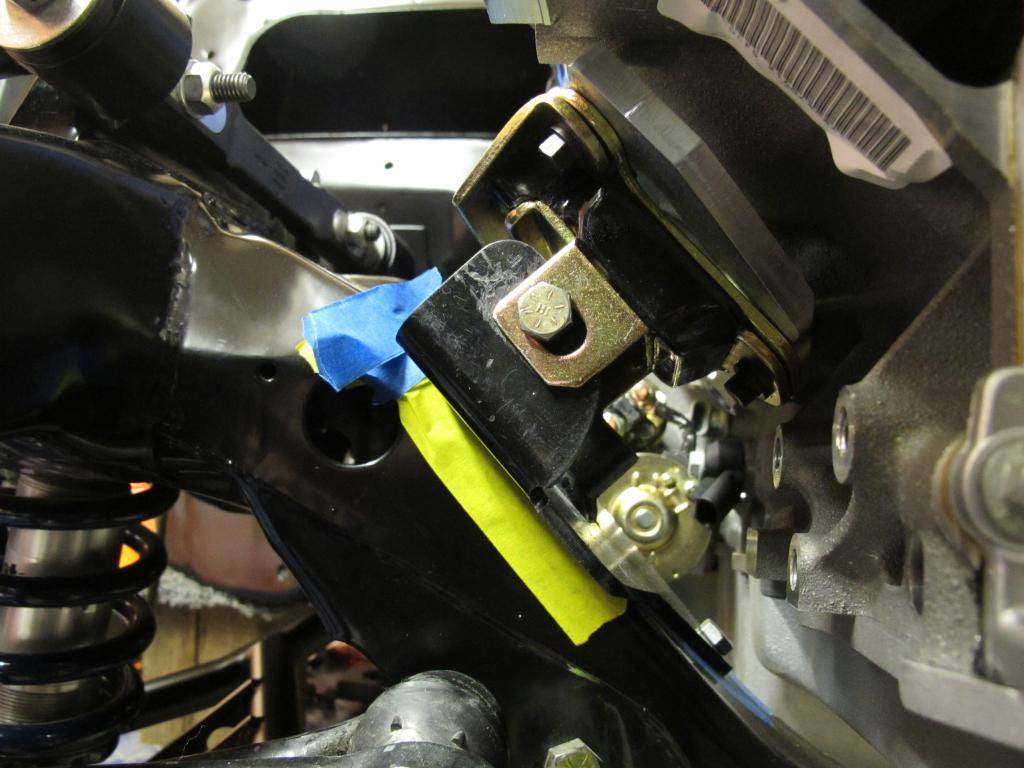
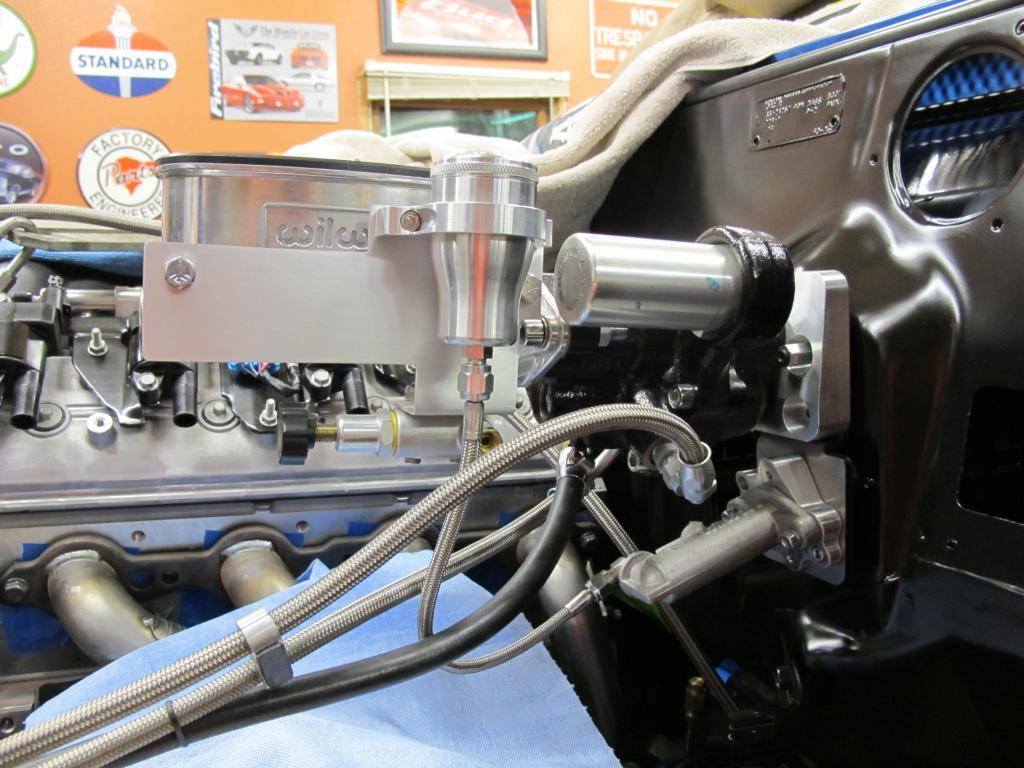
I am currently working with Mark Bowler on a hydraulic clutch setup. My hydrobooster makes it a bit of a challenge so Mark set me a bracket to prototype for him and will be making some changes to the bracket based on my trial. He sent me a tilton master and a 4th gen master to try. His bracket will allow the use of both master setups.
Nice bracket. Once this is in full production it will be a winner. I like the fact that the bracket is adjustable.
Clears my hydrobooster bracket
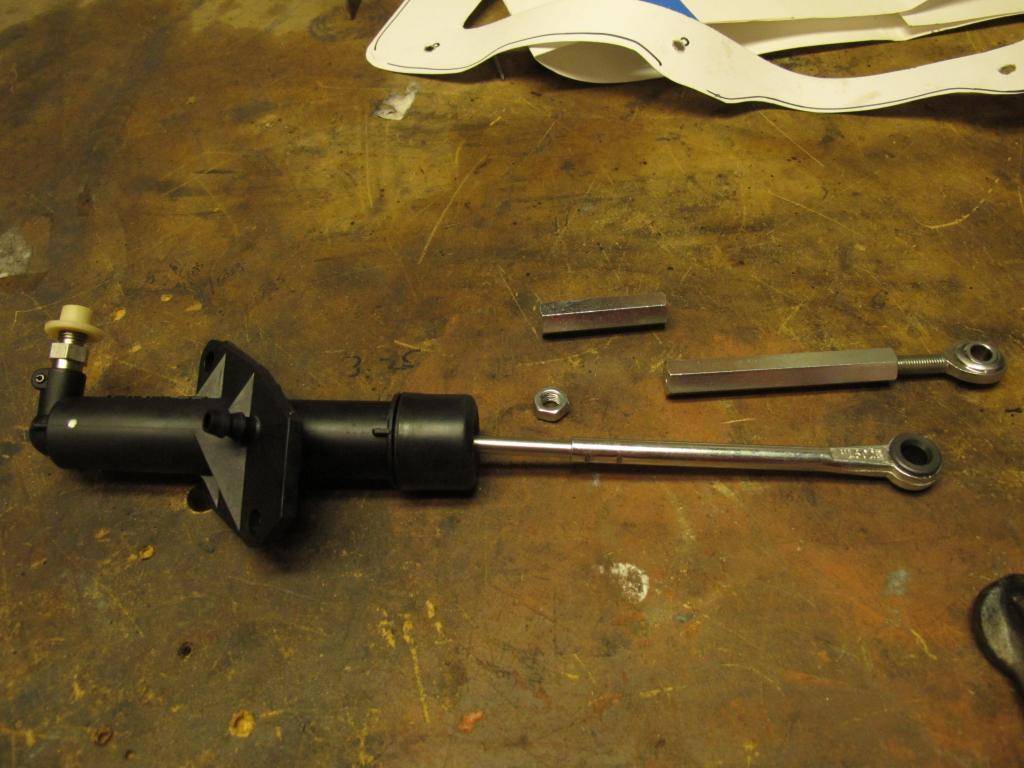
4th gen master. I am working with Mark to figure out if we need to cut down the internal stop in the cylinder.

The master comes with an eyelet on the end of the rod. Not long enough so I decided to take the rod off and try my hand at threading the rod for a long nut coupler.
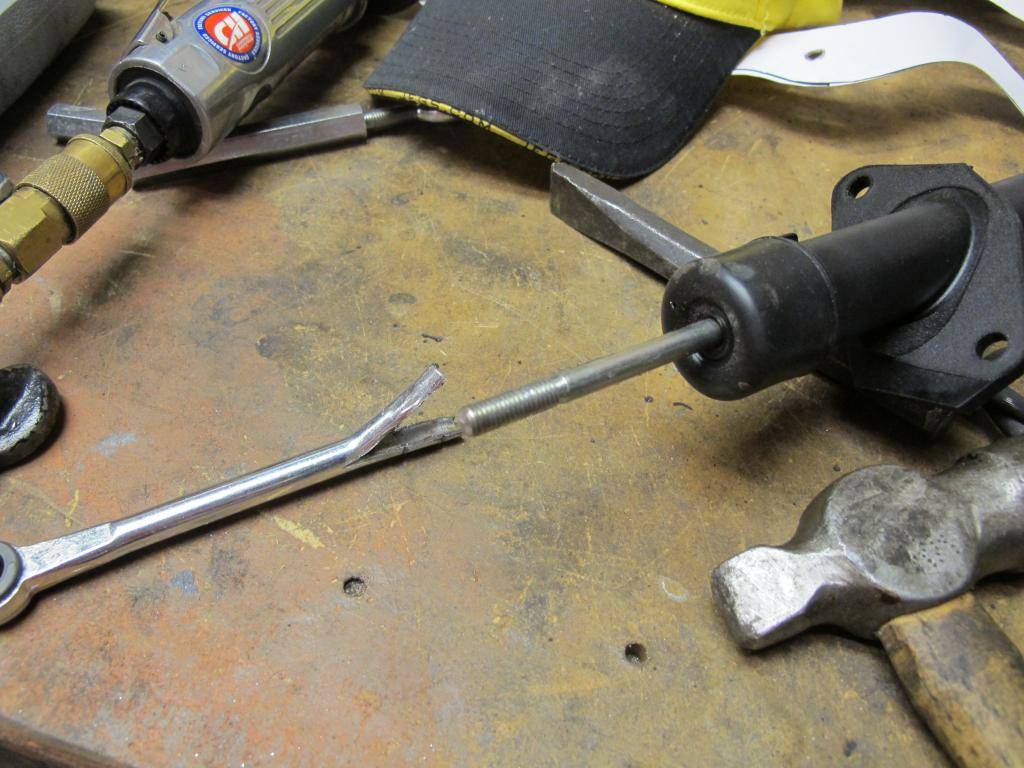
The threads went on crooked, so I am trying to decide what to do here
08-27-2014 #9
-Moderator/Sponsor-
- Join Date
- Apr 2001
- Location
- The City of Fountains
- Posts
- 15,977
Bob,
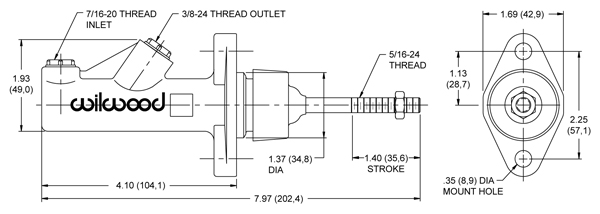
Tell Mark that they should make a bracket to accept the Girling style master cylinders. They are readily available, reliable, and have a 1.4" stroke. They are also much easier to adapt because they already have a threaded rod to which an extension can be attached to. There is no reason to use a factory MC, considering their questionable performance and future availability. The last 4th gen f-body rolled off the factory floor 12 years ago!
Andrew1970 GTO Version 3.0
1967 Cougar build
GM High-Tech Performance feature
My YouTube Channel Please Subscribe!
Instagram @projectgattago
Dr. EFI
I deliver what EFI promises.
Remote Holley EFI tuning.
Please get in touch if I can be of service.
"You were the gun, your voice was the trigger, your bravery was the barrel, your eyes were the bullets." ~ Her
08-27-2014 #10
Registered User
- Join Date
- Aug 2009
- Posts
- 277
Hi Andrew. Thanks for that information. Girling? Who sells and stocks them? Do you have a part number?
08-27-2014 #11
-Moderator/Sponsor-
- Join Date
- Apr 2001
- Location
- The City of Fountains
- Posts
- 15,977
Girling style...this style of MC is made by many companies...The blueprint that I posted is from Wilwood. Originally Posted by old66tiger
AndrewLast edited by andrewb70; 08-28-2014 at 12:05 PM.
1970 GTO Version 3.0
1967 Cougar build
GM High-Tech Performance feature
My YouTube Channel Please Subscribe!
Instagram @projectgattago
Dr. EFI
I deliver what EFI promises.
Remote Holley EFI tuning.
Please get in touch if I can be of service.
"You were the gun, your voice was the trigger, your bravery was the barrel, your eyes were the bullets." ~ Her
08-27-2014 #12
Registered User
- Join Date
- Aug 2009
- Posts
- 277
GOTCHA. I agree that style would be a better deal. The Tilton is a quality piece but takes up way too much real estate by the hydrabooster.
09-05-2014 #13 Registered User
- Join Date
- Mar 2007
- Location
- Mission Viejo, CA
- Posts
- 631
Your story on the car sounds identical to mine. LS or not. Should I? Will it be a Pontiac without the Pontiac? You made the best choice. I did the same thing as well. Restored the car, and then pulled it all apart again. I've been at it for three years and am almost done. I used a lot of my original parts as well, EFI tank, hydroboost, clutch, transmission. As far as the Pontiac guys crying about it, too bad, it's your car and you drive it. I am using the Wilwood master on my set up and it has worked very well. I am sure you will make a sizeable amount of cash by selling off the Pontiac engine and parts as I did to help fund the swap.
1973 Hurst Edition Pontiac Grand Am: 430 CI of ERL built LS7, Tremec Magnum T-56 6-speed, Global West / Speedtech Suspension, Custom rear coil-over suspension, QA1 double adjustable shocks, Wilwood 6/4 piston disc brakes, Modulare C1 19" concave wheels. Shooting for 625 HP and 20 MPG!
09-08-2014 #14
Registered User
- Join Date
- Aug 2009
- Posts
- 277
Had a long talk with Mark Bowler and they are re - designing the adapter plate to accept a wilwood master that can be clocked 0, 90, 180 and 270 degrees. Once complete, the bracket will be able to use either a 4th gen or a girling style master. They are sending me a prototype soon to try out. Thanks for the feedback
09-16-2014 #15 Registered User
- Join Date
- Feb 2005
- Location
- Waunakee, WI
- Posts
- 154
8 months till the Power Tour!
Marty Koppes
09-20-2014 #16
Registered User
- Join Date
- Aug 2009
- Posts
- 277
I hope to make it!
Firewall is done. I have a friend that is is body guy and he came over and did a clean up of the firewall. We filled some dimples and gave it a coat of satin. I left the throttle cable hole, heater wire hole and the firewall pad holes open for possible future use. Turned out nice.
09-24-2014 #17
Registered User
- Join Date
- Feb 2005
- Location
- Waunakee, WI
- Posts
- 154
Looking good!
Marty Koppes
11-09-2014 #18
Registered User
- Join Date
- Aug 2009
- Posts
- 277
Its been awhile so it is time for an update.
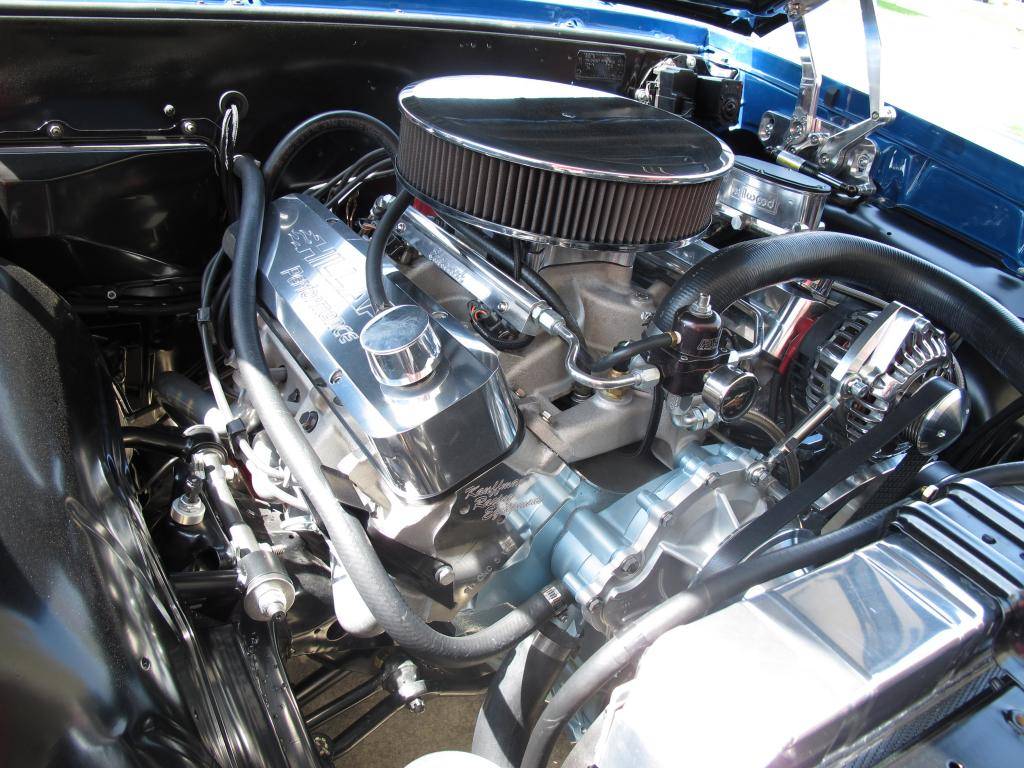
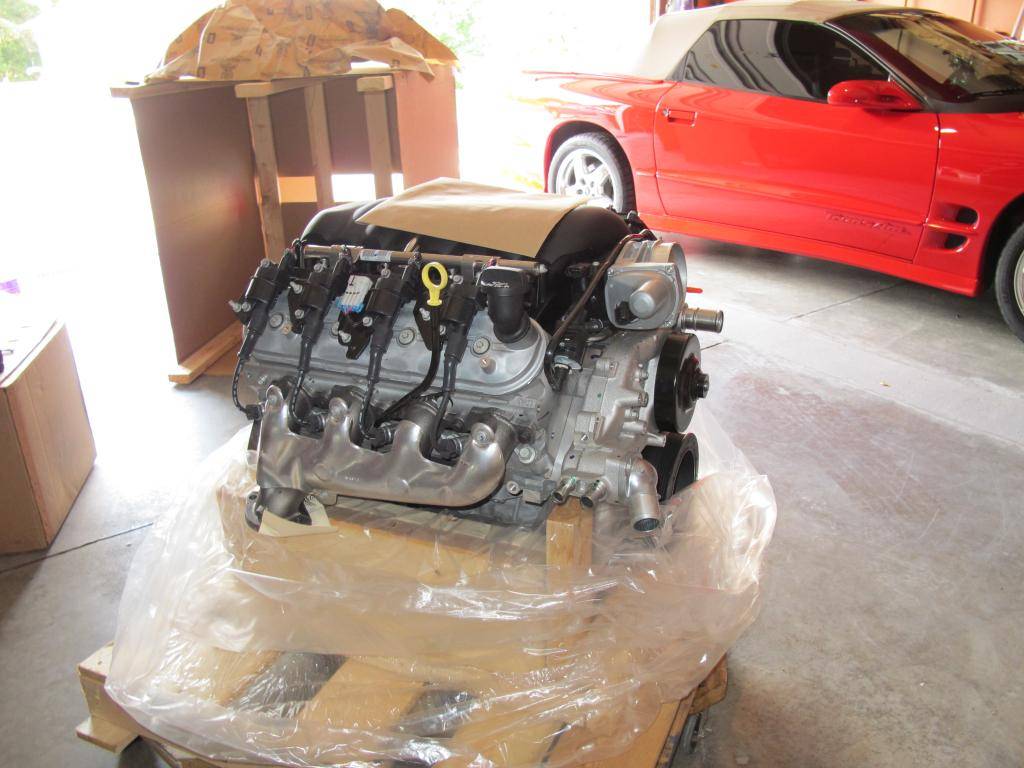
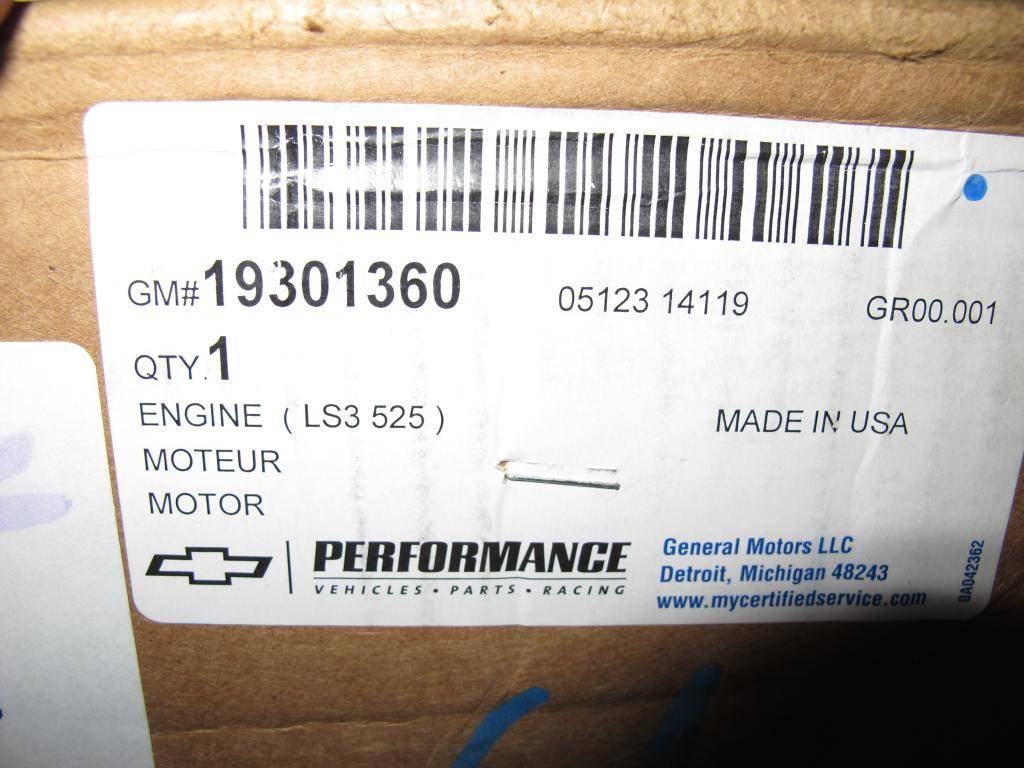
I bought the LS3 525 HP engine from Gandrud in Green Bay, WI at the beginning of October. Nice guys and they price matched Pace Performance and delivered right to my door. I bought the engine, drive accessories, flywheel, clutch and fasteners.
Not a very pretty engine, but this thing ought to make this bucket of bolts haul. Brand new, full warranty and a butt load of potential.
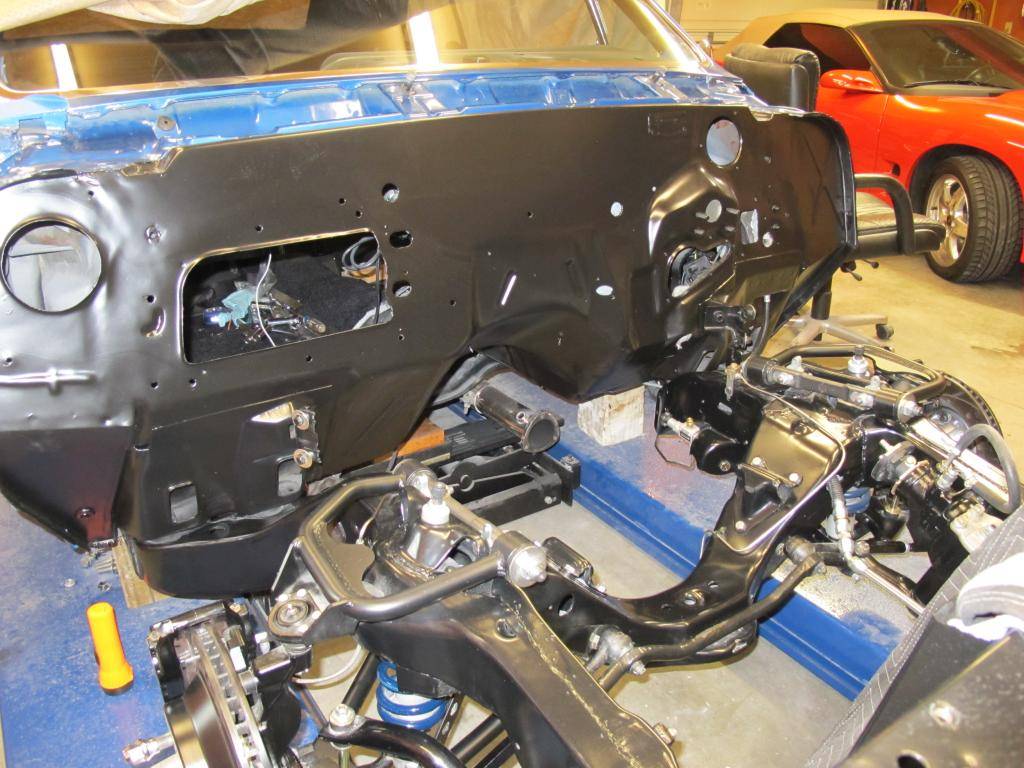
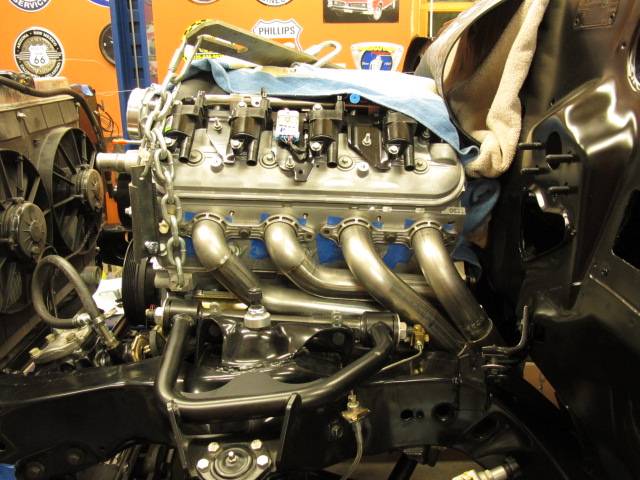
Engine stuffed in the car. Not bad. Notice that I am prototyping a set of Ultimate Headers shorties. More on that to come.
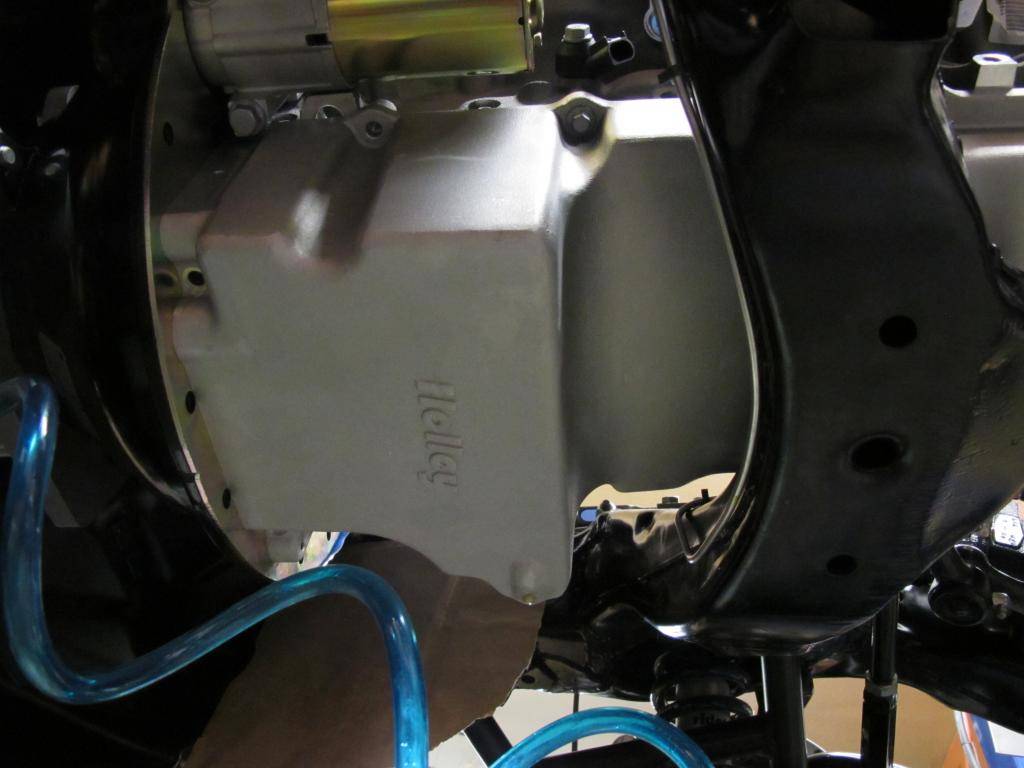
I played around with the Holley 302-2 pan for a bit and I had excellent clearance in the front of the pan. I didn't like the lack of clearance between the back side of the frame and when I spun the motor over without a gasket, I noticed a little incidental contact between the pan and one of the rods. I would assume that the 1/8" thick oil pan gasket would take care of this, but I opted for the 302-1 pan instead
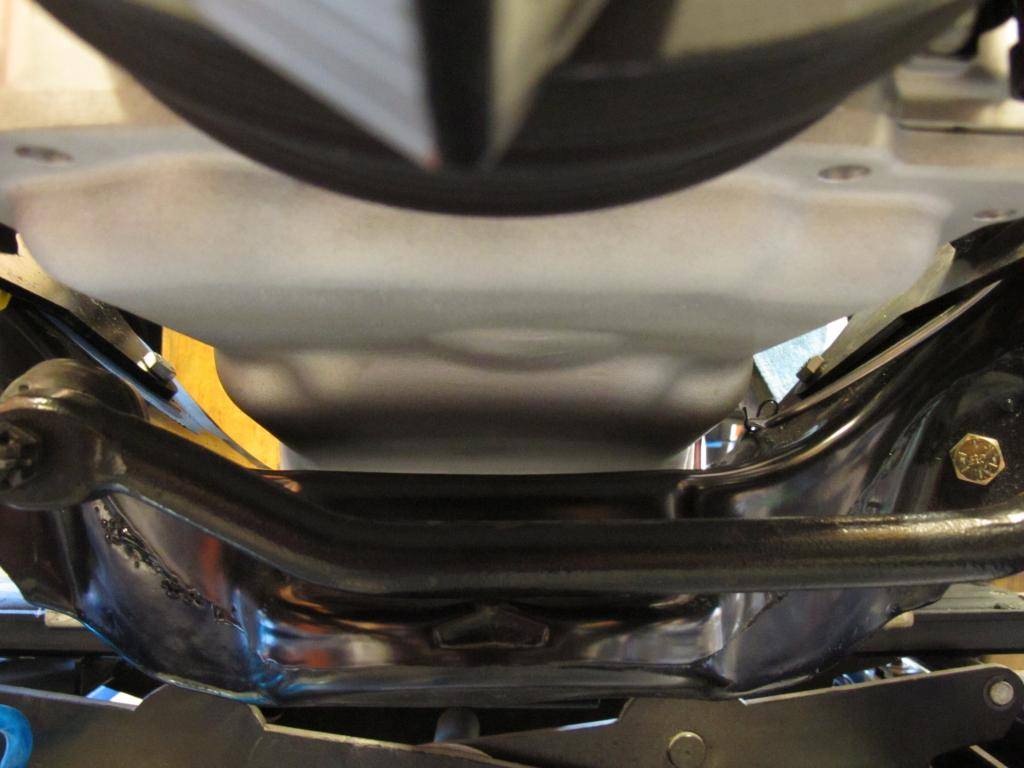
I can keep the full length windage tray with the 302-1 and it is a better casting overall. The 302-2 casting was not nearly as nice as the 302-1. I have about 1/4" clearance before the gasket and should have better than 1/8" with the gasket.

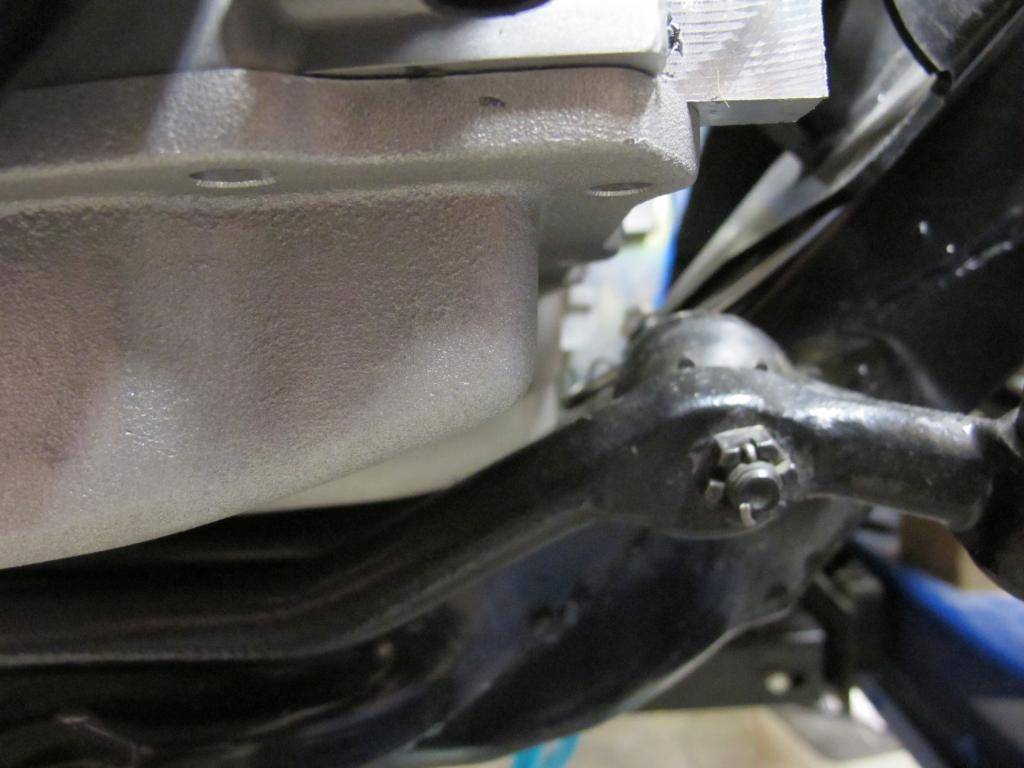
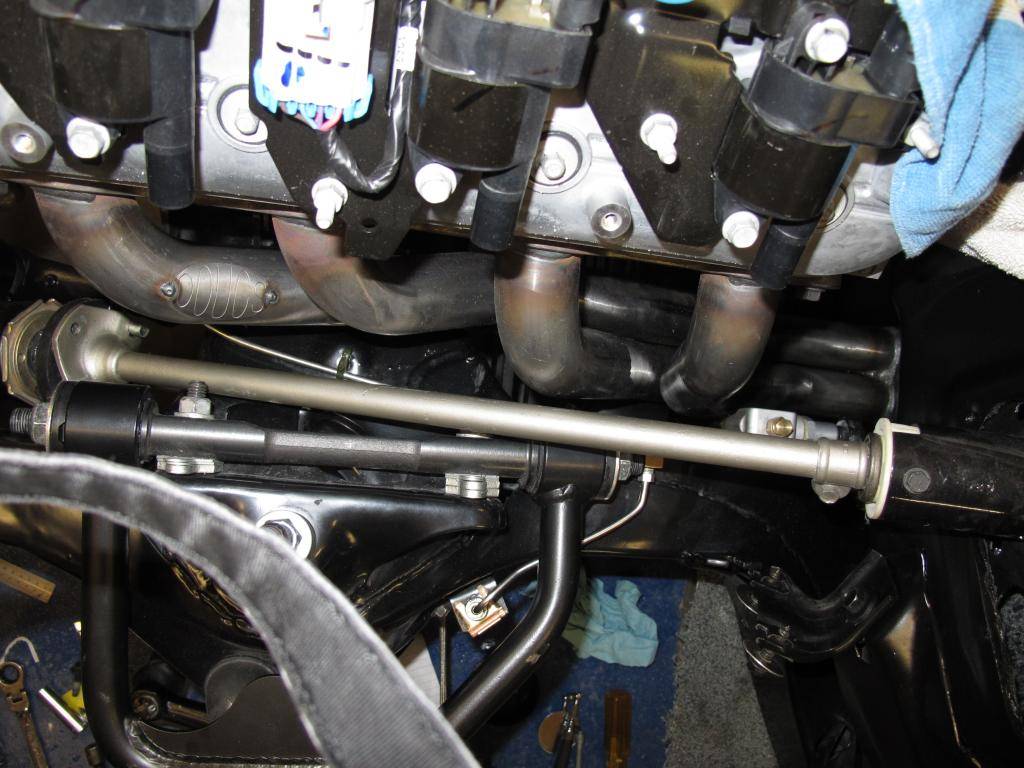
Tie rod clearance that is acceptable for my application. The ridetech arms limit a tight radius. Even if I had more tire turning radius, I think I would be OK to a point.
Note the Lakewood scattershield that I am using with my LGT-700. Sourced from Bowler Performance. More on that later.
Holley engine adapters 12611, Car Shop BOP to Chevy frame mounts and energy suspension 3.1114G mounts (short and wide required.
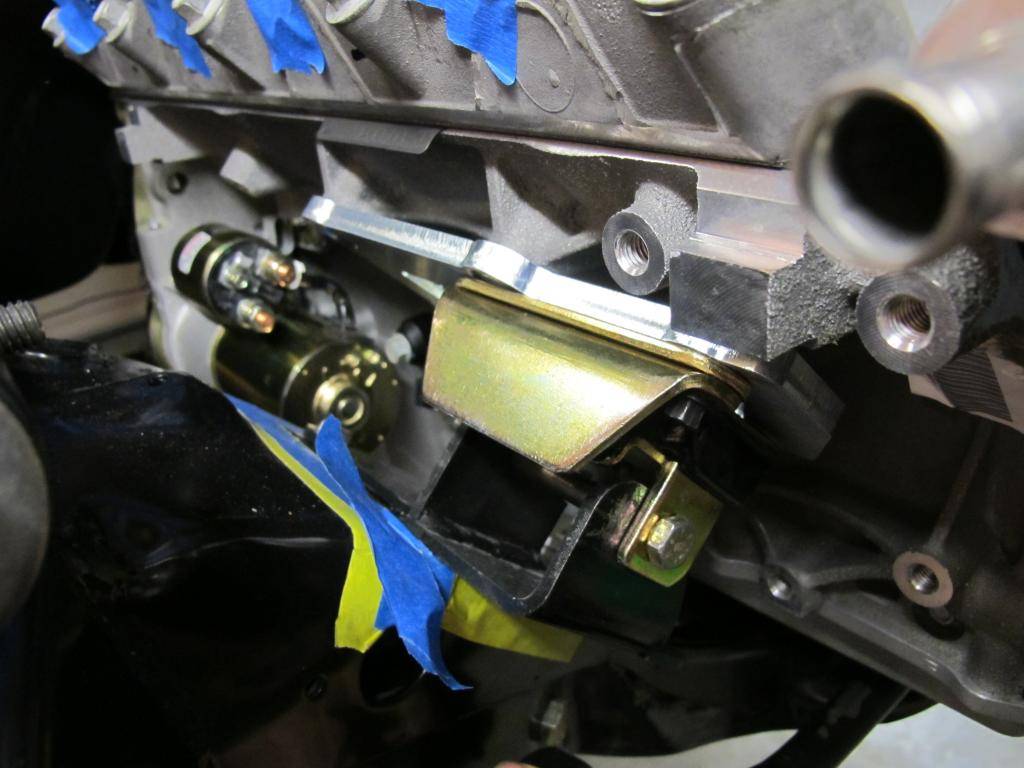
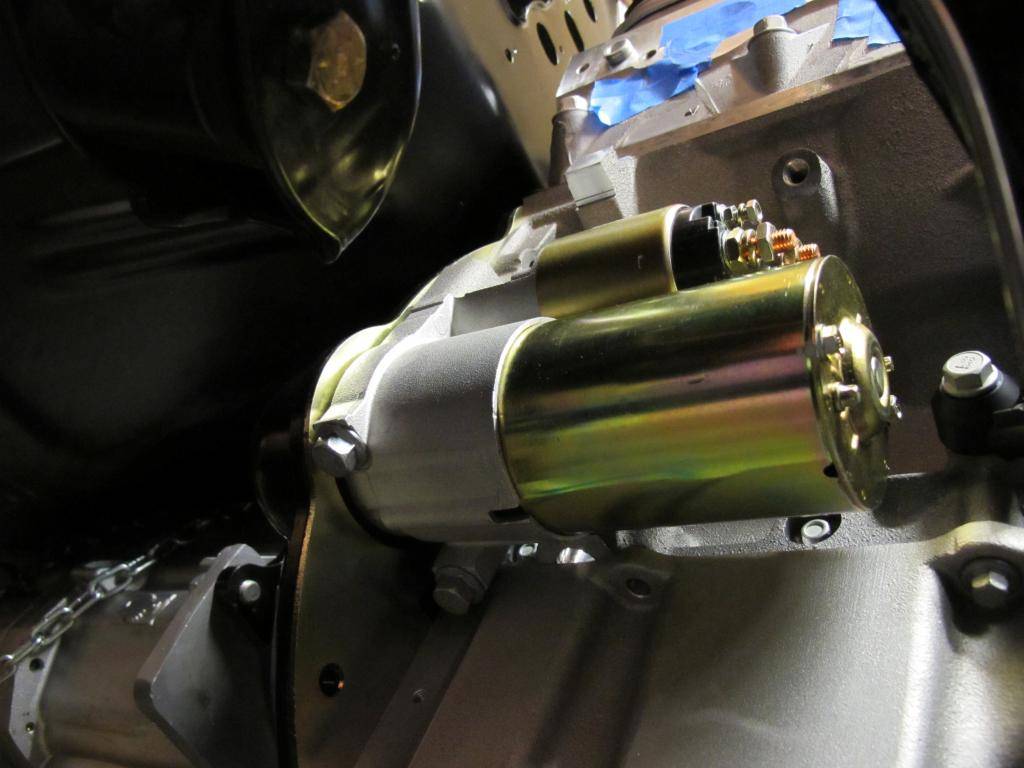
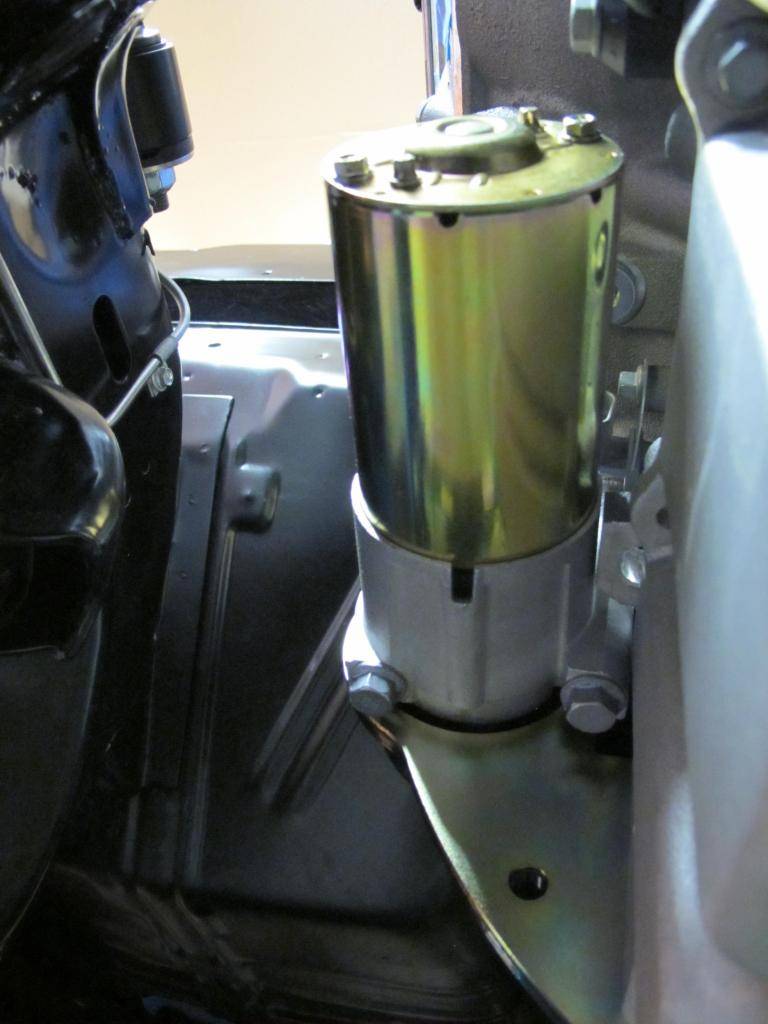
Bosch SR8581N starter from Rock Auto. $107. No core and brand new.
Trail and error with Doug's D3336-R headers. The headers fit fine at the frame and clear the steering column OK. I tried the Dougs SK100 mounts which are IDENTICAL to the Hooker mounts except that the engine can move forward by 3/4" from stock location. If I put the engine 3/4" forward, the headers barely clear the lower a-arm suspension pockets.
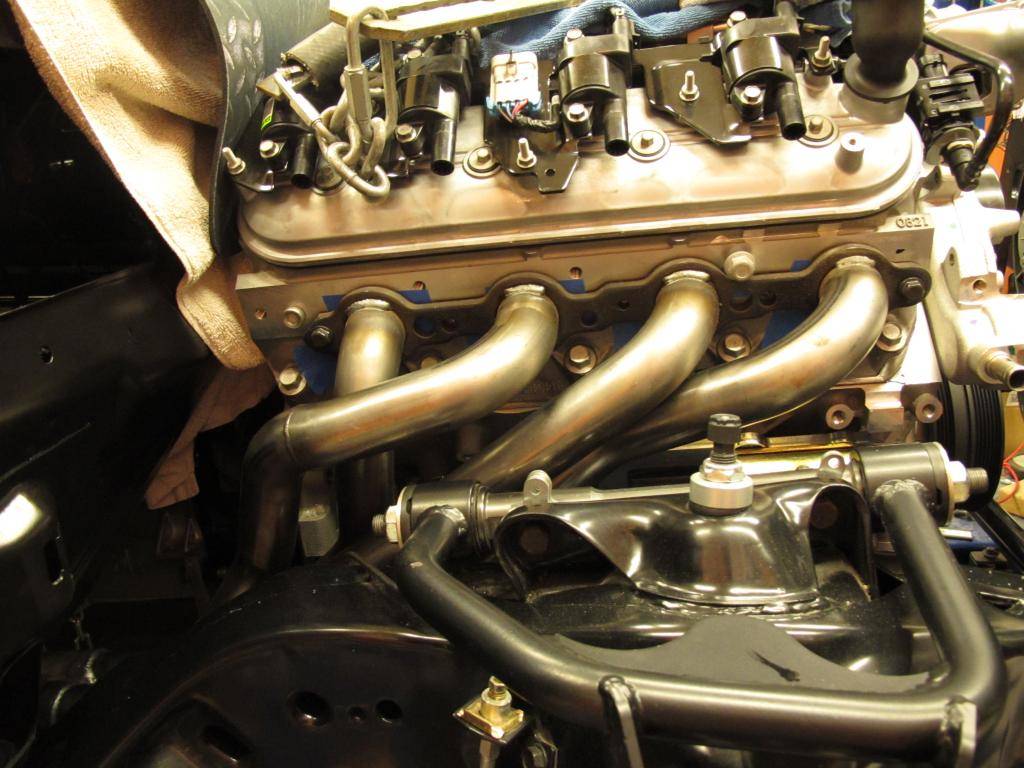
While the D3336-R headers fit OK at the engine and between the frame rails, they are really tight to the floor. I have about 1/2" at best between the header flanges and the floor. I am exploring other headers with Ultimate Headers to see what they can do. My other option is to cut off the flanges, weld in some 3" elbows to move it away from the floor and clear the crossmember. I ordered a new Summit Racing cross member and should have a good idea where things are going after that arrives.
11-23-2014 #19
Registered User
- Join Date
- Aug 2009
- Posts
- 277
Long weekend in the garage with some decent results.
I got the Radaflex 1/0 donkey dick starter cable from Cable Yard and I got that ran that on the passenger side from the trunk to the starter. Waiting on the hydraulic crimper to arrive and I can go to town terminating the cable. I was going to mount the battery on the passenger side of the trunk, but I am seriously considering running a spare tire and the factory spare hook is still in the trunk which makes the location ideal for the spare. With the LS, I plan on driving this thing a bunch more and I really want a spare for the piece of mind. Just need to find a 04-06 GTO spare - close fit...enough to get me where I need to go.
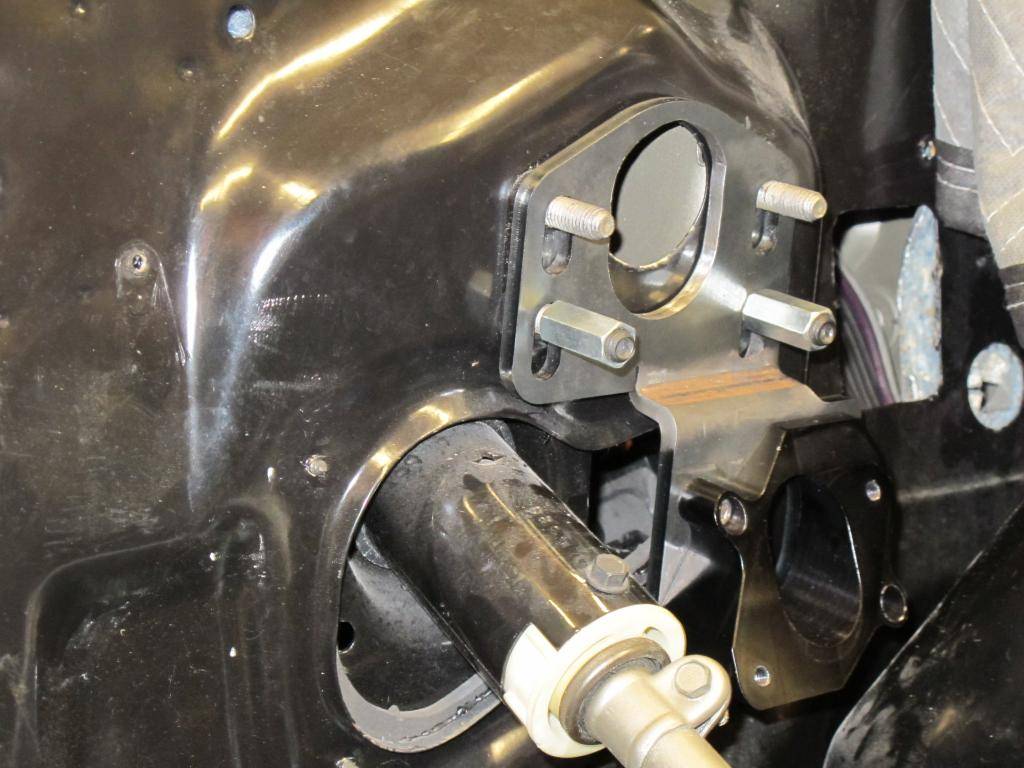
Next on task was to figure out a bracket to mount my proportioning valve and the clutch master reservoir. I opted for a Ring Brothers billet deal which is killer and only a few bucks more than a plain plastic deal. I knew I wanted everything to be located on the brake master cylinder to keep the firewall clean. Starting with some poster board templates, I played around with some patterns. Using some 0.090" aluminum I had sitting around, this is what I came up with. Pretty clean installation
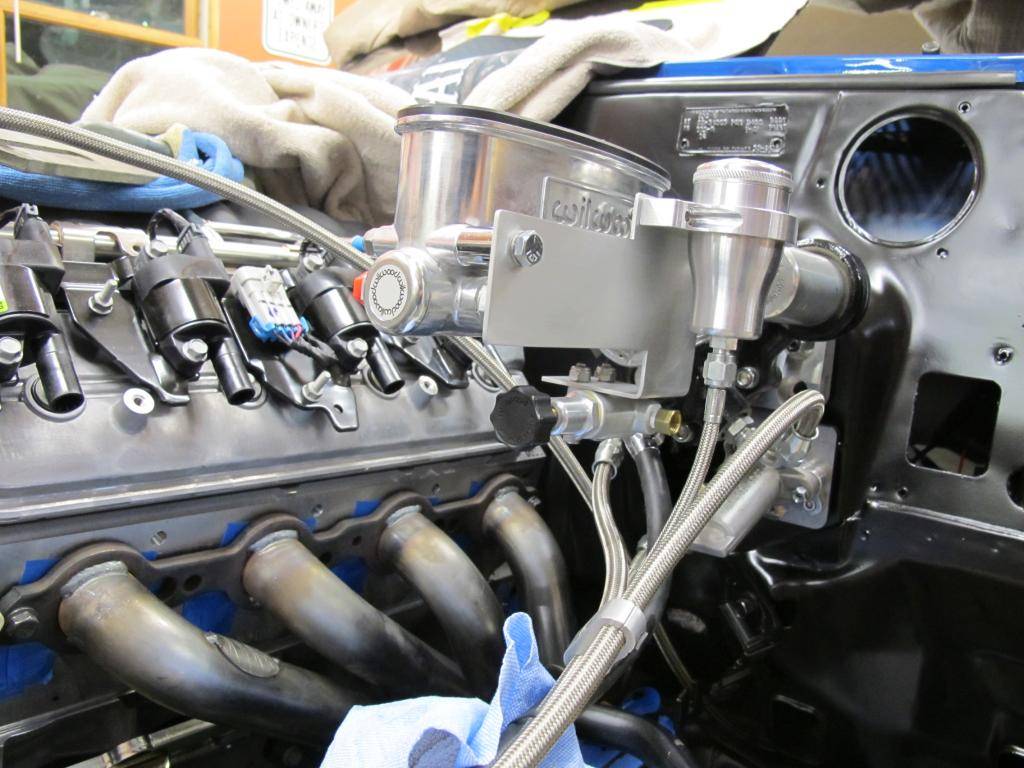
I made up some wire templates for brake lines and I like stainless so I will be shipping these templates off to Right Stuff to have them bend them up for me.
Next on tap was to tackle the clutch pedal mods. I have played around with this before and knew that I could not do a simple heim joint at the clutch pedal because the pedal and the clutch master are not in perfect alignment. Side load is death to a master and so I needed another solution. SOOOOOOO...What to do?
Starting with a piece of 1/4" X 1" flat stock, I welded a long rod nut to the flat stock. I then drilled a hole in the end of the stock for a pivot point.
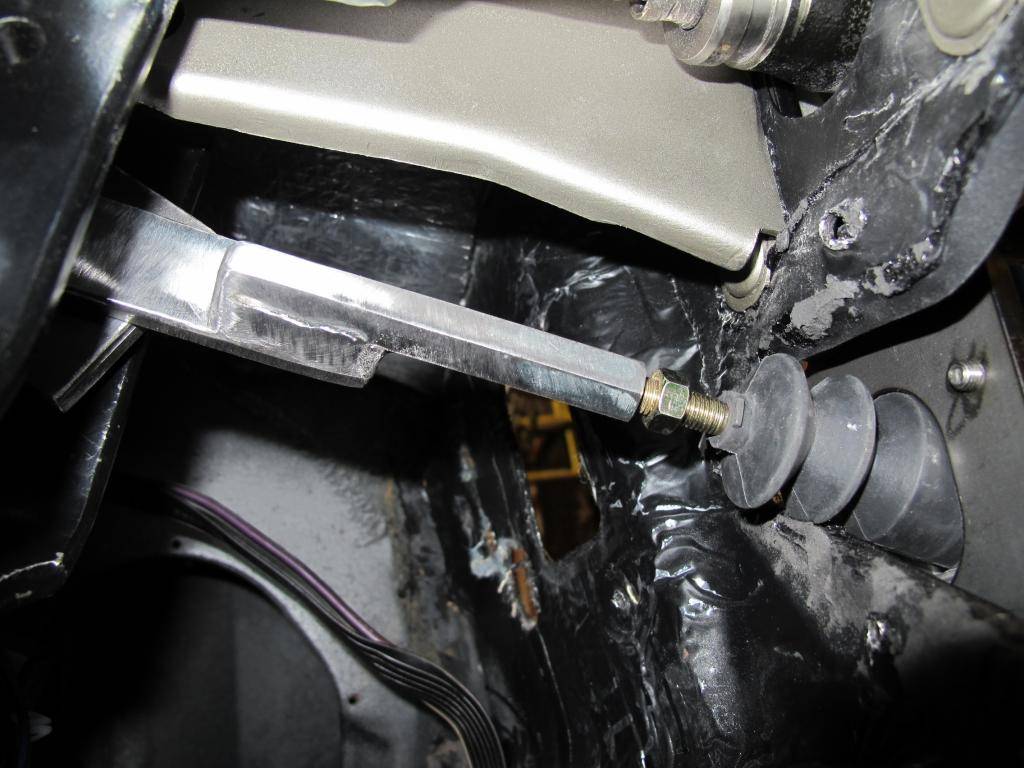
Because of hydraulic setup does not have as much of an angle as the mechanical setup, I had to make a bracket that relocates the pivot point lower on the clutch pedal. As mentioned earlier, the clutch pedal is not in alignment with the master rod. With the new push rod bracket and the clutch pedal adapter piece, I end up needing only a 0.030" thick washer to get the push rod dead nuts in alignment with the clutch master. For the vertical angle, i used my Wixley digital angle finder to match angles between the master body and the input shaft. The angle finder is very compact and I was able to measure the angle off of the master body and the input rod and set the two equal to each other. I plan on adding a bronze bushing for the pivot pin.
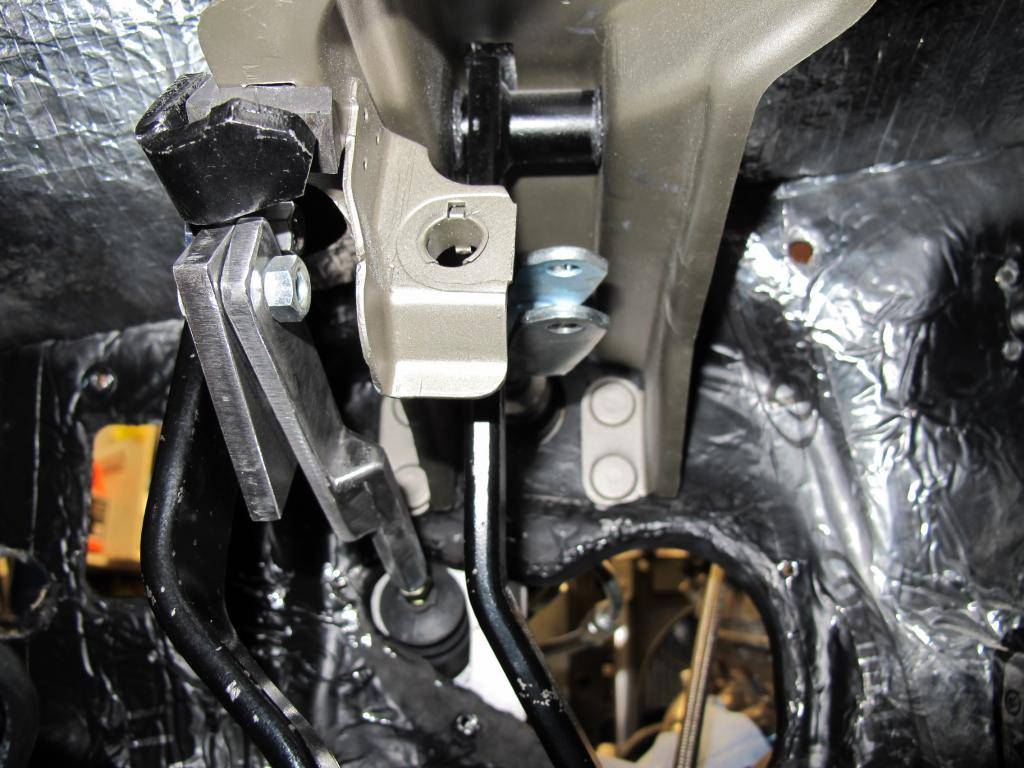
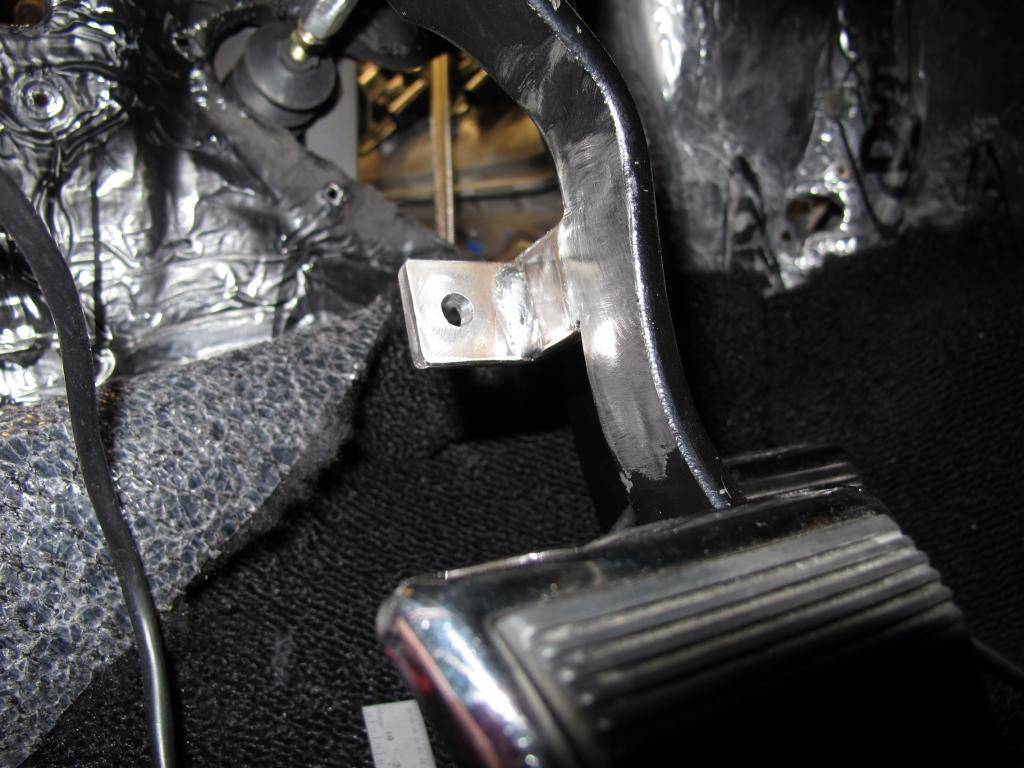
I also made a clutch pedal stop and welded that to the clutch pedal. Just need to find a bumper and a 5/16" rod.
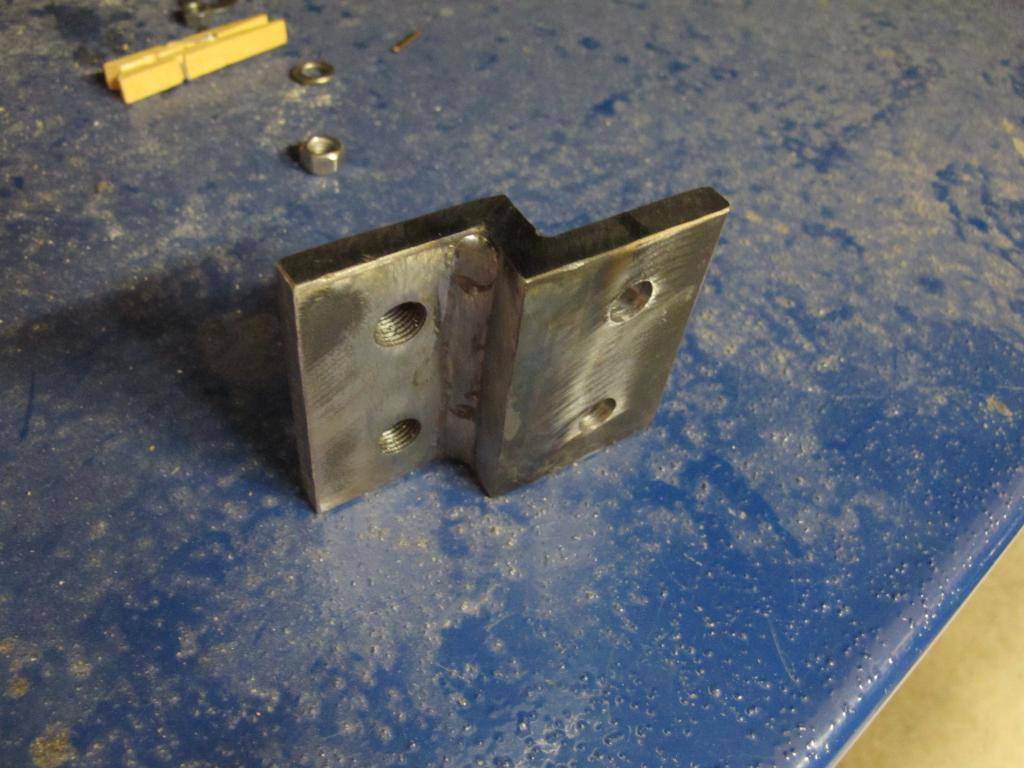
Next up was to make an adapter plate for the crossmember to the transmission mount. Using 3/8" plate, I welded up a couple of pieces of steel and finished them off with a grinder.
Last weekend: I got my order of Aeroquip parts from the Hose Warehouse a week or so ago and plumbed up the Corvette style regulator. Just wished that the input and the return were separated a bit more.
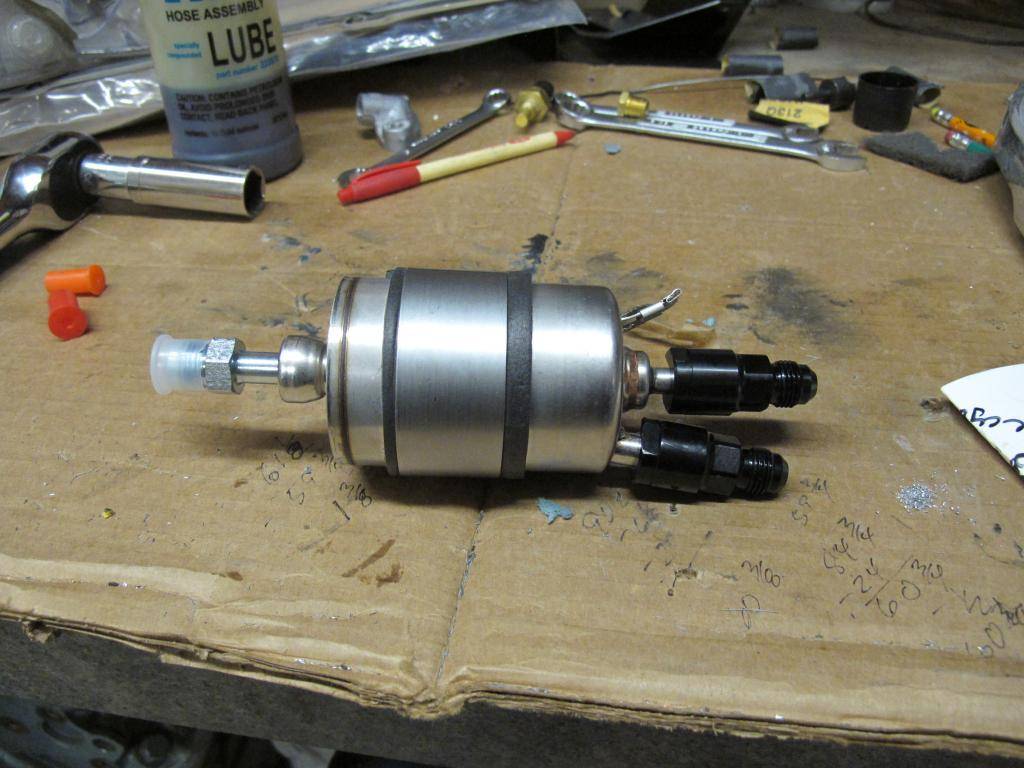
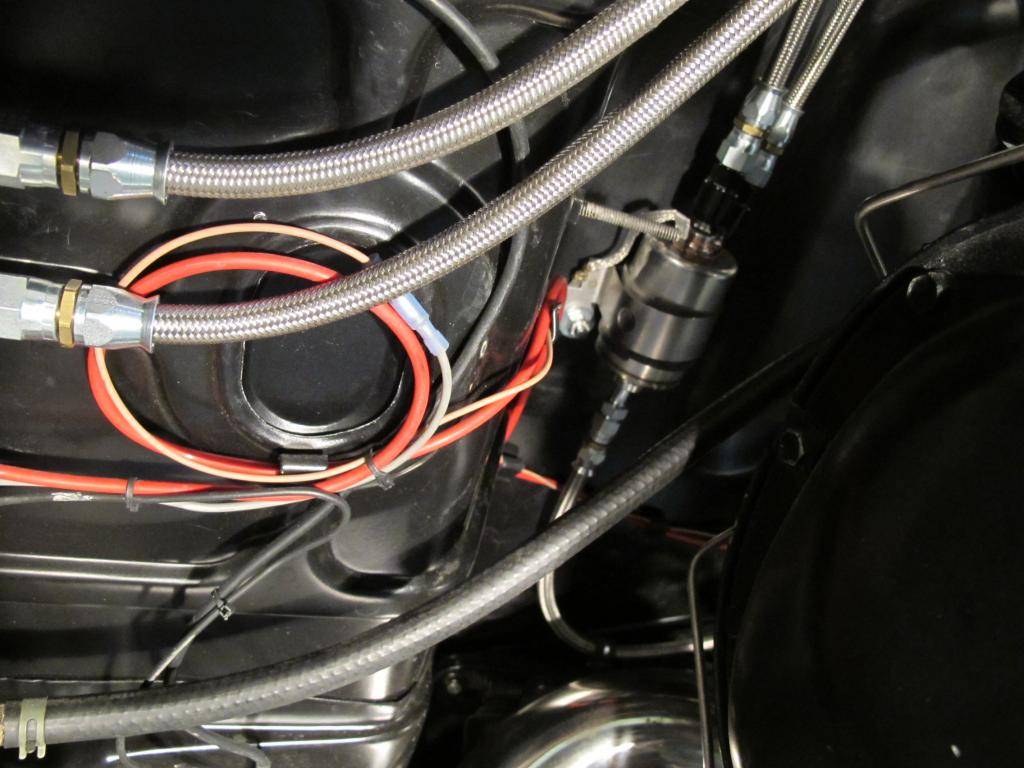
I really like the TFE hose. The ends are super simple to assemble and by running a continuous run of hose from the regulator to the engine, I minimize potential leaks. All clamped off for a clean installation
11-23-2014 #20
Registered User
- Join Date
- Aug 2009
- Posts
- 277
Thanks Marty. Making progress. Your car is an inspiration. Originally Posted by martZ


 Reply With Quote


